background image

ASUS ZenGimbal User Manual

41

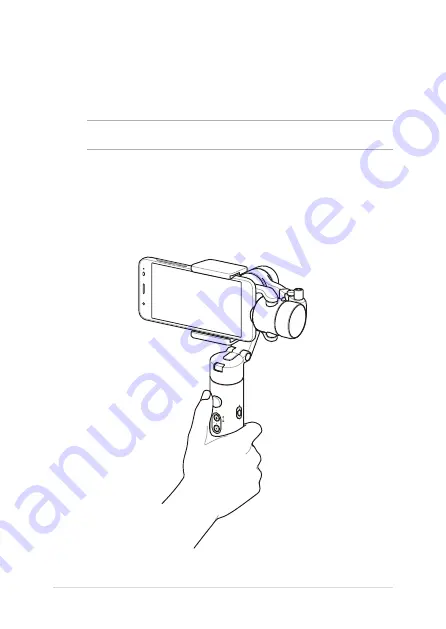
Upright hold

Holding your ASUS ZenGimbal

This section introduces the unique modes you can trigger when holding 

your ASUS ZenGimbal in certain ways.

NOTE:

 Some functions may not be available according to the hold in use.

This is the standard hold of your ASUS ZenGimbal and supports most 

of the shooting scenarios. You can launch 

Wide-angle shot mode

 or 

Selfie mode

 with this hold.

Summary of Contents for ZenGimbal

Page 1: ...E16257 First Edition User Manual ASUS ZenGimbal July 2020 ...

Page 2: ...E AND SHOULD NOT BE CONSTRUED AS A COMMITMENT BY ASUS ASUS ASSUMES NO RESPONSIBILITY OR LIABILITY FOR ANY ERRORS OR INACCURACIES THAT MAY APPEAR IN THIS MANUAL INCLUDING THE PRODUCTS AND SOFTWARE DESCRIBED IN IT Copyright 2020 ASUSTeK COMPUTER INC All Rights Reserved LIMITATION OF LIABILITY Circumstances may arise where because of a default on ASUS part or other liability you are entitled to recov...

Page 3: ...S ZenGimbal Charging ASUS ZenGimbal 20 Mounting your smartphone 21 Balancing your smartphone 24 Buttons and controls 27 Tally light 32 Chapter 3 ASUS ZenGimbal features ASUS ZenGimbal modes 34 Pan follow mode 36 Follow mode 37 Lock mode 38 POV Point of View mode 39 Sport mode 40 Holding your ASUS ZenGimbal 41 Upright hold 41 Wide angle shot mode 42 Selfie mode 43 Underslung hold 44 Flashlight hold...

Page 4: ...l App Download the ASUS ZenGimbal App 50 Connecting your smartphone 51 ASUS ZenGimbal App overview 52 Firmware upgrade notices 55 Appendices Disclaimer 58 Operation safety 58 Safety precautions 59 Lithium ion battery warning 59 Product specifications 60 ...

Page 5: ...ASUS ZenGimbal User Manual 5 Chapter 1 Product Introduction ...

Page 6: ... supports unique features such as Object tracking Time lapse or Panorama when connected to the app Download the ASUS ZenGimbal App To fully utilize ASUS ZenGimbal features please visit App Store iOS or Google Play Android and search for ASUS ZenGimbal to download the app You may also scan the QR code below to download the ASUS ZenGimbal App System requirements iOS 13 or later Android 10 or later ...

Page 7: ...7 Package contents ASUS ZenGimbal USB cable Tripod Counterweight Carrying case Carrying bag Quick Start Guide Wrist strap NOTE If any of the items is damaged or missing contact your retailer The illustration is for reference only ...

Page 8: ...r Manual Unfolding ASUS ZenGimbal 1 Lift the smartphone holder and push it outward until it clicks in place Smartphone holder WARNING DO NOT turn on the power when folding or unfolding your ASUS ZenGimbal to prevent damage ...

Page 9: ...ASUS ZenGimbal User Manual 9 2 Hold the roll motor and lift upward until it clicks in place Roll motor ...

Page 10: ...10 ASUS ZenGimbal User Manual 3 In the orientation shown rotate the roll motor anticlockwise Roll motor IMPORTANT DO NOT rotate the roll motor clockwise to prevent damage to the product ...

Page 11: ...11 4 Press the unlock button and then pull the extension arm all the way out until it clicks in place and the highlighted icon is visible IMPORTANT DO NOT adjust the extension arm to balance the weight of your mounted smartphone ...

Page 12: ...anual Folding ASUS ZenGimbal 1 Press the unlock button and then push the extension arm back in place until you hear a click sound WARNING DO NOT turn on the power when folding or unfolding your ASUS ZenGimbal to prevent damage ...

Page 13: ...ASUS ZenGimbal User Manual 13 2 In the orientation shown rotate the roll motor back in place until you hear a click sound Roll motor ...

Page 14: ...Gimbal User Manual 3 Press the fold button to release the smartphone holder and roll motor Roll motor Fold button 4 Hold the roll motor and fold it down Ensure it is secured in position as shown Smartphone holder ...

Page 15: ...Gimbal User Manual 15 5 In the orientation shown lift the smartphone holder and fold it back in place Smartphone holder NOTE Lift the smartphone holder in the right orientation to prevent damage to the product ...

Page 16: ...16 ASUS ZenGimbal User Manual Overview ...

Page 17: ...17 Smartphone holder Zoom slider Fold button Status indicators Joystick Counterweight mount Battery indicator Unlock button M button Tally light Tilt motor Charging port Pan motor Roll motor Power shutter button Wrist strap hole ...

Page 18: ...18 ASUS ZenGimbal User Manual ...

Page 19: ...ASUS ZenGimbal User Manual 19 Chapter 2 Using ASUS ZenGimbal ...

Page 20: ...nnector into your ASUS ZenGimbal C Plug the power adapter into a grounded power outlet NOTE Power adapter is not included in the package The battery indicator blinks when ASUS ZenGimbal is charging and turns to solid white when fully charged With a power adapter rated 5V 2A it may take 2 5 hours to fully charge your ASUS ZenGimbal ...

Page 21: ...ASUS ZenGimbal User Manual 21 Mounting your smartphone WARNING DO NOT turn on the power before mounting your smartphone 1 Optional Install your ASUS ZenGimbal to the tripod for better grip ...

Page 22: ...rt of the smartphone holder IMPORTANT Ensure to place your smartphone in the orientation as shown The camera lens should not be obstructed by any part of ASUS ZenGimbal Ensure your smartphone is firmly attached to the smartphone holder If the thickness of your smartphone case exceeds 12 mm remove it to ensure a firm grip and prevent your smartphone from falling Camera lens ...

Page 23: ...der so that it is leveled and evenly distributed NOTE When powered on ASUS ZenGimbal will automatically balance your mounted smartphone If your smartphone is still tilted or if your ASUS ZenGimbal powers off refer to the Balancing your smartphone section on how to balance your smartphone ...

Page 24: ... to extend the battery life of your ASUS ZenGimbal When balanced and powered off your ASUS ZenGimbal is neutrally leveled as shown Refer to the steps below on how to balance your smartphone NOTE The following section are for reference only and may vary with actual usage scenarios ...

Page 25: ...ASUS ZenGimbal User Manual 25 1 In the case that your smartphone tilts to the left side use the bundled counterweight to adjust the balance as shown ...

Page 26: ...at your smartphone tilts to the right side slightly adjust it to the left side until it is balanced 2 cm NOTE To prevent your smartphone from falling do not move your smartphone away from the base support of the smartphone holder for more than 2 cm ...

Page 27: ...ASUS ZenGimbal User Manual 27 Buttons and controls ...

Page 28: ...e the joystick to exit sport mode Double press Double press the joystick to automatically adjust your ASUS ZenGimbal to the center position Use this function to quickly resume the default position Press three times Using upright hold press the joystick three times to enter wide angle shot mode Double press the joystick again to exit wide angle shot mode NOTE Some functions may not be available acc...

Page 29: ... is between 10 and 25 Blinking Red Battery power is less than 10 When a power source is connected to your ASUS ZenGimbal and charging its battery Color Status Solid White Fully charged Blinking Blue Charging Status indicators The status indicators help identify the current ZenGimbal modes in use ZenGimbal modes Status indicators Pan follow mode Follow mode Lock mode Point of View POV mode Vortex m...

Page 30: ... the mode active before entering lock mode Press three times Press the M button three times to launch selfie mode Double press the joystick to exit this mode Press four times Using flashlight hold press the M button four times to launch vortex mode To exit vortex mode revert to upright hold NOTE For more information on different holds please refer to the Holding your ASUS ZenGimbal section Press a...

Page 31: ...tion sound to power on power off your ASUS ZenGimbal When connected to the ASUS ZenGimbal App press the power shutter button once to take pictures or record videos Double press the power shutter button to switch between photo mode and video mode in the app WARNING DO NOT turn on the power before mounting your smartphone IMPORTANT Hold firm of the handle after powering on or the handle may spin rap...

Page 32: ...32 ASUS ZenGimbal User Manual Tally light When using the ASUS ZenGimbal App to record a video the built in Tally light of your ASUS ZenGimbal lights up and blinks slowly Tally light ...

Page 33: ...ASUS ZenGimbal User Manual 33 Chapter 3 ASUS ZenGimbal features ...

Page 34: ...Gimbal modes and explains how buttons or controls are used in details The following content are illustrated with the upright hold For more information on different holds please refer to the Holding your ASUS ZenGimbal section NOTE Some functions may not be available according to the ASUS ZenGimbal modes in use ...

Page 35: ... smartphone by moving the tilt axis or pan axis to the desired angle and hold for two 2 seconds Your smartphone will be fixed at that angle Reposition You may double press the joystick to automatically adjust your ASUS ZenGimbal to the center position Use this function to quickly resume the default position ...

Page 36: ...the joystick to adjust the tilt axis and pan axis You can manually adjust the tilt axis This is the default mode when you power on your ASUS ZenGimbal The icons below help indicate the axis movement in this section Pan follow mode Axis is locked and will not follow the movement of the handle Axis will follow the movement of the handle ...

Page 37: ...ce to switch between pan follow mode or follow mode Follow mode Roll axis is locked Allows you to pan left right and tilt up down following the movement of the handle Use the joystick to adjust the tilt axis and pan axis Manual adjustment not supported ...

Page 38: ...ked and the smartphone is fixed at a certain angle Use the joystick to adjust the tilt axis and pan axis You can manually adjust the tilt axis and pan axis Double press the M button to enter lock mode To exit the lock mode press the M Button once Lock mode ...

Page 39: ...ment not supported Manual adjustment not supported Reposition feature not supported Press and hold the M button for three 3 seconds to enter POV Point of View mode To exit the POV mode press the M Button once POV Point of View mode NOTE Exit the POV mode first before you use other ZenGimbal modes ...

Page 40: ...stick adjustment not supported Manual adjustment not supported Reposition feature not supported This mode allows you to swiftly follow and capture fast moving objects Press and hold the joystick to enter sport mode To exit the sport mode release the joystick Sport mode NOTE Exit the sport mode first before you use other ZenGimbal modes ...

Page 41: ...que modes you can trigger when holding your ASUS ZenGimbal in certain ways NOTE Some functions may not be available according to the hold in use This is the standard hold of your ASUS ZenGimbal and supports most of the shooting scenarios You can launch Wide angle shot mode or Selfie mode with this hold ...

Page 42: ...ode to take wide angle shots without the motors blocking the view Press the joystick three times to enter wide angle shot mode To exit the wide angle shot mode double press the joystick Wide angle shot mode NOTE Exit the wide angle shot mode first before you launch selfie mode or use other holds ...

Page 43: ...ser Manual 43 Selfie mode Press the M button three times to enter selfie mode To exit the selfie mode double press the joystick NOTE Exit the selfie mode first before you launch wide angle shot mode or use other holds ...

Page 44: ...nderslung hold This hold allows you to capture low angle shots Enter pan follow mode or lock mode and then adjust the handle of your ASUS ZenGimbal forward and upside down as shown 180 180 NOTE This hold does not support follow mode ...

Page 45: ...al 45 Flashlight hold This hold allows you to launch Vortex mode or Portrait mode Enter pan follow mode or lock mode and then adjust the handle of your ASUS ZenGimbal forward so that it is parallel to the ground as shown 90 90 ...

Page 46: ...ocked and will not follow the movement of the handle You can push joystick to the left or the right to control the spinning movement of the pan axis To exit the vortex mode revert to upright hold Vortex mode NOTE Manual adjustment not supported Reposition feature not supported Exit the vortex mode first before you use other ZenGimbal modes ...

Page 47: ...s you to shoot photos or videos in vertical orientation Using flashlight hold manually rotate your smartphone 90 degrees to enter portrait mode To exit the portrait mode manually rotate your smartphone back in place NOTE Follow mode and sport mode not supported ...

Page 48: ...48 ASUS ZenGimbal User Manual ...

Page 49: ...ASUS ZenGimbal User Manual 49 Chapter 4 ASUS ZenGimbal App ...

Page 50: ... fully utilize ASUS ZenGimbal features please visit App Store iOS or Google Play Android and search for ASUS ZenGimbal to download the app You may also scan the QR code below to download the ASUS ZenGimbal App System requirements iOS 13 or later Android 10 or later ...

Page 51: ...esh the connection To pair a new smartphone with ASUS ZenGimbal disable the Bluetooth connection of the previously paired smartphone Connect your smartphone to ASUS ZenGimbal by using the following steps 4 Select ASUS ZenGimbal from the list of available connections ASUS ZenGimbal will now automatically connect to the app whenever you turn on the power 2 Power on ASUS ZenGimbal 3 Launch the ASUS Z...

Page 52: ...52 ASUS ZenGimbal User Manual ASUS ZenGimbal App overview NOTE The screenshot is for reference only and may vary per app version ...

Page 53: ... to turn flashlight on or off Shooting function selection Tap this to select advanced shooting functions such as Motion time lapse Panorama and more Bluetooth connection Tap this to search for the Bluetooth signal of your ASUS ZenGimbal and connect to it Smartphone battery status This icon displays the battery status of your smartphone ASUS ZenGimbal battery status This icon displays the battery s...

Page 54: ...drag a box around the object that you want to track on your smartphone ASUS ZenGimbal will start tracking when the outline of the box turns to green Camera switch Tap this to switch to the front camera or rear camera Shooting Tap this to take a picture or record a video Shooting mode switch Tap this to switch to photo mode or video mode Album Tap this to view saved photos or videos ...

Page 55: ...phone and ASUS ZenGimbal is above 50 To maintain a stable connection during the upgrade process ensure that your smartphone and ASUS ZenGimbal are close to each other Do not exit the app during the upgrade process and read all the prompts carefully The upgrade process takes about 5 to 10 minutes ...

Page 56: ...56 ASUS ZenGimbal User Manual ...

Page 57: ...ASUS ZenGimbal User Manual 57 Appendices ...

Page 58: ...ould follow the safety guidelines including but not limited to in the user manual Operation safety ASUS ZenGimbal is not water resistant Avoid using this product near rain or any sources of moisture Avoid using this product in dusty environments The recommended operating temperature is 0 C 32 F to 40 C 104 F Never attempt to disassemble and reassemble the product DO NOT strike throw or drop this p...

Page 59: ...cause damage to the battery Lithium ion battery warning Danger of explosion if battery is incorrectly replaced Replace only with the same or equivalent type recommended by the manufacturer Dispose of used batteries according to the manufacturer s instructions Disposal of a battery into fire or a hot oven or mechanically crushing or cutting of a battery that can result in an explosion Leaving a bat...

Page 60: ...dth 58 86 mm Length 180 mm Battery Capacity 2900 mAh Operating Time 10 hours With mounted smartphone balanced Charging Time 2 5 hours JEITA standard Charging Temperature 0 C 40 C Operating Temperature 10 C 45 C Mechanical Range Pan 360 Unlimited Tilt 330 Roll 140 Recording Notice Tally light In App 1 4 Standard Hole 2 App Support iOS 13 or later Android 10 or later Product specifications ...

Reviews: