background image

6

1

    Introducing the Notebook PC

About This User’s Manual

You are reading the Notebook PC User’s Manual. This User’s Manual provides informa-

tion on the various components in the Notebook PC and how to use them. The following 

are major sections of this User’s Manuals:
1.  Introducing the Notebook PC

  Introduces you to the Notebook PC and this User’s Manual.
2.  Knowing the Parts 

  Gives you information on the Notebook PC’s components.
3.  Getting Started

  Gives you information on getting started with the Notebook PC.
4.  Using the Notebook PC   

  Gives you information on using the Notebook PC’s components.
5.  Appendix   

  Introduces you to optional accessories and gives additional information. 

Notes For This Manual

A few notes and warnings in bold are used throughout this guide that you should be aware of in order 

to complete certain tasks safely and completely. These notes have different degrees of importance as 

described below:

NOTE: Tips and information for special situations.

TIP: Tips and useful information for completing tasks.

IMPORTANT! Vital information that must be followed to prevent damage to data, com-

ponents, or persons.

WARNING! Important information that must be followed for safe operation.

Text enclosed in < > or [ ] represents a key on the keyboard; do not actually type the 

< > or [ ] and the enclosed letters.  

< >

[  ]

Summary of Contents for Z96H

Page 1: ...Notebook PC Hardware User s Manual E2763 Aug 2006 ...

Page 2: ...arted 21 Power System 22 Using AC Power 22 Using Battery Power 23 Battery Care 23 Powering ON the Notebook PC 24 The Power On Self Test POST 24 Checking Battery Power 25 Charging the Battery Pack 25 Restarting or Rebooting 26 Powering OFF 26 Special Keyboard Functions 27 Colored Hot Keys 27 Microsoft Windows Keys 29 Keyboard as a Numeric Keypad 29 Keyboard as Cursors 29 Switches and Status Indicat...

Page 3: ...emory Card Reader 41 Hard Disk Drive 41 Connections 42 Modem Connection 42 Network Connection 43 Wireless LAN Connection on selected models 44 Bluetooth Wireless Connection on selected models 45 Power Management Modes 46 Full Power Mode Maximum Performance 46 ACPI 46 Suspend Mode 46 Power Savings 46 Power State Summary 47 Thermal Power Control 47 Stand by and Hibernate 48 Appendix 49 Optional Acce...

Page 4: ... Contents ...

Page 5: ... 1 Introducing the Notebook PC About This User s Manual Notes For This Manual Safety Precautions Preparing your Notebook PC ...

Page 6: ...rmation on using the Notebook PC s components 5 Appendix Introduces you to optional accessories and gives additional information Notes For This Manual A few notes and warnings in bold are used throughout this guide that you should be aware of in order to complete certain tasks safely and completely These notes have different degrees of importance as described below NOTE Tips and information for sp...

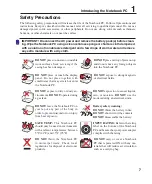
Page 7: ...ook PC should only be used in environments with ambient temperatures between 5 C 41 F and 35 C 95 F Battery safety warning DO NOT throw the battery in fire DO NOT short circuit the contacts DO NOT disassemble the battery DO NOT expose to strong magnetic or electrical fields DO NOT place on uneven or unstable work surfaces Seek servicing if the casing has been damaged DO NOT place or drop objects o...

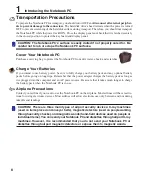
Page 8: ...ttery pack when the Notebook PC is in use Airplane Precautions Contact your airline if you want to use the Notebook PC on the airplane Most airlines will have restric tions for using electronic devices Most airlines will allow electronic use only between and not during takeoffs and landings Transportation Precautions To prepare the Notebook PC for transport you should turn it OFF and disconnect al...

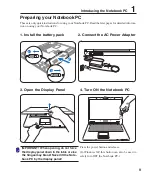
Page 9: ...book PC 1 Install the battery pack 3 Open the Display Panel 4 Turn ON the Notebook PC 2 Connect the AC Power Adapter Press the power button and release In Windows XP this button can also be used to safely turn OFF the Notebook PC 2 1 3 IMPORTANT When opening do not force the display panel down to the table or else the hinges may break Never lift the Note book PC by the display panel ...

Page 10: ...10 1 Introducing the Notebook PC ...

Page 11: ...11 2 Knowing the Parts Basic sides of the Notebook PC ...

Page 12: ...12 2 Knowing the Parts Top Side Refer to the diagram below to identify the components on this side of the Notebook PC NOTE The keyboard will be different for each territory 4 2 1 8 5 9 10 6 7 3 1 ...

Page 13: ...erencing and other interactive applications Microphone Built in The built in mono microphone can be used for video conferencing voice narrations or simple audio recordings Instant Keys Instant keys allow you to launch frequently used applications with one push of a button Details are described in section 3 7 9 10 Status Indicators front Status indicator details are described in section 3 Keyboard ...

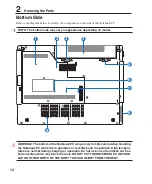
Page 14: ...ot Be careful when handling the Notebook PC while it is in operation or recently been in operation High tempera tures are normal during charging or operation Do not use on soft surfaces such as beds or sofas which may block the vents DO NOT PUT THE NOTEBOOK PC ON YOUR LAP OR OTHER PARTS OF THE BODY TO AVOID INJURY FROM THE HEAT NOTE The bottom side may vary in appearance depending on model ...

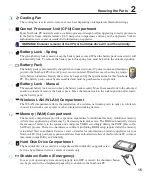
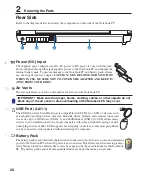
Page 15: ...case your operating system cannot properly turn OFF or restart the shutdown button can be pressed with a straightened paper clip to shutdown the Notebook PC Battery Pack The battery pack is automatically charged when connected to an AC power source and maintains power to the Notebook PC whenAC power is not connected This allows use when moving tempo rarily between locations Battery time varies by ...

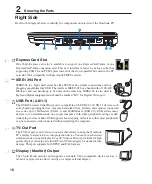
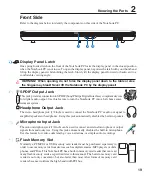
Page 16: ...an S Video connector that allows routing the Notebook PC s display to a television or video projection device You can choose between simultaneously or single display Use an S Video cable not provided for high quality displays or use the provided RCAto S Video adapter for standard video devices This port supports both NTSC and PAL formats Display Monitor Output The 15 pin D sub monitor port support...

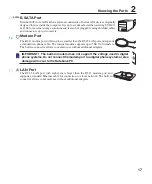
Page 17: ...orts up to 56K V 90 transfers The built in connector allows convenient use without additional adapters IMPORTANT The built in modem does not support the voltage used in digital phone systems Do not connect the modem port to a digital phone system or else damage will occur to the Notebook PC 9 E SATA Port External SATA or eSATA allows external connection of Serial ATA devices originally designed fo...

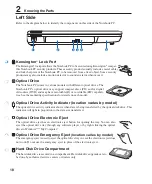
Page 18: ...by model The emergency eject is used to eject the optical drive tray in case the electronic eject does not work Do not use the emergency eject in place of the electronic eject Optical Drive Activity Indicator location varies by model The optical drive activity indicator shows when data is being transferred by the optical disk drive This indicator will light in proportion to the data size transferr...

Page 19: ...of the Notebook PC 1 2 3 4 1 2 3 4 Flash Memory Slot Normally a PCMCIA or USB memory card reader must be purchased separately in order to use memory cards from devices such as digital cameras MP3 players mobile phones and PDAs This Notebook PC has a built in memory card reader that can read many flash memory cards as specified later in this manual The built in memory card reader is not only conven...

Page 20: ...Notebook PC and battery pack always use the supplied power adapter CAUTION MAY BECOME WARM TO HOT WHEN IN USE BE SURE NOT TO COVER THE ADAPTER AND KEEP IT AWAY FROM YOUR BODY 3 4 Air Vents The air vents allow cool air to enter and warm air to exit the Notebook PC IMPORTANT Make sure that paper books clothing cables or other objects do not block any of the air vents or else overheating of the Noteb...

Page 21: ...ting Started Using AC Power Using Battery Power Powering ON the Notebook PC Checking Battery Power Restarting or Rebooting Powering OFF the Notebook PC Special Keyboard Functions Switches and Status Indicators ...

Page 22: ... for almost every country NOTE This Notebook PC may come with either a two or three prong plug depending on territory If a three prong plug is provided you must use a grounded AC outlet or use a properly grounded adapter to ensure safe operation of the Notebook PC WARNING THE POWER ADAPTER MAY BECOME WARM TO HOT WHEN IN USE BE SURE NOT TO COVER THE ADAPTER AND KEEP IT AWAY FROM YOUR BODY Power Sys...

Page 23: ...procedures to install the battery pack 2 1 1 To install the battery pack To remove the battery pack Battery Care The Notebook PC s battery pack like all rechargeable batteries has a limit on the number times it can be recharged The battery pack s useful life will depend on your environment temperature humidity and how your Notebook PC is used It is ideal that the battery be used in a temperature r...

Page 24: ...ow s disk checking program 1 right click any hard disk drive icon in My Computer 2 choose Properties 3 click the Tools tab 4 click Check Now 5 select a hard disk drive 6 select Thorough to also check for physical damages and 7 click Start Third party disk utilities such as Symantec s Norton Disk Doctor can also perform the same functions but with greater ease and more features IMPORTANT If warning...

Page 25: ...n for sub menus Left click the battery icon for power management settings Note Screen captures shown here are examples only and may not re flect what you see in your system Move your mouse over the battery icon for remaining power information When the AC power is connected charging status will be shown Charging the Battery Pack Before you use your Notebook PC on the road you will have to charge th...

Page 26: ... systems and then power OFF by holding the power switch for 2 seconds as opposed to 1 second to power ON Holding the power switch for 2 seconds is necessary in order to prevent ac cidental power OFFs IMPORTANT To protect the hard drive wait at least 5 seconds after turning OFF your Notebook PC before turning it back ON Screens are different depending on security settings Emergency Shutdown In case...

Page 27: ... the Notebook PC in suspend mode either Save to RAM or Save to Disk depending on sleep button setting in power management setup Radio Tower F2 Wireless Models Only Toggles the internal wireless LAN or Blue tooth on selected models ON or OFF with an on screen display When enabled the cor responding wireless indicator will light Windows software settings are necessary to use the wireless LAN or Blue...

Page 28: ...saturation for red green and blue independently You can see the current mode through the on screen display OSD OSD Icons CD Skip to Next Track Fast Forward Icon F12 During CD play skips to next track Scr Lk Del Toggles the Scroll Lock ON and OFF Allows you to use a larger portion of the keyboard for cell navigation Num Lk Ins Toggles the numeric keypad number lock ON and OFF Allows you to use a la...

Page 29: ... pressing Fn Ins Num LK the number lock LED lights up If an external keyboard is connected pressing the Ins Num LK on the external keyboard enables disables the NumLock on both keyboards simultaneously To disable the numeric keypad while keeping the keypad on an external keyboard activated press the Fn Ins Num LK keys on the Notebook PC Keyboard as Cursors The keyboard can be used as cursors while...

Page 30: ... Gear will switch between seven modes in the battery DC mode segment When you remove or apply the AC adapter Power4 Gear will automatically shift you up or down into the proper mode segment AC or DC Pad Lock Key Pressing this button will lock your touchpad when using an external mouse Locking the touchpad will prevent you from accidentally moving the cursor while typing To enable the touchpad simp...

Page 31: ...apitalized letters e g A B C When the capital lock light is OFF the typed letters will be in the lower case form e g a b c Number Lock Indicator Indicates that number lock Num Lk is activated when lighted Number lock allows some of the key board letters to act as numbers for easier numeric data input Top Scroll Lock Indicator Indicates that scroll lock Scr Lk is activated when lit Scroll lock allo...

Page 32: ...FF The Notebook PC s battery is charged or completely drained Blinking Battery power is less than 10 and the AC power is not connected Email Indicator Flashes when there is one or more new email s in your email program s inbox This function requires software setup and may not be currently configured on your Notebook PC This function is designed for Microsoft email software only and may not work wi...

Page 33: ... PC Operating System Pointing Device Storage Devices ExpressCard Slot Optical Drive Hard Disk Drive Connections Modem Connection Network Connection Wireless LAN Connection Bluetooth Wireless Connection Power Management Modes ...

Page 34: ...opular operating systems including those that have been pre installed The support CD does not include the operating system itself The support CD is necessary even if your Notebook PC came pre configured in order to provide additional software not included as part of the factory pre install A recovery CD is optional and includes an image of the original operating system installed on the hard drive ...

Page 35: ...is all that is required to operate the touchpad Because the touchpad is electrostatic sensitive objects cannot be used in place of your fingers The touchpad s primary function is to move the cursor around or select items displayed on the screen with the use of your fingertip instead of a standard desktop mouse The following illustrations demonstrate proper use of the touchpad Moving The Cursor Pla...

Page 36: ...e double click speed using the Windows Control Panel Mouse The following 2 examples produce the same results press the left button twice and release lightly but rapidly strike the touchpad twice press the left cursor button and release lightly but rapidly strike the touchpad Clicking Tapping With the cursor over an item press the left button or use your fingertip to touch the touchpad lightly keep...

Page 37: ...ving the cursor to the desired location then release the button Or you can simply double tap on the item and hold while dragging the item with your fingertip The following illustrations produce the same results hold left button and slide finger on touchpad lightly strike the touchpad twice sliding finger on touchpad during second strike Dragging Clicking Dragging Tapping NOTE A software controlled...

Page 38: ...h previous PCMCIA cards Inserting an ExpressCard Be sure the ExpressCard is level when inserting 1 If there is an ExpressCard socket protector re move it using the Removing an ExpressCard instructions below 2 InserttheExpressCardwiththeconnectorsidefirst and label side up Standard ExpressCards will be flush with the Notebook PC when fully inserted 3 Carefully connect any cables or adapters needed ...

Page 39: ...no obstructions that may get jammed under the drive s tray 3 Hold the disc by the edge and face the disc s printed side up Push down on both sides of the disc s center until the disc snaps onto the hub The hub should be higher than the disc when correctly mounted 4 Slowly push the drive s tray back in The drive will begin reading the table of contents TOC on the disc When the drive stops the disc ...

Page 40: ... hotkeys or Windows speaker icon on the taskbar Using the Optical Drive Optical discs and equipment must be handled with care because of the precise mechanics involved Keep in mind the important safety instructions from your CD suppliers Unlike desktop optical drives the Notebook PC uses a hub to hold the CD in place regardless of the angle When inserting a CD it is important that the CD be presse...

Page 41: ...ter Memory Sticks may be standard or with MagicGate technology The built in memory card reader is not only convenient but also faster than most other forms of memory card readers because it utilizes the high bandwidth PCI bus Hard Disk Drive Hard disk drives have higher capacities and operate at much faster speeds than floppy disk drives and optical drives The Notebook PC comes with a replace able...

Page 42: ... you are connected to an online service do not place the Notebook PC in suspend or sleep mode or else you will disconnect the modem connection Example of the Notebook PC connected to a telephone jack for use with the built in modem Connections Modem Connection The telephone wire used to connect the Notebook PC s internal mo dem should have either two or four wires only two wires telephone line 1 i...

Page 43: ...ith twisted pair wiring If you plan on running the interface at 100 1000Mbps it must be connected to a 100 BASE TX 1000 BASE T hub not a BASE T4 hub For 10Base T use category 3 4 or 5 twisted pair wiring 10 100 Mbps Full Duplex is supported on this Notebook PC but requires connection to a network switching hub with duplex enabled The software default is to use the fastest setting so no user interv...

Page 44: ...ient adapter that supports Infrastructure and Ad hoc modes giving you flexibility on your existing or future wireless network configurations for distances up to 40 meters between the client and the access point To provide efficient security to your wireless communication the optional built in wireless LAN comes with a 64 bit 128 bit Wired Equivalent Privacy WEP encryption and Wi Fi Protected Acces...

Page 45: ...B or ExpressCard Bluetooth module in order to use Bluetooth Bluetooth enabled mobile phones You can wireless connect to your mobile phone Depending on your mobile phone s ca pabilities you can transfer phone book data photos sound files etc or use it as a modem to connect to the Internet You may also use it for SMS messaging Bluetooth enabled computers or PDAs You can wireless connect to another c...

Page 46: ...tead of disabling all power management features ACPI Advanced Configuration and Power Management ACPI was developed by Intel Microsoft and Toshiba especially for Windows and later to control power management and Plug and Play features ACPI is the new standard in power management for Notebook PCs NOTE APM was used in older operating systems like Windows NT4 and Windows 98 Because newer operating sy...

Page 47: ...e upper limit The system shut down for critical cooling when temperature exceeds the maximum safe upper limit Power State Summary STATE ENTRY EVENT EXIT EVENT Stand by Stand by through Windows Start button Timer as set though Power Management in Windows Control Panel higher priority Any device Battery low STR Stand by Suspend to RAM Hotkey see Colored Hotkeys under Special Keyboard Functions in th...

Page 48: ...ll applications and ask if you want to save your work if any are not saved Stand by is the same as Suspend to RAM STR This function stores your current data and status in RAM while many components are turned OFF Because RAM is volatile it requires power to keep refresh the data To operate select Start Shut down and Stand by Hibernate is the same as Suspend to Disk STD and stores your current data ...

Page 49: ...49 Appendix Optional Accessories Optional Connections Glossary Declarations and Safety Statements Notebook PC Information ...

Page 50: ...onnect many USB peripherals through a single cable WARNING To prevent system failures use Safely Remove Hardware on the taskbar before disconnecting the USB floppy disk drive Eject the floppy disk before transporting the Notebook PC to prevent damage from shock USB Floppy Disk Drive An optional USB interface floppy disk drive can accept a standard 1 44MB or 720KB 3 5 inch floppy diskette USB Keybo...

Page 51: ...51 Appendix A Optional Connections These items if desired may be purchased from third parties Printer Connection One or more USB printers can be simultaneously used on any USB port or USB hub ...

Page 52: ...5 Alist of available Bluetooth devices will appear Select Logitech Travel Mouse and click Next 6 The software will register the Bluetooth mouse Click Finish when complete 7 A mouse icon with a pair of green and yellow hands will show in this window R ESET OFF ON If you do not see the Bluetooth mouse here Push the RESET button on the bottom of the mouse and click Refresh here Note RESET may be nece...

Page 53: ...con D o u b l e c l i c k o n t h e registered Bluetooth mouse After connection the icon will show a pair of green and yellow hands Click Refresh in the software and RESET on the mouse Repeat if necessary Question I already registered the Bluetooth mouse before Why is it not working now How do I connect to it Question HowdoIcheckifmyBluetooth is ready A prompt will appear for confirmation Click OK...

Page 54: ...mory disks and the display adapter The BIOS instructions are built into the computer s read only memory BIOS parameters can be configured by the user through the BIOS Setup program The BIOS can be updated using the provided utility to copy a new BIOS file into the EEPROM Bit Binary Digit Represents the smallest unit of data used by the computer A bit can have one of two values 0 or 1 Boot Boot mea...

Page 55: ... used in the PC card slot Not compatible with previous PCMCIA cards Hardware Hardware is a general term referring to the physical components of a computer system including pe ripherals such as printers modems and pointing devices IDE Integrated Drive Electronics IDE devices integrate the drive control circuitry directly on the drive itself eliminating the need for a separate adapter card in the ca...

Page 56: ...tly into the beam Class 3A lasers must not be viewed with opti cally aided devices CLASS 3B Class 3B lasers and Class 3A lasers with outputs of 2 5mW are hazardous to personnel who are within the beam path and look at the beam source directly or by specular reflection These lasers cannot produce hazardous diffuse reflections Personnel working with these lasers should wear appropriate protective ey...

Page 57: ...ains the core file of an operating system and is used to boot up the operating system Twisted Pair Cable The cable used to connect the Ethernet card to a host generally a Hub or Switch is called a straight through Twisted Pair Ethernet TPE The end connectors are called RJ 45 connectors which are not compatible with RJ 11 telephone connectors If connecting two computers together without a hub in be...

Page 58: ...re that all DVD movies be limited to a particular region usually coded to the region at which it is sold While DVD movie content may be released for multiple regions CSS design rules require that any system capable of playing CSS encrypted content must only be capable of playing one region Region Definitions Region 1 Canada US US Territories Region 2 Czech Egypt Finland France Germany Gulf States ...

Page 59: ... if provided is by means of dual tone multifrequency signalling Network Compatibility Declaration Statement to be made by the manufacturer to the Notified Body and the vendor This declaration will indicate the networks with which the equipment is designed to work and any notified networks with which the equipment may have inter working difficulties Network Compatibility Declaration Statement to be...

Page 60: ...Yes Norway Yes No Poland No Not Applicable Portugal No Not Applicable Spain No Not Applicable Sweden Yes No Switzerland Yes No United Kingdom Yes No This information was copied from CETECOM and is supplied without liability For updates to this table you may visit http www cetecom de technologies ctr_21 html 1 National requirements will apply only if the equipment may use pulse dialling manufacture...

Page 61: ...he equipment off and on the user is encouraged to try to correct the interference by one or more of the following measures Reorient or relocate the receiving antenna Increase the separation between the equipment and receiver Connect the equipment into an outlet on a circuit different from that to which the receiver is connected Consult the dealer or an experienced radio TV technician for help WARN...

Page 62: ... co channel of the Mobile Satellite Systems High power radars are allocated as primary user of the 5 25 to 5 35GHz and 5 65 to 5 85GHz bands These radar stations can cause interference with and or damage this device IMPORTANT This device and its antenna s must not be co located or operating in conjunction with any other antenna or transmitter FCC Radio Frequency RF Exposure Caution Statement This ...

Page 63: ...ents in which the use of the 2400 2483 5 MHz band is permitted with an EIRP of less than 100mW indoors and less than 10mW outdoors 01 Ain Orientales 02 Aisne 03 Allier 05 Hautes Alpes 08 Ardennes 09 Ariège 11 Aude 12 Aveyron 16 Charente 24 Dordogne 25 Doubs 26 Drôme 32 Gers 36 Indre 37 Indre et Loire 41 Loir et Cher 45 Loiret 50 Manche 55 Meuse 58 Nièvre 59 Nord 60 Oise 61 Orne 63 Puy du Dôme 64 P...

Page 64: ...ed for UL1642 covering primary non rechargeable and secondary rechargeable lithium batter ies for use as power sources in products These batteries contain metallic lithium or a lithium alloy or a lithium ion and may consist of a single electrochemical cell or two or more cells connected in series parallel or both that convert chemical energy into electrical energy by an irreversible or reversible ...

Page 65: ...å kun ske med batteri af samme fabrikat og type Levér det brugte batteri tilbage til leverandøren Danish VARNING Explosionsfara vid felaktigt batteribyte Använd samma batterityp eller en ekvivalent typ som rekommenderas av apparattillverkaren Kassera använt batteri enligt fabrikantens instruktion Swedish VAROITUS Paristovoiräjähtää josseonvirheellisestiasennettu Vaihdaparistoainoastaanlaitevalmist...

Page 66: ...WARNING Use of controls or adjustments or performance of procedures other than those specified herein or in the laser product installation guide may result in hazard ous radiation exposure Macrovision Corporation Product Notice This product incorporates copyright protection technology that is protected by method claims of certain U S A patents and other intellectual property rights owned by Macrov...

Page 67: ...67 Appendix A Danish Dutch English Finnish French German Greek Italian Portuguese Spanish Swedish CTR 21 Approval for Notebook PC with built in Modem ...

Page 68: ... ______________________________ Type _______________ BIOS Version _ __________________________________________Date _______________ Accessories _ _____________________________________________________________ Accessories _ _____________________________________________________________ Software Operating System _ __________Version _ ___________ Serial Number _______________ Software _ ________________...

Page 69: ...D NOT BE CONSTRUEDASACOMMITMENT BYASUS ASUSASSUMES NO RESPONSIBILITYOR LIABILITYFORANYERRORS OR INACCURACIES THAT MAYAPPEAR IN THIS MANUAL INCLUDING THE PRODUCTS AND SOFTWARE DESCRIBED IN IT Copyright 2006 ASUSTeK COMPUTER INC All Rights Reserved Limitation of Liability Circumstances may arise where because of a default on ASUS part or other liability you are entitled to recover damages from ASUS ...

Reviews: