background image

5

ASUS Xonar HDAV 1.3 Deluxe Quick start guide

English

6. 

Carefully insert the Xonar HDAV card into the PCI Express x1 slot and the 
extension board into the other adjacent slot. Ensure both the Xonar HDAV 
card and the extension board sit properly in place.

7. 

Secure both the Xonar HDAV card and the extension board with screws or 
metal brackets.

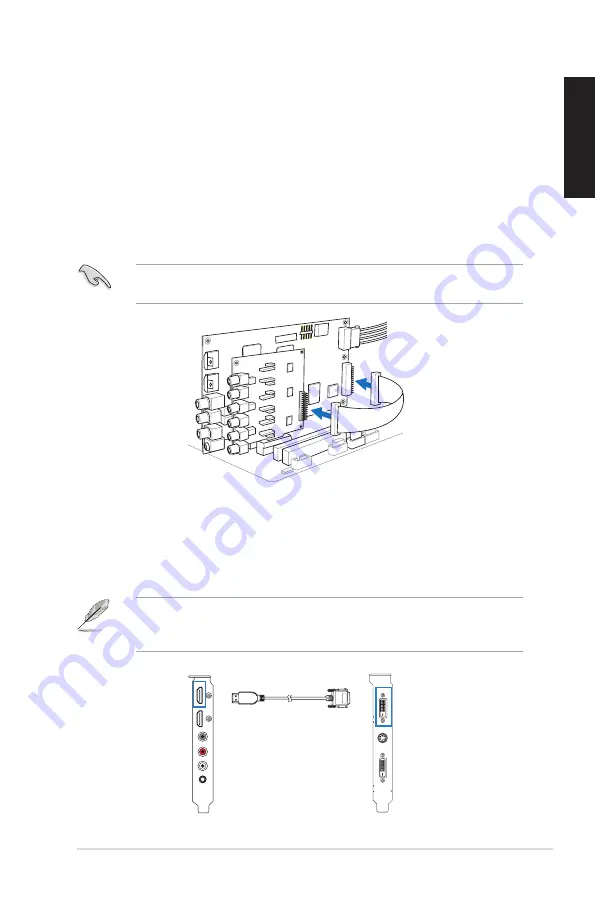
Connecting cables: 

1. 

Using the bridge cable, connect the Xonar HDAV card to the extension board.

2. 

Connect a 4-pin ATX power cable to the ATX power connector on the card.

The Xonar HDAV card requires additional power to work. Ensure that you 
connect the ATX power connector to the card to provide ample power.

1

2

Connecting to a discrete graphics card and an HDMI display device:

1. 

Install a discrete graphics card on your motherboard.

2. 

Using the bundled DVI-to-HDMI cable, connect the DVI Out port of the 
graphics card to the HDMI In port of the Xonar HDAV card.

If you are using an HDMI graphics card, connect your graphics card with the 
Xonar HDAV card using the HDMI cable that comes with your graphics card 
package.

Xonar HDAV card

Graphics card

DVI-to-HDMI cable

HDMI In

DVI Out

Summary of Contents for Xonar HDAV 1.3 Deluxe

Page 1: ...E3910 First Edition V1 May 2008 Xonar HDAV 1 3 Deluxe Audio Video enhanced combo card Quick start guide ...

Page 2: ...on of the Xonar HDAV 1 3 Deluxe card your computer must meet the following requirements One DVI HDMI graphics output to AV card for HDMI function One PCI Express 1 0 or higher compatible slot for the HDAV card and one adjacent slot for the H6 DAC extension board One available 4 pin ATX power cable from PC s power supply unit Microsoft Windows Vista XP 32 64bit MCE2005 Intel Pentium 4 1 4GHz or AMD...

Page 3: ... Right Out port Connect the Right audio cable red from your 2 2 1 channel speakers to this port For multi channel speaker systems connects to the Front Right In port on the powered speakers 5 Front Left Out port Connect the Left audio cable white from your 2 2 1 channel speakers to this port For multi channel speaker systems connects to the Front Right In port on the powered speakers 6 Microphone ...

Page 4: ...rround channel input on 4 5 1 6 1 7 1 powered analog speakers 13 Center Out port Connects to the front center input on 5 1 6 1 7 1 powered analog speakers 14 Subwoofer Out port Connects to the front subwoofer input on 6 1 7 1 powered analog speakers 15 Right Back Surround Out port Connects to the Right Back Surround input on 6 1 7 1 powered analog speakers 16 Left Back Surround Out port Connects t...

Page 5: ...power cable to the ATX power connector on the card The Xonar HDAV card requires additional power to work Ensure that you connect the ATX power connector to the card to provide ample power 1 2 Connecting to a discrete graphics card and an HDMI display device 1 Install a discrete graphics card on your motherboard 2 Using the bundled DVI to HDMI cable connect the DVI Out port of the graphics card to ...

Page 6: ...rn on your computer Windows automatically detects the HDAV card and searches for device drivers When prompted for the drivers click Cancel 2 Insert the support CD into the optical drive If Autorun is enabled in your system the setup starts automatically If not run setup exe from your support CD 3 Follow the on screen instructions to finish the installation The version and content of the driver CD ...

Reviews: