background image

14

VivoMini UN Series

Getting started

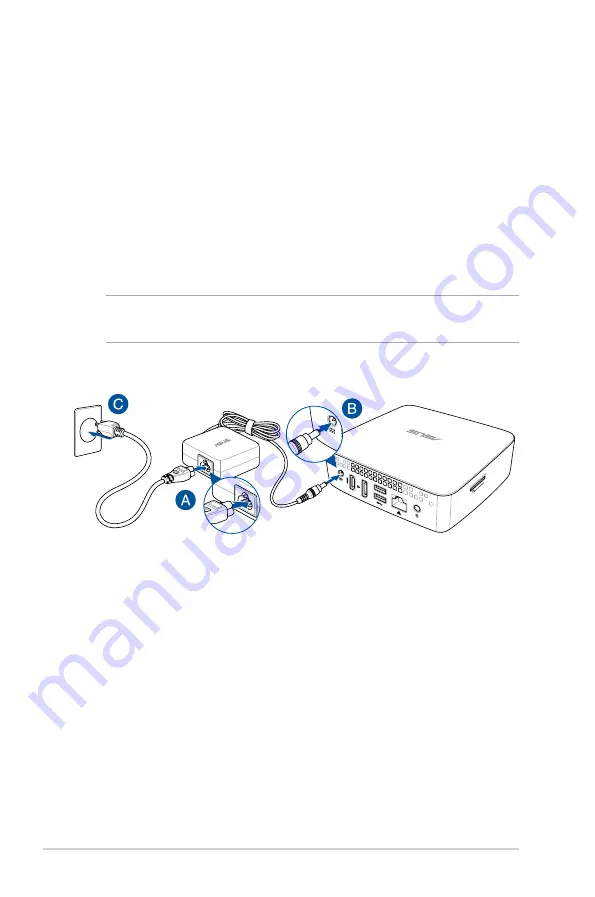
Connecting the AC power adapter

To connect the AC power adapter to your VivoMini:
A.  Connect the AC power cord to the AC/DC adapter.
B.  Connect the DC power connector into your VivoMini’s power 

(DC) input port. 

C.  Plug the AC power cord into a 100 V~240 V power source.

NOTE: 

The power adapter may vary in appearance depending on the 

model or region.

Summary of Contents for VivoMini UN68U

Page 1: ...ni UN68U User Manual Questo manuale d istruzione è fornito da trovaprezzi it Scopri tutte le offerte per Asus VivoMini UN68U BM012M o cerca il tuo prodotto tra le migliori offerte di PC Desktop e Workstation ...

Page 2: ...A COMMITMENT BY ASUS ASUS ASSUMES NO RESPONSIBILITY OR LIABILITY FOR ANY ERRORS OR INACCURACIES THAT MAY APPEAR IN THIS MANUAL INCLUDING THE PRODUCTS AND SOFTWARE DESCRIBED IN IT Copyright 2017 ASUSTeK COMPUTER INC All Rights Reserved LIMITATION OF LIABILITY Circumstances may arise where because of a default on ASUS part or other liability you are entitled to recover damages from ASUS In each such...

Page 3: ...cting a display panel 16 Connecting USB keyboard or mouse 17 Turning on your VivoMini 17 Turning off your VivoMini 18 Putting your VivoMini to sleep 18 Entering the BIOS Setup 18 Quickly enter the BIOS 18 Upgrading yourVivoMini Upgrading memory modules 20 Installing or upgrading the M 2 SSD 26 Installing or upgrading the wireless card 29 Installing the 2 5 HDD 32 Appendix Safety information 36 Set...

Page 4: ...VivoMini Appendix This section includes notices and safety statements for your VivoMini Conventions used in this manual To highlight key information in this manual some text are presented as follows IMPORTANT This message contains vital information that must be followed to complete a task NOTE This message contains additional information and tips that can help complete tasks WARNING This message c...

Page 5: ...ountry or region If the device or any of its components fail or malfunction during normal or proper use and it is still within the warranty period bring the device and the warranty card to you nearest ASUS Service Center Your VivoMini package contains the following items VivoMini Power cable Technical documentations AC power adapter ...

Page 6: ...6 VivoMini UN Series ...

Page 7: ...1 Getting to know your VivoMini ...

Page 8: ...ou to turn the VivoMini on or off You can also press the power button once to put your VivoMini to sleep mode USB 3 1 Gen 2 ports This USB 3 1 Gen 2 Universal Serial Bus 3 1 port provides a maximum of 1 5A output current transfer rate of up to 10 Gbit s and is backward compatible to USB 2 0 The icon indicates this port s USB Charger feature which allows you to quick charge mobile devices ...

Page 9: ...ry card reader enables your VivoMini to read and write data to and from MMC SD SDHC SDXC cards Kensington security slot The Kensington security slot allows you to secure your VivoMini using Kensington compatible security products NOTE The position for this slot may vary per model ...

Page 10: ...ilation IMPORTANT For optimum heat dissipation and air ventilation ensure that the air vents are free from obstructions Power input DC 19V The supplied power adapter converts AC power to DC power for use with this jack Power supplied through this jack supplies power to the VivoMini To prevent damage to the VivoMini always use the bundled power adapter WARNING The power adapter may become warm to h...

Page 11: ... USB 3 1 Gen1 port This USB 3 1 Gen1 Universal Serial Bus port provides a transfer rate of up to 5 Gbit s and is backward compatible to USB 2 0 LAN port The 8 pin RJ 45 LAN port supports a standard Ethernet cable for connection to a local network Headphone output microphone input combo jack port This port allows you to connect your VivoMini to amplified speakers or headphones You can also use this...

Page 12: ...12 VivoMini UN Series ...

Page 13: ...2 Using your VivoMini ...

Page 14: ...power adapter to your VivoMini A Connect the AC power cord to the AC DC adapter B Connect the DC power connector into your VivoMini s power DC input port C Plug the AC power cord into a 100 V 240 V power source NOTE The power adapter may vary in appearance depending on the model or region ...

Page 15: ...ge 19 V IMPORTANT We strongly recommend that you use only the AC power adapter and cable that came with your VivoMini We strongly recommend that you use a grounded wall socket while using your VivoMini The socket outlet must be easily accessible and near your VivoMini To disconnect your VivoMini from its main power supply unplug your VivoMini from the power socket ...

Page 16: ...panel or projector to your VivoMini that has the following connectors HDMI connector DisplayPort connector To connect a display panel to your VivoMini Connect a display cable either to the HDMI or DisplayPort Connecting display via HDMI port Connecting display via DisplayPort ...

Page 17: ...use to your VivoMini You can also connect a USB dongle for a wireless keyboard and mouse set To connect a keyboard and mouse to your VivoMini Connect the USB cable from your keyboard and mouse to any of the USB ports of your VivoMini Turning on your VivoMini Press the power button to turn on your VivoMini ...

Page 18: ...ss F2 or Del during POST NOTE POST Power On Self Test is a series of software controlled diagnostic tests that run when you turn on your PC Entering the BIOS Setup BIOS Basic Input and Output System stores system hardware settings that are needed for system startup in the VivoMini In normal circumstances the default BIOS settings apply to most conditions to ensure optimal performance Do not change...

Page 19: ...3 Upgrading your VivoMini ...

Page 20: ...ist of compatible DIMMs You can only install DDR4 SO DIMMs to the VivoMini s DIMM slots To install or upgrade the memory modules 1 Turn off your VivoMini then disconnect all cables and peripherals 2 Place the VivoMini on a flat stable surface with its top side facing down WARNING Ensure that your hands are dry before proceeding with the rest of the installation process Before installing memory mod...

Page 21: ...er each rubber foot These indicate the sequence you must follow when removing the rubber foot from its slot Refer to the following illustration for details 3 Using a flat head screwdriver or straightened paper clip remove the rubber feet from the bottom side and set them aside then remove the four 4 screws securing the cover ...

Page 22: ...eviously removed then place it into the hole Leave a portion of the screw head that would be enough for you to hold 5 Hold the screw then gently lift the cover slightly from the bottom side of the VivoMini Use your other free hand to hold the VivoMini in place ...

Page 23: ... completely Lift the flap from the SATA connector A then remove the HDD cable from the SATA connector B 7 Align and insert the memory module into the slot A and press it down B until it is securely seated in place Repeat the same steps to install the other memory module IMPORTANT Always install into the lower slot first ...

Page 24: ...D cable into the SATA connector then push the flap down to secure the HDD cable NOTE Ensure the HDD cable is seated securely in the SATA connector 9 Remove the screw you previously attached on the bottom cover A then align and insert the bottom cover back on your VivoMini B ...

Page 25: ...eplace the rubber feet back on each screw hole IMPORTANT Take note of the orientation of the holed rubber foot on the cover and the number printed under each rubber foot These indicate the sequence you must follow when replacing the rubber foot back into each slot Refer to the following illustration for details ...

Page 26: ...upports a 2280 or a 2242 M 2 SSD To install or upgrade a 2242 M 2 SSD 1 Follow steps 1 6 under the Installing or upgrading memory modules section to remove the bottom cover of your VivoMini 2 Insert the hexagon screw as illustrated 3 Align and insert the 2242 M 2 SSD into its slot inside the VivoMini ...

Page 27: ...10 under the Installing or upgrading memory modules section to to replace the bottom cover back on your VivoMini To install or upgrade a 2280 M 2 SSD 1 Follow steps 1 6 under the Installing or upgrading memory modules section to remove the bottom cover of your VivoMini 2 Align and insert the 2280 M 2 SSD into its slot inside the VivoMini ...

Page 28: ...Gently push down the 2280 M 2 SSD on top of the screw hole and fasten it using the bundled screw 4 Follow steps 8 10 under the Installing or upgrading memory modules section to to replace the bottom cover back on your VivoMini ...

Page 29: ...efer to http www asus com for the list of compatible wireless and Bluetooth adapters To install or upgrade the wireless card 1 Follow steps 1 6 under the Installing or upgrading memory modules section to remove the bottom cover of your VivoMini 2 Remove the three 3 screws from the USB 3 1 Gen 1 expansion card then remove it from the chassis ...

Page 30: ...e wireless card into the lower slot inside the VivoMini A then secure it with the bundled screw B 3 optional Remove the M 2 SSD if it is installed Remove the screw securing the M 2 SSD A then remove the M 2 SSD from the slot B and place it aside ...

Page 31: ...antenna to MAIN or and the white antenna to AUX or Refer to the illustration for the right installation procedure NOTE A soft clicking sound indicates that the antenna has been securely attached on the wireless card 7 Follow steps 8 10 under the Installing or upgrading memory modules section to to replace the bottom cover back on your VivoMini ...

Page 32: ...ur VivoMini using the four 4 bundled screws B Installing the 2 5 HDD To install the 2 5 HDD 1 Follow steps 1 6 under the Installing or upgrading memory modules section to remove the bottom cover of your VivoMini 2 Align the bundled bracket on each side of the HDD and insert four 4 screws to secure the 2 5 HDD to the bracket ...

Page 33: ...ering on the HDD cable and stick the cable to the bottom cover of your VivoMini as shown in the illustration below 7 Follow steps 8 10 under the Installing or upgrading memory modules section to to replace the bottom cover back on your VivoMini ...

Page 34: ...34 VivoMini UN Series ...

Page 35: ...VivoMini UN Series 35 Appendix ...

Page 36: ... source Set up the system on a stable surface Openings on the chassis are for ventilation Do not block or cover these openings Make sure you leave plenty of space around the system for ventilation Never insert objects of any kind into the ventilation openings Use this product in environments with ambient temperatures between 0 C and 35 C If you use an extension cord make sure that the total ampere...

Page 37: ...ing button cell battery should not be placed in municipal waste Check local technical support services for product recycling Care during use Do not walk on the power cord or allow anything to rest on it Do not spill water or any other liquids on your system When the system is turned off a small amount of electrical current still flows Always unplug the power cord from the power outlets before clea...

Page 38: ...ctrical safety a coating is applied to insulate the device except on the areas where the I O ports are located Federal Communications Commission Statement This device complies with Part 15 of the FCC Rules Operation is subject to the following two conditions This device may not cause harmful interference and This device must accept any interference received including interference that may cause un...

Page 39: ...uctions and the antenna s used for this transmitter must be installed to provide a separation distance of at least 20 cm from all persons and must not be co located or operating in conjunction with any other antenna or transmitter End users and installers must be provide with antenna installation instructions and transmitter operating conditions for satisfying RF exposure compliance ISED Radiation...

Page 40: ...omique Canada ISED Cet appareil numérique de classe B est conforme aux normes canadiennes ICES 003 RSS 210 et CAN ICES 3 B NMB 3 B Cet appareil est conforme aux normes CNR exemptes de licence d Industrie Canada Le fonctionnement est soumis aux deux conditions suivantes 1 cet appareil ne doit pas provoquer d interférences et 2 cet appareil doit accepter toute interférence y compris celles susceptib...

Page 41: ...led by default The monitor and computer are automatically set to sleep after 10 and 30 minutes of user inactivity To wake your computer click the mouse or press any key on the keyboard Please visit http www energystar gov powermanagement for detail information on power management and its benefits to the environment In addition please visit http www energystar gov for detail information on the ENER...

Page 42: ...Support fax 1 812 284 0883 General support 1 812 282 2787 Online support http support asus com techserv techserv aspx ASUS COMPUTER GmbH Germany and Austria Address Harkort Str 21 23 D 40880 Ratingen Deutschland Fax 49 2102 959991 Web site http www asus com de Technical Support Telephone DE 49 2102 5789555 Telephone AT 43 820 240513 Support Fax 49 2102 959911 Online support http support asus com t...

Page 43: ...onforms to the following specifications FCC Part 15 Subpart B Unintentional Radiators Supplementary Information This device complies with part 15 of the FCC Rules Operation is subject to the following two conditions 1 This device may not cause harmful interference and 2 this device must accept any interference received including interference that may cause undesired operation Representative Person...

Page 44: ......

Reviews: