background image

37

ASUS V9950 Series User Guide

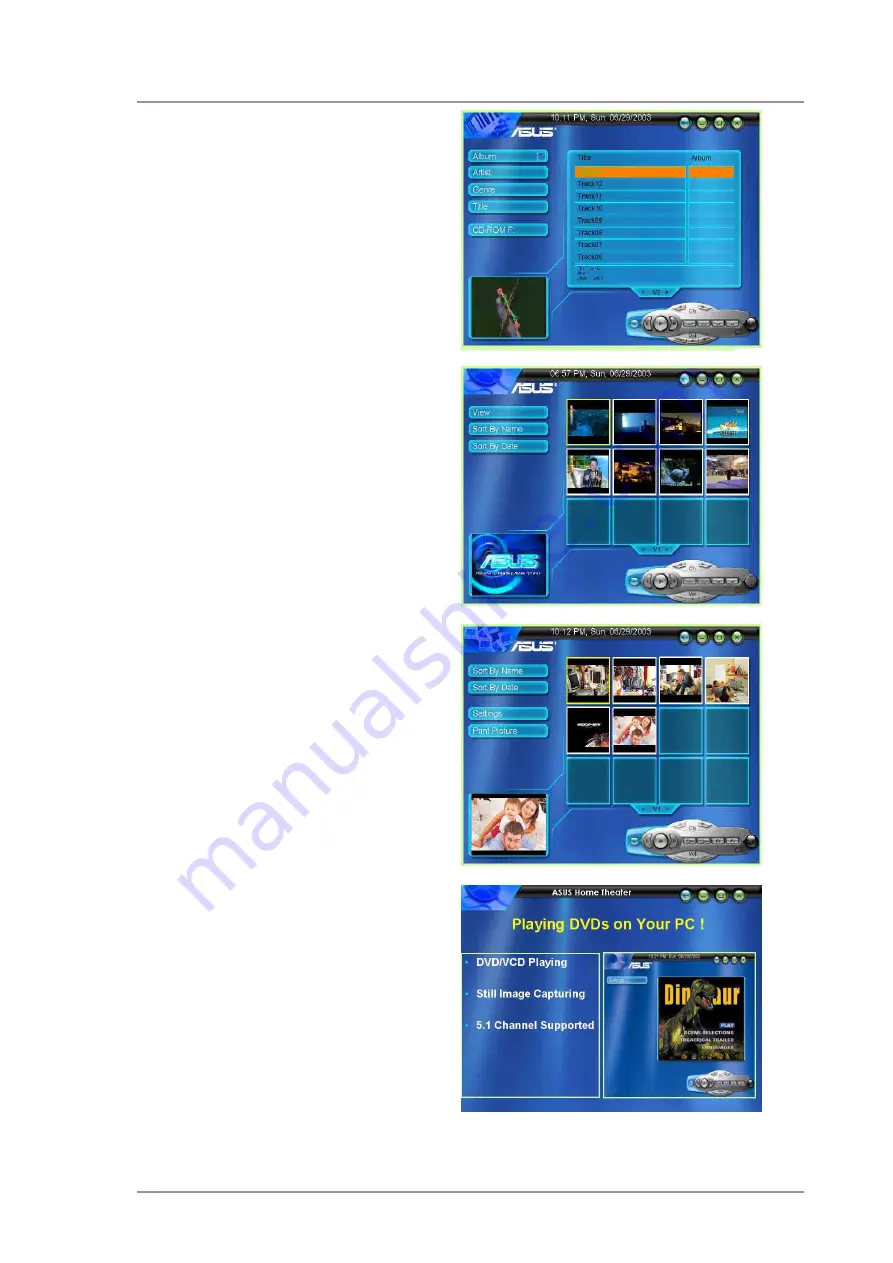
D. Sort pictures on your PC!

Sort pictures from TV/DVD/Video

Display pictures from TV/DVD/
Video

Instant preview feature

Print pictures

C. Sort Videos on your PC!

Sort recordings fromt TV/DVD/
Video

Display recordings from TV/DVD/
Video

Instant Preview feature

Still image capture

Slide show with music

E. Play DVD/VCD on your PC!

DVD/VCD playback

Still image capture feature

5.1 channel audio support

B. Enjoy MP3s on your PC

Listening to MP3 music

Radio recording and playback

Information display

Summary of Contents for V9950 / Delux / TVD / 128M

Page 1: ... V995 995 995 995 9950 0 0 0 0 Series Series Series Series Series Graphics Card V9950 Ultra Deluxe TVD 256M V9950 Deluxe TVD 128M V9950 Ultra TD 128M V9950 TD 128M V9950SE 256 128M USER S MANUAL Hardware Guide ...

Page 2: ...ESS FOR A PARTICULAR PURPOSE IN NO EVENT SHALL ASUS ITS DIRECTORS OFFICERS EMPLOYEES OR AGENTS BE LIABLE FOR ANY INDIRECT SPECIAL INCIDENTAL OR CONSEQUENTIAL DAMAGES INCLUDING DAMAGES FOR LOSS OF PROFITS LOSS OF BUSINESS LOSS OF USE OR DATA INTERRUPTION OF BUSINESS AND THE LIKE EVEN IF ASUS HAS BEEN ADVISED OF THE POSSIBILITY OF SUCH DAMAGES ARISING FROM ANY DEFECT OR ERROR IN THIS MANUAL OR PRODU...

Page 3: ...hod 2 ASUS Quick Setup Program When autorun is disabled 10 Method 3 Plug and Play 11 Method 4 Display Property Page 12 4 1 2 Windows 2000 XP 14 Method 1 ASUS Quick Setup Program 14 Method 2 Plug and Play 14 4 1 3 Windows NT 4 0 15 Method 1 Display Property Page 15 4 2 Install WHQL Driver 17 4 3 Install DirectX 18 4 4 Install GART Driver 19 5 ASUS VideoSecurity 21 5 1 Installing ASUS VideoSecurity ...

Page 4: ...de iv 8 ASUS Home Theater 36 8 1 Introduction 36 8 2 Installing ASUS Home Theater 39 9 ASUS PowerDirector Pro 40 9 1 Introduction 40 9 2 Installing ASUS PowerDirector Pro 42 10 Remote control functions 43 11 Resolution Table 48 ...

Page 5: ...ent does cause harmful interference to radio or television reception which can be determined by turning the equipment off and on the user is encouraged to try to correct the interference by one or more of the following measures Reorient or relocate the receiving antenna Increase the separation between the equipment and receiver Connect the equipment to an outlet on a circuit different from that to...

Page 6: ...ct voltage in your area If you are not sure about the voltage of the electrical outlet you are using contact your local power company If the power supply is broken do not try to fix it by yourself Contact a qualified service technician or your retailer Operation safety Before installing the motherboard and adding devices on it carefully read all the manuals that came with the package Before using ...

Page 7: ...cuments are not part of the standard package WARNING Information to prevent injury to yourself when trying to complete a task CAUTION Information to prevent damage to the components when trying to complete a task IMPORTANT Information that you MUST follow to complete a task NOTE Tips and additional information to aid in completing a task Macrovision Corporation Product Notice This product incorpor...

Page 8: ...ral Email tmd1 asus com Web Site usa asus com Technical Support Support Fax 1 502 933 8713 General Support 1 502 995 0883 Notebook Support 1 510 739 3777 x5110 Support Email tsd asus com ASUS COMPUTER GmbH Germany and Austria Address Harkortstr 25 40880 Ratingen BRD Germany General Email sales asuscom de for marketing requests only General Fax 49 2102 9599 31 Web Site www asuscom de Technical Supp...

Page 9: ...dow effects that create distinctive looks and digital environments Intellisample HCT Hi resolution Compression Technology Intelligent antialiasing captures a higher resolution version of each image then resizes and resamples it for output to your your screen smoothing away imperfections Anisotropic Texture filtering Produces higher image quality for most uses of texturing color and Z compression A...

Page 10: ...ame TV standard for all devices Drawings are for reference only actual card layout may vary DVI I Dual Link output 28pins NVIDIA T M GeForce FX 5900 Ultra GPU Chip Graphics Processing Unit Chip with Fan DVI enabled Flat Panel Display VGA Monitor Output 15pin Standard VGA Output Projector VGA Output Projector OR ATX POWER Frame Buffer DDR Frame Buffer DDR S Video AV Input 9pin ASUS AV Adapter ASUS ...

Page 11: ...d for all devices Drawings are for reference only actual card layout may vary DVI I Dual Link output 28pins NVIDIA T M GeForce FX 5900 GPU Chip Graphics Processing Unit Chip with Fan DVI enabled Flat Panel Display VGA Monitor Output 15pin Standard VGA Output Projector VGA Output Projector OR ATX POWER Frame Buffer DDR Frame Buffer DDR S Video AV Input 9pin ASUS AV Adapter ASUS TV Box CATV S S S VI...

Page 12: ...andard for all devices Drawings are for reference only actual card layout may vary DVI I Dual Link output 28pins NVIDIA TM GeForce FX 5900ultra GPU Chip Graphics Processing Unit Chip with Fan F r a m e B u f f e r D D R DVI enabled Flat Panel Display VGA Monitor Output 15pin Standard VGA Output Projector TV output 4pins Frame Buffer DDR Frame Buffer DDR F r a m e B u f f e r D D R VGA Output Proje...

Page 13: ...NVIDIA TM GeForce FX 5900 GPU Chip Graphics Processing Unit Chip with Fan DVI enabled Flat Panel Display VGA Monitor Output 15pin Standard VGA Output Projector TV output 4pins VGA Output Projector OR S Video Output ATX POWER F r a m e B u f f e r D D R Frame Buffer DDR Frame Buffer DDR F r a m e B u f f e r D D R Notes Use the same TV standard for all devices Drawings are for reference only actual...

Page 14: ...otes Use the same TV standard for all devices Drawings are for reference only actual card layout may vary NVIDIA TM GeForce FX 5900 GPU Chip Graphics Processing Unit Chip with Fan ATX POWER Frame Buffer DDR Frame Buffer DDR VGA Monitor Output 15pin Standard VGA Output Projector DVI I Dual Link output 28pins DVI enabled Flat Panel Display VGA Output Projector OR TV output 4pins S Video Output ...

Page 15: ...or the card mounting bracket to the rear of the chassis and secure it with a screw 8 Replace the system unit cover 9 Use a video signal cable to connect your analog monitor VGA connector 15 pin male to the connector on the card 15 pin female 10 Connect the power cables 11 Proceed to section 4 Display driver installation 3 2 For systems with an existing VGA card 1 Boot your computer 2 Click on the ...

Page 16: ...ver setting to Standard Display Adapter VGA Perform the following procedures to change the Windows display driver settings 1 Boot your computer 2 Click on the Start button Select Settings then Control Panel 3 Double click the System icon in the Control Panel Select the Device Manager tab 4 Double click on Display Adapters 5 Select the current display adapter then click on Properties 6 From the Pro...

Page 17: ...succeeding screen prompts and click on Finish then Yes to restart your computer Method 1 ASUS Quick Setup Program when Autorun is enabled 1 Insert the support CD into your CD ROM drive 2 From the 2D 3D Graphics Video Accelerator main menu click Drivers 5 When Setup has finished installing all the necessary files to your computer it prompts you to restart your computer Click OK 3 Click Install ASUS...

Page 18: ...n My Computer or run the setup utility from the following path Win9xME ANVSetup exe 4 From the main menu click Drivers 7 When Setup has finished installing all the necessary files to your computer it prompts you to restart your computer Click OK 5 Click Install ASUS Enhanced Driver from the Drivers menu to copy the necessary files to your computer 6 Follow the succeeding screen instructions ...

Page 19: ...e following steps replace your old VGA card with an ASUS graphic card Method 3 Plug and Play 4 When Setup prompts you for the location of the driver type the following path assuming that your CD ROM drive is D D WIN9xMe 5 Click Finish to install the driver 6 When Setup has finished installing all the necessary files to your computer it prompts you to restart your computer Click Yes to restart your...

Page 20: ...dard Display Adapter VGA Properties dialog box 4 Click Change on the Adapter tab to display the Update Device Driver Wizard dialog box 5 From the Update Device Driver Wizard click Next 7 From the combo list box click Next 8 Click Show all hardware then Have Disk to display Install From Disk dialog box 6 Click the Display a list of all the drivers in a specific location so you can select the driver...

Page 21: ...When Setup prompts that it has finished installing all the necessary files to your computer click Finish 14 When you are returned to the Standard Display Adapter VGA Properties dialog box click Close 15 In the Display Properties box click Close 16 The system prompts you to restart your computer Click Yes to restart your computer and complete setup The quick setup program works only when the primar...

Page 22: ...your ASUS graphics card the Found New Hardware Wizard dialog box appears 3 Click Cancel to enter the Windows desktop 4 Insert the support CD into your CD ROM drive 3 1 2 Windows 2000 XP Method 1 ASUS Quick Setup Program 5 From the 2D 3D Graphic Video Accelerator main menu click Drivers then Install ASUS Enhanced Driver on the Driver dialog box 6 Follow the onscreen instructions 7 When Setup has fi...

Page 23: ... files for your graphics card check Install one of the other drivers then click Next from the Driver Files Search Results item of the Found New Hardware Wizard dialog box 9 Follow succeeding onscreen instructions 8 When prompted to select the display driver to install in your system select the one that is located in the D WIN2KXP ASUS and click Next 10 When Setup has finished installing all the ne...

Page 24: ...o select the path of the display driver for Windows NT then click OK 10 Select your ASUS VGA Card model then click OK 11 Windows NT will once again prompts for confirmation Confirm installation of display drivers to copy all the necessary files When done click Close to return to the Display Properties box then click Apply 12 The System Settings Change dialog box appears Click Yes to reboot compute...

Page 25: ...bled double click the CD drive icon in My Computer or run Setup exe in the root directory of your support CD to launch the 2D 3D Graphics Video Accelerator installation program 3 From the main menu click Drivers 4 Click Install NVIDIA WQHL Driver from the Drivers dialog box to copy the necessary files to your computer 5 Setup prompts you when it has finished copying all the files to your computer ...

Page 26: ... by regular means such as outlined in Uninstall Display Driver 1 Insert the support CD into your CD ROM drive 2 If autorun is not enabled double click the CD drive icon in My Computer or run Setup exe in the root directory of your support CD to launch the 2D 3D Graphics Video Accelerator installation program 3 From the main menu click Drivers 4 Click Install DirectX from the Drivers dialog box to ...

Page 27: ...ick on the option buttons to select then click OK Installation dialog boxes are slightly different for each chipset Follow the screen instructions to finish the GART driver installation The succeeding steps assume that you are installing for an Intel chipset 1 Insert the support CD into your CD ROM drive 2 If autorun is not enabled double click the CD drive icon in My Computer or run Setup exe in ...

Page 28: ... before clicking OK skip to step 8 Otherwise if you selected No I want to select the other drivers you will be presented with a selection of other drivers Highlight your driver selection from the combo list box and click Install The appropriate driver for your chipset appears as default 9 Setup prompts that it has finished copying all the files to your computer Click OK to finish the installation ...

Page 29: ...ecific time interval by using a video capture devices 5 From the Welcome screen click Next then follow succeeding screen instructions to complete setup 1 Insert the support CD into your CD ROM drive 2 If autorun is not enabled double click the CD drive icon in My Computer or run Setup exe in the root directory of your support CD to launch the 2D 3D Graphics Video Accelerator installation program 3...

Page 30: ...s Before you execute VideoSecurity there are some limitations you have to understand so that you can appropriately use it Due to changing temperatures the captured image of some CCDs will be twisted which may give a wrong detection If the features e g color luminance of the object are similar to that of background the object may not be detected clearly The CCD cannot capture the object smoothly an...

Page 31: ...res its temporary working and log files The default is C VIDEOSEC The directory is user configurable When VideoSecurity is ran a sub directory automatically cre ated under the main directory using the current date and time as the folder name For example 1999 11 30_12 30 20 means that VideoSecurity was started on 30 November 1999 at 12 30 20 PM Detect Region Full window detects all visible area whe...

Page 32: ...up personalized handling procedure through Recording Send email Make phone call or Execute specific program VideoSecurity will execute procedures set up by the user once any error is detected Devices Click the Devices tab to select capture devices and video standard Use mouse to fine tune the Video Security screen and then click OK when done Always on Top is like a Normal Window except that the ma...

Page 33: ... define your VideoSecurity video window Use your mouse to drag your intended rectangular region 5 2 3 Running ASUS VideoSecurity Click the ASUS icon on the taskbar s status area Clicking this icon opens the ASUS Control Panel then click the ASUS VideoSecurity to run VideoSecurity ...

Page 34: ... feature that enhances interactive gaming experience by enabling point to point video conferencing functions and online gaming to take place simultaneously thus allowing you to see and talk to your opponents while playing full screen online games Visit the ASUS website www asus com for more information about the ASUS GameFace technology ...

Page 35: ...ing you to see and talk to your opponents while playing full screen online games 5 From the Welcome screen click Next 1 Insert the support CD into your CD ROM drive 2 If autorun is not enabled double click the CD drive icon in My Computer or run Setup exe in the root directory of your support CD to launch the 2D 3D Graphics Video Accelerator installation program 3 From the main menu click Utilitie...

Page 36: ...ASUS V9950 Series User Guide 28 7 Click Finish after the installation is complete 6 Follow the succeeding screen instructions ...

Page 37: ...ect OSD from in Advanced tab 1 d Check the Enable OSD check box and input the appropriate hotkey ASUS GameFace automatically detects the connected audio video WDM capture device upon start up You can change the input device from Options in the Tool menu if you have more than one audio video device You can also enable the On Screen Display OSD in the GameFace application STEP 1 Enabling ASUS OSD ST...

Page 38: ...the Play Stop button to start or stop local playback 4 a Connect to remote computer Input the computer name Local Area Network or IP Address in the combo box Select New Call from the File menu or press the Make a Call button You will see and hear the remote audio video signal if the remote computer accepts the call For the computer name and IP addresses go to Tools Info for lists of information ST...

Page 39: ...on an incoming call Click Yes to accept the call Select End Call from the File menu or press the End the Call button to disconnect 5 a Select Option from the Tool menu 5 b Select GameFace Option Dialogue 5 c Enter GameFace page to adjust transparency position and hotkey settings STEP 5 GameFace Settings ...

Page 40: ...tkey default is Ctrl Alt V to activate GameFace 6 c Press the On Screen Display hotkey to show the OSD menu 6 d Use the arrow keys to select the GameFace application page and adjust the Transparency Position X Position Y Size or toggle to enable or disable GameFace STEP 6 Launch Game and show GameFace ...

Page 41: ...itor chipset is not present the ASUS Tweak utility will be installed 1 Insert the support CD into your CD ROM drive 2 If autorun is not enabled double click the CD drive icon in My Computer or run Setup exe in the root directory of your support CD to launch the 2D 3D Graphics Video Accelerator installation program 3 From the main menu click Utilities 4 Click Install SmartDoctor from the Utilities ...

Page 42: ...em 7 2 1 Functions Timing adjustment includes engine and memory clock 2D Test lets you test your settings Timing test run when clock is larger than default setting and use current setting at next startup GPU Cooling Tweak automatically reduces the speed of the GPU When processing the GPU automatically throttles back to reduce component temperatures and increase longevity Dynamic Overclocking Tweak...

Page 43: ...35 ASUS V9950 Series User Guide 7 2 2 Set Test When you click the Set Test button the Tweak Utility tests the graphic card onscreen memory and displays the following screen while testing ...

Page 44: ...ning to MP3s playing DVD sorting and viewing video or pictures in one friendly user interface You can easily turn your PC into a multimedia center with ASUS Home Theater A Watch TV on your PC TV Recording Time shifting Playback function for temporary leave Multi channel previewing Scheduled recording Still image capture The ASUS Home Theater is available only for Deluxe TVD models since this appli...

Page 45: ...tures C Sort Videos on your PC Sort recordings fromt TV DVD Video Display recordings from TV DVD Video Instant Preview feature Still image capture Slide show with music E Play DVD VCD on your PC DVD VCD playback Still image capture feature 5 1 channel audio support B Enjoy MP3s on your PC Listening to MP3 music Radio recording and playback Information display ...

Page 46: ...ave to wait until 11 o clock to watch what you recorded because the feature permits play and record functions at the same time Scenario 2 Five more minutes in the most important game of the year and your phone starts ringing and your caller ID indicates that it s from your boss What do you do Continue to watch the game and lose your job or engage in a long boring conversation and miss the game No ...

Page 47: ...es on your PC 4 Click on Finish to complete setup 1 Insert the ASUS Home Theater support CD into your CD ROM drive 2 Double click the CD drive icon in My Computer to bring up the autorun screen or run Setup exe in the root directory of your CD ROM drive 3 From the welcome screen click Next and follow succeeding instructions to copy the necessary files to your computer ...

Page 48: ...wer video editing software applications have taken off to astronomical heights Yet a great inherent limitation such as requiring a huge amount of disk space because of the raw video data it captures still remains This is why many still choose to edit with analog devices What makes PowerDirector the megastar of its industry in one quick flash is its ability to save precious producing time because o...

Page 49: ...tly from DV camcorders in real time or non real time a disc wizard that creates and burns movie discs in a cinch adding titles to clips adding audio streams to clips picture in pictures adding video or images to an existing video clip a huge collection of transitions video and titles effects master audio files watermarks ...

Page 50: ... the support CD into your CD ROM drive 2 Double click the CD drive icon in My Computer to bring up the autorun screen 3 Select a language from the combo list box then click Next 4 The PowerDirector Pro Setup window appears Click Next to start the installation 5 Follow the succeeding on screen instructions to complete setup ...

Page 51: ...43 ASUS V9950 Series User Guide ASUS Remote Controller ASUS Remote Controller Layout 10 Remote Control Functions The ASUS Remote Control is bundled on Deluxe models only ...

Page 52: ...lose App Close App Close App Close App Close App Music Mode Pictures Mode Video Mode DVD Mode Mouse Arrow Keys LMouse Back OK OK OK OK OK Mouse Arrow Keys Mouse Arrow Keys Mouse Arrow Keys Mouse Arrow Keys LMouse Back LMouse Back LMouse Back LMouse Back Remote control button functions ...

Page 53: ...Button Mode 1 Mode 2 Mode 3 Mode 4 Mode 5 Previous Chapter Previous Chapter Previous Chapter Previous Chapter Play Pause Play Pause Play Pause Play Pause Next Chapter Next Chapter Next Chapter Next Chapter Fast Forward Fast Forward Volume Up Down Volume Up Down Volume Up Down Volume Up Down Home Launch Home Launch Home Launch Home Launch Remote control button functions cont ...

Page 54: ...eries User Guide 46 Mute Record Mute Mute Mute Mute Remote Toggle 1 2 3 4 5 6 7 Button Mode 1 Mode 2 Mode 3 Mode 4 Mode 5 Remote Toggle Remote Toggle Remote Toggle Remote Toggle Remote control button functions cont ...

Page 55: ...vailable FM tuner features Features 1 Innovation design of ASUS Remote Controller for controlling ASUSDVD XP PowerVCR II EPG software with desktop PC 2 Mouse mode can be used as mouse function while you aren t in front of your computer 3 Receiver with USB Port it s easy to connect with your computer Specifications Operation Voltage 3V Battery AAA Battery x 2 alkaline battery recommended Receiver I...

Page 56: ...0Hz 112 7 200Hz 135 1 240Hz 166 2 1024 x 768 60Hz 48 4 70Hz 56 4 72Hz 57 5 75Hz 60 0 85Hz 68 7 100Hz 81 7 120Hz 98 8 140Hz 116 6 144Hz 120 2 150Hz 125 7 170Hz 144 1 200Hz 172 8 240Hz 212 1 1152 x 864 60Hz 53 7 70Hz 62 9 72Hz 64 9 75Hz 67 5 85Hz 77 1 100Hz 91 3 120Hz 111 2 140Hz 131 3 144Hz 135 2 150Hz 141 4 170Hz 162 9 200Hz 194 9 1280 x 960 60Hz 60 0 70Hz 69 9 72Hz 72 1 75Hz 75 2 85Hz 86 0 100Hz ...

Page 57: ...z 95 3 120Hz 115 4 140Hz 136 8 144Hz 140 4 150Hz 146 8 1600 x 1200 60Hz 75 0 70Hz 87 5 72Hz 90 1 75Hz 94 0 85Hz 106 1 100Hz 127 5 120Hz 154 5 1920 x 1080 60Hz 67 1 70Hz 78 7 72Hz 81 1 75Hz 84 6 85Hz 96 4 100Hz 113 9 1920 x 1200 60Hz 74 6 70Hz 87 4 72Hz 90 0 75Hz 94 0 85Hz 106 7 100Hz 126 7 1920 x 1440 60Hz 89 4 70Hz 104 9 72Hz 108 5 75Hz 112 5 85Hz 129 4 2048 x 1536 60Hz 95 5 70Hz 111 9 72Hz 115 3...

Page 58: ...ASUS V9950 Series User Guide 50 ...

Reviews: