background image

18

Chapter 2:  Basic Installation

2.4 Install System Memory

The motherboard includes two 168-pin Dual Inline Memory Module
(DIMM) sockets. The sockets support up to 1GB system memory
using PC133-compliant Synchronous Dynamic Random Access
Memory (SDRAM) DIMMs.

Follow these steps to install a
DIMM.

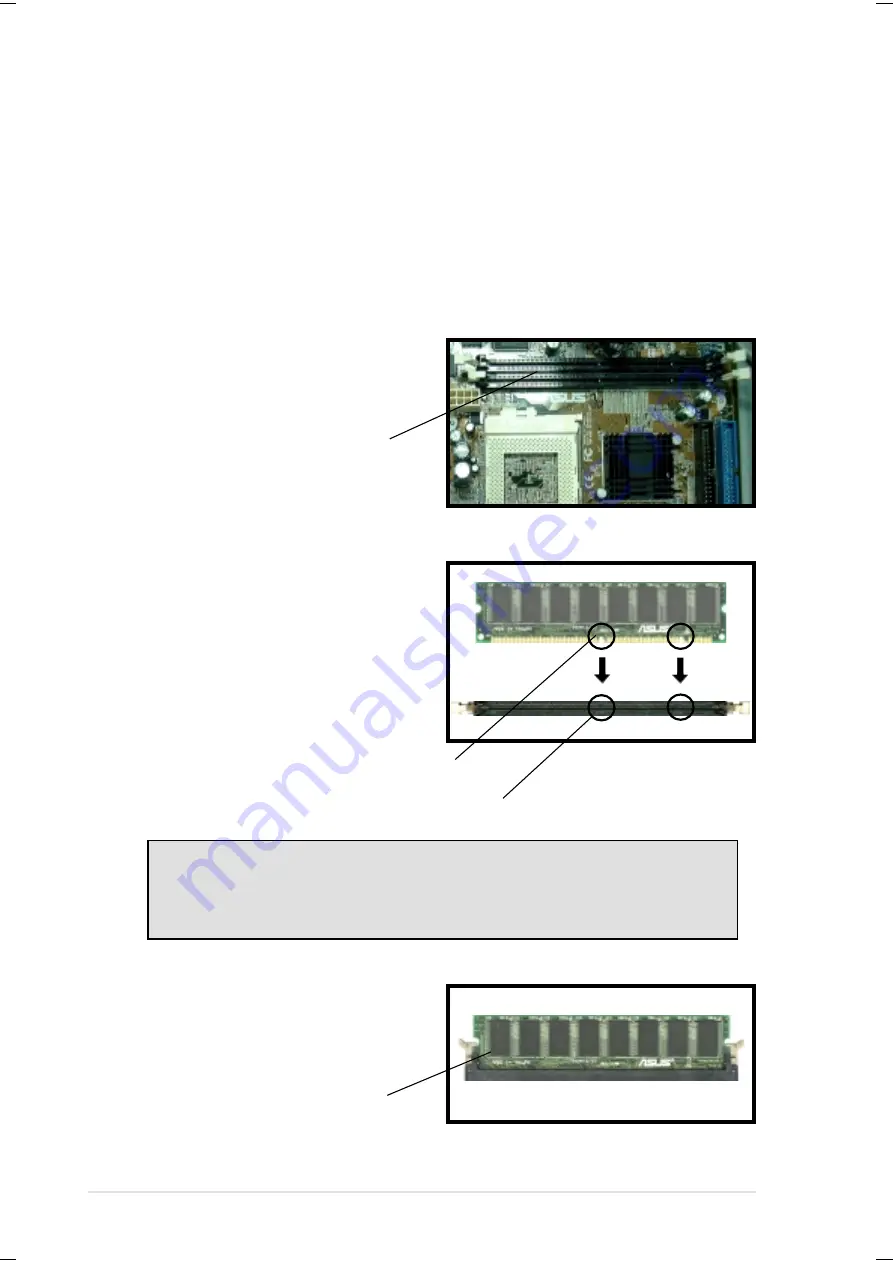
1. Locate the DIMM sockets on

the motherboard.

DIMM Sockets

2. Unlock a DIMM socket by

pressing the retaining clips
outward. Align a DIMM on the
socket such that the notches
on the DIMM match the
breaks on the socket.

3. Firmly insert the DIMM in the

socket until the retaining clips
snap back in place and the
DIMM is properly seated.

CAUTION!

DIMMs are keyed with notches so that they fit in only one direction.
DO NOT force a DIMM into a socket to avoid damaging the DIMM.

Installed DIMM

DIMM Notch

Socket Break

Summary of Contents for Terminator

Page 1: ...Barebone System Terminator Installation Guide ...

Page 2: ...authorized in writing by ASUS or 2 the serial number of the product is defaced or missing Products and corporate names appearing in this manual may or may not be registered trademarks or copyrights of their respective companies and are used only for identification or explanation and to the owners benefit without intent to infringe The product name and revision number are both printed on the produc...

Page 3: ...erica Marketing Address 6737 Mowry Avenue Mowry Business Center Building 2 Newark CA 94560 USA Fax 1 510 608 4555 Email info usa asus com tw Technical Support Fax 1 510 608 4555 BBS 1 510 739 3774 Email tsd asus com WWW www asus com FTP ftp asus com tw pub ASUS ASUS COMPUTER GmbH Europe Marketing Address Harkortstr 25 40880 Ratingen BRD Germany Fax 49 2102 442066 Email sales asuscom de for marketi...

Page 4: ...s cause harmful interference to radio or television reception which can be determined by turning the equipment off and on the user is encouraged to try to correct the interference by one or more of the following measures Reorient or relocate the receiving antenna Increase the separation between the equipment and receiver Connect the equipment to an outlet on a circuit different from that to which ...

Page 5: ... 2 Basic Installation 13 2 1 Remove the Cover 14 2 2 Detach the Drive Frame 15 2 3 Install a CPU 16 2 4 Install System Memory 18 2 5 Install a Hard Disk Drive 19 2 6 Install a CD ROM Drive 21 2 7 Install a Modem Riser Card 23 2 8 Install a PCI Expansion Card 24 2 9 Re connect Cables 25 2 10 Replace the Cover 26 2 11 Connect External Devices 28 Chapter 3 Motherboard Information 29 3 1 Motherboard L...

Page 6: ...Switching Power Supply 4 1 44MB Floppy Disk Drive 5 CD ROM Drive optional 6 56K PCI Modem Card optional 7 Support CD with Drivers and Utilities 8 Installation Guide NOTE If you are assembling the system by yourself make sure to prepare all the components before starting It saves you a lot of time not having to hunt down components when you need them ...

Page 7: ...m Installation Guide This guide provides general information and installation instructions about the Terminator Barebone System About This Guide contains an introduction on the contents of this document that include target audience and chapter description Introduction About This Guide ...

Page 8: ...the internal features 3 Chapter 2 Basic Installation This chapter tells how to install components into the barebone system through illustrated step by step instructions 4 Chapter 3 Motherboard Information This chapter gives information about the CUSC motherboard that comes with the ASUS Terminator Barebone System This chapter includes the motherboard layout jumper settings and connector locations ...

Page 9: ...or Barebone System This chapter gives a general description of the ASUS Terminator barebone system It includes introduction on the front and rear panel features and the internal features Chapter 1 System Introduction ...

Page 10: ...he CD ROM drive and modem card are optional items and may not come installed in some models The lower part of the front panel is a door that covers accessible I O features that include two USB connectors Ports 2 3 a headphone connector and a microphone connector Push the dotted area of the door to open it and show the connectors as in the above figure CD ROM Drive optional Floppy Drive Power Butto...

Page 11: ...g power supply that came with the system has a voltage selector switch beside the power socket Use this switch to select the appropriate voltage according to the voltage supply in your area If the voltage supply in your area is 100 127V set the switch to 115V If the voltage supply in your area is 200 240V set the switch to 230V Game MIDI Connector Serial Port COM1 PS 2 Mouse Connector PS 2 Keyboar...

Page 12: ...ve the cover and flip out the drive frame You will see here the standard components that come already installed in the system and the places where you can install the other required components to get the system running Motherboard Power Supply Modem Card USB audio Board Two 5 25 Drive Bays 3 5 HDD Drive Bay 3 5 Floppy Drive ...

Page 13: ...13 ASUS Terminator Barebone System This chapter tells how to install components into the barebone system through illustrated step by step instructions Chapter 2 Basic Installation ...

Page 14: ...from the chassis 2 Place your hand underneath the front panel and push up the locking tab that secures the panel to the chassis Thumbscrew 3 Pull up the front panel for about an inch after unlocking the tab 4 While still holding the front panel place your other hand on the top rear edge of the cover and carefully lift the cover from the chassis TIP Another way to release the cover is to push on th...

Page 15: ...e frame 1 Place the chassis on a flat surface and turn it on its side then unlatch the drive frame by pulling it outward 2 Carefully lay the drive frame alongside the main chassis frame Swivel Edge Drive Frame NOTE The drive frame has a swivel hinge like edge that is attached to the main chassis It is not necessary to completely detach the drive frame from the chassis when installing components ...

Page 16: ...the chassis has a Socket 370 that supports an Intel Pentium III Celeron processor Follow these steps to install a CPU 1 Locate the CPU socket on the motherboard CPU Socket 370 Socket Pin 1 2 Unlock the socket by pressing the lever sideways then lifting it up to a 90 100 angle CPU Fan Connector CPU_FAN ...

Page 17: ... place WARNING The CPU fits only in one orientation DO NOT force the CPU into the socket to prevent bending the pins and damaging the CPU If the CPU does not fit completely check its orientation or check for bent pins Socket Pin 1 Notched Corner 5 Push down the lever to secure the CPU The lever clicks in place indicating that the socket is locked 6 Connect the CPU fan cable to the 3 pin CPU_FAN co...

Page 18: ...te the DIMM sockets on the motherboard DIMM Sockets 2 Unlock a DIMM socket by pressing the retaining clips outward Align a DIMM on the socket such that the notches on the DIMM match the breaks on the socket 3 Firmly insert the DIMM in the socket until the retaining clips snap back in place and the DIMM is properly seated CAUTION DIMMs are keyed with notches so that they fit in only one direction D...

Page 19: ...e HDD bay location Follow these steps to install an IDE HDD 1 Place the chassis upright 5 25 inch Drive Bay 3 5 inch HDD Drive Bay 3 Carefully push the HDD into the bay until its screw holes align with the holes on the bay Internal View External View HDD Component Side HDD Screws 4 Secure the HDD with two screws on each side of the bay 2 With its component side up carefully insert the HDD into the...

Page 20: ...he cable with Pin 1 on the IDE interface Red Stripe to Pin 1 IDE Ribbon Cable 7 Connect the other end of the IDE ribbon cable to the primary IDE connector blue connector labeled IDE1 on the motherboard Power Cable HDD Primary IDE Connector IDE1 5 Connect a power cable from the power supply to the power connector at the back of the HDD Use the cable with the white connector labeled HDD ...

Page 21: ... if you acquired a model without a CD ROM Follow these steps to install a CD ROM drive 1 Place the chassis upright 3 Carefully push the CD ROM drive into the bay until its screw holes align with the holes on the bay as shown 4 Secure the CD ROM with two screws on each side of the bay 2 Insert the CD ROM drive into the upper 5 25 inch bay CD ROM Screws 5 25 inch Drive Bay ...

Page 22: ...the CD ROM Use the cable with the white connector labeled P6 8 Connect the other end of the IDE ribbon cable to the secondary IDE connector black connector labeled IDE2 on the motherboard 7 Connect one end of the CD ROM audio cable to the 4 pin connector at the back of the CD ROM 9 Connect the other end of the audio cable to the black 4 pin connector labeled CD on the motherboard Secondary IDE Con...

Page 23: ...em riser card 1 Place the chassis on its side 2 Remove the metal bracket cover opposite the AMR expansion slot 3 Align the modem card golden fingers to theAMR slot and its metal bracket to the slot opening on the chassis 4 Press the card firmly until the it is properly seated on the slot 5 Secure the card to the chassis with a bracket screw Connect to a Telephone Line Connect to a Telephone Set Th...

Page 24: ...he metal bracket cover opposite the PCI slot marked PCI1 The figure on the right shows a sample PCI network card that you can install on the PCI slot 3 Align the PCI card golden fingers to the PCI slot and its metal bracket to the slot opening on the chassis 4 Press the card firmly until the it is properly seated on the slot 5 Secure the card to the chassis with a bracket screw NOTE If you have in...

Page 25: ... HDD LED cable to the 2 pin lead marked IDELED 3 Connect the Line Out Mic cable to the FLOUT MIC2 connector on the motherboard matching the red pin stripe with Pin 1 4 Connect the USB2P cable to the USB1 connector on the motherboard matching the red pin stripe with Pin 1 FLOUT Lead for Line Out Cable MIC2 Lead for Microphone Cable PANEL Connector IDELED Lead USB1 Connector Requires an ATX power su...

Page 26: ...llow these steps to re assemble the system 1 With the chassis lying on its side hook the swivel edge of the drive frame to the main chassis 2 Sway the drive frame inward until it fits completely The protruding tabs on both ends of the drive frame should snap perfectly to the chassis edge Protruding Tab 3 Turn the chassis upright 4 Place the cover over the chassis leaving about two inches from the ...

Page 27: ...e the Cover 6 Push the cover towards the rear until it fits The locking tab snaps into the hole on the chassis indicating that the cover is in place Rail Tabs 7 Lock the cover with the captive thumbscrew on the rear panel Locking Tab Hole Locking Tab IMPORTANT Firmly push the cover to ensure that it is fully engaged to the chassis ...

Page 28: ...allation 2 11 Connect External Devices The figure below shows the specific connectors and devices that you can connect to the rear panel ports Serial PS 2 KB VGA Line Out Line In Mic Game MIDI PS 2 Mouse AC Parallel USB RJ 45 ...

Page 29: ...pter includes the motherboard layout jumper settings and connector locations It also includes information on the USB audio board located on the front panel In cases when changing motherboard settings require corresponding BIOS settings adjustments enter BIOS Setup by pressing the Delete key Del during boot up Power On Self Test Chapter 3 M B Information ...

Page 30: ... WOR CUSC FLOUT USB T Port0 B Port1 RJ 45 COM1 PARALLEL PORT LANLED IOC_MB Audio Modem Riser AMR MIC2 DIMM Socket 2 64 72 bit 168 pin module 3 2 DIMM Socket 2 64 72 bit 168 pin module 1 0 Socket 370 PCI Slot 2 PCI Slot 1 ASUS Mozart PS 2 T Mouse B Keyboard Super I O Flash BIOS Line Out Line In Mic In CGAEX COM1 GAME IOC_DC Refer to the layout below to locate specific motherboard components The mot...

Page 31: ...nt panel to support externally accessible connectors including two USB headphone and microphone connectors USB2P MIC2 USB T Port0 B Port1 MIC LOUT LO2 UAEX Front Panel Connectors Connect to USB1 Connector on the Motherboard Connect to FLOUT Lead on the Motherboard Connect to MIC2 Lead on the Motherboard ...

Page 32: ...g in low power mode using the connected USB devices Set to 5VSB to allow wake up from S3 state no power to CPU RAM in slow refresh power supply in reduced power mode CUSC CUSC USB Device Wake Up USBPWR1 5VSB 5V 1 2 2 3 USBPWR 1 External Frequency Selection These jumper settings tell the clock generator what frequency to send to the CPU DRAM and PCI buses CUSC CUSC External Clock BUS Frequency Sele...

Page 33: ... BIOS when you use a primary AMR 4 Clear RTC RAM This jumper allows you to clear the Real Time Clock RTC RAM in CMOS You can clear the CMOS memory of date time and system setup parameters by erasing the CMOS RTC RAM data The RAM data in CMOS that include system setup information such as system passwords is powered by the onboard button cell battery To erase the RTC RAM 1 Turn OFF the computer and ...

Page 34: ...ared Module Connector Standard Infrared SIR Front View Back View 5V IRTX IRRX NC GND SIR 5V IRRX IRTX NC GND NC GND CIRRX CIR 5V CIR 3 4 Connectors CUSC CUSC System Panel Connectors Requires an ATX power supply PLED Ground TB_LED PWR 5 V 5V Speaker Ground 5 V ExtSMI Ground Reset Ground Ground Power LED Speaker Connector MessageLED SMI Lead Reset SW ATX Power Switch CUSC CUSC USB Ports USB Power US...

Reviews: