background image

77

Software 

Utilities

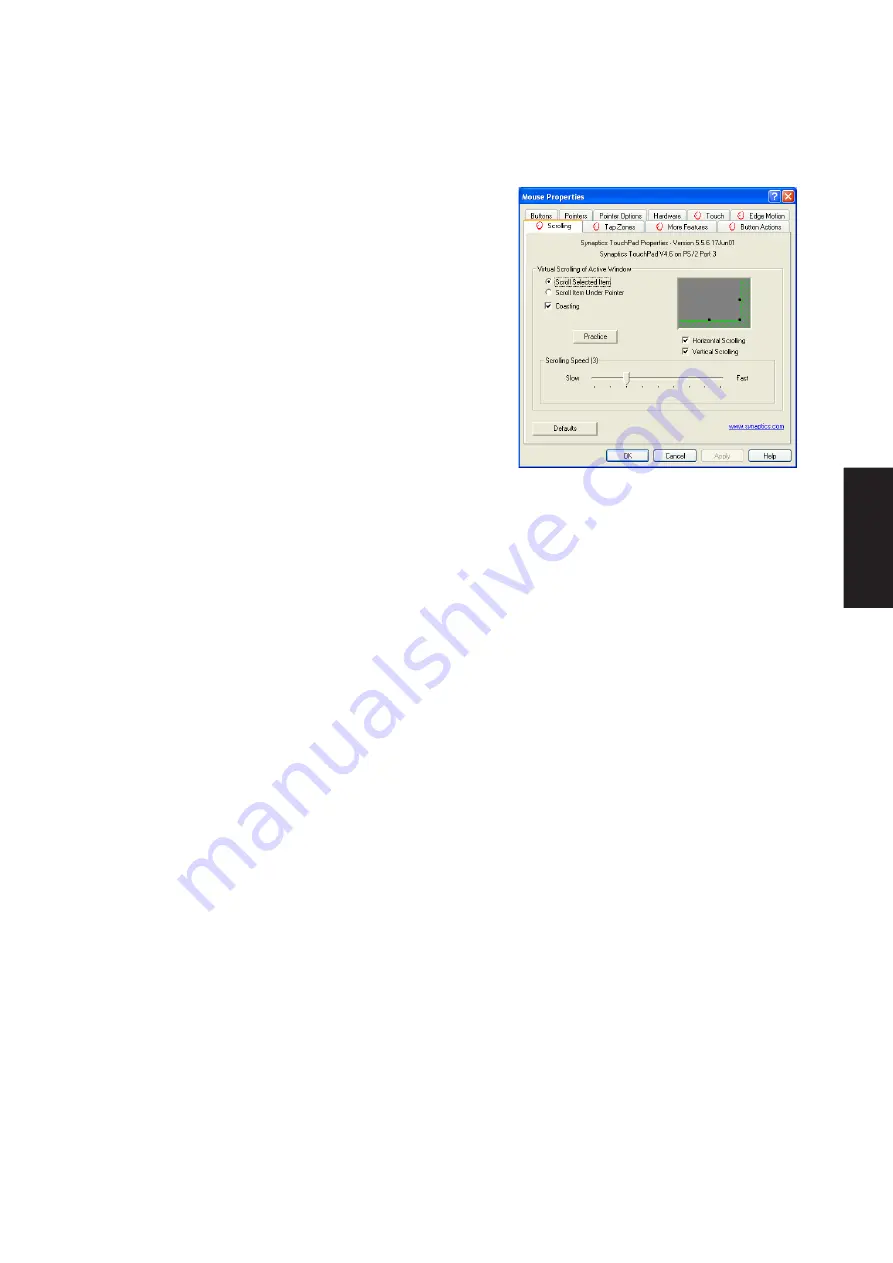
Scrolling Properties Page

The Scrolling properties page allows you to customize the
Virtual Scrolling capabilities of your TouchPad.

In some applications, the scroll zones which activate Virtual
Scrolling can be used for zooming too.

Enabling Virtual Scrolling of the
Active Window

Check the appropriate boxes on this page for the type of Virtual
Scrolling that you prefer:

Horizontal Scrolling

Vertical Scrolling

Coasting

Choose where you want Virtual Scrolling to occur:

Scroll Selected Item

- OR -

Scroll Item Under Pointer

Customizing Scroll Zone Sizes

This page includes a small map of the TouchPad with the scroll zones shaded in red.  See the Scroll Zone
TouchPad Map for a more detailed description.

You can adjust the size of each zone by dragging one of the black resize handles on the TouchPad map.   If
you are having trouble activating the Virtual Scrolling feature, you might want to try making the scroll zones
wider.  If you find that scrolling sometimes gets activated when you didn’t mean to scroll, try narrowing the
scroll zones.

Customizing Virtual Scrolling Speed

You can control the speed of Virtual Scrolling by adjusting the Scrolling Speed slider on this page.  Drag the
slider thumb to the right for faster scrolling.

Summary of Contents for S5A

Page 1: ...Notebook PC Drivers and Utilities User s Manual E2062 May 2005 ...

Page 2: ...te Driver Setup 23 INTEL Calexico Wireless LAN 23 Wireless LAN Driver Setup Calexico2 ABG 24 Wireless LAN Driver Setup Calexico2 2200BG 25 ASUS Wireless LAN 28 ASUS WLAN Driver Setup 30 ASUS WLAN Utility Setup 31 LAN 35 LAN Driver Setup 36 Configuring your LAN 37 Modem 41 Modem Driver Setup 42 Modem Configuration 42 RICOH 45 Ricoh Driver Setup 46 LiveUpdate 48 LiveUpdate Setup 50 Using LiveUpdate ...

Page 3: ... 60 Benefits of Power4 Gear 61 Probe2 PC Probe 65 PC Probe Setup 66 PC Probe Reference 67 TouchPad 71 Touchpad Setup 72 Synaptics TouchPad Features 73 Property Pages 76 Frequently Asked Questions 83 WinFlash 84 WINFLASH Setup 86 Using WINFLASH 87 ...

Page 4: ...4 Support CD ...

Page 5: ...he autorun menu does not appear double clicking the CD ROM disc drive icon in My Computer may be the D drive or E drive on hard drives with two partitions or running SETUP EXE through Start menu Run located in the root of the support CD will bring up the autorun menu New Windows Installation If you install a new operating system on your Notebook PC there will be many hardware devices without drive...

Page 6: ...tion Driver for High Definition Audio Realtek 880 Driver This installs audio drivers for your operating system in order to properly use the Notebook PC s built in sound controller All audio functions are configured through Windows and help can be located within Windows documentation or Windows help files This device is shown under Windows Device Manager Sound video and game controllers INFupdate I...

Page 7: ...s utility helps you easily upgrade your Notebook PC s BIOS through an Internet connection Norton Internet Secruity 2005 Utility Installs Norton Internet Security to provide comprehensive virus prevention threat detection and repair software for your computer It automatically detects and repairs known viruses Norton Internet Security detects viruses and other potential risks in instant messenger at...

Page 8: ...eprovideddevicedriverwillprovideenhancementsandfeaturestotheTouchPadtoincreasethefunctionality of the TouchPad For detailed information see the Software Reference in the next section To access help right click the TouchPad icon on the taskbar and select Help WinFlash Utility Requires ATK0100 Installs a BIOS update utility for Windows so that you can conveniently update your Notebook PC s BIOS with...

Page 9: ...his function is already supported in Windows XP The support CD also includes a version of this utility for other Windows versions Installation will not be possible under Windows XP Intel SpeedStep is a technology that provides adjustable processor speeds for maximum performance when connected to an external power and battery optimized performance when going mobile The processors can dynamically sw...

Page 10: ...e Manager button Hardware Devices After installing your operating system several question marks will appear under Other devices representing hardware devices that Windows cannot recognize After installing the drivers from the provided support CD Those question marks will go away 1 Click start button 2 Click My Computer icon 3 Click View system information link ...

Page 11: ...11 Software Drivers Software Drivers ...

Page 12: ...12 Software Drivers Software Drivers ...

Page 13: ... Driver Setup Display Settings for Windows XP Taskbar Menu Screens and drivers may vary depending on your model and operating system It is necessary to install the VGA driver first in order to see other setup screens in their proper sizes Before After ...

Page 14: ...ng wizard 1 On the Welcome screen click Next after reading the message 3 When setup is complete select Yes and click Finish in order to restart Windows with a higher screen resolution Windows may have already provided the highest screen resolution support for this graphics controller 2 On the LicenseAgreement screen click Yes after reading ...

Page 15: ...f you surpass the display panel s specifications After VGA driver installation display settings will be adjusted for your system Before VGA drivers are installed graphics functions are limited Windows XP does support 1024 x 768 without additional drivers for this display controller Left or Right click for shortcuts to display settings ...

Page 16: ...16 Software Drivers ...

Page 17: ...17 Software Drivers ATK0100 Driver ACPI Topics Covered ATK0100 Driver Setup Screens and drivers may vary depending on your model and operating system Before After Required driver ...

Page 18: ...o software operation is required 1 Double click Unknown device 3 Select No and click Next 6 Click Finish when setup is complete 2 Click Reinstall Driver 5 Browse to the sub folder folder names will vary under ATK0100 and click Next 7 Click Close to close the properties window 4 Select Install from and click Next ...

Page 19: ...k PC has built in speakers and microphone however external audio accessories may be used External audio connections will disable the notebook PC s relevant built in audio device mic and or speakers Required driver Screens and drivers may vary depending on your model and operating system Before After ...

Page 20: ...20 Software Drivers Audio Driver Setup Running setup will give you the following wizard 1 Click Next to begin setup 2 When setup is complete select No and click Finish in order to install other items ...

Page 21: ...21 Software Drivers INF Update Intel Topics Covered INF Update Driver Setup Screens and drivers may vary depending on your model and operating system Required driver ...

Page 22: ...ing wizard 1 On the Welcome screen click Next after confirming this is what you want to setup 3 On the Readme screen click Next after reading 2 On the License Agreement screen click Next after reading 4 Setup is now complete select No and click Finish in order to install other items ...

Page 23: ...ional access point is required to setup a wireless network for the Notebook PC to connect to Required driver on selected models Screens and drivers may vary depending on your model and operating system Note The internal WLAN varies depending on model and is not a user option You may use external WLAN PC Cards PCMCIA from various manufacturers Before After ...

Page 24: ... click Install Software 2 On the Welcome screen click Next after reading the message 3 On the Agreement screen click Next after selecting I accept 4 On the Select Components screen click Next to use the default settings 5 On the Ready screen click Install to begin the installation 6 On the Wizard Complete screen click Finish to exit the installation wizard ...

Page 25: ... On the Autorun screen click Install Software 2 On the Agreement screen click Next after selecting I accept 3 On the Setup Type screen click Next to use the default settings 4 On the Install default components screen click OK to use the default settings 5 Wait while components are installed 6 When complete click Ok to exit the installer ...

Page 26: ...e your wireless connection Double click the taskbar icon to bring up the connection status window Click Details to view available access point information Configure Make a new profile to save specific settings for use in different WLAN networks After installation you will have several options available through the icon on the task bar Green icon indicates connected yellow indicates disconnected mo...

Page 27: ...From My Network Places you can view network connections Clicking the taskbar icon will bring up window displaying available networks Wireless networks can be hidden for security purposes You can manually add wireless networks from the properties page Connection status will show the connected network name and the signal strength ...

Page 28: ...28 Software Drivers ...

Page 29: ... depending on your operating system but the contents should be the same An optional access point is required to setup a wireless network for the Notebook PC to connect to Required driver an selected models Note The internal WLAN varies depending on model and is not a user option You may use external WLAN PC Cards PCMCIA from various manufacturers ...

Page 30: ...ng wizard 1 Click Next after reading the Welcome screen 3 On the Select Program Folder screen click Next to continue or you may first change the folder 2 Click Next after reading the Information screen 4 Setup is now complete select No and click Finish in order to install other items ...

Page 31: ...ity 1 Click Next after reading the Welcome screen 3 On the Choose Destination Location screen click Next to continue or you may first change the destination folder 4 On the Select Program Folder screen click Next to continue or enter a different folder name 2 Click Next after reading the Information screen ...

Page 32: ...h Windows start You will need to make some wireless LAN settings before being able to use your wireless connection 1 Right click the ASUS WLAN icon and select Wireless Settings 2 Set the Network Name SSID to the same name as the SSID set in your wireless access point 5 Click Finish on the Setup Complete screen 6 Select to use ASUS Utilities for added features while using the wireless LAN device Ri...

Page 33: ... exit the utility 5 Check the Status page to see the Association State It should show Connected xx xx xx xx xx xx 3 Use Site Survey if you don t know the name of your access point s 4 Encryption settings must also match those set in the access point Talk with your network administrator if necessary Click Apply to save your settings ...

Page 34: ...34 Software Drivers ...

Page 35: ...35 Software Drivers LAN Topics Covered LAN Driver Setup Configuring your LAN Screens and drivers may vary depending on your model and operating system Before After Required driver ...

Page 36: ...36 Software Drivers LAN Driver Setup Running setup will give you the following wizard 1 Click Next to install files to your system 2 When setup is complete click Finish ...

Page 37: ...y Computer 2 Click View system information You cannot use spaces or symbols in the computername Intheexamplehere awarning is given when trying to use Notebook PC You can use the single word Notebook instead 3 Your computer name workgroup or domain information is shown here Click Change to view options ...

Page 38: ...b Workgroup If your network does not have a domain or you are not authorized to join a domain select Workgroup and type in an existing name or create your own by typing an unused workgroup name Administrator Name or Password not accepted You cannot login with the Administrator name and use one password then use theAdministrator name with another password to add to a domain You must login using ano...

Page 39: ... After you restart your computer you should see some contents through Entire Network 6 Clickingon My Network Places willdisplay networkswhichyouhaveinstalledprotocols for Clicking a network protocol such as MS WindowsNetwork willdisplayalltheservers available under that protocol ...

Page 40: ...40 Software Drivers ...

Page 41: ...m Topics Covered Modem Driver Setup Modem Configuration Screens and drivers may vary depending on your model and operating system Before After Connect a telephone cable from your Notebook PC to a telephone jack Required driver ...

Page 42: ...d in Network Connections to start the configuration wizard to your modem The New Connection Wizard also allows configuration for other communication devices if available such as LAN ISDN ADSL or Bluetooth Modem Driver Setup Running setup will give you the following wizard 1 On the Welcome screen click Next after reading 2 Setup is now complete click OK to exit the wizard ...

Page 43: ...nd click Next 4 Select Connect using a dialup modem and click Next Modem Configuration Cont 7 Enter the dial up number for your ISP 8 Select one of the security preferences and click Next 5 Select your modem and click Next 6 Enter any name to represent your ISP ...

Page 44: ... 9 Enter your ISP account name and password and click Next 10 Select Add a shortcut and click Finish 11 When you click on the link the connection window will show Click Dial to connect to your ISP Modem Configuration Cont ...

Page 45: ...r is installed you can read or write to various memory types See the hardware manual for information on supported memory types SD Secure Digital MMC MultiMedia Card MS Memory Stick MS Select Duo Pro Duo Pro Optional driver Before After Screens and drivers may vary depending on your model and operating system ...

Page 46: ...ou want to setup 3 When complete click Finish 2 On the Ready to install screen click Install to begin copying files to your system 4 Setup is now complete select No and click Finish in order to install other items Ricoh Media Driver Setup Running setup will give you the following wizard ...

Page 47: ...Software Utilities ...

Page 48: ...48 Software Utilities ...

Page 49: ...49 Software Utilities LiveUpdate Topics Covered LiveUpdate Setup Using LiveUpdate Screens and drivers may vary depending on your model and operating system Recommended utility ...

Page 50: ... Choose Destination Location screen click Next to continue or you may first change the destination folder 3 On the Select Program Folder screen click Next to continue or enter a different folder name 4 On the Setup Complete screen click Finish NOTE You cannot run this utility without first installing ATK0100 You will be given this message if you do not have the driver installed ...

Page 51: ...l be shown Check the items to update or select Check all Click OK to download and install the update When update is complete click OK to exit Using LiveUpdate You may be instructed to reset your BIOS It entails pressing F2 on bootup to enter BIOS setup and selecting Load Setup Defaults and then Exit Saving Changes on the Exit menu ...

Page 52: ...52 Software Utilities ...

Page 53: ...rnet Security Topics Covered Norton Internet Security Setup Internet Proxy Settings Internet Security Main Window Internet Security Features Screens and drivers may vary depending on your model and operating system Recommended utility ...

Page 54: ...4 On the installation type screen click Next to continue or you may Browse to another destination folder or change other features using Custom installation 3 On the Preinstall Scanner screen click Next to skip if you are installing on a new system otherwise you may click Start Scan if you are reinstalling on a used system 2 On the Welcome screen click Next after reading ...

Page 55: ...laced on your desktop 1 On the License Agreement screen select I accept and click Next to continue 2 On the Registration screen select your country or region and click Next to continue You may give enter your information if you do not mind being contacted by Symantec After Windows restart Norton Internet Security will startup each time with Windows This icon will be placed in the taskbar to show t...

Page 56: ...m Symantec is optional Check your Network and Internet settings if you cannot connect to the Symantec server 5 Click Finish when registration is complete 4 Your registration information will be sent to Symantec through the Internet Internet Proxy Settings Internet access within a company usually require proxy settings 3 4 1 2 ...

Page 57: ...program icon or the taskbar icon When you open the main window you will see status for each function When you have time you can review each of the functions and make adjustments to your desire Click Help for detailed descriptions and instructions for each function Click LiveUpdate to update the software and virus definitions ...

Page 58: ...ion features Norton Internet Security includes a suite of security tools that help keep your computer safe from security threats and privacy intrusions Personal Firewall ProtectsyourcomputerfromInternetattacks dangerousWebcontent portscans andothersuspiciousbehavior Spam filtering features Asemailbecomesmorepopular manyusersarereceivinganincreasingamountoftheunsolicitedcommercial email messages kn...

Page 59: ...ilities Power4 Gear Topics Covered Power4 Gear Setup Benefits of Power4 Gear Power4 Gear Interface Power4 Gear Configuration Screens and drivers may vary depending on your model and operating system Required utility ...

Page 60: ...mplete screen click Finish 2 On the Select Program Folder screen click Next to continue or enter a different folder name Power4 Gear Setup Running setup will give you the following wizard NOTE You cannot run this utility without first installing ATK0100 You will be given this message if you do not have the driver installed ...

Page 61: ...ou remove the AC adapter the Power4 Gear button will allow switching between modes as in Battery Mode When you remove or apply theAC adapter Power4 Gear will automatically shift you up or down into the proper mode segment Benefits of Power4 Gear Power4 Gear gives you control over power consumption items by allowing you to instantly shift from one power consumption scheme to another The preferences...

Page 62: ...ose settings will also be reflected in Power4 Gear and vice versa Renaming Settings You can rename the power saving levels as you like using the same method to rename files or folders in Windows In the example on the right the brightness level is decreased to 13 and the name is changed to Max Battery Time Battery Mode Press Power4 Gear button AC Mode Press Power4 Gear button Right click the taskba...

Page 63: ...aving Details Double click an item to view possible settings Some power saving items are only available under certain modes Display Panel Brightness System Standby Timer CPU Performance Display Panel Off Timer Hard Drive Off Timer ...

Page 64: ...64 Software Utilities ...

Page 65: ...C Probe Recommended Utility Topics Covered PC Probe Setup PC Probe Reference Starting PC Probe Using PC Probe Monitoring PC Probe Task Bar Icon Screens will vary depending on your operating system but the contents should be the same ...

Page 66: ... Choose Destination Location click Next to continue or enter another destination folder On the Select Program Folder screen click Next to continue or enter a different folder name On the Setup Complete screen click Finish PC Probe Setup Running setup will give you the following wizard ...

Page 67: ...be icon magnifying glass is not shown on the taskbar see below click the Windows Start button point to Programs and then ASUS Utility and then click Probe VX XX When PC Probe starts a splash screen appears allowing you to select whether to show the screen again when you open PC Probe or not To bypass this startup screen clear the Show up in next execution check box The PC Probe icon will appear on...

Page 68: ...ettings Letsyousetthresholdlevelsandpollingintervals or refresh times of the PC s temperature fan rotation and voltages History Lets you record the temperature monitoring activity by date time and target history Click the record button and select a date To view a previous recording simply choose that date Using PC Probe Monitoring ...

Page 69: ...be icon will bring up a menu to open or exit PC Probe and pause or re sume all system monitoring When the PC Probe senses a problem with your PC portions of thePCProbeiconchangestoredandaudioalerts will be heard from the speaker Hard Drives Shows the used and free space of the PC s hard disk drives and the file allocation table or file systemused Informationonotherharddrivescan beaccessedbyclickin...

Page 70: ...70 Software Utilities ...

Page 71: ...e Utilities Screens and drivers may vary depending on your model and operating system TouchPad Topics Covered TouchPad Setup Overview of the TouchPad Property Pages Frequently Asked Questions Recommended Utility ...

Page 72: ...irming the current settings 5 On the Setup Complete screen select No and click Finish 3 On the Information screen click Next after reading 1 On the Choose Setup Language screen select a language and click OK to continue Touchpad Setup Running setup will give you the following wizard 6 You can deselect the welcome screen from appearing each time you start Windows ...

Page 73: ...o hold the mouse or TouchPad button down while moving the pointer to move an icon or window around the screen for example This action is called dragging Just like clicking and double clicking you can also drag without using the button To move or drag an object equivalent to pressing and holding the left TouchPad button 1 Position the pointer over the object and tap twice down up down leaving your ...

Page 74: ... For additional convenience you can configure the top right corner tap zone of theTouchPad to produce right clicks Looking at theTouchPad surface in the picture below taps in the top right corner the red shaded area will produce right clicks but tapping anywhere else on the TouchPad the solid gray area produces left clicks An Example TouchPad There are many different actions that you can assign to...

Page 75: ...om your work By simply sliding your finger up and down the right edge of the TouchPad the contents of the current window will scroll vertically Similarly by sliding your finger left and right along the bottom edge of the TouchPad the contents will scroll horizontally You no longer need to laboriously maneuver the pointer to the small scroll bar elements you can scroll no matter where the pointer h...

Page 76: ...ludedtwofunapplicationprogramsthatdemonstratesomeofthecapabilitiesoftheTouchPad Pressure Graph and The Incomparable Mysterious Synaptics MoodPad To run these applications click once on the Synaptics TouchPad Icon in the Taskbar go to the Accessories menu and select the desired application More About the TouchPad The TouchPad detects your finger by capacitive sensing it is not sensitive to heat or ...

Page 77: ...Under Pointer Customizing Scroll Zone Sizes This page includes a small map of the TouchPad with the scroll zones shaded in red See the Scroll Zone TouchPad Map for a more detailed description You can adjust the size of each zone by dragging one of the black resize handles on the TouchPad map If you are having trouble activating the Virtual Scrolling feature you might want to try making the scroll ...

Page 78: ... zone to mean right clicks Then when you tap your finger on the upper right corner of your TouchPad it is as if you are clicking the right mouse or TouchPad button This page includes a small map of the TouchPad with the active tap zones shaded in red Next to each zone is a text box specifying the action for that zone To Customize 1 To activate the corner tap zones check the box next to the text En...

Page 79: ...re accuracy when pointing with the TouchPad such as in a drawing program Thespeedofthepointercanmakethistypeofaccuracydifficulttoobtain Toslowdownthepointermovement you can specify a slow motion key Then for slow pointer movement press and hold this key as you move the pointer Constrained Pointer Key At times you may want to restrict the pointer to move only horizontally or only vertically You can...

Page 80: ...ween the left and right buttons Customizing Button Assignments You can customize the TouchPad buttons in the same way that you customize the tap zones To Customize Each button has a text box that displays the current action for example it might say Left which means the left click or primary click action To display a list of possible actions click on the down arrow button located to the right of th...

Page 81: ...vity Use the Touch Sensitivity slider to control how much finger pressure you must apply before the TouchPad responds See Adjust the Overall Touch Sensitivity Palm Check The Palm Check slider controls the TouchPad s detection of accidental and unwanted pointing movement In addition to detecting palm contact with the TouchPad the TouchPad can ignore much of the accidental andunwantedpointermovement...

Page 82: ... TouchPad with the edge zones shaded in red See the Edge Zone TouchPad Map for a more detailed description You can adjust the size of each zone by dragging one of the black resize handles on the TouchPad map If you are having trouble activating the Edge Motion feature you might want to try making the edge zones wider Customizing Edge Motion Speed During Edge Motion the speed at which the pointer o...

Page 83: ...ication which owns that win dow Some applications smooth scroll while others wait until you release the scroll bar before updating their contents Virtual Scrolling knows about many common applications and window types and uses this knowledge to trick many windows into smooth scrolling Microsoft Word document windows for example do not normally smooth scroll but they do when you use Vir tual Scroll...

Page 84: ...for zooming in and out on a spread sheet in Mi crosoft Excel These keys can also be used for special pointer movement such as for slowing the pointer down or for constraining the pointer to move only horizontally or only vertically For ex ample you can assign the left shift key to be the Slow Motion Key Then when you press and hold the left shift key the pointer motion will be slower than usual No...

Page 85: ...85 Software Utilities WinFlash Topics Covered WinFlash Setup Using WinFlash Screens and drivers may vary depending on your model and operating system Recommended Utility ...

Page 86: ...n screen click Next to continue or you may first change the destination folder 3 On the Select Program Folder screen click Next to continue or enter a different folder name 4 On the Setup Complete screen click Finish WINFLASH Setup Runningsetupwillgiveyouthefollowingwizard Make sure you installATKACPI first or else you will get this message ...

Page 87: ...write the new BIOS to your Notebook PC You need to restart your Notebook PC and reset your BIOS See instructions on the next page You may be instructed to reset your BIOS It entails pressing F2 on bootup to enter BIOS setup and selecting Load Setup Defaults and then Exit Saving Changes on the Exit menu Do not update your BIOS for no reason You will be warned that you should only update your BIOS i...

Page 88: ...88 Software Utilities ...

Page 89: ...fringe SPECIFICATIONS AND INFORMATION CONTAINED IN THIS MANUAL ARE FURNISHED FOR INFOR MATIONALUSEONLY ANDARESUBJECTTOCHANGEATANYTIMEWITHOUTNOTICE ANDSHOULD NOT BE CONSTRUED AS A COMMITMENT BY ASUS ASUS ASSUMES NO RESPONSIBILITY OR LI ABILITY FOR ANY ERRORS OR INACCURACIES THAT MAYAPPEAR IN THIS MANUAL INCLUDING THE PRODUCTS AND SOFTWARE DESCRIBED IN IT Copyright 2005 ASUSTeK COMPUTER INC All Righ...

Page 90: ...ss usa asus com Technical support General support tel 1 502 995 0883 Online support http vip asus com eservice techserv aspx Notebook tel 1 510 739 3777 x5110 Support fax 1 502 933 8713 ASUS COMPUTER GmbH Germany Austria Company address Harkort Str 25 D 40880 Ratingen Germany General tel 49 2102 95990 Web site address www asuscom de General fax 49 2102 959911 Online contact www asuscom de sales Te...

Reviews: