Notebook PC E-Manual
29
IMPORTANT!
•
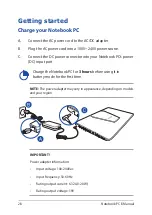
Locate the input/output rating label on your Notebook PC and
ensure that it matches the input/output rating information on your
power adapter. Some Notebook PC models may have multiple rating
output currents based on the available SKU.
•
Ensure that your Notebook PC is connected to the power adapter
before turning it on for the first time. We strongly recommend that
you use a grounded wall socket while using your Notebook PC on
power adapter mode.
•
The socket outlet must be easily accessible and near your Notebook
PC.
•
To disconnect your Notebook PC from its main power supply, unplug
your Notebook PC from the power socket.
WARNING!
Read the following precautions for your Notebook PC’s battery:
•
Only ASUS-authorized technicians should remove the battery inside
the device (for non-removable battery only).
•
The battery used in this device may present a risk of fire or chemical
burn if removed or disassembled.
•
Follow the warning labels for your personal safety.
•
Risk of explosion if battery is replaced by an incorrect type.
•
Do not dispose of in fire.
•
Never attempt to short-circuit your Notebook PC’s battery.
•
Never attempt to disassemble and reassemble the battery
(for non-removable battery only).
•
Discontinue usage if leakage is found.
•
The battery and its components must be recycled or disposed of
properly.
•
Keep the battery and other small components away from children.
Summary of Contents for ROG GL752VW
Page 1: ...E Manual E11167 Revised Edition V2 December 2015 ...
Page 13: ...Notebook PC E Manual 13 Chapter 1 Hardware Setup ...
Page 26: ...26 Notebook PC E Manual ...
Page 27: ...Notebook PC E Manual 27 Chapter 2 Using your Notebook PC ...
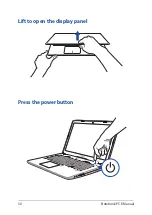
Page 30: ...30 Notebook PC E Manual Lift to open the display panel Press the power button ...
Page 42: ...42 Notebook PC E Manual ...
Page 43: ...Notebook PC E Manual 43 Chapter 3 Working with Windows 10 ...
Page 64: ...64 Notebook PC E Manual ...
Page 65: ...Notebook PC E Manual 65 Chapter 4 Power On Self Test POST ...
Page 80: ...80 Notebook PC E Manual ...
Page 81: ...Notebook PC E Manual 81 Chapter 5 Upgrading your Notebook PC ...
Page 84: ...84 Notebook PC E Manual C Remove the screws securing the HDD bay to the compartment ...
Page 98: ...98 Notebook PC E Manual ...
Page 99: ...Notebook PC E Manual 99 Tips and FAQs ...
Page 106: ...106 Notebook PC E Manual ...
Page 107: ...Notebook PC E Manual 107 Appendices ...
Page 125: ...Notebook PC E Manual 125 German Greek Italian Portuguese Spanish Swedish ...
Page 130: ...130 Notebook PC E Manual ...

