background image

2-8

ASUS P7H55-M

2.2.5 

Submenu items

A solid triangle before each item on any menu screen means that the item has a submenu. To 

display the submenu, select the item and press 

<Enter>

.

2.2.6 

Configuration fields

These fields show the values for the menu items. If an item is user- configurable, you can 

change the value of the field opposite the item. You cannot select an item that is not user-

configurable.A configurable field is enclosed in brackets, and is highlighted when selected. To 

change the value of a field, select it then press 

<Enter> 

to display a list of options. Refer to 

2.2.7 Pop-up window

.

2.2.7 

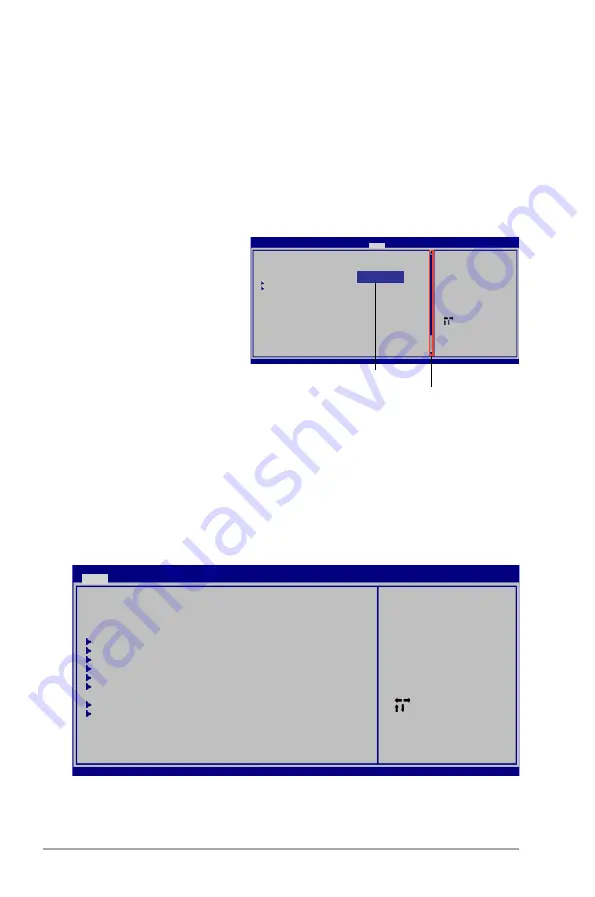
Pop-up window

Select a menu item then press 

<Enter>

 to display a pop-up 

window with the configuration 

options for that item.

2.2.8 

Scroll bar

A scroll bar appears on the right 

side of a menu screen when there 

are items that do not fit on the 

screen. Press the 

<Up> / <Down>


arrow keys or 

<Page Up> /<Page Down>

 keys to display the other items on the screen.

2.2.9 

General help

At the top right corner of the menu screen is a brief description of the selected item.

   Select Screen

    Select Item

+-   Change Field

Tab   Select Field

F1   General Help

F10   Save and Exit

ESC   Exit

v02.61 (C)Copyright 1985-2009, American, American Megatrends, Inc.

BIOS SETUP UTILITY

Main    Ai Tweaker    Advanced    Power    Boot    Tools    Exit

Suspend Mode 


[Auto]

ACPI 2.0 Support 


[Disabled] 

ACPI APIC support 


[Enabled] 

 APM Configuration

 Hardware Monitor

Use [ENTER], [TAB] or 

[SHIFT-TAB] to select 

a field.

Use [+] or [-] to 

configure system 

Time.

  Options

Disabled

Enabled

Pop-up window

Scroll bar

2.3 

Main menu

When you enter the BIOS Setup program, the 

Main

 menu screen appears, giving you an 

overview of the basic system information.

v02.61 (C)Copyright 1985-2009, American Megatrends, Inc.

   Select Screen

    Select Item

+-   Change Field

Tab   Select Field

F1   General Help

F10   Save and Exit

ESC   Exit

BIOS SETUP UTILITY

Main

    Ai Tweaker    Advanced    Power    Boot    Tools    Exit

System Time


[

12

:56:38] 

System Date 

[Tue 01/01/2002]

Language 

[English]

  SATA1       

:[Not Detected]

  SATA2  

:[Not Detected]

  SATA3   

:[Not Detected]

  SATA4  

:[Not Detected]

  SATA5   

:[Not Detected]

  SATA6  

:[Not Detected]

  Storage Configuration

  System Information

Use [ENTER], [TAB] or 

[SHIFT-TAB] to select 

a field.

Use [+] or [-] to 

configure system time.

v02.61 (C)Copyright 1985-2009, American Megatrends, Inc.

Summary of Contents for P7H55-M

Page 1: ...Motherboard P7H55 M ...

Page 2: ...planation and to the owners benefit without intent to infringe Offer to Provide Source Code of Certain Software This product may contain copyrighted software that is licensed under the General Public License GPL and under the Lesser General Public License Version LGPL The GPL and LGPL licensed code in this product is distributed without any warranty Copies of these licenses are included in this pr...

Page 3: ... Layout contents 1 7 1 6 Central Processing Unit CPU 1 8 1 6 1 Installing the CPU 1 8 1 6 2 Installing the CPU heatsink and fan 1 11 1 6 3 Uninstalling the CPU heatsink and fan 1 12 1 7 System memory 1 13 1 7 1 Overview 1 13 1 7 2 Memory configurations 1 14 1 7 3 Installing a DIMM 1 18 1 7 4 Removing a DIMM 1 18 1 8 Expansion slots 1 19 1 8 1 Installing an expansion card 1 19 1 8 2 Configuring an ...

Page 4: ...2 2 4 Menu items 2 7 2 2 5 Submenu items 2 8 2 2 6 Configuration fields 2 8 2 2 7 Pop up window 2 8 2 2 8 Scroll bar 2 8 2 2 9 General help 2 8 2 3 Main menu 2 8 2 3 1 System Time 2 9 2 3 2 System Date 2 9 2 3 3 Language 2 9 2 3 4 SATA1 6 2 9 2 3 5 Storage Configuration 2 10 2 3 6 System Information 2 10 2 4 Ai Tweaker menu 2 11 2 4 1 Ai Overclock Tuner 2 11 2 4 2 CPU Ratio Setting 2 12 2 4 3 Inte...

Page 5: ...CPU Configuration 2 17 2 5 2 Uncore Configuration 2 19 2 5 3 Onboard Devices Configuration 2 19 2 5 4 USB Configuration 2 20 2 5 5 PCIPnP 2 20 2 5 6 Intel VT d 2 20 2 6 Power menu 2 21 2 6 1 Suspend Mode 2 21 2 6 2 ACPI 2 0 Support 2 21 2 6 3 ACPI APIC Support 2 21 2 6 4 APM Configuration 2 21 2 6 5 Hardware Monitor 2 22 2 6 6 Anti Surge Support 2 23 2 7 Boot menu 2 24 2 7 1 Boot Device Priority 2...

Page 6: ...t from that to which the receiver is connected Consult the dealer or an experienced radio TV technician for help The use of shielded cables for connection of the monitor to the graphics card is required to assure compliance with FCC regulations Changes or modifications to this unit not expressly approved by the party responsible for compliance could void the user s authority to operate this equipm...

Page 7: ...peration safety Before installing the motherboard and adding devices on it carefully read all the manuals that came with the package Before using the product ensure that all cables are correctly connected and the power cables are not damaged If you detect any damage contact your dealer immediately To avoid short circuits keep paper clips screws and staples away from connectors slots sockets and ci...

Page 8: ...uct and software updates 1 ASUS websites The ASUS website provides updated information on ASUS hardware and software products Refer to the ASUS contact information 2 Optional documentation Your product package may include optional documentation such as warranty flyers that may have been added by your dealer These documents are not part of the standard package Typography Bold text Indicates a menu ...

Page 9: ...s subject to the physical characteristics of individual CPUs Some hyper DIMMs only support one DIMM per channel Refer to www asus com for the latest Memory QVL Qualified Vendors List When you install a total memory of 4GB or more Windows 32 bit operating system may only recognize less than 3GB We recommend a maximum of 3GB system memory if you are using a Windows 32 bit operating system Expansion ...

Page 10: ... exclusive overclocking features Precision Tweaker 2 vCore Adjustable CPU voltage at 0 00625V increment vIMC Adjustable IMC voltage at 0 00625V increment vDRAM Bus Adjustable DRAM voltage at 0 015V increment vPCH Adjustable PCH voltage at 0 00625V increment vCPU_PLL Adjustable CPU_PLL voltage at 0 05V increment iGPU Adjustable iGPU voltage at 0 00625V increment SFS Stepless Frequency Selection Int...

Page 11: ...or 1 x System panel connector BIOS 64 Mb Flash ROM SPI AMI BIOS PnP DMI 2 0 WfM 2 0 SM BIOS 2 6 ACPI 2 0a Multi language BIOS ASUS EZ Flash 2 ASUS CrashFree BIOS 3 Manageability WfM 2 0 DMI 2 0 WOL by PME WOR by PME PXE Accessories 1 x Ultra DMA 133 100 cable 2 x Serial ATA 3 0Gb s cables 1 x I O shield 1 x User Manual Support DVD Drivers ASUS Utilities ASUS Update Anti virus software OEM version ...

Page 12: ...xii ...

Page 13: ...0 lanes providing great graphics performance Intel Lynnfield processor is one of the most powerful and energy efficient CPU in the world Moreover Intel and Clarkdale processor integrated Graphics Procession Unit GPU which goes with Intel H55 chipset with VGA out can bring you to the whole new experience of the next generation VGA performance It also provides separated 3D 2D and Video Engines to ex...

Page 14: ...or double speed and bandwidth which enhances system performance HDMI support HDMI High Definition Multimedia Interface is a set of digital video standards that deliver multi channel digital audio and uncompressed digital video for full HD 1080p visuals through a single cable Supporting HDCP copy protection such as HD DVD and Blu ray discs HDMI provides you with the highest quality home theater exp...

Page 15: ...y that detects the current system loadings and adjusts the power consumption in real time ASUS Express Gate Express Gate is an ASUS exclusive OS which lets you instantly access the Internet and key applications before entering the Windows OS ASUS Express Gate supports installation on SATA HDDs USB HDDs and flash drives with at least 1 2GB free disk space When installing it on USB HDDs or flash dri...

Page 16: ...pdate the BIOS without using an OS based utility ASUS AI NET2 ASUS AI NET2 remotely detects the cable connection immediately after turning on the system and any faulty cable connections are reported back up to 100 meters at 1 meter accuracy C P R CPU Parameter Recall The BIOS C P R feature automatically restores the CPU default settings when the system hangs due to overclocking failure C P R elimi...

Page 17: ... component place it on a grounded antistatic pad or in the bag that came with the component Before you install or remove any component ensure that the ATX power supply is switched off or the power cord is detached from the power supply Failure to do so may cause severe damage to the motherboard peripherals or components Onboard LED The motherboard comes with a standby power LED that lights up to i...

Page 18: ... and damage motherboard components 1 5 1 Placement direction When installing the motherboard ensure that you place it into the chassis in the correct orientation The edge with external ports goes to the rear part of the chassis as indicated in the image below 1 5 2 Screw holes Place six screws into the holes indicated by circles to secure the motherboard to the chassis Do not overtighten the screw...

Page 19: ...COM1 22 4cm 8 8in 3 2 1 5 4 1 6 2 7 8 9 11 10 13 12 14 1 5 4 Layout contents Connectors Jumpers Slots LED Page Connectors Jumpers Slots LED Page 1 CPU and chassis fan connectors 4 pin CPU_FAN 3 pin CHA_FAN1 1 25 8 System panel connector 20 8 pin PANEL 1 27 2 ATX power connectors 24 pin EATXPWR 8 pin ATX12V 1 24 9 USB connectors 10 1 pin USB78 USB910 USB1112 1 26 3 Serial port connector 10 1 pin CO...

Page 20: ...ge is shipment transit related Keep the cap after installing the motherboard ASUS will process Return Merchandise Authorization RMA requests only if the motherboard comes with the cap on the LGA1156 socket The product warranty does not cover damage to the socket contacts resulting from incorrect CPU installation removal or misplacement loss incorrect removal of the PnP cap 1 6 1 Installing the CPU...

Page 21: ...he tab only The CPU fits in only one correct orientation DO NOT force the CPU into the socket to prevent bending the connectors on the socket and damaging the CPU Gold triangle mark Alignment keys CPU notches 5 Position the CPU over the socket ensuring that the gold triangle is on the bottom left corner of the socket and then fit the socket alignment keys into the CPU notches PnP cap Cap tab ...

Page 22: ... tab 6 Apply some Thermal Interface Material to the exposed area of the CPU that the heatsink will be in contact with ensuring that it is spread in an even thin layer Some heatsinks come with pre applied thermal paste If so skip this step The Thermal Interface Material is toxic and inedible DO NOT eat it If it gets into your eyes or touches your skin wash it off immediately and seek professional m...

Page 23: ...nsion Ensure that you have installed the motherboard to the chassis before you install the CPU fan and heatsink assembly The type of CPU heatsink and fan assembly may differ but the installation steps and functions should remain the same The illustration above is for reference only To install the CPU heatsink and fan 1 Place the heatsink on top of the installed CPU ensuring that the four fasteners...

Page 24: ...onnector 1 6 3 Uninstalling the CPU heatsink and fan To uninstall the CPU heatsink and fan 1 Disconnect the CPU fan cable from the connector on the motherboard 2 Rotate each fastener counterclockwise 3 Pull up two fasteners at a time in a diagonal sequence to disengage the heatsink and fan assembly from the motherboard A A B B A A B B CPU_FAN CPU FAN PWM CPU FAN IN CPU FAN PWR GND P7H55 M CPU fan ...

Page 25: ...installation on a DDR2 DIMM socket DDR3 modules are developed for better performance with less power consumption The figure illustrates the location of the DDR3 DIMM sockets Channel Sockets Channel A DIMM_A1 and DIMM_A2 Channel B DIMM_B1 and DIMM_B2 4 Carefully remove the heatsink and fan assembly from the motherboard 5 Rotate each fastener clockwise to ensure correct orientation when reinstalling...

Page 26: ...ended to protect the CPU According to Intel CPU spec CPUs with a core frequency of 2 66GHz support the maximum DIMM frequency of up to DDR3 1333 To use DIMMs of a higher frequency with a 2 66GHz CPU enable the DRAM O C Profile feature in BIOS Refer to section 2 4 1 Ai Overclock Tuner for details Always install DIMMs with the same CAS latency For optimum compatibility we recommend that you obtain m...

Page 27: ...C8 XMP 4096MB Kit of 2 DS 8 8 8 24 1 65V G SKILL F3 16000CL9D 4GBTD XMP 4096MB Kit of 2 DS 9 9 9 27 1 65V KINGSTON KHX2000C8D3T1K3 3GX XMP 3072MB kit of 3 SS 1 65V KINGSTON KHX2000C9D3T1K3 3GX XMP 3072MB kit of 3 SS 1 65V KINGSTON KHX2000C8D3T1K3 6GX XMP 6144MB Kit of 3 DS 1 65V OCZ OCZ3P20002GK EPP 2048MB Kit of 2 SS 9 9 9 30 1 85V OCZ OCZ3P2000EB2GK 2048MB Kit of 2 SS 9 8 8 30 1 8V OCZ OCZ3P2000...

Page 28: ...DS 7 7 7 20 1 75 1 85V CORSAIR TR3X3G1600C8D XMP 3072MB Kit of 3 SS 8 8 8 24 1 65V CORSAIR CMX4GX3M2A1600C9 XMP 4096MB Kit of 2 DS 9 9 9 24 1 65V CORSAIR TR3X6G1600C8D G XMP 6144MB Kit of 3 DS 8 8 8 24 1 65V CORSAIR TR3X6G1600C8D G XMP 6144MB Kit of 3 DS 8 8 8 24 1 65V Crucial BL12864BA1608 8SFB XMP 3072MB Kit of 3 SS 8 8 8 24 1 8V Crucial BL12864BE2009 8SFB3 EPP 3072MB Kit of 3 SS 9 9 9 28 2 0V C...

Page 29: ...333D3N9 2G 2048MB DS Qimonda IDSH1G 03A1F1C 13H 1 5V KINGSTON KVR1333D3N9 4G 4096MB DS Hynix H5TQ2G83AFR Micron MT8JTF12864AZ 1G4F1 1024MB SS Micron 9FF22D9KPT 9 Micron MT16JTF25664AZ 1G4F1 2048MB DS Micron 9KF27D9KPT 9 OCZ OCZ3P13332GK 2048MB Kit of 2 SS 7 7 7 20 1 8V OCZ OCZ3X13334GK XMP 4096MB Kit of 2 DS 7 7 7 20 1 75V PSC AL7F8G73D DG1 1024MB SS PSC A3P1GF3DGF928M9B05 8 8 8 24 1 5V PSC AL8F8G...

Page 30: ...DIMM 1 Unlock a DIMM socket by pressing the retaining clip outward 2 Align a DIMM on the socket such that the notch on the DIMM matches the DIMM slot key on the socket Support the DIMM lightly with your fingers when pressing the retaining clip The DIMM might get damaged when it flips out with extra force Ensure to unplug the power supply before adding or removing DIMMs or other system components F...

Page 31: ...the screw you removed earlier 6 Replace the system cover 1 8 2 Configuring an expansion card After installing the expansion card configure it by adjusting the software settings 1 Turn on the system and change the necessary BIOS settings if any See Chapter 2 for information on BIOS setup 2 Assign an IRQ to the card 3 Install the software drivers for the expansion card When using PCI cards on shared...

Page 32: ... do not need to clear the RTC when the system hangs due to overclocking For system failure due to overclocking use the CPU Parameter Recall C P R feature Shut down and reboot the system then the BIOS automatically resets parameter settings to default values Due to the chipset limitation AC power off is required before you use the C P R function You must turn off and on the power supply or unplug a...

Page 33: ...pe CD DVD player or other audio sources 4 Line Out port lime This port connects to a headphone or a speaker In the 4 6 and 8 channel configurations the function of this port becomes Front Speaker Out 5 Microphone port pink This port connects to a microphone Refer to the audio configuration table below for the function of the audio ports in a 2 4 6 or 8 channel configuration Audio 2 4 6 or 8 channe...

Page 34: ...ctor 10 1 pin AAFP This connector is for a chassis mounted front panel audio I O module that supports either HD Audio or legacy AC 97 audio standard Connect one end of the front panel audio I O module cable to this connector We recommend that you connect a high definition front panel audio module to this connector to avail of the motherboard s high definition audio capability If you want to connec...

Page 35: ...nector is removed to match the covered hole on the Ultra DMA cable connector This prevents incorrect insertion when you connect the IDE cable Use the 80 conductor IDE cable for Ultra DMA 133 100 IDE devices If any device jumper is set as Cable Select ensure that all other device jumpers have the same setting 3 LPT connector 26 1 pin LPT The LPT Line Printing Terminal connector supports devices suc...

Page 36: ...or PSCalculator aspx SLanguage en us for details 4 ATX power connectors 24 pin EATXPWR 8 pin ATX12V These connectors are for ATX power supply plugs The power supply plugs are designed to fit these connectors in only one orientation Find the proper orientation and push down firmly until the connectors completely fit 5 Serial port connector 10 1 pin COM1 This connector is for a serial COM port Conne...

Page 37: ...w inside the system may damage the motherboard components These are not jumpers Do not place jumper caps on the fan connectors 6 CPU and chassis fan connectors 4 pin CPU_FAN 3 pin CHA_FAN1 Connect the fan cables to the fan connectors on the motherboard ensuring that the black wire of each cable matches the ground pin of the connector Only the 4 pin CPU fan supports the ASUS Q FAN feature The CPU_F...

Page 38: ...s These USB connectors comply with USB 2 0 specification that supports up to 480 Mbps connection speed Never connect a 1394 cable to the USB connectors Doing so will damage the motherboard The USB module cable is purchased separately SATA1 GND RSATA_TXP1 RSATA_TXN1 GND RSATA_RXP1 RSATA_RXN1 GND SATA2 GND RSATA_TXP2 RSATA_TXN2 GND RSATA_RXP2 RSATA_RXN2 GND SATA3 GND RSATA_RXN3 RSATA_RXP3 GND RSATA_...

Page 39: ...ty LED cable to this connector The IDE LED lights up or flashes when data is read from or written to the HDD System warning speaker 4 pin SPEAKER This 4 pin connector is for the chassis mounted system warning speaker The speaker allows you to hear system beeps and warnings ATX power button soft off button 2 pin PWRSW This 2 pin connector is for the system power button Reset button 2 pin RESET This...

Page 40: ...ckage contains the drivers software applications and utilities that you can install to avail all motherboard features If Autorun is NOT enabled in your computer browse the contents of the Support DVD to locate the file ASSETUP EXE from the BIN folder Double click the ASSETUP EXE to run the DVD The following screen is for reference only The contents of the Support DVD are subject to change at any t...

Page 41: ...pdown list select any of the updating process Updating from the Internet a Select Update BIOS from the Internet then click Next b Select the ASUS FTP site nearest you to avoid network traffic or click Auto Select then click Next c From the FTP site select the BIOS version that you wish to download then click Next 2 1 1 ASUS Update utility The ASUS Update is a utility that allows you to manage save...

Page 42: ... 2 performs the BIOS update process and automatically reboots the system when done The ASUS Update utility is capable of updating itself through the Internet Always update the utility to avail all its features Updating from a BIOS file a Select Update BIOS from a file then click Next b Locate the BIOS file from the Open window then click Open 3 Follow the onscreen instructions to complete the upda...

Page 43: ...pported 3 The utility automatically checks the devices for the BIOS file When found the utility reads the BIOS file and starts flashing the corrupted BIOS file 4 Turn off the system after the utility completes the updating process and turn on again DO NOT shut down or reset the system while updating the BIOS Doing so can cause system boot failure Ensure to load the BIOS default settings to ensure ...

Page 44: ...by pressing the item number 4 At the FreeDOS prompt type d and press Enter to switch the disk from Drive C optical drive to Drive D USB flash drive Please select boot device and to move selection ENTER to select boot device ESC to boot using defaults SATA XXXXXXXXXXXXXXXX CDROM XXXXXXXXXXXXXXX USB XXXXXXXXXXXXXXXXX Network XXXXXXXXXXXXX 2 The BIOS Updater backup screen appears indicating the BIOS ...

Page 45: ...USTek BIOS Updater for DOS V1 00b 09 06 22 Current ROM Update ROM A Note Enter Select or Load Tab Switch V Drive Info Up Down Home End Move B Backup Esc Exit P7H55 M ROM 2097152 2009 12 28 17 30 48 PATH A BOARD P7H55 M VER 0208 DATE 1 15 2010 BOARD Unknown VER Unknown DATE Unknown D bupdater pc g 2 The BIOS Updater screen appears as below 3 Press Tab to switch between screen fields and use the Up ...

Page 46: ...t the system while updating the BIOS to prevent system boot failure For BIOS Updater version 1 04 or later the utility automatically exits to the DOS prompt after updating BIOS Ensure to load the BIOS default settings to ensure system compatibility and stability Select the Load Setup Defaults item under the Exit menu Refer to section 2 9 Exit menu for details Ensure to connect all SATA hard disk d...

Page 47: ... Megatrends Inc Use ENTER TAB or SHIFT TAB to select a field Use or to configure system Time Navigation keys General help Menu bar Submenu items Configuration fields Menu items BIOS SETUP UTILITY Main Ai Tweaker Advanced Power Boot Tools Exit System Time 12 56 38 System Date Tue 01 01 2002 Language English SATA1 Not Detected SATA2 Not Detected SATA3 Not Detected SATA4 Not Detected SATA5 Not Detect...

Page 48: ...s a brief description of the selected item Select Screen Select Item Change Field Tab Select Field F1 General Help F10 Save and Exit ESC Exit v02 61 C Copyright 1985 2009 American AmericanMegatrends Inc BIOS SETUP UTILITY Main Ai Tweaker Advanced Power Boot Tools Exit Suspend Mode Auto ACPI 2 0 Support Disabled ACPI APIC support Enabled APM Configuration Hardware Monitor Use ENTER TAB or SHIFT TAB...

Page 49: ...abled Enabled This item only appears in the SATA1 4 menus 2 3 1 System Time xx xx xx Allows you to set the system time 2 3 2 System Date Day xx xx xxxx Allows you to set the system date 2 3 3 Language English Allows you to choose the BIOS language version from the options Configuration options Chinese Trad Chinese Simp Japanese French Deutsch English 2 3 4 SATA1 6 While entering Setup the BIOS aut...

Page 50: ...al ATA connectors supported by the Southbridge chip Configuration options IDE AHCI If you want to use the Serial ATA hard disk drives as Parallel ATA physical storage devices keep the default setting IDE If you want the Serial ATA hard disk drives to use the Advanced Host Controller Interface AHCI set this item to AHCI The AHCI allows the onboard storage driver to enable advanced Serial ATA featur...

Page 51: ...AM Timing Control CPU Differential Amplitude Auto CPU Clock Skew Auto CPU Voltage Mode Offset Offset Voltage Auto IMC Voltage Auto DRAM Voltage Auto CPU PLL Voltage Auto PCH Voltage Auto v02 61 C Copyright 1985 2009 American Megatrends Inc DRAM DATA REF Voltage on CHA Auto DRAM DATA REF Voltage on CHB Auto Auto PSI Enabled Load Line Calibration Auto PCIE Spread Spectrum Disabled PCI PCIe CLK Statu...

Page 52: ...djust the value The valid value ranges differently according to your CPU model 2 4 3 Intel R SpeedStep TM Tech Disabled When set to Disabled the CPU runs at its default speed When set to Enabled the CPU speed is controlled by the operating system Configuration options Disabled Enabled 2 4 4 Xtreme Phase Full Power Mode Auto Auto Automatic configuration Enabled Enables Full Power Mode to ensure the...

Page 53: ...y may cause the system to become unstable If this happens revert to the default setting 2 4 8 QPI Frequency Auto Allows you to set the QPI operating frequency Configuration options Auto 4270MHz 4800MHz 2 4 9 DRAM Timing Control Auto The items in this menu allow you to set the DRAM timing control features The configuration options for some of the following items vary depending on the DIMMs you inst...

Page 54: ...vance 15 Clock Advance 1 Clock Normal Delay 1 Clock Delay 15 Clock DRAM Round Trip Latency on CHB Auto Auto Advance 15 Clock Advance 1 Clock Normal Delay 1 Clock Delay 15 Clock 3rd Information 5 5 16 10 10 10 7 6 4 7 7 4 The values vary depending on your settings of the following sub items DRAM WRITE to READ Delay DD Auto Configuration options Auto 1 DRAM Clock 8 DRAM Clock DRAM WRITE to READ Dela...

Page 55: ... You can also use the and keys to adjust the value To restore the default setting type auto using the keyboard and press the Enter key 2 4 12 CPU Voltage Mode Offset Allows you to set the CPU Vcore over voltage Different sub items appear according to the VCore Over Voltage item setting Configuration options Offset Manual Offset Voltage Auto This item appears only when you set the CPU Voltage Mode ...

Page 56: ... system to work stably under high voltage settings 2 4 17 DRAM DATA REF Voltage on CHA B Auto Allows you to set the DRAM DATA Reference Voltage on Channel A B The values range from 0 395x to 0 630x with a 0 005x interval Different ratio might enhance DRAM overclocking ability 2 4 18 Auto PSI Enabled Enables or disables the Auto PSI mode Configuration options Disabled Enabled 2 4 19 Load Line Calib...

Page 57: ...een S e l e c t I t e m Enter Go to Sub Screen F1 General Help F10 Save and Exit ESC Exit CPU Configuration Uncore Configuration Onboard Devices Configuration USB Configuration PCIPnP Intel VT d Disabled CPU Ratio Setting Auto Allows you to adjust the ratio between CPU Core Clock and BCLK Frequency Use the and keys to adjust the value The valid value ranges differently according to your CPU model ...

Page 58: ...on Enabled Enabled Enables the overheated CPU to throttle its clock speed to cool down Disabled Disables this function Execute Disable Bit Capability Enabled Enabled Enables the No Execution Page Protection Technology Disabled Forces the XD feature flag to always return to zero 0 Active Processor Cores All All Activate all CPU cores in the processor package 1 Activate only 1 CPU core in the proces...

Page 59: ...dio Realtek Enabled Enabled Enables the Realtek LAN controller Disabled Disables the controller LAN Boot ROM Disabled This item appears only when you set the previous item to Enabled Enabled Enables the Realtek Gigabit LAN Boot ROM Disabled Disables the LAN Boot ROM VT6415 IDE Controller Enabled Enables or disables the VT6415 IDE Controller Configuration options Enabled Disabled Serial Port1 Addre...

Page 60: ...operating systems without an EHCI hand off feature 2 5 5 PCIPnP The PCIPnP menu items allow you to change the advanced settings for PCI PnP devices Plug And Play O S No When set to No BIOS configures all the devices in the system When set to Yes and if you install a Plug and Play operating system the operating system configures the Plug and Play devices not required for boot Configuration options ...

Page 61: ...to S1 POS Power On Suspend S3 only Sets the APCI suspend mode to S3 STR Suspend To RAM Auto The system automatically configures the ACPI suspend mode 2 6 2 ACPI 2 0 Support Enabled Disabled When set to Disabled the system will not add additional tables as per ACPI 2 0 specifications Enabled When set to Enabled the system adds additional tables as per ACPI 2 0 specifications 2 6 3 ACPI APIC Support...

Page 62: ...VSB lead Power On By PCIE Devices Disabled Allows you to enable or disable the PCIE devices to generate a wake event Disabled Disables the PCIE devices to generate a wake event Enabled Enables the PCIE devices to generate a wake event Power On By PS 2 Keyboard Disabled Allows you to use specific keys on the keyboard to turn on the system This feature requires an ATX power supply that provides at l...

Page 63: ...e Configuration options 40ºC 104ºF 50ºC 122ºF 70ºC 158ºF 60ºC 140ºF 70ºC 158ºF 80ºC 176ºF 90ºC 194ºF CPU Fan Max Duty Cycle 100 Sets the maximum CPU fan duty cycle When the CPU temperature reaches the upper limit the CPU fan will operate at the maximum duty cycle Configuration options 20 30 40 50 60 70 80 90 100 CPU Lower Temperature 40ºC 104ºF Displays the lower limit of the CPU temperature CPU F...

Page 64: ... device items that appears on the screen depends on the number of devices installed in the system Configuration options Removable Dev Hard Drive ATAPI CD ROM Disabled To select the boot device during system startup press F8 when ASUS Logo appears To access Windows OS in Safe Mode do any of the following Press F5 when ASUS Logo appears Press F8 after POST Set this item to Enabled to use the ASUS My...

Page 65: ...firm the password when prompted The message Password Installed appears after you successfully set your password To change the supervisor password follow the same steps as in setting a supervisor password To clear the supervisor password select the Change Supervisor Password then press Enter twice The message Password uninstalled appears If you forget your BIOS password you can clear it by erasing ...

Page 66: ...ration options Setup Always 2 8 Tools menu The Tools menu items allow you to configure options for special functions Select an item then press Enter to display the submenu ASUS O C Profile AI NET 2 ASUS EZ Flash 2 Express Gate Auto Enter OS Timer 10 Seconds Reset User Data No BIOS SETUP UTILITY Main Ai Tweaker Advanced Power Boot Tools Exit Tools Settings 2 8 1 ASUS O C Profile This item allows yo...

Page 67: ...nvironment that provides quick access to the Internet browser and Skype Configuration options Disabled Enabled Auto Enter OS Timer 10 Seconds Sets countdown duration that the system waits at the Express Gate s first screen before starting Windows or other installed OS Choose Prompt User to stay at the first screen of Express Gate for user action Configuration options Prompt User 1 second 3 seconds...

Page 68: ... PC is turned off When you select this option a confirmation window appears Select Ok to save changes and exit Exit Discard Changes Select this option only if you do not want to save the changes that you made to the Setup program If you made changes to fields other than System Date System Time and Password the BIOS asks for a confirmation before exiting Discard Changes This option allows you to di...

Reviews: