background image

8

8

8

8

8

Q u i c k   i n s t a l l a t i o n   g u i d e

Q u i c k   i n s t a l l a t i o n   g u i d e

Q u i c k   i n s t a l l a t i o n   g u i d e

Q u i c k   i n s t a l l a t i o n   g u i d e

Q u i c k   i n s t a l l a t i o n   g u i d e

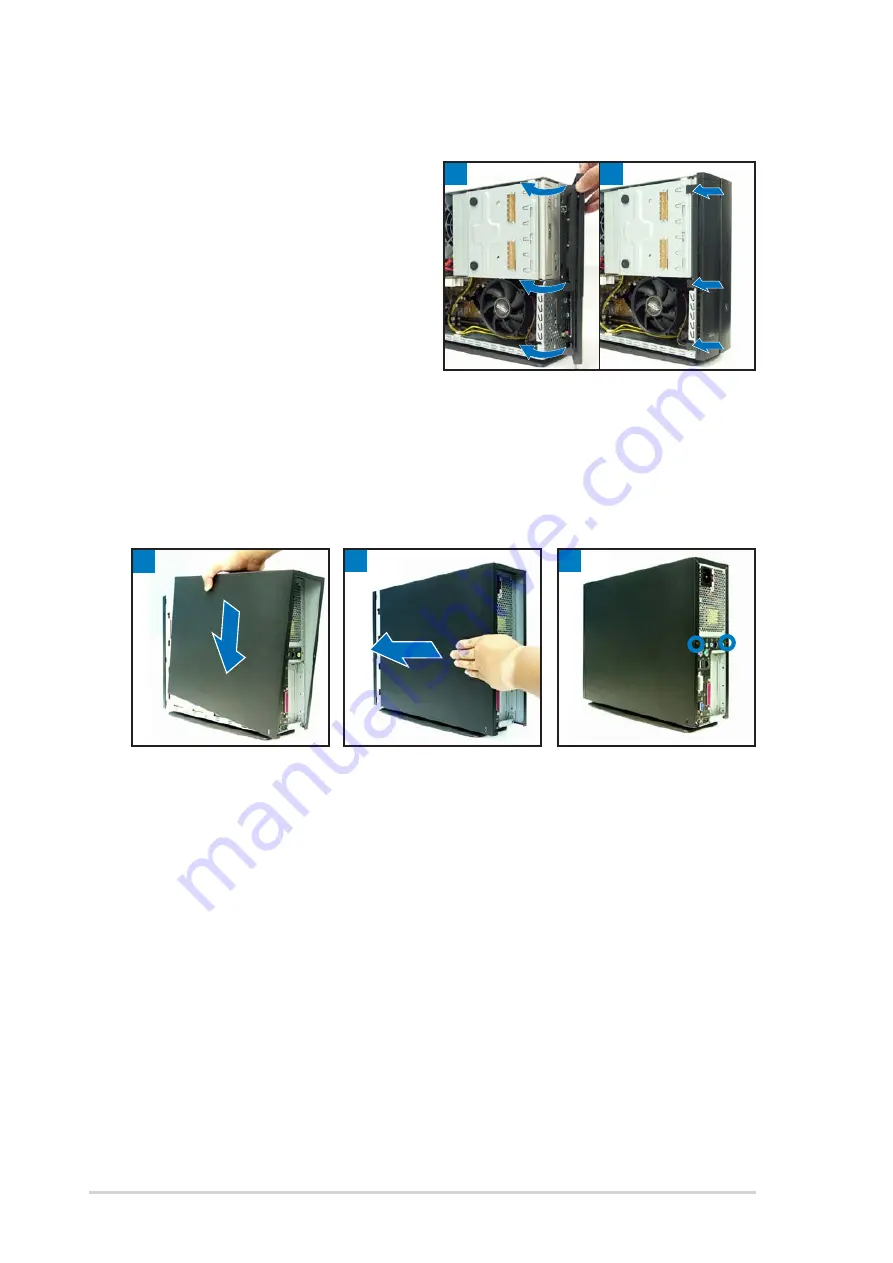
Reinstalling the front panel cover

1.

Insert the front panel cover
tabs to the holes at the right
side of the chassis, then close.

2.

Insert the front panel cover
hooks to the chassis tabs until
the front panel cover fits in
place.

1

1

1

1

1

2

2

2

2

2

Reinstalling the cover

1.

Install the cover to the chassis. Make sure the cover tabs fit the chassis rails.

2.

Push the cover toward the front panel until it fits in place.

3.

Secure the cover with two screws.

1

1

1

1

1

2

2

2

2

2

3

3

3

3

3

Summary of Contents for P1-PH1

Page 1: ...Pundit P1 PH1 Barebone System Quick Installation Guide E2347 E2347 E2347 E2347 E2347 ...

Page 2: ...ophone port Microphone port Microphone port Microphone port Microphone port PCI slot metal brackets PCI slot metal brackets PCI slot metal brackets PCI slot metal brackets PCI slot metal brackets Power supply air vents Power supply air vents Power supply air vents Power supply air vents Power supply air vents Cover screw Cover screw Cover screw Cover screw Cover screw TV Out port TV Out port TV Ou...

Page 3: ...nit 4 PCI card riser bracket connected to the motherboard PCI slot 5 ASUS motherboard 6 DIMM sockets 7 LGA775 socket under the CPU fan and heatsink assembly 8 CPU fan and heatsink assembly 1 1 1 1 1 2 2 2 2 2 3 3 3 3 3 4 4 4 4 4 5 5 5 5 5 6 6 6 6 6 8 8 8 8 8 Removing the cover 1 Remove the cover screws Keep the screws for later use 2 Pull the cover slightly toward the rear panel 3 Lift the cover t...

Page 4: ...t panel cover hooks outward 2 Carefully remove the front panel cover then set it aside 1 1 1 1 1 2 2 2 2 2 1 Lay the system on its side then locate and remove three storage drive assembly screws Removing the storage drive assembly 2 Lift the storage drive assembly then set aside 3 Lift the CPU fan and heatsink assembly then set aside 1 Disconnect the CPU fan cable 2 Loosen the CPU fan and heatsink...

Page 5: ...se the load plate then lock the load lever 5 Reinstall the CPU fan and heatsink assembly then reconnect the CPU fan cable to the CPU fan connector on the motherboard Refer to the instructions in the previous section for details Installing a DIMM 1 Locate the DIMM sockets in the motherboard 2 Unlock a DIMM socket by pressing the retaining clips outward 3 Align a DIMM on the socket such that the not...

Page 6: ...motherboard PCI slot Installing optical and storage drives 1 Turn the storage drive assembly upside down with the 3 5 inch bay on top of the 5 25 inch bay 2 Insert the optical drive upside down to the 5 25 inch bay then secure it with two screws on both sides 3 Turn the storage drive assembly insert the hard disk drive upside down to the 3 5 inch bay then secure it with two screws on both sides 1 ...

Page 7: ...l drive then the gray plug to the hard disk drive 2 Connect the 4 pin power plugs to the power connectors at the back of the drives 3 Install the storage drive assembly to the chassis 4 Secure the storage drive assembly with three screws 3 3 3 3 3 4 4 4 4 4 1 Match the foot stand hooks to the holes on the chassis Installing the foot stand 2 Pull the foot stand to the direction of the arrow until t...

Page 8: ...to the holes at the right side of the chassis then close 2 Insert the front panel cover hooks to the chassis tabs until the front panel cover fits in place 1 1 1 1 1 2 2 2 2 2 Reinstalling the cover 1 Install the cover to the chassis Make sure the cover tabs fit the chassis rails 2 Push the cover toward the front panel until it fits in place 3 Secure the cover with two screws 1 1 1 1 1 2 2 2 2 2 3...

Reviews: