background image

3-12

Chapter 3: General Instruction

3.3 

Troubleshooting (FAQ)

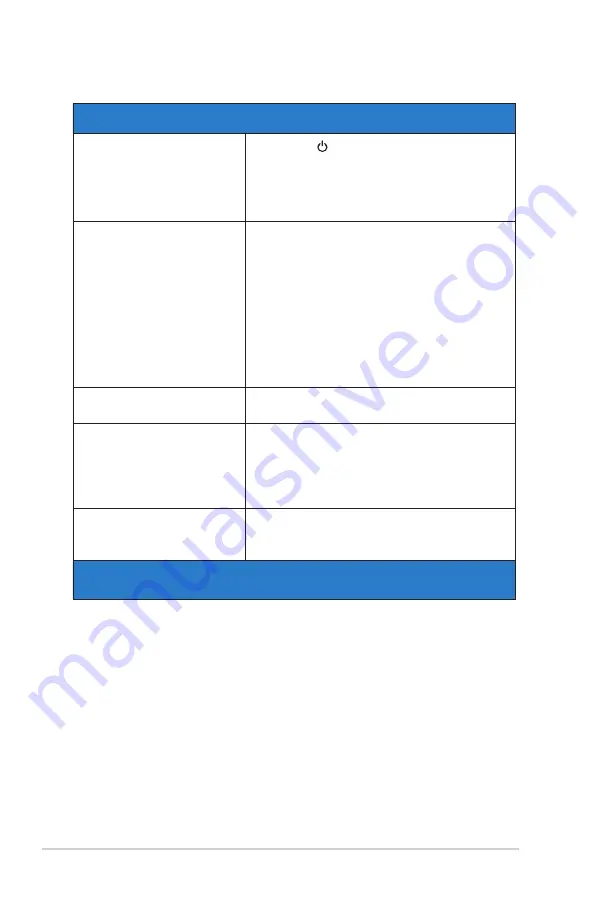
Problem

Possible Solution

Power LED is not ON

•  Press the   button to check if the monitor is 

in the ON mode.

•  Check if the USB Type-C cable is 

properly connected to the monitor and the 

computer.

The power LED lights amber 

and there is no screen image

•  Check if the monitor and the computer are in 

the ON mode.

•  Make sure the USB Type-C cable is properly 

connected between the Portable USB Monitor 

and the computer.

•  Inspect the signal cable and make sure none 

of the pins are bent.

•  Connect the computer with another available 

monitor to check if the computer is properly 

working.

Screen image is too light or 

dark

•  Adjust the Brightness settings via the button.

Screen image bounces or a 

wave pattern is present in the 

image

•  Make sure the USB Type-C cable is properly 

connected between the Portable USB Monitor 

and the computer.

•  Move electrical devices that may cause 

electrical interference.

Screen image has color 

defects (white does not look 

white)

•  Inspect the USB Type-C cable and make sure 

that none of the pins are bent.

Problem

Possible Solution

Summary of Contents for MB166C

Page 1: ...MB166C Portable USB Monitor User Guide ...

Page 2: ...OR DATA INTERRUPTION OF BUSINESS AND THE LIKE EVEN IF ASUS HAS BEEN ADVISED OF THE POSSIBILITY OF SUCH DAMAGES ARISING FROM ANY DEFECT OR ERROR IN THIS MANUAL OR PRODUCT SPECIFICATIONS AND INFORMATION CONTAINED IN THIS MANUAL ARE FURNISHED FOR INFORMATIONAL USE ONLY AND ARE SUBJECT TO CHANGE AT ANY TIME WITHOUT NOTICE AND SHOULD NOT BE CONSTRUED AS A COMMITMENT BY ASUS ASUS ASSUMES NO RESPONSIBILI...

Page 3: ...erference to radio or television reception which can be determined by turning the equipment off and on the user is encouraged to try to correct the interference by one or more of the following measures Reorient or relocate the receiving antenna Increase the separation between the equipment and receiver Connect the equipment to an outlet on a circuit different from that to which the receiver is con...

Page 4: ... This symbol on the product or on its packaging indicates that this product must not be disposed of with your other household waste Instead it is your responsibility to dispose of your waste equipment by handing it over to a designated collection point for the recycling of waste electrical and electronic equipment The separate collection and recycling of your waste equipment at the time of disposa...

Page 5: ...by USB port which complies with LPS and SELV circuit according to IEC60950 1 2005 WARNING Usage of other than specified head or earphones can result in hearing loss due to excessive sound pressures Please confirm the distribution system in building installation shall provide the circuit breaker rated 120 240V 20A maximum If provided with a 3 pin attachment plug on the power cord plug the cord into...

Page 6: ...n NEVER place the product on tall furniture for example cupboards or bookcases without anchoring both the furniture and the product to a suitable support NEVER place the product on cloth or other materials that may be located between the product and supporting furniture NEVER place items that might tempt children to climb such as toys and remote controls on the top of the product or furniture on w...

Page 7: ...Switch for hours When the screen becomes black or flashes or cannot work anymore contact your dealer or service center to fix it Do not repair the screen by yourself Conventions used in this guide WARNING Information to prevent injury to yourself when trying to complete a task CAUTION Information to prevent damage to the components when trying to complete a task IMPORTANT Information that you MUST...

Page 8: ... our environment We believe in providing solutions for our customers to be able to responsibly recycle our products batteries and other components as well as the packaging materials Please go to http csr asus com english Takeback htm for detail recycling information in different region Product information fro EU energy label ...

Page 9: ...vides great portability and simplicity to your daily life enhancing both of your viewing experience and style 1 2 Package contents Check your package for the following items Portable USB Monitor Quick Start Guide Warranty Card USB Type C Cable Protective Sleeve If any of the above items is damaged or missing contact your retailer immediately ...

Page 10: ...er button Power LED Press this button to turn the monitor on off The color definition of the power indicator is as the below table Status Description Blue ON Amber Standby mode Dark OFF 2 Menu button Press this button to enter the OSD menu 3 Brightness Adjust the energy level of brightness 4 USB Type C Port ...

Page 11: ...and achieve a consistent look and feel Alignment grid 1 will be rotated automatically if auto rotation is enabled Alignment Grid1 Alignment Grid1 Alignment Grid1 Alignment Grid1 Auto rotation function is only working under Windows OS by installing DisplayWidget software Alignment Grid2 2 Photo size Provides photographers and other users to accurately view and edit their photos in real size on the ...

Page 12: ...2 1 ASUS USB Type C Monitor MB166C 2 1 Monitor standing positions You can stand up the monitor by several positions with the protective sleeve A B A B ...

Page 13: ...Setup 2 2 Connect the USB monitor with system Type C Please make sure the host system connected supports USB Type C DisplayPort Alt Mode USB Type C cable is correctly connected between USB monitor and the host system ...

Page 14: ...n to activate the OSD menu 2 Press the button to toggle between options in the Menu As you move from one icon to another the option name is highlighted 3 To select the highlighted item on the menu press the button 4 Press the button to select the desired parameter 5 Press the button to enter the slide bar and then use the button according to the indicators on the menu to make your changes 6 Select...

Page 15: ...y Theater Mode This is the best choice for movie watching with SPLENDID Video Intelligence Technology Game Mode This is the best choice for game playing with SPLENDID Video Intelligence Technology Night View Mode This is the best choice for playing dark scene game or watching dark scene movie with SPLENDID Video Intelligence Technology Reading Mode This is the best choice for book reading Darkroom...

Page 16: ... to the following to alleviate eye strains Users should take some time away from the display if working for long hours It is advised to take short breaks at least 5 mins after around 1 hour of continuous working at the computer Taking short and frequent breaks is more effective than a single longer break To minimize eye strain and dryness in your eyes users should rest the eye periodically by focu...

Page 17: ...ightness The adjusting range is from 0 to 100 Contrast The adjusting range is from 0 to 100 Saturation The adjusting range is from 0 to 100 Color Temp Contains three preset color modes Cool Normal Warm and User Mode Skin Tone Contains three color modes including Reddish Natural and Yellowish In the User Mode colors of R Red G Green and B Blue are user configurable the adjusting range is from 0 100...

Page 18: ...ness The adjusting range is from 0 to 100 Trace Free Speeds up the response time by Over Drive technology The adjusting range is from lower 0 to faster 100 Aspect Control Adjusts the aspect ratio to Full 4 3 VividPixel ASUS Exclusive Technology that brings lifelike visuals for crystal clear and detail oriented enjoyment The adjusting range is from 0 to 100 ASCR Select ON or OFF to enable or disabl...

Page 19: ...e C 1920x1080 60Hz ASUS MB166C S System Setup Power Indicator OFF Key Lock Information Power Key Lock All Reset sRGB Mode Type C 1920x1080 60Hz ASUS MB166C Splendid Demo Mode Activate the demo mode for the Splendid function Auto Rotation To enable disable rotate image automatically Please be noted that Auto rotation function is only working under Windows OS by installing DisplayWidget software ...

Page 20: ... is specially designed for new gamers or beginners interested in First Person Shooter FPS games To active GamePlus Select ON to enter the GamePlus main menu Press to select between Chrosshair Timer and Display Alignment function Press to confirm the function you choose Select to go off and exit For the latest version of DisplayWidget software please go to www asus com product page to download and ...

Page 21: ...ePlus Timer Display Alignment Crosshair Practive Mode GamePlus Crosshair GamePlus Timer Position QuickFit See page 1 3 for details ECO Mode Activate the ecology mode for power saving OSD Setup Adjusts the OSD Timeout DDC CI and Transparency of the OSD screen ...

Page 22: ...inese Japanese Korean Persian Thai and Indonesian More Return the next page of System Setting Key Lock Disable all key functions Pressing the menu button for more than five seconds to disable key lock function Information Displays the monitor information Power Indicator Turn the power LED indicator on off Power Key Lock To disable enable power key All Reset Selects Yes to revert all settings to th...

Page 23: ...olor Temp QuickFit GamePlus sRGB Mode Type C 1920x1080 60Hz ASUS MB166C Shortcut User can select from Blue Light Filter Splendid Brightness Contrast Auto Rotation Color Temp QuickFit GamePlus and set as shortcut key 7 MyFavorite Load Save all settings on the monitor S MyFavorite Setting 1 Setting 2 Load Save Setting 3 Setting 4 sRGB Mode Type C 1920x1080 60Hz ASUS MB166C ...

Page 24: ...ors Black Power Consumption 8 W Operating Temp 0 40 Phys Dimension WxHxD 360 14 x225 64x11 8 mm Box Dimension WxHxD 434 x 290 x 76 mm Net Weight Esti 0 8kg Gross Weight Esti 1 7kg Regulation Approvals cTUVus CB CE CCC KCC FCC BSMI EAC CU RCM VCCI J Moss UkrSEPRO RoHS WEEE Windows 7 8 1 10 WHQL Blue light filter Flicker free Energy Star 8 0 Voltage Rating 4 75 5 25V Or 8 55 9 45V Or 11 4 12 6V 2 0A...

Page 25: ...r and the computer Inspect the signal cable and make sure none of the pins are bent Connect the computer with another available monitor to check if the computer is properly working Screen image is too light or dark Adjust the Brightness settings via the button Screen image bounces or a wave pattern is present in the image Make sure the USB Type C cable is properly connected between the Portable US...

Page 26: ... small red colored font S indicating it is now in safe mode Enter brightness setup press the up key to tune up brightness During the process please note down brightness value Y up until MB166C re start 2 For example if brightness value shows 70 and MB166C restarts when adjusting to 71 70 is the Y value to note down and is the highest brightness value for the connecting USB C source device Press ME...

Page 27: ...0x960 60Hz 60kHz 1280x1024 60Hz 63 981kHz 1440x900 60Hz 55 935kHz 1680x1050 60Hz 65 29kHz 1920x1080 60Hz 67 5kHz IBM Modes Factory Preset Timing Resolution Refresh Rate Horizontal Frequency 640x350 70Hz 31 469kHz 720x400 70Hz 31 469kHz VESA Modes User Available Timing Resolution Refresh Rate Horizontal Frequency 848x480 60Hz 31 02kHz 1280x720 60Hz 44 772kHz 1280x800 60Hz 49 702kHz 1920x1080 60Hz 6...

Reviews: