5-30
Chapter 5: Software support
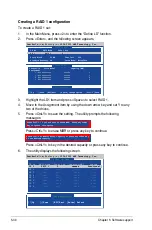
Creating a RAID 1 configuration
To create a RAID 1 set:
1. In the Main Menu, press <2> to enter the “Define LD” function.
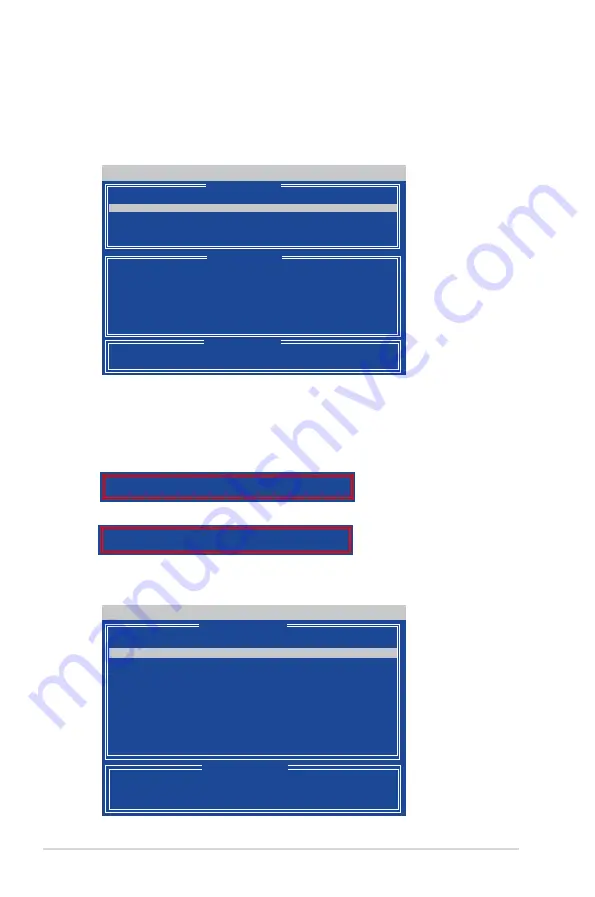
2. Press <Enter>, and the following screen appears.
FastBuild (tm) Utility (c) 2004-2005 AMD Technology, Inc.
[ Define LD Menu ]
[
↑
]Up [
↓
]Down [ESC]Exit [Enter] Select
[ Keys Available ]
LD No RAID Mode Total Drv Capacity(MB) Status
LD 1 RAID 1
2
xxxxxx Functional
LD 2 ----
---- ---- ----
LD 3 ----
---- ---- ----
LD 4 ----
---- ---- ----
LD 5 ----
---- ---- ----
LD 6 ----
---- ---- ----
LD 7 ----
---- ---- ----
LD 8 ----
---- ---- ----
FastBuild (tm) Utility (c) 2004-2005 AMD Technology, Inc.
[
↑
]Up [
↓
]Down [ESC]Exit [Space] Change Option [Ctrl-Y]Save
[ Keys Available ]
[ Define LD Menu ]
[ Define LD Menu ]
Channel:ID
Drive Model
Capacity (MB)
Assignment
1:Mas xxxxxxxxx
xxxxxx
Y
2:Mas xxxxxxxxx
xxxxxx
Y
3:Mas xxxxxxxxx
xxxxxx
N
4:Mas xxxxxxxxx
xxxxxx
N
LD No RAID Mode Total Drv
LD 1 RAID 1
2
Strip Block: 64 KB
Fast Init: OFF
Gigabyte Boundary: ON
Cache Mode: WriteThru
3. Highlight the LD1 item and press <Space> to select RAID 1.
4. Move to the Assignment item by using the down arrow key and set Y to any
two of the drives.
5. Press <Ctrl+Y> to save the setting. The utility prompts the following
messages:
Press <Ctrl+Y> to key in the desired capacity or press any key to continue.
6. The utility displays the following screen.
Press Ctrl-Y to Modify Array Capacity or press any other key
to use maxinum capacity...
Press <Ctrl+Y> to erase MBR or press any key to continue.
Press Ctrl-Y if you are sure to erase MBR! Press any other
key to ignore this option...

