background image

1-3

ASUS LCD Monitor LS221 Series

1.3.2 

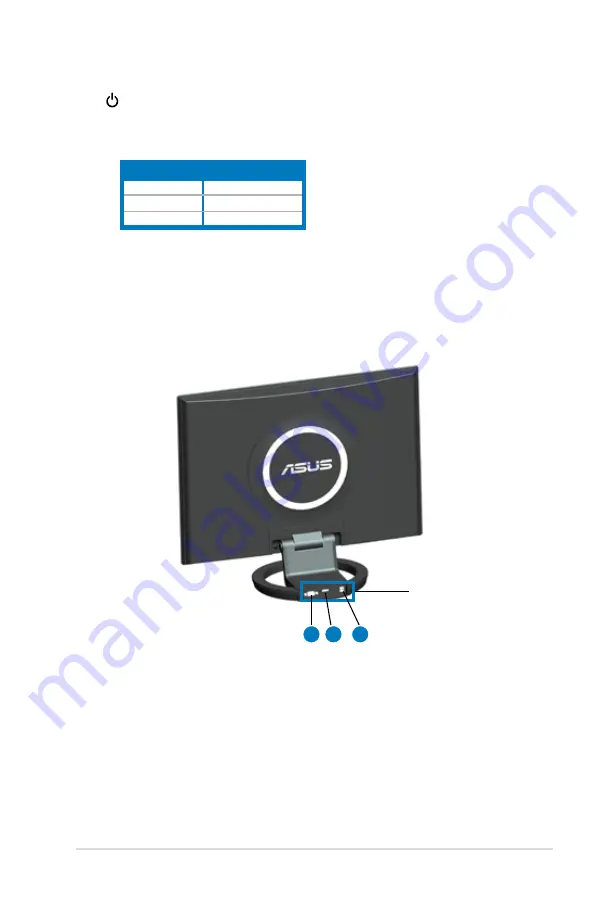
Back view

6. 

 Power button / power indicator          

•  Press this button to turn the monitor on/off

•  The color definition of the power indicator is as the below table.

Rear connectors (from left to right)

1. 

VGA port

. This 15-pin port is for PC VGA connection.     

2. 

HDMI port (LS221H only)

. For High-Definition Multimedia Interface (HDMI) 

signal connection.

3. 

DC-IN port

. This port connects the power connector from the bundled power 

adapter.

Status

Description

  Blue

ON

  Amber

Standby mode

  OFF

OFF

Rear connectors

1

2

3

7.  Light-in-motion function


The function indicates the status of the monitor. The color definition of the 

light is as the above table. You can turn on/off this function through the OSD 

menu.

Summary of Contents for LS221 Series

Page 1: ...LS221 Series LCD Monitor User Guide ...

Page 2: ...CHANTABILITY OR FITNESS FOR A PARTICULAR PURPOSE IN NO EVENT SHALL ASUS ITS DIRECTORS OFFICERS EMPLOYEES OR AGENTS BE LIABLE FOR ANY INDIRECT SPECIAL INCIDENTAL OR CONSEQUENTIAL DAMAGES INCLUDING DAMAGES FOR LOSS OF PROFITS LOSS OF BUSINESS LOSS OF USE OR DATA INTERRUPTION OF BUSINESS AND THE LIKE EVEN IF ASUS HAS BEEN ADVISED OF THE POSSIBILITY OF SUCH DAMAGES ARISING FROM ANY DEFECT OR ERROR IN ...

Page 3: ...Chapter 2 Setup 2 1 Unfolding the monitor 2 1 2 2 Connecting the cables 2 1 2 3 Turning the monitor on 2 1 2 4 Adjusting the monitor 2 2 2 5 Installing the monitor to a VESA wall mount adapter 2 2 Chapter 3 General instruction 3 1 OSD On Screen Display menu 3 1 3 1 1 How to reconfigure 3 1 3 1 2 OSD Function Introduction 3 1 3 2 Specifications summary 3 4 3 3 Troubleshooting FAQ 3 6 3 4 Supported ...

Page 4: ...h can be determined by turning the equipment off and on the user is encouraged to try to correct the interference by one or more of the following measures Reorient or relocate the receiving antenna Increase the separation between the equipment and receiver Connect the equipment to an outlet on a circuit different from that to which the receiver is connected Consult the dealer or an experienced rad...

Page 5: ...s Never place this product near or over a radiator or heat source unless proper ventilation is provided The monitor should be operated only from the type of power source indicated on the label If you are not sure of the type of power supply to your home consult your dealer or local power company Use the appropriate power plug which complies with your local power standard Do not overload power stri...

Page 6: ...e of the fluorescent light Turn off the Power Switch and turn it on again to make sure that the flicker disappears You may find slightly uneven brightness on the screen depending on the desktop pattern you use When the same image is displayed for hours an afterimage of the previous screen may remain after switching the image The screen will recover slowly or you can turn off the Power Switch for h...

Page 7: ...e updates 1 ASUS websites The ASUS websites worldwide provide updated information on ASUS hardware and software products Refer to http www asus com 2 Optional documentation Your product package may include optional documentation that may have been added by your dealer These documents are not part of the standard package ...

Page 8: ...viii ...

Page 9: ...ience With these features you can enjoy the convenience and delightful visual experience that the LS221 Series brings you 1 2 Package contents Check your LS221 Series LCD package for the following items LCD monitor Quick start guide 1 x Power cord 1 x Power adapter 1 x VGA cable 1 x HDMI DVI cable LS221H only 1 x Support CD 1 x Cleaning cloth For some models If any of the above items is damaged or...

Page 10: ...us menu as the OSD menu is active Automatically adjust the image to its optimized position clock and phase by long pressing this button for 2 4 seconds for VGA mode only 3 button Press this button to decrease the value of the function selected or move left up to the previous function 4 MENU sensor Press this button to enter select the icon function highlighted while the OSD is activated 5 button P...

Page 11: ...s for PC VGA connection 2 HDMI port LS221H only For High Definition Multimedia Interface HDMI signal connection 3 DC IN port This port connects the power connector from the bundled power adapter Status Description Blue ON Amber Standby mode OFF OFF Rear connectors 1 2 3 7 Light in motion function The function indicates the status of the monitor The color definition of the light is as the above tab...

Page 12: ...1 4 Chapter 1 Product introduction ...

Page 13: ...carefully tilt the monitor forward with the other hand until the Button rebounds with a click Connect the cables as the following instructions To connect the power adapter first connect the adapter cord securely to the monitor s DC in port Then connect the power plug to the adapter port with the other end to a power outlet To connect the VGA HDMI cable a Plug the VGA HDMI connector to the LCD moni...

Page 14: ...he foldable stand of the LS221 LCD monitor is specially designed for a VESA wall mount adapter To install the monitor to a VESA wall mount adapter 1 Have the front of the monitor face down on a table 2 Press down the button on the arm and fold the stand toward the back of the monitor until the button rebounds with a click 3 Fix the monitor on the VESA wall mount adapter using a screw driver to fas...

Page 15: ...any other function 3 1 2 OSD Function Introduction 1 Spendid This function contains five sub functions you can select for your preference Each mode has the Reset selection allowing you to maintain your setting or return to the preset mode Scenery Mode best choice for scenery photo display with SPLENDID Video Enhancement Standard Mode best choice for document editing with SPLENDID Video Enhancement...

Page 16: ...nction Focus reduces Horizonal line noise and Vertical line noise of the image by adjusting Phase and Clock separately The adjusting range is from 0 to 100 3 Color Select the desired image color from this function Color Temp contains five color modes including Cool Normal Warm sRGB and User mode Skin Tone contains three color modes including Reddish Natural and Yellowish In the User mode colors of...

Page 17: ...l or 4 3 OSD Setup Adjusts the horizontal postition H Position the vertical position V Position of the OSD from 0 to 100 Adjusts the OSD timeout from 10 to 120 Enables or disables the DDC CI function Language there are several languages for your selection including English French German Spanish Italian Dutch Russian Traditional Chinese Simplified Chinese and Japanese Information shows the monitor ...

Page 18: ... Protection Glass Yes Anti reflection 2 9H hardness Video Features Trace Free Technology Yes SPLENDID Video Intelligence Tech Yes SPLENDID Video Preset Mode 5 modes Skin Tone Selection 3 modes Color Temperature Selection 5 modes HDCP Yes Convenient Hotkeys SPLENDID Video Preset Mode Select Yes 5 modes Auto Adjustment Yes Brightness Adjustment Yes Input Selection Yes Input Output PC Input D Sub Vid...

Page 19: ...ngton lock Yes Dimension Phys Dimension WxHxD 531 x 436 x 248mm Box Dimension WxHxD 589 x 535 x 210mm Weight Net Weight Esti 7 kg Gross Weight Esti 10 1kg Accessories HDMI DVI cable VGA cable Power cord CD user guide Warranty card Quick start guide Cleaning cloth Regulation Approvals Energy Star UL cUL CB CE FCC CCC BSMI MIC PSE PSB Gost R C Tick VCCI RoHS WEEE Windows Vista WHQL ...

Page 20: ...utton for two seconds to automatically adjust the image Adjust the H Position or V Position settings via OSD Screen image bounces or a wave pattern is present in the image Make sure the signal cable is properly connected to the monitor and the computer Move electrical devices that may cause electrical interference Screen image has color defects white does not look white Inspect the signal cable an...

Page 21: ...4 x 768 70Hz 56 50KHz 75 00MHz 1024 x 768 75Hz 60 02KHz 78 75MHz XGA 1152 x 864 75Hz 67 50KHz 108 00MHz WXGA 1280 x 800 60Hz 49 62KHz 83 375MHz 1280 x 720 60Hz 44 69KHz 74 375MHz 1280 x 768 60Hz 47 78KHz 79 50MHz 1280 x 768 75Hz 60 29KHz 102 25MHz QVGA 1280 x 960 60Hz 60 00KHz 108 00MHz SXGA 1280 x 1024 60Hz 64 00KHz 108 00MHz 1280 x 1024 75Hz 80 00KHz 135 00MHz WXGA 1360 x 768 60Hz 47 71KHz 85 50...

Page 22: ...3 8 Chapter 3 General Instruction ...

Reviews: