background image

34

Chapter : Getting started

English

Installing the device driver

To install the device driver:

1.  Connect the Easy DVB-T Tuner to the USB port of your desktop PC or 

laptop. 

.  Your computer system automatically 

detects the connected device. Click 

Cancel

 from the pop-up message.

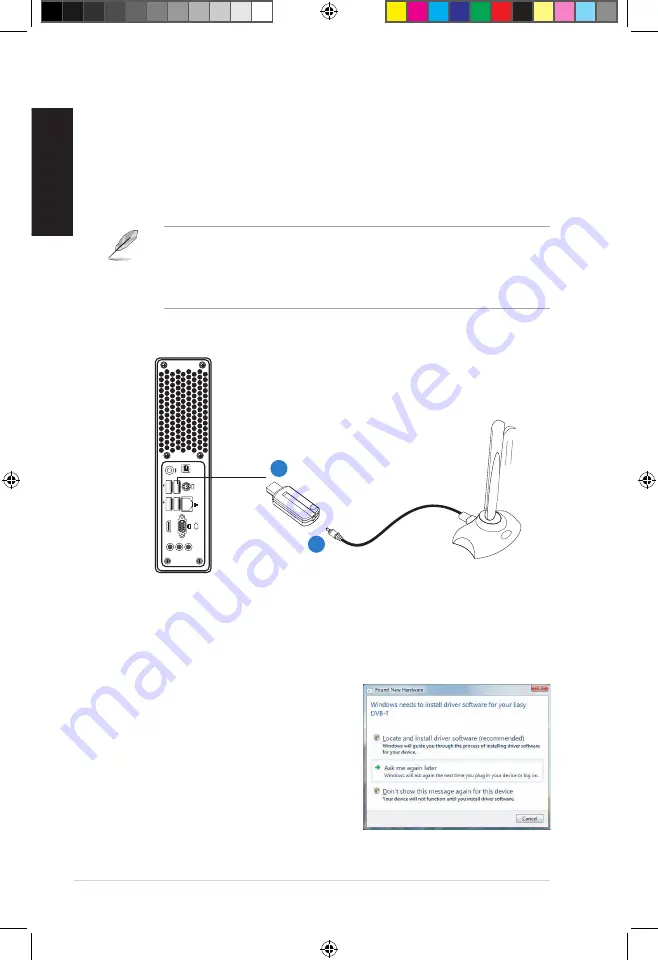
Using the indoor antenna

1.  Connect the indoor antenna to the antenna port at the bottom of the Easy 

DVB-T Tuner. 

.  Connect the Easy DVB-T Tuner to the USB port of your desktop PC or 

laptop. 

For some conditions, the TV signal may be blocked off by buildings. To get a 

better signal reception, put the antenna near the window or towards an area 

with a skyline, or in the direction pointing to the transmitter if its position is 

already known.  The antenna base is made of magnetic material. Placing the 

antenna base on a metallic material can also improve the reception.

D

C

IN

S

/P

D

IF

H

D

M

I

2

.0

2

.0

USB 2.0

1

2

Book 1.indb   34

9/4/08   5:04:37 PM

Summary of Contents for ES5000

Page 1: ...Contents English 1 Italiano 36 Português 72 Polski 106 Česky 140 Book 1 indb 1 9 4 08 5 03 46 PM ...

Page 2: ...Essentio ES5000 ES5000 P ASUS Desktop PC User Manual Book 1 indb 1 9 4 08 5 03 48 PM ...

Page 3: ...E IN NO EVENT SHALL ASUS ITS DIRECTORS OFFICERS EMPLOYEES OR AGENTS BE LIABLE FOR ANY INDIRECT SPECIAL INCIDENTAL OR CONSEQUENTIAL DAMAGES INCLUDING DAMAGES FOR LOSS OF PROFITS LOSS OF BUSINESS LOSS OF USE OR DATA INTERRUPTION OF BUSINESS AND THE LIKE EVEN IF ASUS HAS BEEN ADVISED OF THE POSSIBILITY OF SUCH DAMAGES ARISING FROM ANY DEFECT OR ERROR IN THIS MANUAL OR PRODUCT SPECIFICATIONS AND INFOR...

Page 4: ...orate Way Fremont California 94539 USA TEL 001 510 739 3777 Fax 1 510 608 4555 Web site usa asus com Technical Support Telephone 1 812 282 2787 Support fax 1 812 284 0883 Online support support asus com ASUS COMPUTER GmbH Germany and Austria Address Harkortstr 21 23 40880 Ratingen Germany Telephone 49 01805 010923 Fax 49 02102 9599 11 Web site www asus de Online contact www asus de sales Technical...

Page 5: ...interference to radio or television reception which can be determined by turning the equipment off and on the user is encouraged to try to correct the interference by one or more of the following measures Reorient or relocate the receiving antenna Increase the separation between the equipment and receiver Connect the equipment to an outlet on a circuit different from that to which the receiver is ...

Page 6: ...tausch der Batterie Ersatz nur durch denselben oder einem vom Hersteller empfohlenem ähnljchen Typ Entsorgung gebrauchter Batterien nach Angaben des Herstellers LASER PRODUCT WARNING CLASS 1 LASER PRODUCT Operation safety Before installing devices into the system carefully read all the documentation that came with the package Before using the product ensure that all cables are correctly connected ...

Page 7: ...ps screws and threads away from connectors slots sockets and circuitry Do not stuff anything into the components Otherwise it may cause a short circuit or damage the circuitry If the computer has been used for a long time avoid direct contact with the heatsinks and the surfaces of IC as they may become very warm and hot Check if the system receives adequate ventilation Before you add or remove a p...

Page 8: ... on the front and rear panels 2 Chapter 2 Getting started This chapter helps you power up the system and install drivers and utilities from the support DVD Audience This guide provides general information about ASUS Essentio ES5000 ES5000 P Desktop PC and instructions on how to use the Support DVD that comes with the system package This guide is intended for experienced users and integrators with ...

Page 9: ... a task NOTE Tips and additional information to aid in completing a task Where to find more information Refer to the following sources for additional information and for product and software updates 1 ASUS Websites The ASUS websites worldwide provide updated information on ASUS hardware and software products Refer to the ASUS contact information 2 Optional Documentation Your product package may in...

Page 10: ...PC x 1 Foot stand x 1 Mouse x 1 Keyboard x 1 2 Cables AC power cord x 1 3 Accessories AC power adapter x 1 Mouse pad x 1 4 Support DVD x 1 5 User Manual x 1 6 Warranty card x 1 If any of the items is damaged or missing contact your retailer immediately Specifications are subject to the desktop PC you purchased Check with your supplier for exact offers Book 1 indb 9 9 4 08 5 03 54 PM ...

Page 11: ...10 English Book 1 indb 10 9 4 08 5 03 54 PM ...

Page 12: ...er 1 System introduction This chapter gives a general description of the desktop PC The chapter lists the system features including introduction on the front and rear panels Book 1 indb 11 9 4 08 5 03 55 PM ...

Page 13: ... button to eject an optical disk 3 Front panel cover Pull outward to open the front panel cover Inside are two USB 2 0 ports one E SATA port one Microphone port and one Headphone port 4 Network LED This LED lights up when a wireless wired network connection is established on the system 5 Hard disk drive HDD LED This LED lights up when data is being read from or written to the hard disk drive 6 Pow...

Page 14: ... the top and rear panels of the system chassis The components inside the chassis may overheat and be damaged without adequate ventilation 2 Optical S PDIF Out port This port connects an external audio output device via an optical S PDIF cable 3 PS 2 keyboard port This port is for a PS 2 keyboard 4 LAN RJ 45 port This port allows Fast Ethernet connection to a Local Area Network LAN through a networ...

Page 15: ...audio configuration table below for the function of the audio ports in 2 4 or 6 channel configuration 9 DC IN input port This port connects the DC output plug of an AC power adapter 10 USB 2 0 ports 2 0 These Universal Serial Bus 2 0 USB 2 0 ports are available for connecting USB 2 0 devices such as a mouse printer scanner camera PDA and others 11 Video Graphics adapter VGA port This port connects...

Page 16: ...PC horizontally 1 3 2 Vertical placement Install the foot stand supplied in the system package Place your desktop PC vertically To install the foot stand 1 Locate the screw hole on the bottom of your desktop PC 2 Secure the foot stand to your desktop PC with the supplied screw Book 1 indb 15 9 4 08 5 04 05 PM ...

Page 17: ...th a number of I O ports at the rear and front panels where you can connect peripheral devices to the system Refer to the illustration below for details Before you connect a peripheral device to the system refer to the documentation that comes with the device or contact your supplier directly for information on how to install it Power jack USB VGA HDMI Microphone Line Out Line In RJ 45 PS 2 keyboa...

Page 18: ...Chapter 2 Getting started This chapter helps you to power up the system and install drivers and utilities from the support DVD Book 1 indb 17 9 4 08 5 04 16 PM ...

Page 19: ...o install the drivers that come with the OS Select NO when a window appears asking if you want to restart the system Install drivers according to the instructions in the following sections 2 2 Powering your system Press the Power button to power up the system To ensure that the OS works properly install the drivers bundled in the Support DVD Motherboard settings and hardware options vary Use the s...

Page 20: ...ical drive The DVD automatically displays the Drivers menu if Autorun is enabled on your computer Click an icon to display Support DVD motherboard information 2 3 Support DVD information The Support DVD that comes with the system package contains the drivers software applications and utilities that you can install to avail all system features The contents of the Support DVD are subject to change a...

Page 21: ...zard Intel R Chipset Inf Update Program Installs the Intel chipset Inf update program Realtek Audio Driver Installs the Realtek audio driver and application ATI Display Driver Installs the ATI display driver JMicron JMB36X Controller Driver Installs the JMicron JMB36X controller driver ITE CIR Driver Installs the ITE CIR driver Realtek RTL8111C LAN Driver Installs the Realtek RTL8111C LAN driver A...

Page 22: ...date Allows you to download the latest version of BIOS from the ASUS website ASUS AI Manager Installs the ASUS AI Manager where you can launch AI Disk AI Security and AI Probe easily Adobe Acrobat Reader 8 Installs the Adobe Acrobat Reader 8 The manuals in the Support DVD are in PDF Portable Document Format format which can be opened with Adobe Acrobat Reader Before using the ASUS Update ensure th...

Page 23: ...ort DVD includes the manual of Realtek HD Audio The manual is in PDF format To open it install the Adobe Acrobat Reader from the Utilities menu 2 3 5 ASUS contact information Click the Contact tab to display the ASUS contact information Book 1 indb 9 4 08 5 04 1 PM ...

Page 24: ...een give additional information on the motherboard and the contents of the Support DVD Click an icon to display the specified information Browse this DVD Displays the Support DVD contents in graphical format Motherboard Info Displays the general specifications of the motherboard Book 1 indb 3 9 4 08 5 04 3 PM ...

Page 25: ...support Form Displays the ASUS Technical Support Request Form that you have to fill out when requesting technical support Filelist Displays the contents of the Support DVD and a brief description of each in text format Book 1 indb 4 9 4 08 5 04 4 PM ...

Page 26: ...lick the Utilities tab then click ASUS AI Manager 3 Follow the screen instructions to complete the installation 2 4 2 Launching AI Manager You can launch AI Manager right after installation or anytime from the Windows desktop To launch AI Manager from the Windows desktop click Start All Programs ASUS AI Manager AI Manager v1 xx xx The AI Manager Quick Bar appears After launching the application th...

Page 27: ... Main Launch AI Disk AI Security or AI Probe from the Main menu Click the small triangle to open or close the Main menu Click to open close the Main menu AI Disk AI Disk allows you to easily clear the temporary IE files IE URLs IE cookies IE history list Recycle Bin and recently opened files list Select the item that you want to clear then click Apply Book 1 indb 6 9 4 08 5 04 5 PM ...

Page 28: ...nd a CD DVD disk which ensures more security for your data To lock a device 1 If you are using AI Security for the first time key in a password that consists of no more than 20 letters numbers or symbols 2 Confirm your password 3 Key in your password hint optional 4 Click OK 5 Select the device you want to lock then click Apply Book 1 indb 7 9 4 08 5 04 6 PM ...

Page 29: ... 1 Deselect the device you locked then click Apply 2 Key in your password then click OK To change your password click Change Password and follow the screen instructions AI Probe AI Probe automatically detects the motherboard and CPU temperatures CPU fan speed and CPU voltage It also allows you to adjust these values manually Book 1 indb 8 9 4 08 5 04 6 PM ...

Page 30: ...hen select from the succeeding screen the application you want to add to the My Favorites menu 2 Click Open The application you selected is added and its icon appears Right click an icon in the My Favorites menu to open delete or rename the corresponding application Double click an icon to open the corresponding application Book 1 indb 9 9 4 08 5 04 6 PM ...

Page 31: ...S international website online technical support website online download support website and contact information website 2 4 7 Information The Information menu displays the general information of your system motherboard CPU BIOS memory and other devices installed Book 1 indb 30 9 4 08 5 04 7 PM ...

Page 32: ...m to a partition or Recovery system to entire HD Click Next 3 A confirmation screen pops up Click Next to confirm 4 Check I accept from the succeeding screen and click Next 5 A list displays the contents you are going to recover Click Yes to confirm The recovery process starts 6 Insert the second Recovery CD then click OK 7 Insert the Support DVD then click OK The system restarts 8 After the syste...

Page 33: ...system partition as drive C Recover Windows to entire HD This option deletes all partitions from your hard disk and creates a new system partition as drive C Recover Windows to entire HD with 2 partitions This option deletes all partitions from your hard disk and creates two new system partitions The first partition takes up 60 of the whole hard disk size and the second partition takes up 40 The n...

Page 34: ...VB T is broadcasted The type of connection to use depends on the type of adapter used The following two basic connections are for ordinary conditions Consult your dealer for the right adapter Using the outdoor antenna 1 Connect the antenna cable s terminal to the MCX to IEC adapter s IEC terminal 2 Connect the adapter s MCX terminal to the antenna port at the bottom of the Easy DVB T Tuner 3 Conne...

Page 35: ...the bottom of the Easy DVB T Tuner 2 Connect the Easy DVB T Tuner to the USB port of your desktop PC or laptop For some conditions the TV signal may be blocked off by buildings To get a better signal reception put the antenna near the window or towards an area with a skyline or in the direction pointing to the transmitter if its position is already known The antenna base is made of magnetic materi...

Page 36: ...ner Driver 4 Follow the Installation Wizard to complete the installation process A progress bar or the driver installing message pops up to indicate the installation progress 5 Click Finish when the installation is completed Ensure that the Easy DVB T Tuner is connected to your computer when installing the driver Book 1 indb 35 9 4 08 5 04 37 PM ...

Page 37: ...Italiano Essentio ES5000 ES5000 P ASUS Desktop PC Manuale Utente Book 1 indb 36 9 4 08 5 04 39 PM ...

Page 38: ...I FUNZIONARI IMPIEGATI O DISTRIBUTORI SONO RESPONSABILI PER QUALSIASI DANNO INDIRETTO PARTICOLARE ACCIDENTALE O CONSEGUENTE COMPRESI DANNI DERIVANTI DA PERDITA DI PROFITTO PERDITA DI CONTRATTI PERDITA D USO O DI DATI INTERRUZIONE DELL ATTIVITA E SIMILI ANCHE SE ASUS E STATA AVVISATA DELLA POSSIBILITA CHE TALI DANNI SI POSSANO VERIFICARE IN SEGUITO A QUALSIASI DIFETTO O ERRORE NEL PRESENTE MANUALE ...

Page 39: ...visti nonchè le spese e gli altri termini relativi all assistenza e al supporto se previsti verranno specificati nella documentazione destinata al cliente fornita a corredo con il Prodotto E responsabilità dell utente prima ancora di richiedere l assistenza effettuare il backup dei contenuti presenti sul Prodotto inclusi i dati archiviati o il software installato nel prodotto ASUSTeK COMPUTER INC ...

Page 40: ...altra situazione che lo renda inutilizzabile anche la possibilità di utilizzare il prodotto OEM viene compromessa Chiunque acquisti unitamente al prodotto un software OEM è tenuto ad osservare i termini e le condizioni del contratto di licenza tra il proprietario del software e l utente finale denominato EULA End User Licence Agreement visualizzato a video durante la fase di installazione del soft...

Page 41: ...Online support asus com ASUS COMPUTER GmbH Germania e Austria Indirizzo Harkortstr 21 23 40880 Ratingen Germany Telefono 49 01805 010923 Fax 49 02102 9599 11 Sito Web www asus de Contatto Online www asus de sales Supporto Tecnico Telefono 49 01805 010923 Fax di Supporto 49 02102 9599 11 Supporto Online support asus com ASUS ITALY S r l Italia Indirizzo Centro Direzionale Villa Fiorita Palazzo B Vi...

Page 42: ...ful interference to radio or television reception which can be determined by turning the equipment off and on the user is encouraged to try to correct the interference by one or more of the following measures Reorient or relocate the receiving antenna Increase the separation between the equipment and receiver Connect the equipment to an outlet on a circuit different from that to which the receiver...

Page 43: ...osionsgetahr bei unsachgemäßen Austausch der Batterie Ersatz nur durch denselben oder einem vom Hersteller empfohlenem ähnljchen Typ Entsorgung gebrauchter Batterien nach Angaben des Herstellers AVVERTENZA PER PRODOTTI LASER PRODOTTO LASER DI CLASSE 1 Sicurezza Operativa Prima di installare dispositivi sulla scheda madre leggere con attenzione il manuale presente nella confezione Prima di utilizza...

Page 44: ...el sistema Per evitare corto circuiti tenere ferraglia viti e fili lontani da connettori slot prese e circuiti Non mettere niente all interno dei componenti Altrimenti potrebbero verificarsi corto circuiti o danni al circuito Se il computer è stato utilizzato per un lungo tempo evitare il contatto diretto con i dissipatori e le superfici di IC poichè potrebbero diventare molto calde Verificare che...

Page 45: ...l pannello frontale e posteriore 2 Capitolo 2 Installazione e Utilizzo Questo capitolo illustra le modalità di accensione del sistema e di installazione di driver e utilità dal DVD di Supporto Questo manuale fornisce informazioni generali su ASUS Essentio ES5000 ES5000 P Desktop PC e le istruzioni su come utilizzare il DVD di Supporto compreso nella confezione del sistema Il manuale si rivolge ad ...

Page 46: ...GATORIAMENTE per completare un operazione NOTA Suggerimenti e informazioni aggiuntive utili per completare un operazione Ulteriori Approfondimenti Riferirsi alle seguenti fonti per informazioni aggiuntive e per gli aggiornamenti per prodotti e software 1 Siti Web ASUS Il sito webASUS fornisce informazioni aggiornate su hardware e softwareASUS Riferirsi alla sezione Contatti ASUS 2 Documentazione O...

Page 47: ... x 1 Piedistallo x 1 Mouse x 1 Tastiera x 1 2 Cavi Cavo di alimentazione AC x 1 3 Accessori Adattatore di corrente AC x 1 Tappetino per il Mouse x 1 4 DVD di Supporto x 1 5 Manuale Utente x 1 6 Certificato di Garanzia x 1 In caso di articoli danneggiati o mancanti contattare immediatamente il rivenditore Le specifiche dipendono dal desktop PC acquistato Controllare l esatta tipologia con il rivend...

Page 48: ...olo 1 Introduzione del Sistema Questo capitolo fornisce una descrizione generale del desktop PC e delle caratteristiche del sistema compreso il pannello frontale e posteriore Book 1 indb 47 9 4 08 5 04 45 PM ...

Page 49: ...pellere un disco ottico 3 Copertura del Pannello Frontale Tirare verso l esterno per aprire la copertura del pannello frontale Al suo interno si trovano due porte USB 2 0 una porta E SATA una porta per il microfono ed una porta per le cuffie 4 LED di Rete Questo LED si illumina quando si stabilisce una connessione di rete via cavo senza cavo nel sistema 5 LED Disco Rigido HDD Questo LED si illumin...

Page 50: ...sul pannello superiore e posteriore del telaio del sistema In mancanza di un adeguata ventilazione i componenti all interno del telaio potrebbero surriscaldarsi e guastarsi 2 Porta S PDIF Out Ottica Porta per la connessione di un dispositivo esterno per l uscita audio mediante un cavo ottico S PDIF 3 Porta Tastiera PS 2 Porta per una tastiera PS 2 4 Porta LAN RJ 45 Porta per la connessione Fast Et...

Page 51: ... sottostante tabella per la funzione delle porte audio in configurazioni a 2 4 o 6 canali 9 Porta ingresso DC IN Porta per la connessione di una spina per l uscita DC di un adattatore di corrente AC 10 Porte USB 2 0 2 0 Queste porte USB 2 0 Universal Serial Bus 2 0 sono predisposte per la connessione con dispositivi USB 2 0 quali mouse stampanti scanner fotocamere PDA ed altri ancora 11 Porta VGA ...

Page 52: ...zzontale 1 3 2 Posizionamento Verticale Installare il piedistallo fornito nella confezione del sistema e porre il desktop PC in senso verticale Per installare il piedistallo 1 Individuare il foro per la vite sul lato inferiore del desktop PC 2 Fissare il piedistallo al desktop PC con la vite in dotazione Book 1 indb 51 9 4 08 5 04 55 PM ...

Page 53: ...te I O sul pannello frontale e posteriore dove collegare le periferiche al sistema Fare riferimento all illustrazione sottostante per i particolari Prima di collegare una periferica al sistema consultare la documentazione fornita con il dispositivo o direttamente il fornitore per informazioni sulle modalità di installazione Jack alimentazione USB VGA HDMI Microfono Line Out Line In RJ 45 Tastiera ...

Page 54: ...Capitolo 2 Installazione e Utilizzo Questo capitolo illustra le modalità di accensione del sistema e di installazione di driver e utilità dal DVD di Supporto Book 1 indb 53 9 4 08 5 05 09 PM ...

Page 55: ... NO all apparire del messaggio di richiesta di riavvio del sistema Installare i driver attenendosi alle istruzioni dei paragrafi seguenti 2 2 Accensione del Sistema Per accendere il sistema premere il pulsante di accensione Per essere sicuri che il sistema operativo funzioni correttamente installare i driver contenuti nel DVD di Supporto Le impostazioni della scheda madre e le opzioni hardware pos...

Page 56: ...tivata la funzione di esecuzione automatica il DVD visualizza automaticamente il menu Drivers Cliccare su un icona per visualizzare informazioni sulla scheda madre DVD di Supporto 2 3 Informazioni sul DVD di Supporto Nel DVD di Supporto contenuto nella confezione del sistema si trovano i driver le applicazioni software e le utilità da installare per beneficiare di tutte le funzionalità del sistema...

Page 57: ...ipset Inf Update Program Installa il programma di aggiornamento Intel Chipset Inf Update Program Realtek Audio Driver Installa il driver e l applicazione audio Realtek ATI Display Driver Installa il driver di visualizzazione ATI JMicron JMB36X Controller Driver Installa il driver del Controller JMicron JMB36X ITE CIR Driver Installa il driver ITE CIR Realtek RTL8111C LAN Driver Installa il driver ...

Page 58: ...ne guidata ASUS Update Consente di scaricare la versione più aggiornata del BIOS dal sito web ASUS ASUS AI Manager Installa ASUS AI Manager da cui è possibile avviare facilmente AI Disk AI Security e AI Probe Adobe Acrobat Reader 8 Installa Adobe Acrobat Reader 8 I manuali nel DVD di Supporto sono in formato PDF Portable Document Format da aprire con Adobe Acrobat Reader Prima di utilizzare ASUS U...

Page 59: ... di Supporto è contenuto il manuale di Realtek HD Audio Il manuale è in formato PDF Per aprirlo installare Adobe Acrobat Reader dal menu Utilities Utilità 2 3 5 Contatti ASUS Cliccare sulla scheda Contact Contatti per visualizzare i contatti ASUS Book 1 indb 58 9 4 08 5 05 15 PM ...

Page 60: ...ioni aggiuntive sulla scheda madre e sul contenuto del DVD di Supporto Cliccare su un icona per visualizzare specifiche informazioni Esplorazione del Contenuto del DVD Visualizza il contenuto del DVD di Supporto in formato grafico Informazioni sulla Scheda Madre Visualizza le specifiche della scheda madre Book 1 indb 59 9 4 08 5 05 16 PM ...

Page 61: ...upporto Tecnico Visualizza ASUS Technical Support Request Form da compilare per richiedere l assistenza tecnica Elenco File Visualizza il contenuto del DVD di Supporto e fornisce una breve descrizione di ciascuno in formato testo Book 1 indb 60 9 4 08 5 05 17 PM ...

Page 62: ... poi su ASUS AI Manager 3 Seguire le istruzioni sullo schermo per completare l installazione 2 4 2 Avvio di AI Manager AI Manager può essere avviato subito dopo l installazione o in qualsiasi momento dal desktop Windows Per avviare AI Manager dal desktop Windows cliccare Start Tutti i Programmi ASUS AI Manager AI Manager v1 xx xx Appare la barra di accesso rapido AI Manager Dopo aver avviato l app...

Page 63: ...in Principale Avviare AI Disk AI Security o AI Probe dal menu Main Principale Cliccare sul triangolo piccolo per aprire o chiudere il menu Cliccare qui per aprire chiudere il menu Principale AI Disk AI Disk permette di cancellare con facilità file temporanei IE cookies IE URL IE cronologia IE l elenco dei file aperti di recente o di svuotare il cestino Selezionare l elemento da cancella re e clicc...

Page 64: ...DVD e garantire una maggiore protezione dei dati Per bloccare un dispositivo 1 Quando si usa AI Security per la prima volta si richiede l impostazione di una password di max 20 lettere numeri o simboli 2 Confermare la password 3 Digitare il suggerimento per la password opzionale 4 Cliccare OK 5 Selezionare il dispositivo da bloccare e cliccare Apply Applica Book 1 indb 63 9 4 08 5 05 19 PM ...

Page 65: ...il dispositivo bloccato e cliccare Apply Applica 2 Digitare la password e premere OK Per modificare la password cliccare Change Password Cambia Password e seguire le istruzioni sullo schermo AI Probe AI Probe rileva automaticamente la temperatura della scheda madre e della CPU la velocità della ventola e il voltaggio della CPU E inoltre possibile regolare i valori manualmente Book 1 indb 64 9 4 08...

Page 66: ...onare dalla schermata successiva l applicazione da aggiungere al menu My Favorites 2 Cliccare Open Apri Con l aggiunta dell applicazione selezionata apparirà anche l icona corrispondente Con il tasto di destra cliccare su un icona del menu My Favorites per aprire eliminare o rinominare l applicazione corrispondente Cliccare due volte su un icona per aprire la relativa applicazione Book 1 indb 65 9...

Page 67: ...b internazionale ASUS con il sito per il supporto tecnico online per il supporto download online e la pagina con le informazioni sui contatti ASUS 2 4 7 Information Informazioni Il menu Information visualizza le informazioni generali su sistema scheda madre CPU BIOS memoria e altri dispositivi installati Book 1 indb 66 9 4 08 5 05 0 PM ...

Page 68: ...o 2 Selezionare Recover system to a partition o Recovery system to entire HD Cliccare Next 3 Appare un messaggio di conferma Cliccare Next per confermare 4 Selezionare I accept dalla schermata successiva e cliccare Next 5 Sono visualizzati a elenco i contenuti da ripristinare Cliccare Yes per confermare Ha inizio il processo di ripristino 6 Inserire il secondo CD di Ripristino e cliccare OK 7 Inse...

Page 69: ...disco C Recover Windows to entire HD Questa opzione eliminerà tutte le partizioni dall unità disco rigido e creerà una nuova partizione del sistema come il disco C Recover Windows to entire HD with 2 partitions Questa opzione eliminerà tutte le partizioni dall unità disco rigido e creerà due nuove partizioni del sistema La prima partizione contiene sino al 60 dell intero disco rigido mentre la sec...

Page 70: ...i connessione dipende dal tipo di adattatore utilizzato Le seguenti due connessioni di base si applicano in condizioni normali Rivolgersi al rivenditore per sapere quale sia l adattatore corretto Tramite Antenna Esterna 1 Collegare il terminale del cavo dell antenna al terminale IEC dell adattatore da MCX a IEC 2 Collegare il terminale MCX dell adattatore alla porta per l antenna sul lato inferior...

Page 71: ...riore del sintonizzatore Easy DVB T 2 Collegare il sintonizzatore Easy DVB T alla porta USB del desktop PC o di un portatile In determinate condizioni il segnale TV potrebbe rimanere bloccato all esterno degli edifici Per una migliore ricezione del segnale collocare l antenna in prossimità di una finestra o rivolta verso una zona con l orizzonte oppure in direzione del trasmettitore se ne è già no...

Page 72: ...lla il driver del sintonizzatore 4 Seguire il programma di installazione guidata per completare il processo Apparirà una barra progressiva oppure un messaggio di installazione del driver per indicare il procedere dell operazione 5 Al termine cliccare Finish Fine Durante l installazione del driver assicurarsi che il sintonizzatore Easy DVB T sia collegato al computer Book 1 indb 71 9 4 08 5 05 5 PM...

Page 73: ...Português Essentio ES5000 ES5000 P ASUS Desktop PC Manual do utilizador Book 1 indb 7 9 4 08 5 05 6 PM ...

Page 74: ...DADE PARA UM DETERMINADO FIM EM CIRCUNSTÂNCIA ALGUMA PODE A ASUS SEUS DIRECTORES OFICIAIS EMPREGADOS OU AGENTES SER RESPONSABILIZADA POR QUAISQUER DANOS INDIRECTOS ESPECIAIS ACIDENTAIS OU CONSEQUENTES INCLUINDO DANOS PELA PERDA DE LUCROS PERDA DE NEGÓCIO PERDA DE UTILIZAÇÃO OU DE DADOS INTERRUPÇÃO DA ACTIVIDADE ETC MESMO QUE A ASUS TENHA SIDO ALERTADA PARA A POSSIBILIDADE DE OCORRÊNCIA DE TAIS DAN...

Page 75: ...te Way Fremont CA 94539 USA Telefone 001 510 739 3777 Fax 1 510 608 4555 Site Web usa asus com Assistência técnica Telefone 1 812 282 2787 Fax da Assistência 1 812 284 0883 Assistência online support asus com ASUS COMPUTER GmbH Alemanha e Áustria Endereço Harkortstr 21 23 40880 Ratingen Germany Telefone 49 01805 010923 Fax 49 02102 9599 11 Site Web www asus de Contacto online www asus de sales Ass...

Page 76: ...on reception which can be determined by turning the equipment off and on the user is encouraged to try to correct the interference by one or more of the following measures Reorient or relocate the receiving antenna Increase the separation between the equipment and receiver Connect the equipment to an outlet on a circuit different from that to which the receiver is connected Consult the dealer or a...

Page 77: ...r Batterie Ersatz nur durch denselben oder einem vom Hersteller empfohlenem ähnljchen Typ Entsorgung gebrauchter Batterien nach Angaben des Herstellers AVISO relativo à segurança da unidade de CD ROM PRODUTO LASER CLASSE 1 Segurança do funcionamento Antes de instalar dispositivos no sistema leia atentamente toda a documentação que veio com o pacote Antes de utilizar o produto certifique se de que ...

Page 78: ... eixos afastados dos conectores ranhuras tomadas e circuitos eléctricos Não introduza nada dentro dos componentes Caso contrário poderá causar um curto circuito ou danificar os circuitos eléctricos Se o computador foi utilizado durante muito tempo evite o contacto directo com os dissipadores de calor e com as superfícies do circuito integrado pois podem tornar se mesmo muito quentes Verifique se o...

Page 79: ...éis frontal e traseiro 2 Capítulo 2 Primeiros passos Este capítulo ajuda o a ligar o sistema e instalar controladores e utilitários a partir do DVD de Apoio Público Este guia faculta informação geral sobre o PC de Secretária ASUS Essentio ES5000 ES5000 P bem como instruções sobre como utilizar o DVD de Apoio que vem incluído no pacote de sistema Este guia é destinado a utilizadores experientes e i...

Page 80: ...nformações adicionais para o ajudar a concluir uma tarefa Onde encontrar mais informação Para obter mais informações e para actualizações de produtos e de software queira consultar as seguintes fontes 1 Sites da ASUS Os sites da ASUS por todo o mundo fornecem informações actualizadas sobre o hardware e produtos de software ASUS Consulte as informações de contacto da ASUS 2 Documentação Opcional O ...

Page 81: ...Rato 1 Teclado 2 Cabos 1 Cabo de alimentação AC 3 Acessórios 1 Adaptador eléctrico AC 1 Tapete para rato 4 1 DVD de Apoio 5 1 Manual do Utilizador 6 1 Cartão de garantia Se qualquer um dos itens acima referidos estiver danificado ou em falta queira contactar o seu revendedor As especificações são de acordo com o PC de Secretária que comprou Para saber quais as ofertas exactas consulte o seu fornec...

Page 82: ...Introdução ao sistema Este capítulo dá uma descrição geral do PC de Secretária O capítulo enuncia as funcionalidades do sistema incluindo a introdução aos painéis frontal e traseiro Book 1 indb 81 9 4 08 5 05 3 PM ...

Page 83: ...para ejectar um disco óptico 3 Tampa do painel frontal Puxe para fora para abrir a tampa do painel frontal Dentro estão duas portas USB 2 0 uma porta E SATA uma porta de Microfone e uma porta de Auscultadores 4 LED de Rede Este LED acende quando é estabelecida uma ligação de rede sem fios cablada no sistema 5 LED da unidade de disco rígido HDD Este LED acende quando os dados estão a ser lidos a pa...

Page 84: ... superior e traseiro do chassis do sistema Sem a ventilação adequada os componentes dentro do chassis podem sobreaquecer e ser danificados 2 Porta de Saída Óptica S PDIF Esta porta liga um dispositivo de saída de áudio externo através de um cabo óptico S PDIF 3 Porta de teclado PS 2 Esta porta é para um teclado PS 2 4 Porta LAN RJ 45 Esta porta permite uma ligação rápida de Ethernet a uma Rede de ...

Page 85: ...liga um microfone Para saber a função das portas áudio na configuração de 2 4 ou 6 canais consulte a tabela de configuração áudio 9 Porta de entrada DC Esta porta liga a ficha de saída DC de um adaptador eléctrico AC 10 Portas USB 2 0 2 0 Estas portas Universal Serial Bus 2 0 USB 2 0 estão disponíveis para ligar dispositivos USB 2 0 tais como um rato uma impressora um scanner uma câmara um PDA e o...

Page 86: ...a horizontal 1 3 2 Colocação vertical Instale o suporte fornecido no pacote de sistema Coloque o seu PC de Secretária na vertical Para instalar o suporte 1 Localize o orifício do parafuso na parte inferior do seu PC de Secretária 2 Fixe o suporte ao seu PC de Secretária com o parafuso fornecido Book 1 indb 85 9 4 08 5 05 41 PM ...

Page 87: ...a nos painéis frontal e traseiro onde pode ligar dispositivos periféricos ao sistema Para mais detalhes consulte a ilustração abaixo Antes de ligar um dispositivo periférico ao sistema consulte a documentação incluída no dispositivo ou contacte directamente o seu fornecedor para informações sobre como instalá lo Tomada eléctrica USB VGA HDMI Microfone Saída de Linha Entrada de Linha RJ 45 Teclado ...

Page 88: ...Capítulo 2 Primeiros passos Este capítulo ajuda o a ligar o sistema e instalar controladores e utilitários a partir do CD de Apoio Book 1 indb 87 9 4 08 5 05 51 PM ...

Page 89: ...ione NO NÃO quando surgir uma janela a perguntar se quer reiniciar o sistema Instale os controladores de acordo com as instruções referidas nas secções seguintes 2 2 Ligar o seu sistema Prima o botão de energia para ligar o sistema Para se certificar de que o sistema operatico funciona bem instale os controladores incluídos no DVD de Apoio As opções das definições da motherboard e de hardware vari...

Page 90: ... automaticamente o menu Drivers Controladores se o Autorun Execução automática estiver activado no seu computador Clique num ícone para mostrar a informação do DVD de Apoio motherboard 2 3 Informação do DVD de Apoio O DVD de Apoio incluído no pacote de sistema contém os controladores as aplicações de software e os utilitários que pode instalar para beneficiar de todas as funcionalidades do sistema...

Page 91: ...e Controladores Programa de Actualização do Chipset Inf Intel R Instala o programa de actualização informática do Chipset Inf Intel Controlador de Áudio Realtek Instala o controlador de áudio Realtek e a aplicação Controlador do Visor ATI Instala o controlador do visor ATI Controlador JMicron JMB36X Instala o controlador JMicron JMB36X Controlador ITE CIR Instala o controlador ITE CIR Controlador ...

Page 92: ...ima versão da BIOS a partir do site da ASUS ASUS AI Manager Gestor AI ASUS Instala facilmente o ASUS AI Manager Gestor AI ASUS onde pode executar o AI Disk Disco AI o AI Security Segurança AI e o AI Probe Teste AI Adobe Acrobat Reader 8 Instala o Adobe Acrobat Reader 8 Os manuais contidos no DVD de Apoio estão no formato PDF Formato de Documento Portátil que pode ser aberto com o Adobe Acrobat Rea...

Page 93: ...i o manual do Realtek HD Audio O manual está em formato PDF Para o abrir instale o Adobe Acrobat Reader a partir do menu Utilities Utilitários 2 3 5 Informação de Contactos ASUS Clique no separador Contact Contacto para mostrar a informação de contactos Book 1 indb 9 9 4 08 5 05 56 PM ...

Page 94: ...informação adicional sobre a motherboard e os conteúdos do DVD de Apoio Clique num ícone para mostrar a informação especificada Pesquisar neste DVD Mostra os conteúdos do DVD de Apoio em formato gráfico Informações sobre a motherboard Mostra as especificações gerais da motherboard Book 1 indb 93 9 4 08 5 05 58 PM ...

Page 95: ...écnica Mostra o Formulário de Pedido de Assistência Técnica da ASUS o qual terá de preencher quando solicitar assistência técnica Lista de ficheiros Mostra os conteúdos do DVD de Apoio e uma breve descrição de cada um em formato de texto Book 1 indb 94 9 4 08 5 05 59 PM ...

Page 96: ...nager Gestor AI ASUS 3 Siga as instruções no ecrã para concluir a instalação 2 4 2 Executar o AI Manager Gestor AI Pode executar o AI Manager Gestor AI logo após a instalação ou a qualquer momento a partir do Ambiente de Trabalho do Windows Para executar o AI Manager Gestor AI a partir do Ambiente de Trabalho do Windows clique em Start Iniciar All Programs Todos os Programas ASUS AI Manager Gestor...

Page 97: ... AI Security Segurança AI ou o AI Probe Teste AI a partir do menu principal Clique no triângulo pequeno para abrir ou fechar o menu principal Clique para abrir fechar o menu principal AI Disk Disco AI O AI Disk Disco AI permite lhe limpar facilmente os ficheiros temporários do IE os URL s do IE os cookies do IE a lista de histórico do IE a Reciclagem e a lista de ficheiros recentemente abertos Sel...

Page 98: ...de CD DVD o que lhe garante mais segurança para os seus dados Para bloquear um dispositivo 1 Se está a utilizar o AI Security Segurança AI pela primeira vez digite uma palavra passe que consista em não mais de 20 letras números ou símbolos 2 Confirme a sua palavra passe 3 Digite a dica para a sua palavra passe opcional 4 Clique em OK 5 Seleccione o dispositivo que quer bloquear e clique em Apply A...

Page 99: ...e clique em Apply Aplicar 2 Digite a sua palavra passe e clique em OK Para alterar a sua palavra passe clique em Change Password Alterar Palavra Passe e siga as instruções no ecrã AI Probe Teste AI O AI Probe Teste AI detecta e exibe automaticamente as temperaturas da placa mãe e do CPU a velocidade do ventilador do CPU e a voltagem do mesmo Permite lhe também ajustar manualmente estes valores Boo...

Page 100: ...ã seguinte a aplicação que quer adicionar ao menu My Favorites Os Meus Favoritos 2 Clique em Open Abrir A aplicação que seleccionou foi adicionada e o seu ícone está presente Clique com o lado direito do rato sobre um ícone no menu My Favorites Os Meus Favoritos para abrir apagar ou mudar o nome à aplicação correspondente Clique com o lado direito do rato num ícone para abrir a aplicação correspon...

Page 101: ...acional da ASUS para o site de assistência técnica online para o site de assistência a downloads online e para o site de informações de contacto 2 4 7 Informações O menu Information Informações mostra a informação geral do seu sistema placa mãe CPU BIOS memória e outros dispositivos instalados Book 1 indb 100 9 4 08 5 06 0 PM ...

Page 102: ...ma para uma partição ou Recovery system to entire HD Recuperar sistema para todo o disco rígido Clique em Next Seguinte 3 Surge um ecrã de confirmação Clique em Next Seguinte para confirmar 4 Marque I accept Aceito no próximo ecrã e clique em Next Seguinte 5 Uma lista mostra os conteúdos que vai recuperar Clique em Yes Sim para confirmar O processo de recuperação é iniciado 6 Introduza o segundo C...

Page 103: ...artição de sistema como unidade C Recuperar o Windows para todo o disco rígido Esta opção apaga todas as partições do seu disco rígido e cria uma nova partição de sistema como unidade C Recuperar o Windows para todo o disco rígido com 2 partições Esta opção apaga todas as partições do seu disco rígido e cria duas novas partições de sistema A primeira partição ocupa 60 do tamanho total do disco ríg...

Page 104: ... aplicados à maioria dos países onde o DVB T é emitido O tipo de ligação a utilizar depende do tipo de adaptador utilizado As duas ligações básicas seguintes aplicam se a condições normais Consulte o seu adaptador para saber qual o adaptador certo Usar uma antena exterior 1 Ligue o terminal do cabo da antenna ao terminal IEC do adaptador MCX para IEC 2 Ligue o terminal MCX do adaptador à porta da ...

Page 105: ...porta da antena situada na parte inferior do Sintonizador Easy DVB T 2 Ligue o Sintonizador Easy DVB T à porta USB do seu PC de secretária ou computador portátil Em algumas condições o sinal de TV pode ser bloqueado por edifícios Para obter uma melhor recepção de sinal coloque a antena perto da janela ou virada para uma área aberta ou na direcção do transmissor se a posição deste for já conhecida ...

Page 106: ...o Sintonizador 4 Siga o Assistente de Instalação para concluir o processo de instalação Surge uma barra de progresso ou uma mensagem de instalação de controlador para indicar o progresso da instalação 5 Clique em Finish Concluir quando a instalação ficar concluída Quando instalar o controlador certifique se de que o Sintonizador Easy DVB T está ligado ao seu computador Book 1 indb 105 9 4 08 5 06 ...

Page 107: ...Polski Essentio ES5000 ES5000 P ASUS Desktop PC Podręcznik użytkownika Book 1 indb 106 9 4 08 5 06 09 PM ...

Page 108: ...EŚLONEGO CELU W ŻADNYM PRZYPADKU FIRMAASUS JEJ DYREKTORZY KIEROWNICY PRACOWNICY LUB AGENCI NIE BĘDĄ ODPOWIADAĆ ZA JAKIEKOLWIEK NIEBEZPOŚREDNIE SPECJANE PRZYPADKOWE LUB KONSEKWENTNE SZKODY WŁĄCZNIE Z UTRATĄ ZYSKÓW TRANSAKCJI BIZNESOWYCH UTRATĄ MOŻLIWOŚCI KORZYSTANIA LUB UTRACENIEM DANYCH PRZERWAMI W PROWADZENIU DZIAŁANOŚCI ITP NAWET JEŚLI FIRMA ASUS UPRZEDZAŁA O MOŻLIWOŚCI ZAISTNIENIA TAKICH SZKÓD ...

Page 109: ...ate Way Fremont California 94539 USA Telefon 001 510 739 3777 Faks 1 510 608 4555 Strona sieci web usa asus com Pomoc techniczna Telefon 1 812 282 2787 Faks pomocy 1 812 284 0883 Pomoc online support asus com ASUS COMPUTER GmbH Niemcy i Austria Adres Harkortstr 21 23 40880 Ratingen Niemcy Telefon 49 01805 010923 Faks 49 02102 9599 11 Strona sieci web www asus de Kontakt online www asus de sales Po...

Page 110: ...interference to radio or television reception which can be determined by turning the equipment off and on the user is encouraged to try to correct the interference by one or more of the following measures Reorient or relocate the receiving antenna Increase the separation between the equipment and receiver Connect the equipment to an outlet on a circuit different from that to which the receiver is ...

Page 111: ...rsatz nur durch denselben oder einem vom Hersteller empfohlenem ähnljchen Typ Entsorgung gebrauchter Batterien nach Angaben des Herstellers LASER PRODUCT WARNING CLASS 1 LASER PRODUCT Bezpieczeństwo działania Przed instalacją urządzeń w systemie należy uważnie przeczytać wszystkie znajdujące się w opakowaniu dokumenty Przed użyciem produktu należy upewnić się że wszystkie kable są prawidłowo podłą...

Page 112: ...omponentów i spowodować awarię systemu Aby uniknąć zwarcia należy trzymać z dala od złączy szczelin gniazd i obwodów ścinki śruby i nitki Nie należy niczego wkładać do komponentów W przeciwnym razie może to spowodować zwarcie i uszkodzenie obwodów Jeśli komputer był długo używany nalezu unikać bezpośredniego kontaktu z radiatorami i powierzchniami IC ponieważ mogą one być gorące Należy sprawdzić c...

Page 113: ... Rozdział 2 Na początek Ten rozdział pomoże we włączeniu zasilania systemu i instalacji sterowników oraz narzędzi z pomocniczego dysku DVD Audytorium Ten podręcznik udostępnia ogólne informacje o komputerze desktop PC ASUS Essentio ES5000 ES5000 P i instrukcje dotyczące korzystania z pomocniczego dysku DVD dostarczonego w opakowaniu z systemem Ten podręcznik jest przeznaczony dla zaawansowanych uż...

Page 114: ...ania UWAGA Wskazówki i dodatkowe informacje umożliwiające dokończenie zadania Gdzie można uzyskać dalsze informacje Następujące źródła udostępniają dodatkowe informacje dotyczące produktu i aktualizacji oprogramowania 1 Strony sieci web ASUS Strony sieci web ASUS udostępniają zaktualizowane informacje dotyczące sprzętu i oprogramowania ASUS Sprawdź informacje kontaktowe ASUS 2 Opcjonalna dokumenta...

Page 115: ...Klawiatura x 1 2 Kable Przewód zasilający prądu zmiennego x 1 3 Akcesoria Zasilacz x 1 Podkładka myszy x 1 4 Pomocniczy dysk DVD x 1 5 Podręcznik użytkownika x 1 6 Karta gwarancyjna x 1 Jeśli którekolwiek z wymienionych elementów są uszkodzone lub nie ma ich w opakowaniu należy bezzwłocznie skontaktować się ze sprzedawcą Specyfikacje odpowiadają zakupionemu komputerowi desktop PC Sprawdź dokładną ...

Page 116: ...dział 1 Wprowadzenie do systemu Ten rozdział podaje ogólny opis komputera desktop PC Ten rozdział wymienia funkcje systemu włącznie z omówieniem paneli przednich i tylnych Book 1 indb 115 9 4 08 5 06 15 PM ...

Page 117: ... optycznego 3 Pokrywa panela przedniego Pociągnij na zewnątrz w celu otwarcia pokrywy panela przedniego Wewnątrz znajdują się dwa porty USB 2 0 jeden port E SATA jeden port mikrofonu i jeden port słuchawek 4 Dioda LED sieci Ta dioda LED świeci po nawiązaniu w systemie bezprzewodowego przewodowego połączenia sieciowego 5 Dioda LED dysku twardego HDD Ta dioda LED świeci podczas odczytu lub zapisu da...

Page 118: ... panelu górnym i tylnym obudowy systemu Bez odpowiedniej wentylacji mogą ulec przegrzaniu i uszkodzeniu komponenty wewnątrz obudowy 2 Port wyjścia optycznego S PDIF Ten port służy do połączenia zewnętrznego urządzenia wyjścia audio poprzez optyczny kabel S PDIF 3 Port klawiatury PS 2 Ten port służy do klawiatury PS 2 4 Port LAN RJ 45 Ten port umożliwia połączenie Fast Ethernet z lokalną siecią kom...

Page 119: ...uży do podłączenia mikrofonu Sprawdź tabelę konfiguracji audio poniżej dla uzyskania opisu funkcji portów audio w konfiguracji 2 4 lub 6 kanałowej 9 Port wejścia prądu stałego Ten port służy do podłączenia wtyczki wyjścia prądu stałego zasilacza prądu zmiennego 10 Porty USB 2 0 2 0 Te porty Universal Serial Bus 2 0 USB 2 0 są dostępne do połączenia urządzeń USB 2 0 takich jak mysz drukarka skaner ...

Page 120: ...tera desktop PC 1 3 2 Ustawienie pionowe Zainstaluj podstawkę dostarczoną w opakowaniu systemu Ustaw komputer desktop PC pionowo W celu instalacji podstawki 1 Zlokalizuj otwór na śrubę w dolnej części komputera desktop PC 2 Zamocuj podstawkę komputera desktop PC dostarczoną śrubą Book 1 indb 119 9 4 08 5 06 4 PM ...

Page 121: ...nim gdzie można podłączyć do systemu urządzenia peryferyjne Szczegółowe informacje znajdują się na ilustracji poniżej Przed podłączeniem do systemu urządzenia peryferyjnego należy sprawdzić dostarczoną z urządzeniem dokumentację lub skontaktować się bezpośrednio z dostawcą w celu uzyskania informacji o instalacji tego urządzenia Gniazdo zasilania USB VGA HDMI Mikrofon Wyjście liniowe Wejście linio...

Page 122: ...Rozdział 2 Na początek Ten rozdział pomaga we włączeniu zasilania systemu i instalacji sterowników oraz narzędzi z pomocniczego dysku DVD Book 1 indb 1 1 9 4 08 5 06 3 PM ...

Page 123: ...eniu okna z pytaniem o ponowne uruchomienie systemu operacyjnego Zainstaluj sterowniki zgodnie z instrukcjami w następujących częściach 2 2 Włączanie zasilania systemu Naciśnij przycisk zasilania w celu włączenia zasilania systemu Aby upewnić się że działa prawidłowo system operacyjny zainstaluj sterowniki znajdujące się w pakieci oprogramowania na pomocniczym dysku DVD Ustawienia płyty głównej i ...

Page 124: ...t włączona funkcja Autorun Automatyczne uruchomienie zostanie automatycznie wyświetlone menu DVD Drivers Sterowniki Kliknij ikonę w celu wyświetlenia informacji Pomocniczego dysku DVD płyty głównej 2 3 Informacje pomocniczego dysku DVD Pomocniczy dysk DVD dostarczony z pakietem oprogramowania systemowego zawiera sterowniki aplikacje programowe i narzędzia które należy zaistalować w celu udostępnie...

Page 125: ...ll Sterowniki Program aktualizacji Inf chipsetu Intel R Instalacja programu aktualizacji Inf chipsetu Intel Sterownik audio Realtek Instalacja sterownika audio Realtek i aplikacji Sterownik wyświetlania ATI Instalacja sterownika wyświetlania ATI Sterownik kontrolera JMicron JMB36X Instalacja sterownika kontrolera JMicron JMB36X Sterownik ITE CIR Instalacja sterownika ITE CIR Sterownik LAN Realtek ...

Page 126: ...wersji BIOS ze strony sieci web ASUS ASUS AI Manager Instalacja programu ASUS AI Manager który umożliwia łatwe uruchomienie AI Disk AI Security oraz AI Probe Adobe Acrobat Reader 8 Instalacja programu Adobe Acrobat Reader 8 Podręczniku na pomocniczym dysku DVD są w formacie PDF Portable Document Format obsługiwanym przez program Adobe Acrobat Reader Przed użyciem ASUS Update Aktualizacja ASUS nale...

Page 127: ...altek HD Audio Podręcznik jest dostępny w formacie PDF W celu jego otwarcia należy zainstalować program Adobe Acrobat Reader z menu Utilities Narzędzia 2 3 5 Informacje kontaktowe ASUS Kliknij zakładkę Contact Kontakt w celu wyświetlenia informacji kontaktowych ASUS Book 1 indb 1 6 9 4 08 5 06 37 PM ...

Page 128: ...e głównej i zawartości pomocniczego dysku DVD Kliknij ikonę w celu wyświetlenia określonych informacji Browse this DVD Przeglądaj ten dysk DVD Wyświetlanie zawartości pomocniczego dysku DVD w formacie graficznym Motherboard Info Informacje o płycie głównej Wyświetla ogólne specyfikacje płyty głównej Book 1 indb 1 7 9 4 08 5 06 39 PM ...

Page 129: ... ASUS Technical Support Request Form Formularz pomocy technicznej ASUS który należy wypełnić jeśli wymagane jest udzielenie pomocy technicznej Filelist Lista plików Wyświetla zawartość pomocniczego dysku DVD i krótki opis każdego z elementów w formacie tekstowym Book 1 indb 1 8 9 4 08 5 06 41 PM ...

Page 130: ...tępnie kliknij ASUS AI Manager 3 Wykonaj instrukcje ekranowe w celu dokończenia instalacji 2 4 2 Uruchamianie AI Manager Program AI Manager można uruchomić zaraz po instalacji lub w dowolnym czasie z pulpitu Windows Aby uruchomić AI Manager z pulpitu Windows kliknij Start All Programs Wszystkie programy ASUS AI Manager AI Manager v1 xx xx Pojawi się zakładka AI Manager Quick Bar Pasek szybkiego ur...

Page 131: ...Uruchamianie AI Disk AI Security lub AI Probe z menu głównego Kliknij mały trójkąt w celu otwarcia lub zamknięcia menu głównego Kliknij aby otworzyć zamknąć menu główne AI Disk AI Disk umożliwia łatwe usunięcie tymczasowych plików IE adresów URL IE plików cookie IE listy historii IE kosza i listy ostatnio otwartych plików Wybierz element do usunięcia a następnie kliknij Apply Zastosuj Book 1 indb ...

Page 132: ... dysk CD DVD które zapewniają większe bezpieczeństwo danych Aby zablokować urządzenie 1 Przy pierwszym użyciu AI Security wprowadź hasło które składa się z nie więcej niż 20 liter liczb lub symboli 2 Potwierdź hasło 3 Wprowadź podpowiedź do hasła opcjonalna 4 Kliknij OK 5 Wybierz urządzenie do zablokowania a następnie kliknij Apply Zastosuj Book 1 indb 131 9 4 08 5 06 43 PM ...

Page 133: ...owanego urządzenia a następnie kliknij Apply Zastosuj 2 Wprowadź hasło a następnie kliknij OK W celu zmiany hasła kliknij Change Password Zmień hasło i wykonaj instrukcje ekranowe AI Probe AI Probe automatycznie wykrywa płytę główną i temperatury procesora obroty wentylatora procesora i napięcie procesora Umożliwia także ręczną regulację tych wartości Book 1 indb 13 9 4 08 5 06 43 PM ...

Page 134: ...wybierz z kolejnych ekranów aplikację do dodania do menu My Favorites Moje ulubione 2 Kliknij Open Otwórz Zostanie dodana wybrana aplikacja i pojawi się jej ikona Kliknij prawym przyciskiem ikonę w menu My Favorites Moje ulubione aby otworzyć usunąć lub zmienić nazwę odpowiedniej aplikacji Kliknij dwukrotnie ikonę w celu otwarcia odpowiedniej aplikacji Book 1 indb 133 9 4 08 5 06 44 PM ...

Page 135: ...nmy sieci web ASUS strony sieci web pomocy technicznej strony sieci web pobierania online i strona sieci web informacji kontaktowych 2 4 7 Informacje Menu Information Informacje wyświetla ogólne informacje o systemie płycie głównej procesorze BIOS pamięci i innych zainstalowanych urządzeniach Book 1 indb 134 9 4 08 5 06 44 PM ...

Page 136: ...stem na partycji lub Recovery system to entire HD Przywróć system na całym dysku twardym Kliknij Next Dalej 3 Pojawi się ekran potwierdzenia Kliknij Next Dalej w celu potwoerdzenia 4 Zaznacz I accept Akceptuję na kolejnym ekranie i kliknij Next Dalej 5 Na liście pokazana jest zawartość która ma zostać przywrócona Kliknij Yes Tak w celu potwierdzenia Uruchomiony zostanie proces przywracania 6 Włóż ...

Page 137: ...ową partycję systemową jako napęd C Recover Windows to entire HD Przywróć Windows na cały dysk twardy Ta opcja usuwa z dysku twardego wszystkie partycje i tworzy nową partycję systemową jako napęd C Recover Windows to entire HD with 2 partitions Przywrócenie systemu Windows na całym dysku twardym z 2 partycjami Ta opcja usuwa z dysku twardego wszystkie partycje i tworzy dwie nowe partycje systemow...

Page 138: ...w większości krajów w których nadawany jest sygnał DVB T Rodzaj zastosowanego połączenia zależy od rodzaju zastosowanego adaptera Poniższe dwa podstawowe połączenia przeznaczone są dla warunków normalnych W sprawie właściwego adaptera skonsultuj się ze swoim dostawcą Używanie anteny zewnętrznej 1 Podłącz gniazdo anteny do gniazda IEC adaptera IEC MCX 2 Podłącz gniazdo adaptera MCX do gniazda anten...

Page 139: ...gniazda anteny na dole tunera Easy DVB T 2 Podłącz tuner Easy DVB T do gniazda USB komputera biurkowego lub laptopa W niektórych warunkach sygnał telewizyjny może być tłumiony przez budynki Aby uzyskać lepszy odbiór sygnału ustaw antenę w pobliżu okna lub skierowaną na obszar z widocznym niebem lub skierowaną do nadajnika jeżeli jego położenie jest znane Podstawa anteny wykonana jest z materiału m...

Page 140: ...uj sterownik tunera 4 W celu zakończenia procesu instalacji postępuj zgodnie ze wskazówkami kreatora instalacji Wyświetlony zostanie pasek postępu lub komunikat o instalowaniu sterownika celem wskazania postępu instalacji 5 Po zakończeniu instalacji kliknij Finish Zakończ Przed instalacją sterownika upewnij się że tuner Easy DVB T jest podłączony do komputera Book 1 indb 139 9 4 08 5 06 49 PM ...

Page 141: ...Česky Essentio ES5000 ES5000 P Stolní počítač ASUS Uživatelská příručka Book 1 indb 140 9 4 08 5 06 50 PM ...

Page 142: ...ÍPADĚ ZA ŽÁDNÉ PŘÍMÉ SPECIÁLNÍ NAHODILÉ NEBO NÁSLEDNÉ ŠKODY VČETNĚ ÚŠLÉHO ZISKU ZTRÁTY ZAKÁZEK NEMOŽNOSTI POUŽÍVÁNÍ ČI ZTRÁTY DAT PŘERUŠENÍ OBCHODNÍ ČINNOSTI A PODOBNĚ I KDYŽ BYL ASUS OBEZNÁMEN S MOŽNOSTÍ VZNIKU TAKOVÝCHTO ŠKOD ZPŮSOBENÝCH NEDOSTATKY NEBO CHYBAMI V TÉTO PŘÍRUČCE NEBO VÝROBKU SPECIFIKACE A INFORMACE OBSAŽENÉ V TÉTO PŘÍRUČCE JSOU POSKYTOVÁNY JEN PRO INFORMAČNÍ ÚČELY MOHOU SE KDYKOLI...

Page 143: ...rporate Way Fremont California 94539 USA Telefon 001 510 739 3777 Fax 1 510 608 4555 Web usa asus com Technická podpora Telefon 1 812 282 2787 Fax podpory 1 812 284 0883 Online podpora support asus com ASUS COMPUTER GmbH Německo a Rakousko Adresa Harkortstr 21 23 40880 Ratingen Německo Telefon 49 01805 010923 Fax 49 02102 9599 11 Web www asus de Online kontakt www asus de sales Technická podpora T...

Page 144: ...nterference to radio or television reception which can be determined by turning the equipment off and on the user is encouraged to try to correct the interference by one or more of the following measures Reorient or relocate the receiving antenna Increase the separation between the equipment and receiver Connect the equipment to an outlet on a circuit different from that to which the receiver is c...

Page 145: ...ní do systému si pečlivě přečtěte veškerou dokumentaci která přišla v balení Před použitím výrobku se ujistěte zda jsou všechny kabely správně připojeny a zda nejsou napájecí kabely poškozené Pokud zjistíte jakékoliv poškození spojte se okamžitě s vaším prodejcem Aby nedošlo ke zkratu nesmí se do konektorů štěrbin zásuvek a obvodů dostat papírové svorky šrouby a svorky Vyhněte se prachu vlhkosti a...

Page 146: ...t poruchu systému Aby nedošlo ke zkratu nesmí se do konektorů štěrbin zásuvek a obvodů dostat útržky šrouby a nitě Do součástek nic nezastrkujte Jinak to může způsobit zkrat nebo poškodit obvody Pokud se počítač dlouho používal nedotýkejte se přímo chladičů a povrchu integrovaných obvodů protože mohou být velmi teplé až horké Zkontrolujte zda je systém dostatečně odvětrán Než přidáte do systému ne...

Page 147: ...tně představení jeho předního a zadního panelu stěny 2 Kapitola 2 Začínáme Tato kapitola vám pomůže se zapnutím systému a s instalaci ovladačů a nástrojů z podpůrného DVD Komu je určena Tato příručka poskytuje obecné informace o stolním počítači ASUS Essentio ES5000 ES5000 P a pokyny jak používat Podpůrné DVD které se dodává se systémem Tato příručka je určena pro zkušené uživatele a integrátory s...

Page 148: ...follow to complete a task POZNÁMKA Tipy a dodatečné informace které vám pomohou se splněním úkolu Kde najít další informace Následující zdroje vám poskytnou další informace a aktualizace výrobku a softwaru 1 Weby ASUS Weby ASUS poskytují aktualizované informace o hardware a software ASUS po celém světě Viz kontaktní informace ASUS 2 Volitelná dokumentace Vaše balení může obsahovat volitelnou dokum...

Page 149: ...x 1 Stojan x 1 Myš x 1 Klávesnice x 1 2 Kabely Napájecí kabel x 1 3 Příslušenství Napájecí adaptér x 1 Podložka myši x 1 4 Podpůrné DVD x 1 5 Uživatelská příručka x 1 6 Záruční list x 1 Pokud je některá položka poškozená nebo chybí okamžitě kontaktujte vašeho prodejce Technické údaje záleží na typu stolního počítače který jste koupili Přesné nabídky si zjistěte u vašeho dodavatele Book 1 indb 148 ...

Page 150: ...Představení systému Tato kapitola poskytuje obecný popis stolního počítače Tato kapitola obsahuje seznam vlastností systému včetně představení jeho předního a zadního panelu stěny Book 1 indb 149 9 4 08 5 06 56 PM ...

Page 151: ...k 3 Kryt předního panelu Kryt předního panelu otevřete tahem směrem ven Uvnitř jsou dva porty USB 2 0 jeden port E SATA jeden port pro mikrofon a jeden port pro sluchátka 4 Síťový LED indikátor Tento indikátor LED se rozsvítí když systém vytvoří připojení do bezdrátové drátové sítě 5 LED indikátor pevného disku Tento LED indikátor se rozsvítí když se data čtou z pevného disku nebo se na něj zapisu...

Page 152: ...a horním a zadním panelu systémové skříně Součástky ve skříni by se mohly přehřát a poškodit bez přiměřené ventilace 2 Optický port S PDIF Out Tento port připojuje externí výstupní zvukové zařízení kabelem S PDIF 3 Port klávesnice PS 2 Tento port je pro klávesnici PS 2 4 Port LAN RJ 45 Tento port umožňuje připojení typu Fast Ethernet k lokální počítačové síti LAN přes síťový hub 9 Port sluchátek c...

Page 153: ...řipojení mikrofonu V níže uvedené tabulce audio konfigurace najdete funkci audio portů v konfiguraci 2 4 nebo 6 kanálů 9 Vstupní port stejnosměrného napájení Tento port připojuje výstupní zástrčku stejnosměrného napětí na napájecí adaptér pro střídavé napětí 10 USB 2 0 porty 2 0 2 0 Tyto porty Universal Serial Bus 2 0 USB 2 0 jsou k dispozici pro připojení zařízení USB 2 0 např myši tiskárny skene...

Page 154: ...ní počítač vodorovně 1 3 2 Svislé umístění Nainstalujte podstavec dodaný v systémovém balení Položte svůj stolní počítač svisle Jak instalovat stojan 1 Najděte otvor pro šroub na spodní straně vašeho počítače 2 Připevněte stojan k vašemu stolnímu počítači dodaným šroubem Book 1 indb 153 9 4 08 5 07 05 PM ...

Page 155: ...na zadním a předním panelu kde můžete k systému připojit periferní zařízení Detaily najdete na ilustracích níže Než připojíte periferní zařízení k systému přečtěte si dokumentaci která se dodává se zařízením nebo kontaktujte vašeho dodavatele přímo abyste získali informace jak je instalovat Napájecí jack USB VGA HDMI Mikrofon Linkový výstup Linkový vstup RJ 45 PS 2 klávesnice S PDIF Out Pokud použ...

Page 156: ...Kapitola 2 Začínáme Tato kapitola vám pomůže se zapnutím systému a s instalaci ovladačů a nástrojů z podpůrného DVD Book 1 indb 155 9 4 08 5 07 1 PM ...

Page 157: ... ovladače dodávané s OS Zvolte NO NE když se objeví okno s dotazem zda chcete restartovat systém Nainstalujte ovladače dle pokynů v následujících částech 2 2 Jak zapnout váš systém Zapněte systém stiskem tlačítka vypínače Aby OS správně fungoval nainstalujte ovladače přiložené k Podpůrnému DVD Nastavení pro základní desky a možnosti hardware jsou různé Nastavovací postupy uvedené v této kapitole p...

Page 158: ... jednotky DVD automaticky zobrazí nabídku Drivers Ovladače pokud je na vašem počítači povoleno automatické spouštění Autorun Klepnutím na ikonu zobrazíte Podpůrné DVD základní deska 2 3 Informace o Podpůrném DVD Podpůrné DVD které se dodává v systémovém balení obsahuje ovladače softwarové aplikace a nástroje které můžete instalovat abyste využili všechny funkce systému Obsah Podpůrného DVD může bý...

Page 159: ...adačů Aktualizační program Intel R Chipset Inf Instaluje aktualizační program Intel chipset Inf Audio ovladač Realtek Instaluje Audio ovladač a aplikaci Realtek Ovladač displeje ATI Instaluje ovladač displeje ATI Ovladač kontroléru JMicron JMB36X Instaluje ovladač kontroléru JMicron JMB36X Ovladač ITE CIR Instaluje Ovladač ITE CIR Ovladač Realtek RTL8111C LAN Instaluje ovladač Realtek RTL8111C LAN...

Page 160: ...ního průvodce ASUS Update Umožňuje vám stáhnout nejnovější verzi BIOSu z webu ASUS ASUS AI Manager Instaluje ASUS AI Manager v němž můžete snadno spustit AI Disk AI Security a AI Probe Adobe Acrobat Reader 8 Instaluje Adobe Acrobat Reader 8 Návody na Podpůrném DVD jsou ve formátu PDF Přenosný dokumentový formát který lze otevřít aplikací Adobe Acrobat Reader Než použijete ASUS Update zkontrolujte ...

Page 161: ...e návod pro Realtek HD Audio Návod je ve formátu PDF Chcete li jej otevřít nainstalujte Adobe Acrobat Reader z nabídky Utilities Nástroje 2 3 5 Kontaktní informace ASUS Klepnutím na kartě Contact Kontakt zobrazíte kontaktní informace ASUS Book 1 indb 160 9 4 08 5 07 17 PM ...

Page 162: ...ám poskytnou další informace o základní desce a obsahu Podpůrného DVD Klepnutím na dané ikoně zobrazíte konkrétní informace Procházet toto DVD Zobrazí obsah Podpůrného DVD v grafickém formátu Info o základní desce Zobrazí obecné technické údaje pro základní desku Book 1 indb 161 9 4 08 5 07 0 PM ...

Page 163: ...ro technickou podporu Zobrazí žádanku o technickou podporu ASUS kterou musíte vyplnit když žádáte o technickou podporu Seznam souborů Zobrazí obsah Podpůrného DVD a stručný popis každé položky v textovém formátu Book 1 indb 16 9 4 08 5 07 PM ...

Page 164: ... Nástroje a potom klepněte na ASUS AI Manager 3 Dokončete instalaci podle pokynů na obrazovce 2 4 2 Jak spustit aplikaci AI Manager Aplikaci AI Manager můžete spustit hned po instalaci nebo kdykoliv z plochy Windows Z plochy Windows spustíte AI Manager klepnutím na Start All Programs Všechny programy ASUS AI Manager AI Manager v1 xx xx Objeví se Rychlá lišta aplikace AI Manager Po spuštění aplikac...

Page 165: ...ger 2 4 4 Hlavní Z Hlavní nabídky spustíte AI Disk AI Security nebo AI Probe Hlavní nabídku otevřete a zavřete klepnutím na malý trojúhelník Klepnutím otevřete zavřete Hlavní nabídku AI Disk AI Disk vám umožňuje snadno smazat soubory IE URL IE cookies IE historii IE odpadkový koš a seznam nedávno otevřených souborů Zvolte položku kterou chcete smazat a potom klepněte na Apply Použít Book 1 indb 16...

Page 166: ...D DVD disk což zajišťuje vyšší bezpečnost vašich dat Jak zamknout zařízení 1 Pokud používáte AI Security poprvé zadejte heslo skládající se z nanejvýš 20 písmen čísel nebo symbolů 2 Potvrďte vaše heslo 3 Zadejte nápovědu pro heslo volitelné 4 Klepněte na OK 5 Zvolte zařízení které chcete zamknout a potom klepněte na Apply Použít Book 1 indb 165 9 4 08 5 07 3 PM ...

Page 167: ...ho zařízení a potom klepněte na Apply Použít 2 Zadejte heslo a potom klepněte na OK Chcete li změnit heslo klepněte na Change Password Změnit heslo a postupujte podle pokynů na obrazovce AI Probe AI Probe automaticky detekuje základní desku a teploty CPU rychlost ventilátoru CPU a napětí CPU Dovoluje vám nastavit tyto hodnoty ručně Book 1 indb 166 9 4 08 5 07 3 PM ...

Page 168: ...z následující obrazovky aplikaci kterou chcete přidat do nabídky My Favorites Moje oblíbené 2 Klepněte na Open Otevřít Vámi zvolená aplikace se přidá a objeví se její ikona Klepněte pravým tlačítkem myši na nabídce My Favorites Moje oblíbené chcete li otevřít odstranit nebo přejmenovat příslušnou aplikaci Poklepáním na ikoně otevřete příslušnou aplikaci Book 1 indb 167 9 4 08 5 07 4 PM ...

Page 169: ...odní web firmy ASUS web online technické podpory web podpory online stahování a web s kontaktními informacemi 2 4 7 Informace Nabídka Information Informace zobrazuje obecné informace o vašem systému základní desce CPU BIOSu paměti a jiných instalovaných zařízeních Book 1 indb 168 9 4 08 5 07 4 PM ...

Page 170: ... do oddílu nebo Recovery system to entire HD Obnovit systém na celý pevný disk Klepněte na Next Další 3 Objeví se potvrzovací obrazovka Potvrďte klepnutím na Next Další 4 Na následující obrazovce klepněte na I accept Přijímám a klepněte na Next Další 5 Seznam zobrazí obsah který se chystáte obnovit Potvrďte klepnutím na Yes Ano Proces obnovy bude zahájen 6 Vložte druhé Obnovovací CD a potom klepně...

Page 171: ...ddíly a vytvoří nový systémový oddíl jako disk C Obnovit Windows na celý pevný disk Tato možnost odstraní všechny oddíly z vašeho pevného disku a vytvoří nový systémový oddíl jako disk C Obnovit Windows na celý pevný disk s 2 oddíly Tato možnost odstraní všechny oddíly z vašeho pevného disku a vytvoří dva nové systémové oddíly První oddíl zabere 60 z celého pevného disku a druhý oddíl zabere 40 No...

Page 172: ...je vysílán signál DVB T Typ připojení pro použití závisí na typu použitého adaptéru Pro běžné situace jsou k dispozici následující dvě základní připojení Poraďte se s prodejcem o vhodném adaptéru Používání venkovní antény 1 Připojte výstup anténního kabelu k výstupu IEC adaptéru MCX na IEC 2 Připojte výstup MCX adaptéru k anténnímu portu na spodní straně tuneru Easy DVB T 3 Zasuňte Tuner Easy DVB ...

Page 173: ... Připojte pokojovou anténu k anténnímu portu na spodní straně tuneru Easy DVB T 2 Připojte tuner Easy DVB T k portu USB stolního počítače nebo notebooku V některých situacích může být signál TV blokován budovami Aby se zlepšil příjem umístěte anténu blízko okna nebo s lepším výhledem ve směru vysílače znáte li jeho polohu Podstavec antény je vyroben z magnetického materiálu Příjem lze rovněž zlepš...

Page 174: ...the Tuner Driver Instalovat ovladač tuneru 4 Podle pokynů průvodce instalací dokončete instalaci Instalace je zobrazena indikátorem průběhu nebo zprávou o průběhu instalování ovladače 5 Po dokončení instalace klepněte na tlačítko Finish Dokončit Po celou dobu instalace ovladače musí být tuner Easy DVB T připojen k počítači Book 1 indb 173 9 4 08 5 07 9 PM ...

Reviews: