background image

D r i v e r s   a n d   u t i l i t i e s   i n s t a l l a t i o n   g u i d e

D r i v e r s   a n d   u t i l i t i e s   i n s t a l l a t i o n   g u i d e

D r i v e r s   a n d   u t i l i t i e s   i n s t a l l a t i o n   g u i d e

D r i v e r s   a n d   u t i l i t i e s   i n s t a l l a t i o n   g u i d e

D r i v e r s   a n d   u t i l i t i e s   i n s t a l l a t i o n   g u i d e

1 1

1 1

1 1

1 1

1 1

2 . 2

2 . 2

2 . 2

2 . 2

2 . 2

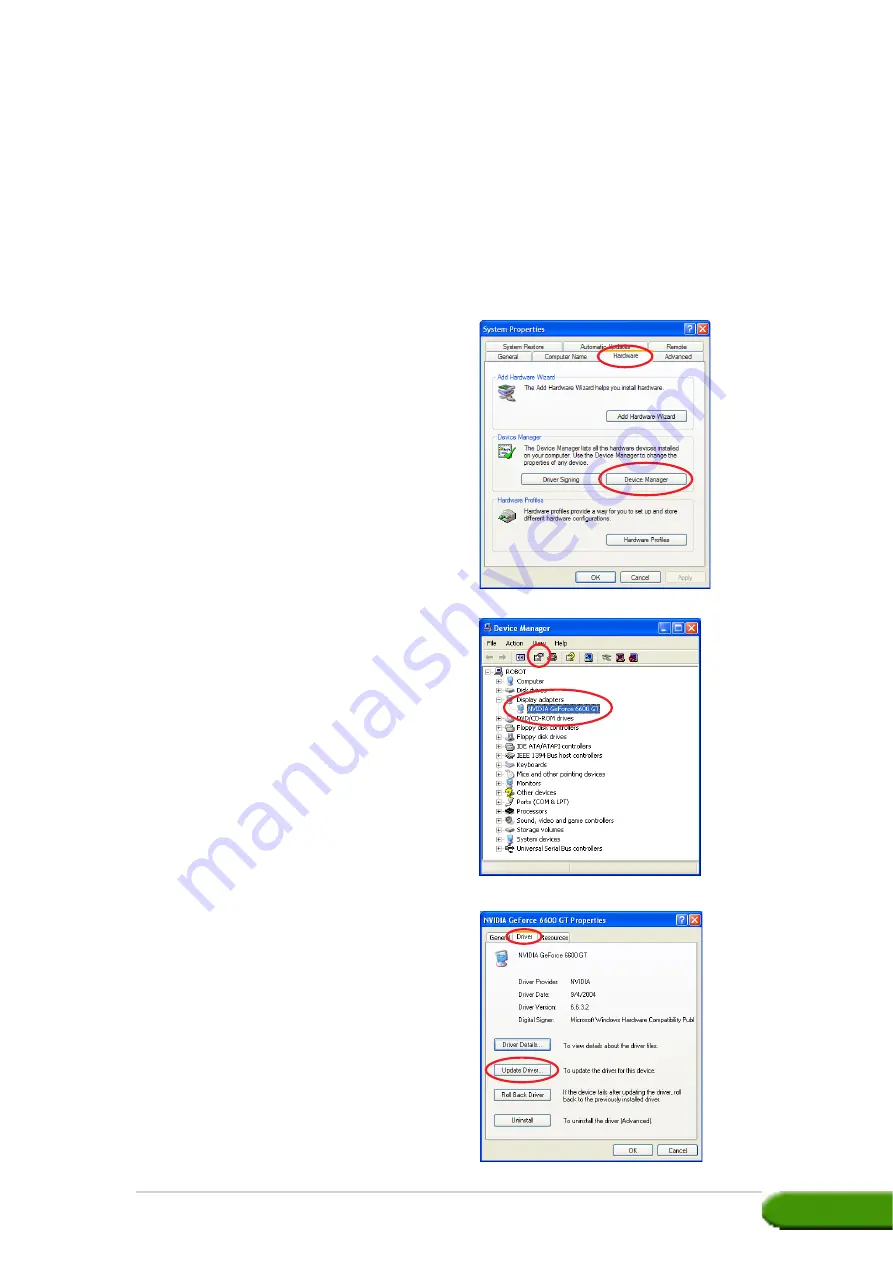
Updating the Windows display driver

Updating the Windows display driver

Updating the Windows display driver

Updating the Windows display driver

Updating the Windows display driver

The latest display driver for your ASUS graphics card is available at the
ASUS website (www.asus.com). Visit the ASUS website to download driver
updates.

To update the Windows display driver:

5.

Select the current display
adapter then click on the
P r o p e r t i e s   i c o n

P r o p e r t i e s   i c o n

P r o p e r t i e s   i c o n

P r o p e r t i e s   i c o n

P r o p e r t i e s   i c o n.

1.

Boot your computer.

2.

Click the S t a r t

S t a r t

S t a r t

S t a r t

S t a r t button. Select

S e t t i n g s

S e t t i n g s

S e t t i n g s

S e t t i n g s

S e t t i n g s, then C o n t r o l

C o n t r o l

C o n t r o l

C o n t r o l

C o n t r o l

P a n e l

P a n e l

P a n e l

P a n e l

P a n e l.

3.

Double-click the S y s t e m

S y s t e m

S y s t e m

S y s t e m

S y s t e m icon in

the Control Panel. Select the
H a r d w a r e

H a r d w a r e

H a r d w a r e

H a r d w a r e

H a r d w a r e tab.

4.

Click D e v i c e   M a n a g e r

D e v i c e   M a n a g e r

D e v i c e   M a n a g e r

D e v i c e   M a n a g e r

D e v i c e   M a n a g e r, then

double-click on D i s p l a y

D i s p l a y

D i s p l a y

D i s p l a y

D i s p l a y

a d a p t e r s

a d a p t e r s

a d a p t e r s

a d a p t e r s

a d a p t e r s.

6.

From the Properties dialog box,
select the D r i v e r

D r i v e r

D r i v e r

D r i v e r

D r i v e r tab, then click

on U p d a t e   D r i v e r

U p d a t e   D r i v e r

U p d a t e   D r i v e r

U p d a t e   D r i v e r

U p d a t e   D r i v e r.

Summary of Contents for EN5750

Page 1: ...Graphics Card Drivers and Utilities Installation Guide ...

Page 2: ...OR DATA INTERRUPTION OF BUSINESS AND THE LIKE EVEN IF ASUS HAS BEEN ADVISED OF THE POSSIBILITY OF SUCH DAMAGES ARISING FROM ANY DEFECT OR ERROR IN THIS MANUAL OR PRODUCT SPECIFICATIONS AND INFORMATION CONTAINED IN THIS MANUAL ARE FURNISHED FOR INFORMATIONAL USE ONLY AND ARE SUBJECT TO CHANGE AT ANY TIME WITHOUT NOTICE AND SHOULD NOT BE CONSTRUED AS A COMMITMENT BY ASUS ASUS ASSUMES NO RESPONSIBILI...

Page 3: ...g the Windows display driver 11 2 3 Removing display driver 13 3 Utilities 14 3 1 Utilities installation 15 3 2 Removing installed utilities 18 4 Accessories Drivers 20 4 1 Installing Webcam driver 20 4 2 Installing the Gamepad drivers 22 4 3 Removing Webcam driver 24 4 4 Removing the Gamepad drivers 25 5 ASUS Contact information 26 6 Other information 27 6 1 Browse Support CD 27 6 3 View readme f...

Page 4: ...s cause harmful interference to radio or television reception which can be determined by turning the equipment off and on the user is encouraged to try to correct the interference by one or more of the following measures Reorient or relocate the receiving antenna Increase the separation between the equipment and receiver Connect the equipment to an outlet on a circuit different from that to which ...

Page 5: ...ted and the power cables are not damaged If you detect any damage contact your dealer immediately To avoid short circuits keep paper clips screws and staples away from connectors slots sockets and circuitry Avoid dust humidity and temperature extremes Do not place the product in any area where it may become wet Place the product on a stable surface If you encounter technical problems with the prod...

Page 6: ...SUS hardware and software products The ASUS websites are listed in the ASUS Contact Information on the inside front cover of this installation guide 2 Optional Documentation Optional Documentation Optional Documentation Optional Documentation Optional Documentation Your product package may include optional documentation such as warranty flyers that may have been added by your dealer These document...

Page 7: ...tem Click a menu item Click a menu item to open other to open other to open other to open other to open other installation menus installation menus installation menus installation menus installation menus If autorun is NOT enabled in your computer browse the contents of the support CD to locate the file SETUP EXE Double click the SETUP EXE SETUP EXE SETUP EXE SETUP EXE SETUP EXE to run the support...

Page 8: ...ancel Cancel Cancel Cancel Cancel to enter the Windows desktop 2 Insert the support CD into your CD ROM drive 3 If autorun is enabled the 2D 3D Graphics Video Accelerator appears automatically If autorun is disabled run Setup exe Setup exe Setup exe Setup exe Setup exe from the root directory of your support CD 4 From the 2D 3D Graphics Video Accelerator main menu click VGA Drivers VGA Drivers VGA...

Page 9: ...cal Typical Typical Typical Typical then click Next Next Next Next Next The Setup prepares the Install Shield Wizard which will guide you through the program setup process A progress bar on the lower right hand corner of your screen displays the progress of the driver installation process The Typical Typical Typical Typical Typical setup type will not include the Windows Display Model WDM and VGAR...

Page 10: ... Microsoft DirectX setup Select I accept the I accept the I accept the I accept the I accept the agreement agreement agreement agreement agreement then click Next Next Next Next Next The following screen displays the NVIDIA display driver installation process After installing the NVIDIA display drivers the setup installs the ASUS Enhanced display drivers The wizard copies the necessary files to yo...

Page 11: ...Back Back Back Back to return from previous screen or Cancel Cancel Cancel Cancel Cancel to abort installation The Microsoft DirectX setup installs components 9 The Microsoft DirectX setup notifies you to restart your computer to apply changes Click Finish Finish Finish Finish Finish The ASUS VGA installation program will restart your computer after all components are installed into your computer ...

Page 12: ...Cancel Cancel Cancel Cancel to enter the Windows desktop 2 Insert the support CD into your CD ROM drive 3 If autorun is enabled the 2D 3D Graphics Video Accelerator appears automatically If autorun is disabled run Setup exe Setup exe Setup exe Setup exe Setup exe from the root directory of your support CD 4 From the 2D 3D Graphics Video Accelerator main menu click VGA Drivers VGA Drivers VGA Drive...

Page 13: ...er Driver Driver Driver NVIDIA NVIDIA NVIDIA NVIDIA NVIDIA installs the NVIDIA driver for your graphics card ASUS ASUS ASUS ASUS ASUS installs the ASUS Enhanced drivers to support the bundled ASUS utilities including ASUS GameFace Live and SmartDoctor These enhanced drivers also enable support for Direct3D and OpenGL modes DirectX DirectX DirectX DirectX DirectX installs the latest Microsoft Direc...

Page 14: ...rectX item from the custom install screen 9 Click Next Next Next Next Next to continue or Back Back Back Back Back to return from previous screen or Cancel Cancel Cancel Cancel Cancel to abort installation The ASUS Enhanced Display drivers installation process appears only if you selected ASUS drivers from the custom install screen The NVIDIA driver installation process appears only if you selecte...

Page 15: ...will restart your computer after all components are installed into your computer 11 The following screen displays the Windows Display Model WDM drivers setup Click Next Next Next Next Next 12 After the WDM driver installation is complete the setup notifies you to restart your computer Select No I will restart my No I will restart my No I will restart my No I will restart my No I will restart my co...

Page 16: ...o w n o w n o w then click Finish Finish Finish Finish Finish 13 From the ASUS VGARTD driver installation screen select Yes Yes Yes Yes Yes install its VGARTD driver install its VGARTD driver install its VGARTD driver install its VGARTD driver install its VGARTD driver then click O K O K O K O K O K 14 Follow the succeeding screen instructions to install the appropriate VGARTD driver for the chips...

Page 17: ...t the current display adapter then click on the Properties icon Properties icon Properties icon Properties icon Properties icon 1 Boot your computer 2 Click the Start Start Start Start Start button Select Settings Settings Settings Settings Settings then Control Control Control Control Control Panel Panel Panel Panel Panel 3 Double click the System System System System System icon in the Control P...

Page 18: ...Have Disk Have Disk on the following screen then click Next Next Next Next Next 10 When setup prompts you for the location of the driver click Browse Browse Browse Browse Browse to locate the saved driver file in your hard disk network floppy or CD ROM drive 11 Follow the succeeding screen instructions 12 The application prompts you to restart your computer to complete the process Click Y e s Y e ...

Page 19: ...d or Remove Programs Programs Programs Programs Programs screen 3 Select ASUS NVIDIA Driver ASUS NVIDIA Driver ASUS NVIDIA Driver ASUS NVIDIA Driver ASUS NVIDIA Driver from the list then click Change Remove Change Remove Change Remove Change Remove Change Remove 4 Follow the succeeding screen instructions 5 The application prompts you to restart your computer to complete the process Click Y e s Y ...

Page 20: ...ou can see and talk to your opponents while playing full screen online games B B B B B ASUS SmartDoctor ASUS SmartDoctor ASUS SmartDoctor ASUS SmartDoctor ASUS SmartDoctor The Smart Doctor utility monitors the VGA card condition and significantly cools down the VGA Graphics Processing Unit GPU This utility also allows you to adjust the graphics card clock settings The ASUS Smart Doctor utility wor...

Page 21: ...ies Utilities Utilities Utilities Utilities The Setup prepares the Install Shield Wizard which will guide you through the program setup process 4 Click Next Next Next Next Next from the Install Shield Wizard welcome screen 3 1 3 1 3 1 3 1 3 1 Utilities installation Utilities installation Utilities installation Utilities installation Utilities installation To install the utilities Method 1 Complete...

Page 22: ... advanced users 1 Insert the support CD into your CD ROM drive 2 If autorun is enabled the 2D 3D Graphics Video Accelerator appears automatically If autorun is disabled run Setup exe Setup exe Setup exe Setup exe Setup exe from the root directory of your support CD 3 From the 2D 3D Graphics Video Accelerator main menu click Utilities Utilities Utilities Utilities Utilities The Setup prepares the I...

Page 23: ...installation guide 1 7 1 7 1 7 1 7 1 7 4 Click Next Next Next Next Next from the Install Shield Wizard welcome screen 5 Select Custom Custom Custom Custom Custom then click Next Next Next Next Next 6 Click the check box of the item you want to install then click Next Next Next Next Next 7 The setup displays the target directory for the utilities selected click Next Next Next Next Next ...

Page 24: ...low the procedures in this section to completely remove the utilities from the system To remove the utilities 1 Insert the support CD into your CD ROM drive 2 If autorun is enabled the 2D 3D Graphics Video Accelerator appears automatically If autorun is disabled run Setup exe Setup exe Setup exe Setup exe Setup exe from the root directory of your support CD 3 From the 2D 3D Graphics Video Accelera...

Page 25: ...es installation guide Drivers and utilities installation guide Drivers and utilities installation guide 1 9 1 9 1 9 1 9 1 9 5 Click the check box of the item you want to remove then click Next Next Next Next Next 6 Click Finish Finish Finish Finish Finish to restart your computer and apply the changes ...

Page 26: ...Installing Webcam driver Installing Webcam driver To install the webcam drivers 1 Insert the support CD into your CD ROM drive 2 If autorun is enabled the 2D 3D Graphics Video Accelerator appears automatically If autorun is disabled run Setup exe Setup exe Setup exe Setup exe Setup exe from the root directory of your support CD 3 From the 2D 3D Graphics Video Accelerator main menu click Accessorie...

Page 27: ...tion guide Drivers and utilities installation guide 2 1 2 1 2 1 2 1 2 1 5 Click Next Next Next Next Next on the following screen The setup displays the installation progress Click Cancel Cancel Cancel Cancel Cancel if you want to abort installation 6 After the installation is complete click Finish Finish Finish Finish Finish You can now use your webcam ...

Page 28: ...D into your CD ROM drive 2 If autorun is enabled the 2D 3D Graphics Video Accelerator appears automatically If autorun is disabled run Setup exe Setup exe Setup exe Setup exe Setup exe from the root directory of your support CD 3 From the 2D 3D Graphics Video Accelerator main menu click Accessories Drivers Accessories Drivers Accessories Drivers Accessories Drivers Accessories Drivers The Setup di...

Page 29: ...s and utilities installation guide Drivers and utilities installation guide Drivers and utilities installation guide 2 3 2 3 2 3 2 3 2 3 The setup prepares the files for installation 6 After the installation is complete click Finish Finish Finish Finish Finish You can now use your game pad ...

Page 30: ...un is enabled the 2D 3D Graphics Video Accelerator appears automatically If autorun is disabled run Setup exe Setup exe Setup exe Setup exe Setup exe from the root directory of your support CD 3 From the 2D 3D Graphics Video Accelerator main menu click Accessories Drivers Accessories Drivers Accessories Drivers Accessories Drivers Accessories Drivers The Setup displays the supported accessories 4 ...

Page 31: ...d the 2D 3D Graphics Video Accelerator appears automatically If autorun is disabled run Setup exe Setup exe Setup exe Setup exe Setup exe from the root directory of your support CD 3 From the 2D 3D Graphics Video Accelerator main menu click Accessories Drivers Accessories Drivers Accessories Drivers Accessories Drivers Accessories Drivers The Setup displays the supported accessories 4 Click Game P...

Page 32: ...he 2D 3D Graphics Video Accelerator appears automatically If autorun is disabled run Setup exe Setup exe Setup exe Setup exe Setup exe from the root directory of your support CD 3 From the 2D 3D Graphics Video Accelerator main menu click ASUS Contact Info ASUS Contact Info ASUS Contact Info ASUS Contact Info ASUS Contact Info The setup displays a text box containing the contact information for all...

Page 33: ...nabled the 2D 3D Graphics Video Accelerator appears automatically If autorun is disabled run Setup exe Setup exe Setup exe Setup exe Setup exe from the root directory of your support CD 3 From the 2D 3D Graphics Video Accelerator main menu click Browse CD Browse CD Browse CD Browse CD Browse CD The setup displays the following window 6 Other information 6 1 6 1 6 1 6 1 6 1 Browse Support CD Browse...

Page 34: ...file View readme file View readme file To view the readme file 1 Insert the support CD into your CD ROM drive 2 If autorun is enabled the 2D 3D Graphics Video Accelerator appears automatically If autorun is disabled run Setup exe Setup exe Setup exe Setup exe Setup exe from the root directory of your support CD 3 From the 2D 3D Graphics Video Accelerator main menu click Read Me Read Me Read Me Rea...

Page 35: ... installed No display after the card is installed Your card might not be properly installed Make sure that the card is not tilted or skewed on the slot Your monitor might not be properly connected Make sure that the signal cable is properly connected to your monitor and graphics card Your graphics card is not supported by your motherboard Check the technical documentation that came with your mothe...

Page 36: ... card drivers from different vendors Remove any unused graphics card drivers installed in your system Install the graphics card driver from the support CD that came with your graphics card package The graphics card auxiliary power is not connected Make sure that the auxiliary power cables are properly connected with the power supply unit If your monitor comes with BNC connectors the port connectio...

Page 37: ...system settings Make sure that your graphics card can support your desired display settings See the specifications table that came with this graphics card package Some graphics driver files might be corrupted Remove your current graphics drivers and reinstall the graphics drivers from the support CD Poor heat dissipation inside the chassis Make sure that the chassis fan CPU and heatsink with fan a...

Page 38: ...ASUS NVIDIA series graphics card ASUS NVIDIA series graphics card ASUS NVIDIA series graphics card ASUS NVIDIA series graphics card ASUS NVIDIA series graphics card A 4 A 4 A 4 A 4 A 4 ...

Reviews: