background image

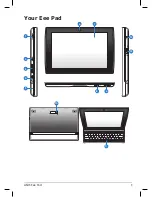
ASUS Eee Pad

1

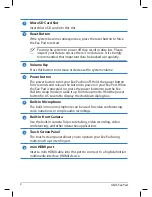
Micro SD Card Slot

Insert Micro SD card into this slot.

2

Reset Button

If the system becomes unresponsive, press the reset button to force 

the Eee Pad to restart.

Forcing the system to power off may result in data loss. Please 

inspect your data to ensure there is no data loss. It is strongly 

recommended that important data be backed up regularly.

3

Volume Key

Press this button to increase or decrease the system volume.

4

Power button

The power button turns your Eee Pad on/off. Hold the power button 

for 4 seconds and release the button to power on your Eee Pad. When 

the Eee Pad is powered on, press the power button to put the Eee 

Pad into sleep mode or wake it up from sleep mode. Hold the power 

button for 0.5 second to display the shutdown dialog box. 

5

Built-in Microphone

The built-in mono microphone can be used for video conferencing, 

voice narrations, or simple audio recordings.

6

Built-in front Camera

Use the built-in camera for picture taking, video recording, video 

conferencing, and other interactive applications.

7

Touch Screen Panel

The touch screen panel allows you to operate your Eee Pad using 

multi-touch up to ten fingers.

8

mini HDMI port

Insert a mini HDMI cable into this port to connect to a high-definition 

multimedia interface (HDMI) device.

Summary of Contents for Eee Pad SL101

Page 1: ...ual items You can send your Eee Pad through airport X ray machines But do not send your Eee Pad through airport magnetic detectors or expose it to magnetic wands Airplane Precautions Ask an airline personnel if you want to use your Eee Pad onboard an aircraft Most airlines have restrictions for using electronic devices Most airlines allow electronic use only between and not during takeoffs and lan...

Page 2: ...ms is damaged or missing contact your retailer The power plug that comes with your Eee Pad may vary depending on your territory to fit the wall outlet Eee Pad USB Charger Power Plug Docking connector to USB cable UserManual User Manual Warranty Card ...

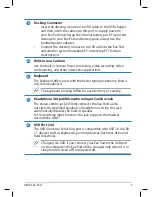
Page 3: ...ASUS Eee Pad Your Eee Pad 6 7 HDMI 8 9 10 Home PgDp PgUp End Enter Backspace Tab Caps Lock Shift Shift Ctrl Ctrl Alt Fn 11 12 13 1 4 3 2 5 ...

Page 4: ...ase the button to power on your Eee Pad When the Eee Pad is powered on press the power button to put the Eee Pad into sleep mode or wake it up from sleep mode Hold the power button for 0 5 second to display the shutdown dialog box 5 Built in Microphone The built in mono microphone can be used for video conferencing voice narrations or simple audio recordings 6 Built in front Camera Use the built i...

Page 5: ...d The keyboard offers users with the better typing experience than a on screen keyboard The keyboard printing differs for each territory or country 12 Headphone Output Microphone Input Combo Jack The stereo combo jack 3 5mm connects the Eee Pad s audio out signal to amplified speakers or headphones Using this jack automatically disables the built in speaker For microphone input function the jack s...

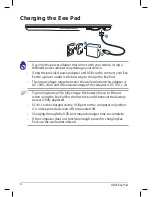
Page 6: ...ng through the USB port may take longer time to complete If the computer does not provide enough power for charging Eee Pad use the wall outlet instead Use only the power adapter that comes with your device Using a different power adapter may damage your device Using the provided power adapter and USB cord to connect your Eee Pad to a power outlet is the best way to charge the Eee Pad The input vo...

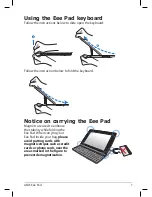
Page 7: ...e Eee Pad Magnets are used to enhance the stability while folding the Eee Pad When carrying your Eee Pad inside your bag please avoid putting cards with magnetic stripes such as credit cards or phone cards near the areas marked in the figure to prevent demagnetization 2 1 2 Follow the instruction below to fold the keyboard ...

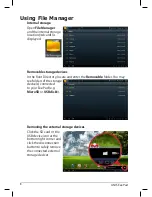
Page 8: ...n the Root Directory locate and enter the Removable folder You may see folders of the storage device s connected to your Eee Pad e g MicroSD or USBdisk1 Removing the external storage devices Click the SD card or the USB device icon at the bottom right corner and click the disconnection button to safely remove the connected external storage devices ...

Page 9: ...erference by one or more of the following measures Reorient or relocate the receiving antenna Increase the separation between the equipment and receiver Connect the equipment into an outlet on a circuit different from that to which the receiver is connected Consult the dealer or an experienced radio TV technician for help Changes or modifications not expressly approved by the party responsible for...

Page 10: ...use undesired operation of the device This Class B digital apparatus complies with Canadian ICES 003 Cet appareil numérique de la classe B est conforme à la norme NMB 003 du Canada This Category II radiocommunication device complies with Industry Canada Standard RSS 310 Ce dispositif de radiocommunication de catégorie II respecte la norme CNR 310 d Industrie Canada IC Radiation Exposure Statement ...

Page 11: ...35 C 95 F Risk of Explosion if Battery is Replaced by an Incorrect Type Dispose of Used Batteries According to the Instructions CE Mark Warning CE marking for devices without wireless LAN Bluetooth The shipped version of this device complies with the requirements of the EEC directives 2004 108 EC Electromagnetic compatibility and 2006 95 EC Low voltage directive CE marking for devices with wireles...

Page 12: ... entitled to recover damages from ASUS In each such instance regardless of the basis on which you are entitled to claim damages from ASUS ASUS is liable for no more than damages for bodily injury including death and damage to real property and tangible personal property or any other actual and direct damages resulted from omission or failure of performing legal duties under this Warranty Statement...

Reviews: