background image

2

© ASUSTek Computer Inc. All Rights Reserved.

Quick Installation Guide

Device Installation

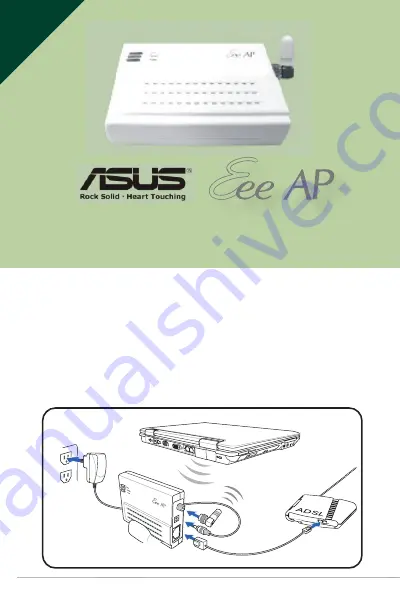
1.  Connect the antenna to the Eee AP.

2.  Plug the power connector into the AC-in port on the unit, and 

plug the other end into a power outlet.

3.   Connect the Eee AP with your PC or notebook (Eee PC  

preferable) via wireless connection.

Englaih

Summary of Contents for Eee AP

Page 1: ...lation Guide Guide d installation rapide Anleitung zur schnellen Installation Guida rapida di installazione 快速安装指南 快速安裝指南 A SUS E ee A P Q uick Installation Guide Version 1 0 March 4 th 20 0 8 預設WEP KEY 3132333435 ...

Page 2: ...1 Eee AP Quick Installation Guide V1 March 4th 2008 Language Langue Sprache Lingua язык 语言 語言 English 2 Français 6 Deutsch 10 Italiano 14 Русский 18 简体中文 22 繁體中文 26 ...

Page 3: ...uide Device Installation 1 Connect the antenna to the Eee AP 2 Plug the power connector into the AC in port on the unit and plug the other end into a power outlet 3 Connect the Eee AP with your PC or notebook Eee PC preferable via wireless connection E n g l a i h ...

Page 4: ...e click on the EeeAP icon 2 The Eee AP Setup Wizard window appears Click Connect 3 Please wait for a few moments as Eee AP establishes connection with Eee PC A message will appear to notify you that the connection to Eee PC has been established and Eee AP has been configured to work with Eee PC Click OK to close the dialogue Now you re connected to the Internet Enjoy surfing ...

Page 5: ... settings if any 3 Type http 192 168 0 10 on the ad dress bar of the browser then press Enter 4 A web browser appears When prompted enter the default user name admin and password admin then click OK The Web Configuration utility page appears Please do not change the default configurations for Eee AP Doing so may prevent Easy Connection Utility from functioninf properly If you need to change the SS...

Page 6: ...mputer 1 Make sure you installed the Eee AP properly as the previous section 2 On the Eee PC screen switch to the Internet tab choose Network click Create choose Local Area Network click Next select Static IP Address in Select Address Type screen in the Connection Settings screen enter the IP Address within the range 192 168 0 1 254 and click Next 3 Open a web browser and link to http 192 168 0 10...

Page 7: ...ion de l appareil 1 Connectez l antenne au P A Eee 2 Branchez le connecteur secteur dans le port d entrée C A sur l appareil et branchez l autre extrémité dans une prise secteur 3 Connectez votre P A Eee à votre PC ou à un ordinateur portatif PC Eee de préférence à l aide d une connexion sans fil ...

Page 8: ...a fenêtre de l Assistant de configuration du P A Eee appa raît Cliquez sur Connect Connexion 3 Veuillez patienter quelques instants pendant que le P A Eee établit la connexion avec le PC Eee Un message apparaitra pour vous aviser que la connexion avec le PC Eee a été établie et que le P A Eee AP a été configuré pour travailler avec le PC Eee Cliquez sur OK pour fermer la boîte de dialogue Vous ête...

Page 9: ...y s il y en a 3 Tapez http 192 168 0 10 dans la barre d adresse du navigateur puis appuyez sur Entrée 4 Un navigateur Web apparaîtra Lorsqu on vous le demande entrez l identifiant par défaut admin et le mot de passe admin puis cliquez sur OK La page de l utilitaire de la configuration Web apparaît Veuillez ne pas changer les configurations par défaut du P A Eee Si vous le faites cela pourra empêch...

Page 10: ... précédente 2 Sur l écran du PC Eee faites passer sur l onglet Internet choisissez Network Réseau cliquez Créer choisissez Local Area Net work Réseau local cliquez sur Next Suivant sélectionnez Static IP Address Adresse IP statique dans l écran Select Ad dress Type Sélectionner le type d adresse dans l écran Con nection Settings Paramètres de connexion entez l adresse IP dans la plage 192 168 0 1 ...

Page 11: ...ion der Vorrichtung 1 Schließen Sie die Antenne an Eee AP an 2 Stecken Sie den Leistungssteckverbinder in den AC in Anschluss der Einheit und das andere Ende in eine Steckdose 3 Schließen Sie Eee AP an Ihren PC oder Ihr Notebook bevorzugt Eee PC über eine Drahtlosverbindung an D e u t s c h ...

Page 12: ... Es erscheint das Eee AP Setup Wizard Fenster Klicken Sie auf Connect 3 Warten Sie bitte ein paar Sekunden bis Eee AP die Verbindung mit dem Eee PC hergestellt hat Es erscheint eine Nachricht die Sie informiert dass die Verbindung mit dem Eee PC hergestellt wurde und dass Eee AP für die Arbeit mit dem Eee PC konfiguriert wurde Klicken Sie auf OK um das Dialogfenster zu schließen Jetzt sind Sie mit...

Page 13: ...tivieren Sie ggf Ihre Proxy Einstellungen 3 Geben Sie http 192 168 0 10 in die Adressleiste des Browsers ein dann drücken Sie Enter 4 Es erscheint ein Web Browser Wenn Sie gefordert werden geben Sie den Default Benutzernamen admin und das Passwort admin ein klicken Sie dann OK Die erscheibt die Web Konfiguration Utility Seite Bitte ändern Sie die Default Konfigurationen für Eee AP nicht Sonst kann...

Page 14: ...s Sie Eee AP richtig installiert haben wie im vorhergehenden Abschnitt 2 Auf dem Eee PC Bildschirm schalten Sie um zu Internet tab choose Netzwerk click Erstellen choose Lokales Netz click Nächstes select Statische IP Adresse in Adressentyp wählen screen in the Verbindungseinstellungen screen Geben Sie die IP Adresse innerhalb des Bereichs ein 192 168 0 1 254 and click Nächstes 3 Öffnen Sie einen ...

Page 15: ...azione del dispositivo 1 Connettere l antenna a Eee AP 2 Collegare il cavo di alimentazione alla porta CA dell unità e collegare l altra estremità alla presa di corrente 3 Connettere Eee AP al vostro PC o notebook preferibilmente Eee PC tramite connessione senza fili I t a l i a n o ...

Page 16: ...ee AP 2 Si aprirà la finestra di dialogo dell Installazione guidata di Eee AP Fare clic su Connetti 3 Attendere alcuni istanti affinché Eee AP stabilisca una connessione con Eee PC Un messaggio avvertirà che la connessione con Eee PC è stata stabilita e che Eee AP è configurato per operare con Eee PC Fare clic su OK per chiudere la finestra di dialogo Adesso è possibile accedere a Internet Buona n...

Page 17: ...ni del proxy 3 Digitare l indirizzo http 192 168 0 10 sulla barra degli indirizzi del browser e premere Invio 4 Apparirà un browser web Quando richiesto inserire il nome utente admin e la password admin predefiniti e fare clic su OK Apparirà la pagina dell utilità di configurazione web Bitte ändern Sie die Default Konfigurationen für Eee AP nicht Sonst kann das Easy Connection Utility nicht richti...

Page 18: ...e come illustrato nella sezione precedente 2 Dalla schermata di Eee PC scegliere la scheda Internet selezionare Rete fare clic su Crea selezionare Rete locale fare clic su Avanti selezionare Indirizzo IP statico nella schermata Seleziona tipo di indirizzo nella schermata Impostazioni di connessione inserire un indirizzo IP compreso nell intervallo 192 168 0 1 254 e fare clic su Avanti 3 Aprire un ...

Page 19: ...дключите антенну к устройству Eee AP 2 Включите разъем питания в соответствующее гнездо прибора подключите другой разъем к внешнему источнику переменного тока 3 Подключите устройство Eee AP к настольному компьютеру или ноутбуку предпочтительный вариант Eee PC посредством беспроводного соединения Р у с с к и й ...

Page 20: ... иконке EeeAP 2 После чего появится окно программы Eee AP Setup Wizard Мастер настройки Eee AP Нажмите на кнопку Connect Подключиться 3 Подождите несколько секунд пока Eee AP устанавливает подключение с Eee PC На экране появится сообщение подтверждающее что соединение установлено и Eee AP настроен для работы с Eee PC Нажмите на кнопку OK чтобы закрыть диалогове окно Теперь вы подключены к сети Инт...

Page 21: ...ет браузер 2 Отключите настройки прокси сервера если они включены 3 Введите http 192 168 0 10 в адресной строке браузера затем нажмите Войти 4 Появится окно интернет браузера Когда система запросит имя пользователя и пароль введите в обоих случаях admin и после чего нажмите OK Появляется страница Настройка сети Не меняйте установленные по умолчанию настройки Eee AP Это может отрицательно сказаться...

Page 22: ...ыдущего раздела 2 На экране Eee PC перейдите на вкладку Internet Интернет выберите пункт Network Сеть нажмите на кнопку Create Создать после чего выберите пункт Local Area Network Локальная сеть нажмите Next Далее на экране Select Address Type Тип IP flhtcf выберите Static IP Address Статический IP адрес после чего на экране Connection Settings Настройки соединения введите IP адрес в диапазоне 192...

Page 23: ...22 ASUSTek Computer Inc All Rights Reserved 快速安装指南 设备安装 1 将天线与 Eee AP 连接 2 把电源连接器插入设备上的 AC in 端口 然后将另一端插 入电源插座 3 使用无线网络将 Eee AP 与台式电脑或笔记本电脑连接 简 体 中 文 ...

Page 24: ...on Guide V1 March 4th 2008 简易模式 开始与 Eee AP 建立无线互联网连接 1 首先请切换到 Eee PC 桌面上的设置标签 双击 EeeAP 图标 2 Eee AP 设置向导窗口出现 单击 连接 3 Eee AP 正在与 Eee PC 建立连接 请稍等 稍后会 出现一条消息通知您已建立与 Eee PC 的连接 且 Eee AP 已配置好与 Eee PC 协作 单击 确定 关闭 对话框 现在您已连接到互联网 祝您上网愉快 ...

Page 25: ... 的高级接入点以及以太网适配器设置 使用互联网浏览器启动 Web 配置 实用程序 1 打开 Web 浏览器 2 如果使用代理 请禁用您的 代理设置 3 在浏览器地址栏中键入 http 192 168 0 10 然后 按下 回车 4 Web 浏览器打开 出现提示时 输入默认用户名 admin 和密 码 admin 然后单击 确定 则 Web 配置 实用程序页面 出现 请勿更改 Eee AP 默认的配置 这样做可能会使 Easy Connection Utility 无 法正常运作 如果需要更改 SSID 请参考 Eee AP 用户手册 第二节 取得说明 在您可以用 Web 配置 实用程序设置 Eee AP 之前 您必须按照 Eee AP 用户 手册 第三节 的描述设置笔记本电脑 ...

Page 26: ...也可以使用 AP 设备 背面的卡扣和固定钉子将其竖直置于墙面上 IP 配置 将设备实用程序应用到您的电脑 1 确保您按前述方法正确安装了 Eee AP 2 从 Eee PC 画面 切换至 互联网 索引卷标 选择 网络 设置 单击 创建 选择 局域网 单击 下一步 在 选择地址类型 画面中选择 静态 IP 地址 在 联机 设定 中 输入下列范围内的 IP 地址 192 168 0 1 254 并单击 下一步 3 打开 Web 浏览器 并链接到 http 192 168 0 10 IP 地址无法设置为 Eee AP 默认 IP 192 168 0 10 ...

Page 27: ...26 ASUSTek Computer Inc All Rights Reserved 快速安裝指南 裝置安裝 1 將 Eee AP 與天線連接 2 將電源連接器一端插入 AC 輸入連接埠 並將另一端插入 電源插座 3 透過無線網路 將 Eee AP 與您的個人電腦或筆記型電腦 連接 繁 體 中 文 ...

Page 28: ...March 4th 2008 簡易模式 開始與 Eee AP 進行無線網際網路連線 1 首先 請切換至 Eee PC 桌面上的 設定 索引標 籤 連按兩下 EeeAP 圖示 2 Eee AP 設定精靈 視窗便會出現 按一下 連線 3 在 Eee AP 建立與 Eee PC 的連線時請稍待片刻 之 後會出現訊息來通知您已建立 Eee PC 的連線 且 已將 Eee AP 設定為與 Eee PC 共同運作 按一下 確定 關閉對話框 現在您已連線至網際網路 請盡情享受上網瀏覽的樂趣 ...

Page 29: ...路介面卡設定 使用網際網路瀏覽器啟動 Web 組態 公用程式 1 開啟網頁瀏覽器 2 停用 Proxy 設定 若有的話 3 在瀏覽器網址列輸入 http 192 168 0 10 然後按下 Enter 4 網頁瀏覽器便會出現 當出現提 示時 輸入預設的使用者名稱 admin 及密碼 admin 然後按 一下 確定 Web 組態 公用 程式頁面便會出現 請不要變更 Eee AP 的預設組態 變更預設組態可能會導致 Easy Connection Utility 無法正常運作 如果您需要變更 SSID 請參閱 Eee AP 使用者手冊 第二節內容 以取得說明 在您可以用 Web 組態 公用程式設定 Eee AP 之前 您必須依照 Eee AP 使用者手冊 第三節所述 設定您的筆記型電腦 ...

Page 30: ... 與固定釘子將 AP 直立掛於牆上 IP 組態 若要在電腦中安裝使用裝置公用程式 1 確認您已照前段所述內容正確安裝 Eee AP 2 在 Eee PC 畫面上 切換至 網際網路 索引標籤 選 擇 網路設定 按一下 建立 選擇 區域網路 按 一下 下一步 在 選擇位址類型 畫面中 選擇 靜態 IP 位址 在 連線設定 中 輸入下列範圍內的 IP 位 址 192 168 0 1 254 並按一下 下一步 3 開啟網頁瀏覽器 然後連結至 http 192 168 0 10 IP 位址不能設定成 Eee AP 預設 IP 192 168 0 10 5 W7000000069 ...

Reviews: