background image

ASUS DV201

7

ENGLISH

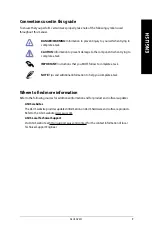
Conventions used in this guide

To ensure that you perform certain tasks properly, take note of the following symbols used 

throughout this manual.

DANGER/WARNING:

 Information to prevent injury to yourself when trying to 

complete a task. 

CAUTION:

 Information to prevent damage to the components when trying to 

complete a task. 

IMPORTANT:

 Instructions that you MUST follow to complete a task.

NOTE:

 Tips and additional information to help you complete a task.

Where to find more information

Refer to the following sources for additional information and for product and software updates.


ASUS websites


The ASUS website provides updated information on ASUS hardware and software products. 

Refer to the ASUS website www.asus.com.


ASUS Local Technical Support


Visit ASUS website at http://support.asus.com/contact for the contact information of local 

Technical Support Engineer. 

Summary of Contents for DV201

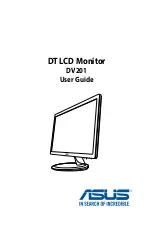
Page 1: ...DT LCD Monitor DV201 User Guide ...

Page 2: ...R A PARTICULAR PURPOSE IN NO EVENT SHALL ASUS ITS DIRECTORS OFFICERS EMPLOYEES OR AGENTS BE LIABLE FOR ANY INDIRECT SPECIAL INCIDENTAL OR CONSEQUENTIAL DAMAGES INCLUDING DAMAGES FOR LOSS OF PROFITS LOSS OF BUSINESS LOSS OF USE OR DATA INTERRUPTION OF BUSINESS AND THE LIKE EVEN IF ASUS HAS BEEN ADVISED OF THE POSSIBILITY OF SUCH DAMAGES ARISING FROM ANY DEFECT OR ERROR IN THIS MANUAL OR PRODUCT SPE...

Page 3: ...o know your computer 10 Front panel 10 Rear panel 12 Chapter 2 Setting up your monitor 13 Attaching removing your monitor to from its base 13 Attaching your monitor to its base 13 Removing your monitor from its base 14 Connecting to your desktop PC 15 Connecting via the VGA port 15 Powering your monitor 15 Adjusting your monitor 16 Chapter 3 Using the Onscreen Display OSD menu 17 Configuring the O...

Page 4: ...residential installation This equipment generates uses and can radiate radio frequency energy and if not installed and used in accordance with manufacturer s instructions may cause harmful interference to radio communications However there is no guarantee that interference will not occur in a particular installation If this equipment does cause harmful interference to radio or television reception...

Page 5: ...or top of the monitor are provided for ventilation Do not block these slots Never place this product near or over a radiator or heat source unless proper ventilation is provided Plug the monitor s power adapter to the correct power rating based on the label or local power regulations Do not overload power strips and extention cords Overloading can result in fire or electric shock Avoid dust humidi...

Page 6: ...a cleaner that is intended for use with an LCD monitor Do not use a cleaner containing alcohol or acetone Do not spray the cleaner directly on the screen as it may drip inside the monitor and cause an electric shock LCD monitor behavior The monitor screen may flicker when you use it for the first time Turn your monitor off then turn it on again to ensure that your monitor stops flickering The moni...

Page 7: ...sk IMPORTANT Instructions that you MUST follow to complete a task NOTE Tips and additional information to help you complete a task Where to find more information Refer to the following sources for additional information and for product and software updates ASUS websites The ASUS website provides updated information on ASUS hardware and software products Refer to the ASUS website www asus com ASUS ...

Page 8: ... Normal White White luminance Center 250 cd m2 Typ Contrast radio 1000 Typ Optical response time 5ms Typ on off Nominal InputVoltageVDD 5 0V Typ Power consumption VDD Line LED Line LED Line PBLU typ 8 32 W TBC VDD Line PDD typ TBD Electrical interface Dual channel LVDS Support color 16 7M colors RGB 6 bit Hi_FRC Surface treatment Anti glare 3H Temperature range 0 40o C Operating storagge 20 60o C ...

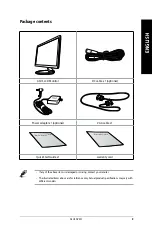
Page 9: ...sing contact your retailer The illustrated items above are for reference only Actual product specifications may vary with different models ASUS LCD Monitor DC cable x 1 optional Power adapter x1 optional VGA cable x1 Quick Start Guide Quick Start Guide x1 warranty card Warranty card ...

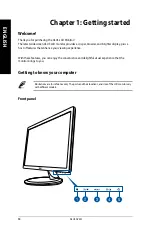
Page 10: ...plus a host of features that enhance your viewing experience With these features you can enjoy the convenience and delightful visual experience that the monitor brings to you Getting to know your computer Illustrations are for reference only The ports and their locations and size of the LCD monitor vary with different models Front panel Chapter 1 Getting started ...

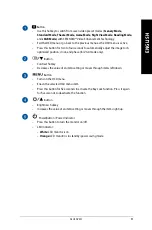
Page 11: ...position clock and phase for VGA mode only Button Contrast hotkey Decreases the value of an item setting or moves through items left down Button Turns on the OSD menu Enacts the selected OSD menu item Press this button for five seconds to activate the Key Lock function Press it again for five seconds to deactivate the function Button Brightness hotkey Increases the value of an item setting or move...

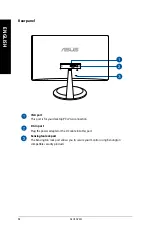
Page 12: ...t This port is for your desktop PC s VGA connection DC In port Plug the power adapter or the DC cable into this port Kensington lock port The Kensington lock port allows you to secure your monitor using Kensington compatible security products ...

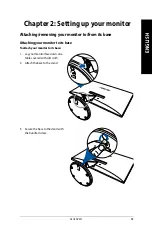
Page 13: ...hing removing your monitor to from its base Attaching your monitor to its base To attach your monitor to its base 1 Lay your monitor face down on a table covered with soft cloth 2 Attach the base to the stand 3 Secure the base to the stand with the bundled screw ...

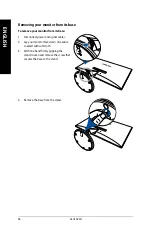
Page 14: ...e your monitor from its base 1 Disconnect power and signal cables 2 Lay your monitor face down on a table covered with soft cloth 3 With one hand firmly gripping the stand loosen and remove the screw that secures the base to the stand 4 Remove the base from the stand ...

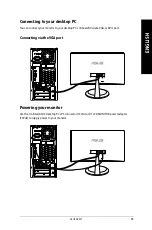
Page 15: ...u can connect your monitor to your desktop PC s onboard discrete VGA or DVI I port Connecting via theVGA port Powering your monitor Use the UL listed ASUS Desktop PC LPS connector 12Vdc or DT LCD MONITOR power adapter 19Vdc to supply power to your monitor ...

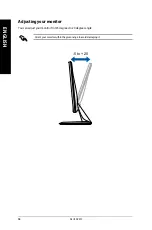
Page 16: ...16 ASUS DV201 ENGLISH Adjusting your monitor You can adjust your monitor from 5 degrees to 20 degrees angle Orient your monitor within the given range to avoid damaging it 5 to 20 ...

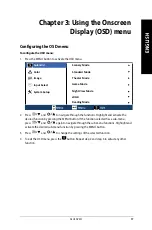
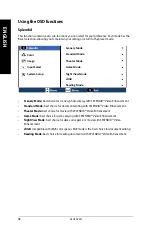
Page 17: ...ight View Mode Reading Mode 2 Press and to navigate through the functions Highlight and activate the desired function by pressing the MENU button If the function selected has a sub menu press and again to navigate through the sub menu functions Highlight and activate the desired sub menu function by pressing the MENU button 3 Press and to change the settings of the selected function 4 To exit the ...

Page 18: ...ing Mode Scenery Mode best choice for scenery photo display with SPLENDID Video Enhancement Standard Mode best choice for document editing with SPLENDID Video Enhancement Theater Mode best choice for movie with SPLENDID Video Enhancement Game Mode best choice for game playing with SPLENDID Video Enhancement NightView Mode best choice for dark scene game or movie with SPLENDID Video Enhancement sRG...

Page 19: ...following information displays the color details of your display Brightness Contrast Saturation ColorTemperature SkinTone DX201 Splendid Image Input Select System Setup Brightness Contrast Saturation Color Temp Skin Tone Color 90 80 50 User Mode Natural The Color function is not user configurable ...

Page 20: ...ting range is from 0 to 100 Aspect Control allows you to view the display onscreen according to a set aspect ratio ASCR ASCR stands for ASUS Smart Contrast Ratio which allows the monitor to change its contrast dynamically Position allows you to change the horizontal and vertical position of your display onscreen Focus reduces Horizonal line noise and Vertical line noise of the image by adjusting P...

Page 21: ...1 ENGLISH Input Select This function shows the input port used for connecting your LCD monitor to an external device DX201 Splendid Image Input Select System Setup VGA Color VGA is not a user configurable function ...

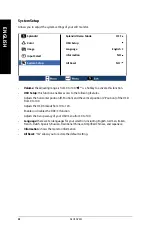
Page 22: ...es access to the following features Adjusts the horizontal position H Position and the vertical position V Position of the OSD from 0 to 100 Adjusts the OSD timeout from 10 to 120 Enables or disables the DDC CI function Adjusts the transparency of your OSD menu from 0 to 100 Language there are ten languages for your selection including English German Italian French Dutch Spanish Russian Traditiona...

Page 23: ...ASUS DV201 23 ENGLISH ...

Page 24: ... asus com Technical Support Telephone 1 812 282 2787 Support fax 1 812 284 0883 Online support support asus com ASUS COMPUTER GmbH Germany and Austria Address Harkort Str 21 23 D 40880 Ratingen Germany Fax 49 2102 959911 Web site www asus de Online contact www asus de sales Technical Support Telephone Component 49 1805 010923 Telephone System Notebook Eee LCD 49 1805 010920 Support Fax 49 2102 959...

Reviews: