background image

3-43

ASUS DiGiMatrix

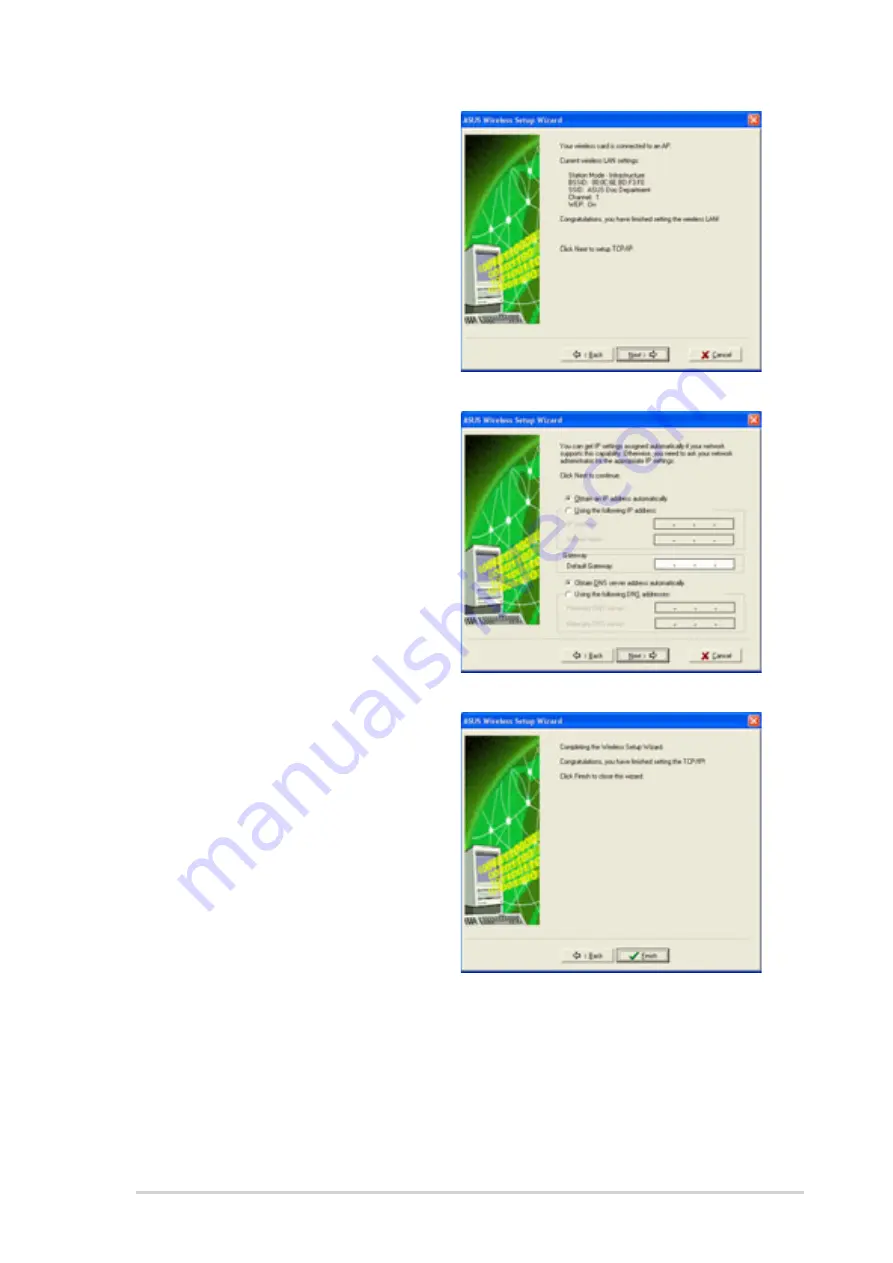
The wizard displays the hidden
wireless network information where
the wireless LAN adapter is
associated.

Click Next to set the TCP/IP settings.

Select automatic IP settings if your
network supports automatic
assignment of IP address. If not,
obtain the IP settings from your
network administrator, then enter the
IP address manually.

Click Next when done.

The wireless LAN adapter setup is
complete. Click Finish to close the
setup wizard.

Summary of Contents for DiGiMatrix

Page 1: ...Digital Entertainment PC AB V10 DiGiMatrix User Guide ...

Page 2: ... A PARTICULAR PURPOSE IN NO EVENT SHALL ASUS ITS DIRECTORS OFFICERS EMPLOYEES OR AGENTS BE LIABLE FOR ANY INDIRECT SPECIAL INCIDENTAL OR CONSEQUENTIAL DAMAGES INCLUDING DAMAGES FOR LOSS OF PROFITS LOSS OF BUSINESS LOSS OF USE OR DATA INTERRUPTION OF BUSINESS AND THE LIKE EVEN IF ASUS HAS BEEN ADVISED OF THE POSSIBILITY OF SUCH DAMAGES ARISING FROM ANY DEFECT OR ERROR IN THIS MANUAL OR PRODUCT SPEC...

Page 3: ...ation 2 1 Preparation 2 2 2 2 Before you proceed 2 2 2 3 Removing the top cover 2 3 2 4 Installing a hard disk drive 2 4 2 5 Installing a CPU 2 6 2 6 Installing a DIMM 2 9 2 7 Replacing the top cover 2 10 2 8 Connecting cables 2 11 2 8 1 Power adapter and cable 2 11 2 8 2 Radio antenna 2 12 2 8 3 Audio Video cable 2 12 2 8 4 Video out cable 2 12 2 8 5 HDTV cable 2 13 2 8 6 Audio out cable 2 13 2 9...

Page 4: ...ning into an FM radio station 3 21 3 5 5 Presetting a station 3 21 3 5 6 Adjusting the volume 3 21 3 6 ASUS Home Theater 3 22 3 6 1 Installing ASUS Home Theater 3 22 3 6 2 Using ASUS Home Theater 3 24 5 6 3 Entertainment modes 3 26 3 7 ASUS Wireless LAN adapter 3 35 3 7 1 Installing the WLAN Card utilities and driver 3 36 3 7 2 Setting the Windows XP wireless options 3 36 3 7 3 Other support CD op...

Page 5: ...guration 5 17 5 5 Power menu 5 21 5 5 1 Power Up Control 5 23 5 5 2 Hardware Monitor 5 24 5 6 Boot menu 5 25 5 7 Exit menu 5 27 Appendix A 1 Subsystem A 2 A 1 1 Front and rear panel features A 2 A 1 2 Removing the top cover A 3 A 1 3 Installing a hard disk drive A 3 A 1 4 Connecting the Subsystem to DiGiMatrix A 4 A 2 DiGiMatrix remote controller A 5 A 2 1 Specifications A 5 A 2 2 Remote control l...

Page 6: ...se harmful interference to radio or television reception which can be determined by turning the equipment off and on the user is encouraged to try to correct the interference by one or more of the following measures Reorient or relocate the receiving antenna Increase the separation between the equipment and receiver Connect the equipment to an outlet on a circuit different from that to which the r...

Page 7: ...y damage contact your dealer immediately To avoid short circuits keep paper clips screws and staples away from connectors slots sockets and circuitry Avoid dust humidity and temperature extremes Do not place the product in any area where it may become wet Place the product on a stable surface If you encounter technical problems with the product contact a qualified service technician or your retail...

Page 8: ...ation This chapter provides step by step instructions on how to install components in the ASUS DiGiMatrix system 3 Chapter 3 Starting up This chapter helps you power up the system and install drivers and utilities from the support CD 4 Chapter 4 Motherboard Information This chapter gives information about the P4SQ motherboard that came with the system This chapter includes the motherboard layout j...

Page 9: ...ormation to aid in completing a task Where to find more information Refer to the following sources for additional information and for product and software updates 1 ASUS websites The ASUS websites worldwide provide updated information on ASUS hardware and software products Refer to the ASUS contact information 2 Optional documentation Your product package may include optional documentation such as...

Page 10: ...age for the following items 1 ASUS DiGiMatrix Digital Entertainment System with ASUS P4SQ motherboard DVD ROM CD RW DVD RW drive 7 in 1 storage card reader 2 Cables Universal power adapter and cable 100V 240V HDTV cable Audio video cable Video out cable Audio out cable 3 Accessories Radio antenna Remote controller 4 DiGiMatrix support CD 5 User guide ...

Page 11: ...trix Chapter 1 System Introduction This chapter gives a general description of the ASUS DiGiMatrix The chapter lists the system features including introduction on the front and rear panels and internal components ...

Page 12: ...vity for external devices and peripherals are eight 8 USB 2 0 ports fast Ethernet and Gigabit LAN ports IEEE 1394 port and S PDIF interface The DiGiMatrix includes an IEEE 802 11b compliant wireless network adapter to support your wireless networking needs The DiGiMatrix features the most silent multimedia system to give you pure acoustic enjoyment With the ASUS DiGiMatrix you don t need anything ...

Page 13: ...trix operating system See page 3 19 for details 9 PLAY PAUSE button Press this button to perform various functions in different modes In CD mode plays the first track of the audio CD DVD in the optical drive When playing an audio track pauses the track being played In Hard Disk HD mode plays the first MP3 file of a selected playlist When playing an audio track file pauses the track file being play...

Page 14: ... flash memory card is inserted into any of the card slots 12 NEXT button Press this button to perform various functions in different modes In CD HD mode selects the next audio track file In Radio mode selects the next preset station In Playlist mode selects the next available audio source 13 CompactFlash Microdrive card slot This slot is for a CompactFlash Microdrive storage card 14 Memory Stick M...

Page 15: ...rd 20 Secure Digital MultimediaCard slot This slot is for a Secure Digital MultimediaCard storage card 21 Optical S PDIF port This port connects your audio system for 5 1 channel surround sound and enhanced 3D audio 22 4 pin IEEE 1394 port This port provides high speed connectivity for IEEE 1394 compliant audio video devices storage peripherals and other PC devices 23 6 pin IEEE 1394 port This por...

Page 16: ...l mode the function of this port becomes Surround Speaker 5 Cable TV connector This connects a cable TV twist on connector 6 Video In port This port connects a video casette recorder 7 Ethernet LAN port This port allows connection to a Local Area Network LAN through a network hub 8 Gigabit LAN port This port allows high speed connection to the Internet via a DSL or cable modem 9 PS 2 mouse port Th...

Page 17: ...ects a VGA monitor 14 DVI port This port connects a DVI enabled flat screen or LCD monitor using a DVI cable 15 HDTV TV port This port connects a high definition television HDTV or a regular TV set using the supplied HDTV audio video or video out cable 16 USB 2 0 ports These Universal Serial Bus 2 0 USB 2 0 ports are available for connecting USB 2 0 devices such as a mouse printer scanner camera P...

Page 18: ...1 on how to preset a radio station Audio DJ The LED panel displays the playlist number when Audio DJ is set to HD mode In play status the LED panel displays the play icon track number and track duration In DVD CD mode the LED panel displays the audio mode In play status the LED panel displays the play icon track number and track duration The LED panel displays the station preset number and station...

Page 19: ...ASUS DiGiMatrix Chapter 2 Basic Installation This chapter provides step by step instructions on how to install components in the ASUS DiGiMatrix system ...

Page 20: ...rounded object or to a metal object such as the power supply case before handling components to avoid damaging them due to static electricity Hold components by the edges to avoid touching the ICs on them Whenever you uninstall any component place it on a grounded antistatic pad or in the bag that came with the component P4SQ P4SQ Onboard LED SBPWRLED ON Standby Power OFF Powered Off The motherboa...

Page 21: ...cure the top cover to the chassis 2 Use a Phillips cross screw driver to remove the top cover screws Keep the screws for later use 3 Pull the top cover slightly toward the rear panel until the side tabs are disengaged from the chassis 3 2 3 2 4 Hold the center edge of the top cover then lift Set the top cover aside 4 1 1 ...

Page 22: ...ield Set your hard disk drive as Master device before connecting the IDE cable and power plug Refer to the HDD documentation on how to set the drive as a Master device 2 4 Installing a hard disk drive The DiGiMatrix system supports one UltraATA133 IDE hard disk drive HDD To install a hard disk drive 1 Remove the two metal cover screws Keep the screws for later use 1 2 Hand slot Side hooks Side hoo...

Page 23: ...he drive screw holes two at the side and two at the bottom 6 Secure the drive with two side screws 3 4 5 6 Metal tacks To side of the drive Metal tacks To bottom of the drive Insert the side metal tacks before inserting the bottom metal tacks 7 Replace the metal cover by aligning its side hooks with the tray rail and optical drive shield Slide the metal cover toward the front panel until it fits i...

Page 24: ...r Intel Pentium 4 Celeron processor To install a CPU 1 Loosen the CPU fan screws 2 Disconnect the CPU fan cable from the CPU fan connector on the motherboard 3 Lift the CPU fan 3 1 2 8 Secure the metal cover with screws that you removed earlier 8 The DiGiMatrix system comes with a pre installed proprietary CPU fan and heatsink assembly Do not replace the CPU fan with other models ...

Page 25: ...CPU socket on the motherboard Unlock the socket by pressing the lever sideways then lifting it up to a 90 angle 8 Position the CPU above the socket such that its marked corner gold mark matches the base of the socket lever 9 Carefully insert the CPU to the socket until it fits in place 10 When the CPU is in place push down the socket lever to secure the CPU The lever clicks on the side tab to indi...

Page 26: ...tor on the P4SQ motherboard 15 14 11 Reinstall the chassis fan and heatsink assembly Align the bracket screw hole with the rear panel screw hole 12 Secure the chassis fan and heatsink assembly with the screw you removed earlier 13 Connect the chassis fan cable to the chassis fan connector Refer to page 4 11 for the location of the chassis fan connector 11 12 13 Do not overtighten the CPU fan screw...

Page 27: ...IMM 1 Locate the two DIMM sockets on the motherboard 2 Unlock a socket by pressing the retaining clips outward 4 Firmly insert the DIMM into the socket until the retaining clips snap back in place and the DIMM is properly seated A DDR DIMM is keyed with a notch so that it fits in only one direction DO NOT force a DIMM into a socket to avoid damaging the DIMM 3 Align a DIMM on the socket such that ...

Page 28: ...he front edge of the top cover at least two inches from the front panel cover Fit the top cover tabs with the chassis rail and the front panel cover tabs 2 Lower the rear edge of the top cover as shown 3 Push the top cover slightly toward the front panel until it fits in place 4 Secure the top cover with two screws that you removed earlier 3 4 3 4 1 Tabs 2 ...

Page 29: ...our DiGiMatrix in any location regardless of the power voltage To connect the power adapter and power cable 1 Connect the power cable female plug to the power adapter 2 Connect the other end of the power cable male plug to a power outlet 3 Check the power adapter LED The LED lights up to indicate that the power from the source is within the operating range 4 Connect the DC IN power plug to the DiG...

Page 30: ...o Video cable S Video output plug to the S Video port of your video casette recorder Connect the Audio Video audio output plugs to the audio input ports of your video cassette recorder 2 1 2 8 4 Video out cable The video out cable connects a television set with an S Video feature Insert one end of the video out cable to the HDTV port Connect the other end to the S Video port on your TV Place the r...

Page 31: ...6 Audio out cable This cable connects a 6 channel audio system To connect a 6 channel audio system 1 Insert the Line In Line Out and Mic plugs of the audio out cable to the audio I O ports 2 Insert the input output jacks of the audio out cable to the sound system input ports Refer to the table below for the functions of the audio I O ports in 2 4 and 6 channel configurations Audio ports function v...

Page 32: ... Installation To the rear panel 2 9 Connecting external devices To the front panel VOLUME Mic Headphone HDD Scanner Camera Audio Devices PS 2 KB PS 2 Mouse Line Out Line In Mic RJ 45 VGA USB Mouse DVI DiGiMatrix subsystem ...

Page 33: ...ASUS DiGiMatrix Chapter 3 Starting up This chapter helps you power up the system and install drivers and utilities from the support CD ...

Page 34: ...y use the setup procedures presented in this chapter for general reference only Refer to your OS documentation for more information VOLUME 3 2 Powering up DiGiMatrix has two power buttons located in the front panel Press the system power button to enter the DiGiMatrix operating system OS Press the Audio DJ power button AUDIO to turn on the DiGiMatrix Audio DJ feature See page 3 19 for details on t...

Page 35: ... click the ASSETUP EXE to run the CD 3 3 2 Drivers menu The drivers menu shows the available device drivers if the system detects installed devices Install the necessary drivers to activate the devices SiS 651 Display Driver Click this item to load the installation wizard and install the SiS 651 display driver SiS AGP Driver Click this item to load the installation wizard and install the SiS AGP d...

Page 36: ...stalls the 3Com Gigabit LAN driver SiS Mini IDE Driver This item installs the SiS Mini IDE driver USB 2 0 Driver Click this item to install the USB 2 0 driver ITE Remote Controller driver This item installs the driver for the DiGiMatrix remote controller ASUS DiGiMatrix TV Card Driver Click this item to install the driver for the DiGiMatrix TV Card ASUS Wireless LAN Adapter Driver This item instal...

Page 37: ...ps you keep your computer in a healthy operating condition See page 3 9 for details ASUS Update This item installs the ASUS Update that allows you to update the motherboard BIOS in Windows environment This utility requires an Internet connection either through a network or an Internet Service Provider ISP See page 3 7 for details PC CILLIN 2002 This item installs the PC cillin 2002 anti virus prog...

Page 38: ...dditional information on the motherboard and the contents of the support CD Audio DJ This item installs the Audio DJ feature and Music Wizard utility The Music Wizard utility allows you to save MP3 playlists to your HDD and play them using the Audio DJ feature See page 3 16 for details on Music Wizard and page 3 19 for details on Audio DJ ASUS Screensaver This item installs the ASUS screensaver ...

Page 39: ...te the motherboard BIOS and drivers This utility requires an Internet connection either through a network or an Internet Service Provider ISP Follow these steps to use the ASUS Update 2 Select your desired update method then click Next 1 Launch the utility from your Windows Start menu Programs AsusUpdate Vx xx xx AsusUpdate The ASUS Update initial screen appears 3 If you selected updating download...

Page 40: ...wnload Click Next If you selected the option to update the BIOS from a file a window pops up prompting you to locate the file Select the file click Save then follow the screen instructions to complete the update process 5 The BIOS ROM information is displayed Click Flash to update the BIOS ...

Page 41: ...rnal frequencies through the DMI Explorer Starting ASUS PC Probe When ASUS PC Probe starts a splash screen appears allowing you to select whether to show the screen again when you open PC Probe or not To bypass this startup screen clear the Show up in next execution check box To launch ASUS PC Probe click the Windows Start button point to Programs and then ASUS Utility and then click Probe Vx xx T...

Page 42: ... for supported processors only Temperature Warning threshold adjustment Move the slider up to increase the threshold level or down to decrease the threshold level Fan Monitor Shows the system s fan rotations Voltage Monitor Shows the system voltages Fan Warning threshold adjustment Move the slider up to increase the threshold level or down to decrease the threshold level ...

Page 43: ...olling intervals or refresh times of the DiGiMatrix temperature fan rotation and voltages History Lets you record the monitoring activity of a certain component of your DiGiMatrix for future reference Information tab Hard Drive Shows the used and free space of the DiGiMatrix hard disk drive and the file allocation table or file system used ...

Page 44: ... the ASUS Probe modules To run a program click Execute Program NOTE This feature is currently unavailable ASUS PC Probe Task Bar Icon Right clicking the PC Probe icon brings up a menu to open or exit ASUS PC Probe and pause or resume all system monitoring When the ASUS PC Probe senses a problem with your PC portions of the ASUS PC Probe icon change to red the PC speaker beeps and the ASUS PC Probe...

Page 45: ... the SoundMAX Digital Integrated Audio icon to display the SoundMAX Control Panel 2 The Listening Environment tab allows you to set to multi channel speakers enable or disable the Virtual Theater Surround and select Acoustic Environments and Virtual Ear 3 The default setting is Stereo Speakers 2 channel To set to a 6 channel speaker system click the arrow under Speaker Setup to display a list of o...

Page 46: ... Play Test Noise button becomes Stop Playing button Click this button at any time to stop playing 9 Click the Close button when done 10 The MIDI Music Synthesizer tab allows you to select a setting for the MIDI 11 Click the Synthesizer Default Set drop down menu to display a list of options Choose the desired setting 12 Click Apply then click OK when finished 13 Reboot the computer Audio path indi...

Page 47: ...hannel audio capability when playing DVDs check the boxes opposite AC3 SPDIF and PCM SPDIF Click Close Adjusting the microphone settings 1 Click on the Microphone Advanced button to display the Advanced Controls for Microphone window 2 Check the box opposite Mic2 Select to enable the front panel microphone 3 Click Close for the new settings to take effect The rear panel Mic port pink is automatica...

Page 48: ...upport CD that came with the DiGiMatrix package Refer page 3 5 to install Music Wizard Launching Music Wizard Launch the Music Wizard utility from the Windows desktop by clicking Start All Programs O2Micro Music Wizard Music Wizard The Music Wizard window displays the playlists or folders P1 to P9 and command buttons located at the bottom of the window Creating a Playlist or Folder Click Add to cr...

Page 49: ...e the folder with the MP3 files 2 Select the folder then click Select Click Unselect to remove the folder 3 Click OK when done Saving your playlist or folder When prompted save the playlist or the folder Type a file name then click Save You may also drag and drop MP3 files to the Selected Files window to add more files to the playlist The Music Wizard window displays the created playlist and folde...

Page 50: ...To add remove a file to from a playlist 1 Select a playlist then click Edit A confirmation window appears Click OK to remove the file from the playlist 2 Select the file you wish to add from the Existing Files window then click Select Click OK when done To remove a file select the file from the Selected Files window then click Unselect ...

Page 51: ...ce 1 Radio FM Device play media hdd mp3 Track 0001 Player Status Playing See page A 6 for the remote controller functions in Audio DJ mode The Audio DJ window appears You must install Audio DJ from the support CD to use this feature See page 3 6 To turn on the Audio DJ feature press the Audio DJ power button AUDIO located on the front panel or press the button of the remote controller The Audio DJ...

Page 52: ...plays the playlists you created using the Music Wizard utility see page 3 16 If you selected Hard Disk as audio source the first playlist is automatically selected To play an MP3 playlist 1 Press the STOP button or the button on the remote controller to select a playlist 2 Press the PLAY PAUSE button to start playing the first MP3 file on the playlist 3 5 3 Playing an audio CD DVD To play an udio ...

Page 53: ...he preset station 3 5 6 Adjusting the volume You may adjust the volume by turning the Volume Dial clockwise volume up or counterclockwise volume down You may also press the or on the remote controller Press the volume dial to MUTE sound CD DVD Device 1 Radio FM Device play media radio FM Player Status Playlist Mode 3 5 4 Tuning into an FM radio station To tune into an FM station 1 Select Radio FM ...

Page 54: ...SUS Home Theater allows you to maximize the DiGiMatrix multimedia features The following sections provide information on installing and using the ASUS Home Theater 3 6 1 Installing ASUS Home Theater Place the ASUS Home Theater CD into the optical drive to start installation The initial installation window appears Click Next Read the License Agreement then click Yes ...

Page 55: ...ows To configure Home Theater settings in Windows 1 From the Windows desktop click Start All Programs Home Theater Home Theater Config A Configuration window appears 2 Change the Home Theater General Pictures Television and DVD settings by clicking their respective tabbed property sheets 3 Click OK when done You may also change the Home Theater settings using the Setup button in the Home Theater m...

Page 56: ...s the current or last entertainment mode used Entertainment mode buttons Click on a button to launch an entertainment mode Setup Click this button to display the setup window WWW Click this button to open the ASUS website Window control buttons Controls the Home Theater window Click to return to the previous window Click to minimize the window Click to maximize the window Click to exit Home Theate...

Page 57: ...nel to control the entertainment modes The control panel buttons and functions are illustrated below Some control panel buttons change from one entertainment system to another Channel up Volume up Record Snapshot Previous Play Pause Stop Rewind Replay Forward Next Channel down Volume down Mute ...

Page 58: ...ing and replaying TV programs Simultaneous playing and recording Home Theater allows you to watch a recorded TV program while in the middle of a recording For example you recorded a TV program that runs from 1 00 p m to 2 00 p m There is no need to wait for recording to finish Click the PLAY button anytime between the recording schedule to watch the program being recorded Home Theater continues to...

Page 59: ...bsite for details You may only use this feature when watching a recorded program or while recording a TV program Recorded TV The Recorded TV option lets you view play and organize recorded TV programs Select a recorded program from the list then click the Play button to start playing Organize your recorded programs by clicking the Sort By Name Date buttons The Recorded TV window also displays reco...

Page 60: ...e click Home Theater automatically saves a recorded program in the Windows My Videos folder Home Theater records TV programs in MPEG file format The TV recording feature requires a higher capacity HDD if you save a recorded program in high quality Add schedule 3 Home Theater displays the recording schedule To edit a recording schedule select the schedule from the list then click To delete a record...

Page 61: ...l to display Settings To change the TV settings 1 Click the Settings button 2 Select the TV source Cable Antenna input source TV S Video Composite and record quality Good Better Best Click the side arrows to view available options 3 Click the to return to the TV main window Click to select other options TV Audio The TV Audio button allows you to set the TV audio output to Stereo Mono or SAP ...

Page 62: ...op button to stop recording Home Theater automatically saves your radio recording in the Windows My Music folder Use the Home Theater Music window to view and or listen to your recordings Music Home Theater lets you play audio CD DVD tracks MP3 files and radio recordings using the Music window The Music window lists the title album artist and genre of available audio tracks Select My Music to view...

Page 63: ...licking the Sort By Name Date buttons Click Print Picture to print a selected picture You may also zoom or rotate the pictures using the control panel buttons Click the PLAY button to start a slideshow Customizing slideshows To customize your picture slideshow 1 Click the Settings button 2 Adjust the slideshow properties from this window 3 Click to return to the Pictures window then click the PLAY...

Page 64: ...to Resume Allows you to resume watching a movie from the beginning or from where you stopped Source Displays the video input source Audio output Allows you to set your audio output to analog or digital S PDIF Speaker configuration Home Theater automatically detects your speaker configuration Change the speaker configuration using the SoundMAX application Refer to page 3 13 for details Click View t...

Page 65: ... This item allows you to select the country Home Theater automatically fills in the correct Video Standard for the selected country Video Capture Device This item allows you to select the video capture device for TV recording Home Theater automatically detects the installed video capture device Input Source This item lets you set your video input source to TV Composite or S Video Video Standard Ho...

Page 66: ...Close Click this button to exit Home Theater and return to the Windows desktop Stand By Click this option to put the DiGiMatrix in a stand by mode Shutdown Click this button to shut down the DiGiMatrix system Cancel Click this button to return to the Home Theater main window Picture settings Allows you to customize your picture viewing and to setup a slideshow Click Next to display the DVD setting...

Page 67: ...is capable of transmitting and receiving signals through radio waves on the 2 4 GHz band Below are other wireless LAN adapter features Reliable data transfer rates of up to 11Mbps with automatic fallback to 5 5 2 and 1Mbps Secure data transmission via Wired Equivalent Privacy WEP encryption Operating distance of up to 100 ft 30 m indoors Easy installation and full software support Soft access poin...

Page 68: ...ick this option to install the WiFi HOME screen savers in your DiGiMatrix system Explore this CD Click this option to explore the support CD contents Browse our Web Site Click this option to visit the ASUS website Installation Language This option allows you to change the installation language Click the arrow to display available installation languages Click EXIT to close the installation window 3...

Page 69: ...gnal The wizard also allows you to connect to any of the available APs If you want to set your wireless LAN adapter in soft access point mode or in Ad hoc network setting check My Configuration then click Next See My Configuration section on page 3 39 for details Station Mode Follow these instructions to set your wireless LAN adapter in station STA mode Select a wireless network from the table the...

Page 70: ...n the setup wizard prompts you to enter the WEP keys Refer to Config Encryption Tab on page 3 54 for WEP encryption settings Click Next when done Obtain the WEP keys from the network administrator The WEP keys of the wireless LAN adapter and the selected AP must be identical to establish connection The wizard prompts you to return to the previous window and select another wireless network if the w...

Page 71: ...plete Click Finish to close the setup wizard My Configuration The setup wizard allows you to set the wireless LAN adapter in various operating modes when you selected My Configuration Select an operation mode then click Next The TCP IP configuration window appears when you run the setup wizard on Windows 98SE ME 2000 The window also appears in Windows XP OS if the wireless LAN adapter is not bridg...

Page 72: ...d assign an SSID Network Name to the soft access point AP or wireless LAN network Ad hoc you wish to create then select a radio channel that you wish to use in communicating with other wireless devices Click Next to continue Assign WEP encryption keys to your soft AP or wireless LAN network Refer to Config Encryption Tab on page 3 54 for WEP encryption settings Click Next Keep a record of the WEP ...

Page 73: ...ge 3 66 When the wireless LAN adapter is set to Ad hoc mode click Next to configure the TCP IP settings Refer to the Station Mode section on page 3 60 for TCP IP configuration Connecting to a hidden wireless LAN Some access points disable their SSID broadcasting to prevent a wireless device from finding and accessing their networks Obtain the SSID of the hidden wireless LAN from the network admini...

Page 74: ...cryption the setup wizard prompts you to enable data encyption Check the Data encryption box the click next Obtain the WEP keys from the network administrator The wireless LAN adapter and the hidden wireless LAN WEP keys must be identical to establish connection Enter the WEP encryption keys that you obtained from the network administrator Refer to Config Encryption Tab section on page 3 54 for WE...

Page 75: ... Click Next to set the TCP IP settings Select automatic IP settings if your network supports automatic assignment of IP address If not obtain the IP settings from your network administrator then enter the IP address manually Click Next when done The wireless LAN adapter setup is complete Click Finish to close the setup wizard ...

Page 76: ...ection Sharing ICS ICS is a networking feature that allows several computers in a wired or wireless network to share a single Internet connection Follow these instructions to setup ICS 1 Select the broadband network connection from the drop down list Click Next 1 Select whether your computer connects to the Internet or not Click Next The wizard will require you to create a home network connection ...

Page 77: ...re using to connect to the host computer or residential gateway Click Next 2 Select the network adapters that connect to other computers in your home network if any The wizard will bridge these networks with the wireless LAN adapter Click Next Internet connection via another computer or residential gateway If your computer connects to the Internet through another computer or residential gateway ...

Page 78: ...s network connections to be added in a network bridge based on your configuration Write down these network connections in a piece of paper Click OK 3 The wizard creates a network bridge between your wired LAN and wireless wireless LAN adapter network connections Click Next Network bridge is a process of connecting several wired or wireless LAN segments See page 3 70 for details ...

Page 79: ...zard Refer to Windows XP Help and Support Center for articles and help files on the Network Bridge function 7 The Network Connections window appears Select the network connections to be bridged Press the Ctrl key while clicking the network connections icons to select multiple connections Right click on any selected network icon to open a drop down menu Select Bridge Connections ...

Page 80: ...s on To enable ICS if you have an existing broadband network that is always on DSL cable modem or LAN 1 Select whether your computer directly connects to the Internet or through another computer or residential gateway Click Next Direct internet connection To enable ICS if your computer connects directly to the Internet 1 Select the number of IP address assigned to you by your Internet Service Prov...

Page 81: ...ial up connection from the drop down list Click Next If you do not have a dial up connection the wizard will instruct you to create one using the Windows interface or the support CD from your Internet Service Provider ISP 2 Select whether your computer directly connects to the Internet or through another computer or residential gateway Click Next 3 If your computer connects to the internet via ano...

Page 82: ...access point and connection to the Internet Refer to the table below for icon indications Station Mode Infrastructure Network Mode wireless LAN adapter to an access point Excellent link quality and Excellent link quality but not connected to the Internet connected to the Internet Good link quality and Good link quality but not connected to the Internet connected to the Internet Fair link quality a...

Page 83: ...here the system is connected Service Set Identifier SSID This field displays the SSID of the network to which the card is associated or is intending to join The SSID is a group name shared by every member of a wireless network Only client PCs with the same SSID are allowed to establish a connection The MAC Address field displays the hardware address of a device connected to a network The Current C...

Page 84: ... Rescan button Click to allow wireless LAN adapter to scan available wireless networks and to connect to the network with the best signal quality Change SSID button Click to change the SSID Clicking this button opens the Config Basic window See Config Basic Tab on the next page Search and Connect button Click to view all wireless networks within the range of your system Clicking this button opens ...

Page 85: ...anytime to cancel the ping session The session field displays information on the verified connection including the roundtrip time minimum maximum and average and packets sent received and lost after a ping session Click the Clear button to clear the session field Config Basic Tab The Basic tab provides general information on network types and other configurations Network Type Select the type of ne...

Page 86: ...k SSID is a string use to identify a wireless LAN Assign different SSIDs to segment the wireless LAN and increase network security Set the SSID to a null string to allow your station to connect to any available access point Null string may not be used in Ad hoc mode Channel In Infrastructure mode wireless LAN adapter automatically tunes in to the access point channel In Ad hoc mode select a channe...

Page 87: ...t and 40 bit WEP keys use the same encryption method and can interoperate on wireless networks This lower level of WEP encryption uses a 40 bit 10 hexadecimal digits assigned by the user secret key and a 24 bit Initialization Vector assigned by the wireless LAN adapter 104 bit and 128 bit WEP keys use the same encryption method After assigning the WEP keys click APPLY to save and activate the encr...

Page 88: ...an available network connection is placed in the Internet field Check this option if you want to share a single Internet connection with other computers in a wireless network See page 95 for details When disabled the available Internet connection is bridged with the wireless LAN adapter Refer to page 3 70 to setup a network bridge Enable Firewall This option is active when ICS is enabled Check thi...

Page 89: ...as an enabled On or disabled Off WEP encryption Select an available network and click Connect to establish connection Click Search to rescan available networks About Click the About icon to view the software version driver version and copyright information Link State Displays the current connection status of the wireless LAN adapter to the AP or to other Wi Fi devices An icon represents the Link S...

Page 90: ...ode The Change Mode menu allows you to set the wireless LAN adapter in a Station STA or soft Access Point AP mode See Soft Access Point Soft AP Mode on page 3 63 for details on the wireless LAN adapter soft AP function Command icons Apply Click to apply the changes made on wireless LAN adapter configuration and settings OK Click to close the Wireless Settings utility window Cancel Click to cancel ...

Page 91: ...dio Off Turns the wireless LAN adapter radio OFF Search Connect Scans available wireless networks within range Wireless Option Sets your Windows XP wireless networking environment See page 3 36 for details About Control Center The About Control Center menu displays the the software copyright and version information The Control Center left click menu is available only when wireless LAN adapter is s...

Page 92: ...n Soft AP mode your wireless LAN adapter transmits and receives signals to and from other Wi Fi devices in a wireless network The Soft AP feature is available only on systems running on Windows XP Station Mode STA Follow these instructions to set your wireless LAN adapter in Station STA mode Windows 2000 OS 1 Launch the Wireless Settings utility by double clicking the Control Center icon in the Wi...

Page 93: ... Encryption tab to set the wireless LAN adapter encryption if the selected AP has an enabled WEP encryption 7 To check if wireless LAN adapter is associated with the selected AP click the Status icon in the property window then select the Status tab Look for the Associated State field to confirm Refer to the Site Survey window to determine whether the selected AP has an enabled ON or disabled OFF ...

Page 94: ...he previous section to set the wireless LAN adapter in STA mode Windows XP OS Do any of the following to set your wireless LAN adapter in station mode Enter the Wireless Settings utility 1 Double click the Control Center icon in the Windows taskbar to open the Wireless Settings utility 2 Click the Config icon in the property window then select the Soft AP tab Select Station Mode Use the Change Mod...

Page 95: ...ome or small office network must have An installed IEEE 802 11b compliant network interface card Windows 98SE ME 2000 XP operating system Setting your wireless LAN adapter in Soft Access Point Soft AP mode Do any of the following to set your wireless LAN adapter in soft AP mode Enter the Wireless Settings utility 1 Double click the Control Center icon in the Windows taskbar to open the Wireless Se...

Page 96: ...e when the Change Mode window appears Click OK Other Soft AP settings When in Soft AP mode two additional tabbed property sheets are added to the Status settings of the Wireless Settings utility MAC Table The MAC Table tab displays the MAC address of a wireless device connected to the soft AP AID shows the Association ID of a wireless device connected to the soft AP Power Saving Mode displays the ...

Page 97: ...3 65 ASUS DiGiMatrix Event Log The Event Log tab displays detected system events including the date and time of the event and event type Click Clear Log to clear the event log window ...

Page 98: ...hat is always on 1 Open the Wireless Settings utility Select Config from the property window then select the Soft AP tab 2 Select the built in 3Com Gigabit LAN connection from the Available Network Connections field then drag it to the Internet field 3 Check Enable ICS and Enable Firewall then click Apply 4 Click OK when this dialog box appears 5 An Internet Sharing Configuration dialog box appear...

Page 99: ...the host computer with the wireless LAN adapter connects to the Internet using a broadband or dial up connection that requires an account create a broadband PPPoE or dial up network connection using the Windows XP Network Connections window before enabling ICS To create a broadband connection 1 Open the Network Connections window by clicking Start Connect To Show all connections from the Windows d...

Page 100: ... connection select Connect using a broadband connection that requires a user name and password or Connect using a dial up modem then click Next 7 Enter the ISP name then click Next 8 Enter the user name and password assigned by your ISP then check all settings below the user name and password fields Click Next ...

Page 101: ... the connection 10 The Network Connections window displays the created connection Return to the Wireless Settings utility Select the created connection from the Available Network Connections then drag it to the Internet field Refer to the steps on page 3 66 to enable ICS ...

Page 102: ...t computer Network bridging is a cost effective method of connecting LAN segments since it does not require expensive hardwares such as routers and technical expertise for configuring Internet protocol IP addresses Network bridge is essential in enabling ICS among wireless clients in a home network To bridge a wired network connection to the wireless LAN adapter 1 Open the Wireless Settings utilit...

Page 103: ...on to open a drop down menu Select Bridge Connections 7 The Network Connections window displays the bridged network connections 6 Wait while the selected network connections are bridged Only LAN connections may be bridged with the wireless LAN adapter The Wireless Settings utility instructs you to change your settings if you bridge a non LAN connection with the wireless LAN adapter ...

Page 104: ...3 72 Chapter 3 Starting up ...

Page 105: ...DiGiMatrix Chapter 4 Motherboard Info This chapter gives information about the P4SQ motherboard that came with the system This chapter includes the motherboard layout jumper settings and connector locations ...

Page 106: ...4SQ motherboard comes already installed in the ASUS DiGiMatrix system This chapter provides technical information about the motherboard for future upgrades or system reconfiguration 4 2 Motherboard components 2 3 16 9 7 6 4 10 13 8 12 11 14 18 17 15 20 19 5 1 ...

Page 107: ...ata trasfer rate for throughput devices such as DV camcorders digital cameras scanners and printers AudioDJ controller This chip allows you to play MP3 files from the optical drive or from your hard disk drive without entering the operating system Audio CODEC This chip is an AC 97 compliant audio CODEC that allows 6 channel audio playback Card reader controller This is a 6 in 1 card reader control...

Page 108: ...interface Primary IDE connector This primary IDE connector supports an UltraATA133 PIO Modes 0 4 IDE device USB controller This controller supports USB 2 0 specification for faster connectivity of USB 2 0 peripherals and devices Gigabit LAN controller This 3COM Gigabit LAN controller allows faster connection to a Local Area Network LAN through a network hub Standby power LED This standby power LED...

Page 109: ...module RJ 45 Top USB7 USB8 Bottom RJ 45 Top USB9 USB10 Bottom PS 2 T Mouse B Keyboard CHA_FAN BUZZER USB1 USB2 USB1 USB2 FONT MIC FONT LOUT SPDIF OUT IE1394_2 IE1394_1 VGA DVI HDTV ADAPTER IDEPWR SBPWRLED PRI_IDE CR2032 3V Lithium Cell CMOS Power PCI1 CR_CON LED_CON EC_CON LCD_PANEL A_DJPANEL AUX CD AUD_CON USB5 CLRTC PWRSW SiS 301C VIA VT6307 VIA VT6202 4Mb ISA RTL 8201BL AD1980 Micr 3COM 3C940 G...

Page 110: ...t CPU The motherboard comes with a surface mount 478 pin Zero Insertion Force ZIF socket This socket is specifically designed for the Intel Pentium 4 Celeron Northwood processor P4SQ P4SQ Socket 478 Gold Arrow Refer to page 2 6 for CPU installation procedures ...

Page 111: ...IMM sockets that supports up to 2GB unbuffered non ECC PC2700 2100 1600 DDR DIMMs You may install any DDR DIMMs with 64MB 128MB 256MB 512MB and 1GB densities into the two DIMM sockets P4SQ P4SQ 184 Pin DDR DIMM Sockets 80 Pins 104 Pins Refer to page 2 9 for DIMM installation procedures ...

Page 112: ...ard button cell battery To erase the RTC RAM 1 Turn OFF the computer and unplug the power cord 2 Remove the battery 3 Move the jumper cap from pins 1 2 default to pins 2 3 Keep the cap on pins 2 3 for about 5 10 seconds then move the cap back to pins 1 2 4 Re install the battery 5 Plug the power cord and turn ON the computer 6 Hold down the Del key during the boot process and enter BIOS setup to r...

Page 113: ...d on the Mini PCI slot P4SQ P4SQ USB2 0 Connector USB5 GND USB 5V USB P4SQ P4SQ LCD Panel Connector 5VSB GND PIC_DOUT PIC_STB PIC_CLK PIC_DIN PIC_DIN PIC_CLK PIC_STB PIC_DOUT 5V DJ_PLAY DJ_SCANFW DJ_SCANRW 5VSB SMBDA SMBCK GND 12V vol_up vol_down 1 LCD_PANEL 2 LED panel connector 20 1 pin LCD_PANEL This connects to the ASUS proprietary LED panel which displays volume clock timer track number and o...

Page 114: ...gs Pin 20 on the IDE connector is removed to match the covered hole on the UltraATA cable connector This prevents incorrect orientation when you connect the cables For UltraATA133 IDE devices use an 80 conductor IDE cable P4SQ P4SQ IDE Connectors PIN 1 PRI_IDE NOTE Orient the red markings usually zigzag on the IDE ribbon cable to PIN 1 PIN 1 SEC_IDE The SEC_IDE connector connects the optional DiGi...

Page 115: ... Volt Cooling Fan Power CHA_FAN CPU_FAN GND Rotation 12V GND Rotation 12V P4SQ P4SQ Internal Audio Connectors CD Black AUX White Right Audio Channel Left Audio Channel Ground Ground 5 Internal audio connectors 4 pin AUX CD These connectors allow you to receive stereo audio input from sound sources such as a CD ROM TV tuner or MPEG card Do not forget to connect the fan cables to the fan connectors ...

Page 116: ...ER LED Power LED H D D LED 1 6 IDE power connector 4 pin IDEPWR The IDE power connector is for the IDE power cable This connector supplies power to the hard disk drive and the DVD ROM CD RW DVD RW drive 7 Front panel LED connector 6 pin LED_CON The front panel LED connector is for the power HDD activity and card reader activity LEDs ...

Page 117: ...Q Encoder Connector EC_CON COMA GND COMB Mute GND 8 Encoder connector 6 1 pin EC_CON This connector is for the ASUS proprietary encoder board that controls the system volume 9 Rear panel audio connectors 10 1 pin AUD_CON This connector is for the ASUS proprietary rear panel audio board that supports the rear panel audio I O ports ...

Page 118: ...io DJ panel connector 10 1 pin A_DJPANEL The Audio DJ panel connector is for the ASUS proprietary Audio DJ panel that supports the front panel audio buttons and IR reception P4SQ P4SQ Power Switch Connector PWRSW 10 Power switch connector 2 pin PWRSW This connects to the the system power switch button on the DiGiMatrix front panel ...

Page 119: ...ASUS DiGiMatrix Chapter 5 BIOS Information This chapter tells how to change system settings through the BIOS Setup menus and describes the BIOS parameters ...

Page 120: ...r NEW BIOS _ Note EZ Flash will copy file from A Press ESC to reboot Write down the BIOS file name on a piece of paper You need to type the exact BIOS file name at the EZ Flash screen You can manage and update the BIOS setup of the DiGiMatrix system using the ASUS EZ Flash and the ASUS Update utilities The ASUS EZ Flash feature allows you to easily update the BIOS without having to go through the ...

Page 121: ...ly typed in a wrong BIOS file name the error message WARNING File not found appears Press Enter to remove the message then type in the correct file name Press Enter 6 At the above prompt type Y to continue with the update process Pressing N exits the EZ Flash screen and reboots the system without updating the BIOS The following prompts appear if you typed Y 7 Press Y to update the main BIOS area B...

Page 122: ...ord them in the CMOS RAM of the EEPROM The EEPROM on the motherboard stores the Setup utility When you start up the computer the system provides you with the opportunity to run this program Press Delete during the Power On Self Test POST to enter the Setup utility otherwise POST continues with its test routines If you wish to enter Setup after POST restart the system by pressing Ctrl Alt Delete or...

Page 123: ... The keys in the legend bar allow you to navigate through the various setup menus The following table lists the keys found in the legend bar with their corresponding functions Navigation Key s Function Description F1 or Alt H Displays the General Help screen from anywhere in the BIOS Setup Esc Jumps to the Exit menu or returns to the main menu from a sub menu Left or Right arrow Selects the menu i...

Page 124: ...ow press Enter or Esc Sub menu Note that a right pointer symbol as shown on the right appears to the left of certain fields This pointer indicates that you can display a sub menu from this field A sub menu contains additional options for a field parameter To display a sub menu move the highlight to the field and press Enter The sub menu appears Use the legend keys to enter values and move from fie...

Page 125: ...e Tab or Shift Tab keys to move between the month day and year fields Supervisor Password Disabled User Password Disabled These fields allow you to set passwords To set a password highlight the appropriate field and press Enter Type in a password then press Enter You can type up to eight alphanumeric characters Symbols and other characters are ignored To confirm the password type the password agai...

Page 126: ...pervisor password is required to enter the BIOS Setup program and to gain full access to the configuration fields Forgot the password If you forget your password you can clear it by erasing the CMOS Real Time Clock RTC RAM The RAM data containing the password information is powered by the onboard button cell battery See section 3 6Jumper for information on how to erase the R TC RAM Halt On All Err...

Page 127: ... because the hard disk drive is too old or too new If the hard disk was already formatted on an older system Setup may detect incorrect parameters In these cases select User Type HDD to manually enter the IDE hard disk drive parameters Refer to the next section for details Before attempting to configure a hard disk drive make sure you have the correct configuration information supplied by the driv...

Page 128: ...e Esc key to return to the Main menu When the Main menu appears the hard disk drive field displays the size for the hard disk drive that you configured User Type HDD After entering the IDE hard disk drive information into BIOS use a disk utility such as FDISK to partition and format new IDE hard disk drives This is necessary so that you can write or read data from the hard disk Make sure to set th...

Page 129: ...d configures the number of sectors per track Refer to the drive documentation to determine the correct value To make changes to this field set the Type field to User Type HDD and the Translation Method field to Manual CHS Capacity This field shows the drive s maximum CHS capacity as calculated by the BIOS based on the drive information you entered Maximum LBA Capacity This field shows the drive s ...

Page 130: ... may decrease system performance Configuration options Disabled Enabled PIO Mode 4 This option lets you set a PIO Programmed Input Output mode for the IDE device Modes 0 through 4 provide successive increase in performance Configuration options 0 1 2 3 4 Ultra DMA Mode 4 Ultra DMA capability allows improved transfer speeds and data integrity for compatible IDE devices Set to Disabled to suppress U...

Page 131: ...Auto Repeat Rate 12 Sec This controls the speed at which the system registers repeated keystrokes Options range from 6 to 30 characters per second Configuration options 6 Sec 8 Sec 10 Sec 12 Sec 15 Sec 20 Sec 24 Sec 30 Sec Keyboard Auto Repeat Delay 1 4 Sec This field sets the time interval for displaying the first and second characters Configuration options 1 4 Sec 1 2 Sec 3 4 Sec 1 Sec ...

Page 132: ...This field functions as an update loader integrated into the BIOS to supply the processor with the required data When set to Enabled the BIOS loads the update on all processors during system bootup Configuration options Enabled Disabled CPU Speed Manual This parameter allows you select the CPU internal frequency You can select either one of the preset speeds 2000MHz or 2667MHz or select Manual if ...

Page 133: ...port Auto This motherboard supports Universal Serial Bus USB devices The default of Auto allows the system to detect a USB device at startup If detected the USB controller legacy mode is enabled If not detected the USB controller legacy mode is disabled When you set this field to Disabled the USB controller legacy mode is disabled whether or not you are using a USB device Configuration options Aut...

Page 134: ... interface and module banks Configuration options User Defined By SPD SDRAM CAS Latency 2 5T This item controls the latency between the SDRAM read command and the time the data actually becomes available Configuration options 2 5T 2T 1 5T 3T SDRAM RAS to CAS Delay 3T This item controls the latency between the SDRAM active command and the read write command Configuration options 3T 2T 4T SDRAM RAS ...

Page 135: ...ata Configuration options 4MB 8MB 16MB 32MB 64MB 128MB 256MB Onboard VGA Shared Memory Size 32M This item allows you to set the memory space reserved for the VGA frame buffer display memory within the system main memory If you have installed a 3D graphics device select at least 16MB VGA shared memory size Note that the more system memory you share with VGA the less memory space is left for other s...

Page 136: ...Out Function NTSC This item allows selection of the TV output standard Select PAL or NTSC depending on your location Configuration options NTSC PAL USB Function Enabled This parameter allows you to enable or disable the southbridge USB 1 1 controller Configuration options Enabled Disabled USB 2 0 Function Enabled This parameter allows you to enable or disable the southbridge USB 2 0 controller Con...

Page 137: ...you to enable or disable the onboard Gigabit LAN controller Set to Enabled if you wish to use the onboard LAN feature Configuration options Enabled Disabled Onboard 3COM Giga LAN Boot ROM Disabled This field allows you to enable or disable the option ROM in the onboard Gigabit LAN controller Configuration options Disabled Enabled Onboard AC97 Audio Controller Auto Auto allows the BIOS to detect wh...

Page 138: ...led This field allows you to enable or disable the onboard IEEE 1394 controller Configuration options Enabled Disabled Onboard VIA USB Controller Enabled This field allows you to enable or disable the onboard VIA USB controller Configuration options Enabled Disabled ...

Page 139: ...o Max Saving system power is conserved to its greatest amount This setting automatically puts the system into suspend mode after a brief period of system inactivity Min Saving allows the least power saving as the system enters suspend mode only after a long period of inactivity Configuration options User Defined Disabled Min Saving Max Saving You should install the Advanced Power Management APM ut...

Page 140: ...IDE hard disk drives in the system after a period of inactivity as set in this user configurable field This feature does not affect SCSI hard drives Configuration options Disabled 1 Min 2 Min 3 Min 15 Min ACPI Suspend To RAM Enabled This field allows you to enable or disable the ACPI Suspend to RAM feature To support this feature the 5VSB of the power supply should have the capacity to provide mor...

Page 141: ...ead Configuration options Disabled Enabled Power On By PS 2 Keyboard Disabled This parameter allows you to use specific keys on the keyboard to turn on the system This feature requires an ATX power supply that provides at least 1A on the 5VSB lead Configuration options Disabled Space Bar Ctrl Esc Power Key Automatic Power Up Disabled This allows an unattended or automatic system power up You may c...

Page 142: ... Enabled MB Temperature xxxC xxxF CPU Temperature xxxC xxxF The onboard hardware monitor automatically detects and display the power supply and CPU temperatures in these fields CPU Fan Speed xxxxRPM Chassis Fan Speed xxxxRPM The onboard hardware monitor automatically detects the CPU and chassis fan speeds in rotations per minute RPM VCORE Voltage 3 3V Voltage 5V Voltage 12V Voltage The onboard har...

Page 143: ...Device IDE Hard Drive ATAPI CD ROM and Other Boot Device Removable Device USB ZIP Flash Configuration options USB ZIP Flash USB FDD LS120 ZIP ATAPIMO Disabled 5 6 Boot menu Use the front panel USB ports if you will boot the system using a USB FDD or USB ZIP device IDE Hard Drive This field allows you to select the IDE hard disk drive to use in the boot sequence Pressing Enter will show the product...

Page 144: ...us detection ensuring a virus free boot sector The system halts and displays a warning message when it detects a virus If this occurs you can either allow the operation to continue or use a virus free bootable floppy disk to restart and investigate your system Configuration options Enabled Disabled Quick Power On Self Test Enabled This field speeds up the Power On Self Test POST routine by skippin...

Page 145: ... When you select this option a confirmation window appears Select Yes to save changes and exit Pressing Esc does not immediately exit this menu Select one of the options from this menu or F10 from the legend bar to exit If you attempt to exit the Setup program without saving your changes the program prompts you with a message asking if you want to save your changes before exiting Pressing Enter sa...

Page 146: ...he values to the non volatile RAM Discard Changes This option allows you to discard the selections you made and restore the previously saved values After selecting this option a confirmation appears Select Yes to discard any changes and load the previously saved values Save Changes This option saves your selections without exiting the Setup program You can then return to other menus and make furth...

Page 147: ...S DiGiMatrix Appendix Appendix The Appendix provides information on the DiGiMatrix Subsystem remote controller optical drive technical specifications and IEEE 802 11b channels for the wireless LAN adapter ...

Page 148: ...em package includes CD RW drive IDE cable DC power cable The following sections describe the Subsystem features installation and connection to the DiGiMatrix system The Subsystem is purchased separately Rear panel Front panel CD RW drive inside the panel door CD RW drive eject button IDE connector DC IN socket A 1 1 Front and rear panel features ...

Page 149: ...he chassis 4 Hold the center edge of the top cover then lift it up from the chassis Set the top cover aside A 1 3 Installing a hard disk drive 1 Connect the 40 pin IDE cable to the IDE connector on the drive 2 Connect the 4 pin power plug to the HDD power connector Set your hard disk drive as Slave device before connecting the IDE cable and power plug Refer to the HDD documentation on how to set t...

Page 150: ...p cover screw on the DiGiMatrix then insert the IDE cable ground terminal into the screw Tighten the screw 4 Connect the other end of the IDE cable to the Subsystem IDE connector 5 Loosen one top cover screw on the Subsystem then insert the IDE cable ground terminal into the screw Tighten the screw 6 Connect one end of the DC power cable to the DiGiMatrix DC OUT socket 7 Connect the other end of t...

Page 151: ...rough the Audio DJ and ASUS Home Theater windows A 2 1 Specifications Operating range 5 meters max Power Source 2 x AA batteries Receiver Built in infrared receiver A 2 2 Remote control layout Navigation buttons Control buttons Numeric buttons DVD control buttons Audio control buttons OS start button Record button Multimedia buttons Screen control buttons Mode Memory buttons ...

Page 152: ...ency up Skip to previous track Skip to previous MP3 file Scan the frequency down Volume up Volume up Volume up Volume down Volume down Volume down Mute Mute Mute Switch mode Switch mode Switch mode Select radio preset 0 9 Select track number Select track number Confirm selected track Confirm selected track Turns the DiGiMatrix operating system on You may turn on the operating system using the OS S...

Page 153: ...Record TV Pause Pause slideshow Pause Pause Stop recording Stop Stop slideshow Stop Stop Play recorded TV Play Start slideshow Stop Stop Fine tuning Change ambience Rewind Rewind Fine tuning Change ambience Fast forward Fast forward Scan frequency down Previous track Previous pic Previous chap Scan frequency up Next track Next pic Next chap Volume up Volume up Volume up Volume up Volume up Volume ...

Page 154: ...ight Move right Move right Move left Move left Move left Move left Move left Move left Move up Move up Move up Move up Move up Move up Move down Move down Move down Move down Move down Move down Enter Enter Enter Enter Enter Enter 0 9 Select channel Select track Select chapter Open Home Theater Return to the Home Theater main window Return to the entertainment mode main window You may use the OS S...

Page 155: ...CAV 8X CAV 8X CAV DVD RAM 2X ZCLV 2X ZCLV CD ROM 24X CAV 24X CAV 24X CAV Random Access Time DVD ROM 105ms 100 ms 100 ms DVD RAM 170ms 170ms 170ms CD ROM 95ms 90ms 95ms Random Seek Time DVD ROM 95ms 85ms 95ms DVD RAM 120ms 130ms 120ms CD ROM 90ms 80ms 90ms Burst PIO Mode 16 7MB s 16 7MB s 16 7MB s MultiWord DMA 16 7MB s 16 7MB s 16 7MB s Ultra DMA 33 3MB s 33 3MB s 33 3MB s Interface ATAPI ATAPI En...

Page 156: ... of channels available in your location Country Region Regulating Body Available Channels Australia ACA Channels 1 to 13 Belgium RTT E EMC LVD Channels 1 to 13 Bulgaria RTT E EMC LVD Channels 1 to 13 Canada CSA cUL 950 3rd Edition Channels 1 to 11 China MII Channels 1 to 11 Cyprus RTT E EMC LVD Channels 1 to 13 Czech Republic RTT E EMC LVD Channels 1 to 13 Denmark RTT E EMC LVD Channels 1 to 13 Fi...

Page 157: ... Netherlands Antilles RTT E EMC LVD Channels 1 to 13 Netherlands Holland RTT E EMC LVD Channels 1 to 13 New Zealand PTC Channels 1 to 13 Norway RTT E EMC LVD Channels 1 to 13 Portugal RTT E EMC LVD Channels 1 to 13 Saudi Arabia Channels 1 to 13 Singapore Channels 1 to 13 South Korea KS Channels 1 to 13 Spain RTT E EMC LVD Channels 1 to 13 Sweden RTT E EMC LVD Channels 1 to 13 Switzerland RTT E EMC...

Page 158: ...Appendix A 12 ...

Reviews: