background image

2 - 1 5

2 - 1 5

2 - 1 5

2 - 1 5

2 - 1 5

A S U S   T 2 - A E 1

A S U S   T 2 - A E 1

A S U S   T 2 - A E 1

A S U S   T 2 - A E 1

A S U S   T 2 - A E 1

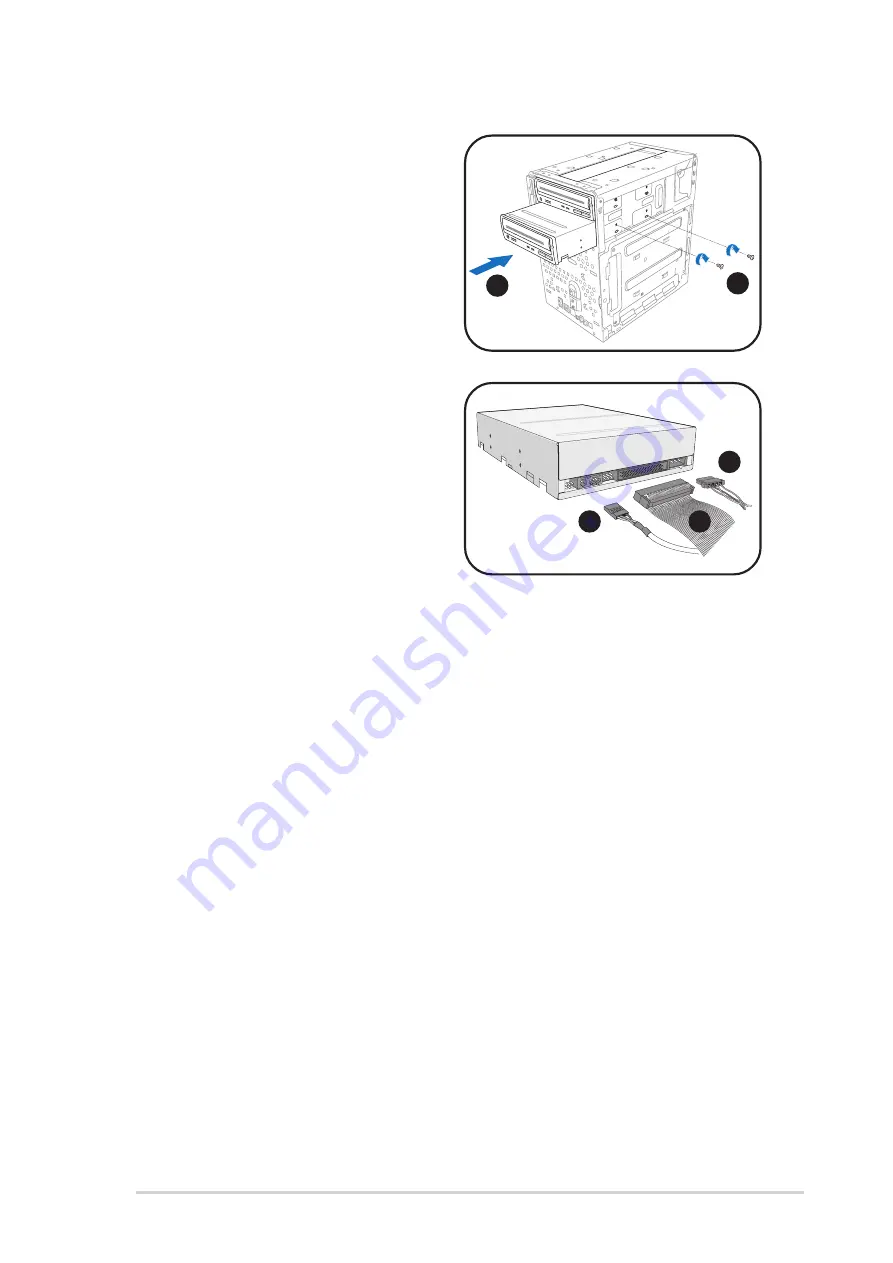
6.

Carefully push the optical drive
into the bay until its screw holes
align with the holes on the bay
as shown.

7.

Secure the optical drive with
two screws on one side of the
bay.

6

6

6

6

6

7

7

7

7

7

8.

Connect a power cable from the
power supply unit to the power
connector at the back of the
optical drive. See page 2-21 for
details.

9.

Connect the IDE ribbon cable to
the IDE interface at the back of
the optical drive, matching the
red stripe on the cable with Pin
1 on the IDE interface.

10. Connect one end of the optical

drive audio cable to the 4-pin
connector at the back of the
optical drive.

11. Make sure that the other end of

the IDE ribbon cable is connected
to the primary IDE connector (blue
connector labeled PRI_IDE) on the
motherboard. See page 4-8 for
the location of the primary IDE
connector.

12. Connect the other end of the

audio cable to the 4-pin CD1
connector on the motherboard.
See page 4-10 for the location of
the CD audio connector.

8

8

8

8

8

9

9

9

9

9

10

10

10

10

10

Summary of Contents for Desktop PC T2-AE1

Page 1: ...Terminator 2 Barebone System Model T2 AE1 ...

Page 2: ...TIONS OF MERCHANTABILITY OR FITNESS FOR A PARTICULAR PURPOSE IN NO EVENT SHALL ASUS ITS DIRECTORS OFFICERS EMPLOYEES OR AGENTS BE LIABLE FOR ANY INDIRECT SPECIAL INCIDENTAL OR CONSEQUENTIAL DAMAGES INCLUDING DAMAGES FOR LOSS OF PROFITS LOSS OF BUSINESS LOSS OF USE OR DATA INTERRUPTION OF BUSINESS AND THE LIKE EVEN IF ASUS HAS BEEN ADVISED OF THE POSSIBILITY OF SUCH DAMAGES ARISING FROM ANY DEFECT ...

Page 3: ...asic Installation Basic Installation 2 1 Preparation 2 2 2 2 Before you proceed 2 2 2 3 Removing the cover 2 3 2 4 Removing the power supply 2 4 2 5 Installing a CPU 2 5 2 6 Installing the CPU fan and heatsink assembly 2 7 2 7 Installing a DIMM 2 8 2 7 1 Memory configurations 2 8 2 7 2 DIMM installation 2 10 2 8 Installing an expansion card 2 11 2 8 1 Expansion slots 2 11 2 8 2 AGP 8X slot 2 11 2 ...

Page 4: ...board Info Motherboard Info Motherboard Info Motherboard Info 4 1 Introduction 4 2 4 2 Motherboard layout 4 2 4 3 Jumpers 4 3 4 4 Connectors 4 5 Chapter 5 Chapter 5 Chapter 5 Chapter 5 Chapter 5 BIOS Information BIOS Information BIOS Information BIOS Information BIOS Information 5 1 Managing and updating your BIOS 5 2 5 1 1 Creating a bootable floppy disk 5 2 5 1 2 ASUS EZ Flash utility 5 3 5 1 3 ...

Page 5: ... 5 4 3 Onboard Devices Configuration 5 22 5 4 4 PCI PnP 5 25 5 4 5 Instant Music Configuration 5 27 5 5 Power menu 5 28 5 5 1 Suspend Mode 5 28 5 5 2 Repost Video on S3 Resume 5 28 5 5 3 ACPI 2 0 Support 5 28 5 5 4 ACPI APIC Support 5 28 5 5 5 APM Configuration 5 29 5 5 6 Hardware Monitor 5 30 5 6 Boot menu 5 32 5 6 1 Boot Device Priority 5 32 5 6 2 Boot Settings Configuration 5 33 5 6 3 Security ...

Page 6: ...ry to correct the interference by one or more of the following measures Reorient or relocate the receiving antenna Increase the separation between the equipment and receiver Connect the equipment to an outlet on a circuit different from that to which the receiver is connected Consult the dealer or an experienced radio TV technician for help Canadian Department of Communications Statement Canadian ...

Page 7: ...ay from connectors slots sockets and circuitry Avoid dust humidity and temperature extremes Do not place the product in any area where it may become wet Place the product on a stable surface If you encounter technical problems with the product contact a qualified service technician or your retailer Lithium Ion Battery Warning Lithium Ion Battery Warning Lithium Ion Battery Warning Lithium Ion Batt...

Page 8: ... 2 Basic installation Chapter 2 Basic installation Chapter 2 Basic installation This chapter provides step by step instructions on how to install components in the system 3 3 3 3 3 Chapter 3 Starting up Chapter 3 Starting up Chapter 3 Starting up Chapter 3 Starting up Chapter 3 Starting up This chapter helps you power up the system and install drivers and utilities from the support CD 4 4 4 4 4 Ch...

Page 9: ...completing a task Where to find more information Where to find more information Where to find more information Where to find more information Where to find more information Refer to the following sources for additional information and for product and software updates 1 1 1 1 1 ASUS Websites ASUS Websites ASUS Websites ASUS Websites ASUS Websites The ASUS websites worldwide provide updated informat...

Page 10: ...assive PFC power supply unit 10 100 Mbps Ethernet LAN port CPU fan and heatsink assembly 2 x 5 25 drive bays 1 x 3 5 floppy disk drive bay 1 x 3 5 hard disk drive bay 6 x USB 2 0 ports 2 x IEEE 1394a ports S PDIF out port 2 2 2 2 2 C a b l e s C a b l e s C a b l e s C a b l e s C a b l e s AC power cable Serial ATA cable Serial ATA power cable 2 in 1 disk drive cable Floppy disk drive cable 3 3 3...

Page 11: ...E1 ASUS T2 AE1 ASUS T2 AE1 Chapter 1 System introduction This chapter gives a general description of the ASUS Terminator 2 The chapter lists the system features including introduction on the front and rear panel and internal components ...

Page 12: ...orts the AMD Athlon 64 Athlon XP processor with 800 MHz FSB and up to 2 GB system memory Supporting up to six USB 2 0 ports and Ethernet LAN Terminator 2 offers extensive connectivity digital entertainment and efficient networking capabilities to meet your personal as well as business requirements With these and many more the Terminator 2 definitely delivers the cutting edge technology for your co...

Page 13: ... 4 4 4 4 Second optical drive door Second optical drive door Second optical drive door Second optical drive door Second optical drive door This door covers a second optical drive bay 5 5 5 5 5 Power button Power button Power button Power button Power button Press this button to turn the system on 6 6 6 6 6 Power LED Power LED Power LED Power LED Power LED This LED lights up to indicate that the sy...

Page 14: ...ne port Microphone port Microphone port Microphone port Microphone port This Mic pink port connects a microphone 13 13 13 13 13 USB 2 0 ports USB 2 0 ports USB 2 0 ports USB 2 0 ports USB 2 0 ports 2 0 These Universal Serial Bus 2 0 USB 2 0 ports are available for connecting USB 2 0 devices such as a mouse printer scanner camera PDA and others 14 14 14 14 14 4 pin IEEE 1394a port 4 pin IEEE 1394a ...

Page 15: ... port PS 2 mouse port PS 2 mouse port This green 6 pin connector is for a PS 2 mouse 5 5 5 5 5 PS 2 keyboard port PS 2 keyboard port PS 2 keyboard port PS 2 keyboard port PS 2 keyboard port This purple 6 pin connector is for a PS 2 keyboard 6 6 6 6 6 VGA port VGA port VGA port VGA port VGA port This port connects a VGA monitor 7 7 7 7 7 Parallel port Parallel port Parallel port Parallel port Paral...

Page 16: ...4 14 Chassis fan vent Chassis fan vent Chassis fan vent Chassis fan vent Chassis fan vent This vent is for the fan that provides ventilation inside the system chassis 15 15 15 15 15 Power supply unit fan vent Power supply unit fan vent Power supply unit fan vent Power supply unit fan vent Power supply unit fan vent This vent is for the PSU fan that provides ventilation inside the power supply unit...

Page 17: ...ot 11 PCI slot 12 Serial ATA connectors 13 Expansion card slots 1 5 Internal components The illustration below is the internal view of the system when you remove the top cover and the power supply unit The installed components are labeled for your reference Proceed to Chapter 2 for instructions on installing additional system components 3 3 3 3 3 1 1 1 1 1 6 6 6 6 6 2 2 2 2 2 9 9 9 9 9 5 5 5 5 5 8...

Page 18: ...1 8 1 8 1 8 1 8 1 8 Chapter 1 System introduction Chapter 1 System introduction Chapter 1 System introduction Chapter 1 System introduction Chapter 1 System introduction ...

Page 19: ...ASUS T2 AE1 ASUS T2 AE1 ASUS T2 AE1 ASUS T2 AE1 ASUS T2 AE1 Chapter 2 Basic installation This chapter provides step by step instructions on how to install components in the system ...

Page 20: ...Before you proceed Take note of the following precautions before you install components into the system The motherboard comes with an onboard standby power LED This LED lights up to indicate that the system is ON in sleep mode or in soft off mode and not powered OFF Unplug the power cable from the power outlet and make sure that the standby power LED is OFF before installing any system component U...

Page 21: ...engaged from the chassis 4 Lift the cover then set aside 2 Use a Phillips screw driver to remove the cover screws Keep the screws for later use 2 3 Removing the cover To remove the cover 1 On the rear panel locate the three screws that secure the cover to the chassis 1 1 1 1 1 1 1 1 1 1 1 1 1 1 1 2 2 2 2 2 2 2 2 2 2 4 4 4 4 4 3 3 3 3 3 2 2 2 2 2 3 3 3 3 3 ...

Page 22: ...about half an inch 6 Slightly lift the PSU 2 4 Removing the power supply You must remove the power supply unit PSU before you can install a central processing unit CPU and other system components To remove the PSU 1 Lay the system on its side on a flat stable surface 2 Disconnect the optical drive and floppy disk drive power plugs 3 Remove the screw that secures the PSU to the chassis 4 4 4 4 4 5 ...

Page 23: ...ount 754 pin Zero Insertion Force ZIF socket designed for the AMD Athlon 64 processor in the 754 pin lidded ceramic micro PGA package Take note of the marked corner with gold triangle on the CPU This mark should match a specific corner on the socket to ensure correct installation Incorrect installation of the CPU into the socket may bend the pins and severely damage the CPU Gold triangle Gold tria...

Page 24: ...h that the CPU corner with the gold triangle matches the socket corner with a small triangle 4 Carefully insert the CPU into the socket until it fits in place 5 When the CPU is in place push down the socket lever to secure the CPU The lever clicks on the side tab to indicate that it is locked 6 Install a CPU heatsink and fan following the instructions that came with the heatsink package 7 Connect ...

Page 25: ...U making sure it fits the retention module 3 Connect the CPU fan cable to the CPU fan connector on the motherboard 2 2 2 2 2 4 4 4 4 4 4 Align the metal clips to the side rail of the CPU fan and heatsink assembly with the locking levers in the reverse orientation 4 Snap the hook of each metal clip into the hole of the retention module 6 6 6 6 6 3 3 3 3 3 5 Carefully press down each locking lever a...

Page 26: ...all only identical identical identical identical identical the same type and size DDR DIMM in DIMM_A and DIMM_B Always install DIMMs with the same CAS latency For optimum compatibility we recommend that you obtain memory modules from the same vendor Due to chipset resource allocation the system may detect less than 2 GB system memory when you installed two 1 GB DDR memory If you installed two 400 ...

Page 27: ...32M8TG 5BC DS MT16VDDT6464AG 40BCB 256MB Infineon HYB25D256800CE 5C SS HYS64D32300HU 5 C 512MB Infineon HYB25D256800CE 5C DS HYS64D64320HU 5 C 256MB CORSAIR W942508BH 5 SS CMX256A 3200C2PT 512MB CORSAIR VS32M8 5 DS VS512MB400 256MB Hynix HY5DU56822DT D43 SS HYMD232645D8J D43 512MB Hynix HY5DU56822DT D43 DS HYMD264646D8J D43 Use only identical DDR DIMM pairs Use only identical DDR DIMM pairs Use on...

Page 28: ...te the two DIMM sockets on the motherboard 2 Unlock a socket by pressing the retaining clips outward 3 Align a DIMM on the socket such that the notch on the DIMM matches the break on the socket 4 Firmly insert the DIMM into the socket until the retaining clips snap back in place and the DIMM is properly seated A DDR DIMM is keyed with a notch so that it fits in only one direction DO NOT force a DI...

Page 29: ...hysical injury and damage the motherboard PCI slot PCI slot PCI slot PCI slot PCI slot The PCI slot supports PCI cards such as a LAN card SCSI card USB card and other cards that comply with PCI specifications The following figure shows a LAN card installed on a PCI slot 2 8 2 2 8 2 2 8 2 2 8 2 2 8 2 AGP 8X slot AGP 8X slot AGP 8X slot AGP 8X slot AGP 8X slot This motherboard has an Accelerated Gra...

Page 30: ...that came with it and make the necessary hardware settings for the card 2 Pull the expansion card lock to the direction of the arrow 3 Remove the metal cover opposite the slot that you intend to use 5 Replace the expansion card lock to secure the card to the chassis 2 Expansion Expansion Expansion Expansion Expansion card lock card lock card lock card lock card lock Metal covers 3 5 P C I P C I P ...

Page 31: ...ric Data Processor 14 Primary IDE Channel These IRQs are usually available for ISA or PCI devices IRQ assignments for this motherboard IRQ assignments for this motherboard IRQ assignments for this motherboard IRQ assignments for this motherboard IRQ assignments for this motherboard A A A A A B B B B B C C C C C D D D D D E E E E E F F F F F G G G G G H H H H H PCI slot 1 shared AGP 8x slot shared ...

Page 32: ... in place 4 Detach the front panel cover top hooks 5 Slightly push the front panel cover outward until it detaches from the chassis then set it aside 1 1 1 1 1 2 2 2 2 2 3 3 3 3 3 On Deluxe models disconnect the LED panel and the front audio button panel cables from their respective connectors before removing the front panel cover To reconnect the cables see pages 4 7 and 4 8 for the location of t...

Page 33: ... ribbon cable to the IDE interface at the back of the optical drive matching the red stripe on the cable with Pin 1 on the IDE interface 10 Connect one end of the optical drive audio cable to the 4 pin connector at the back of the optical drive 11 Make sure that the other end of the IDE ribbon cable is connected to the primary IDE connector blue connector labeled PRI_IDE on the motherboard See pag...

Page 34: ...tion Chapter 2 Basic installation Chapter 2 Basic installation Chapter 2 Basic installation 14 Lock the front panel cover hooks to the chassis holes as indicated 1 1 1 1 14 4 4 4 4 13 Reinstall the front panel cover by aligning its hooks with the chassis holes 1 1 1 1 13 3 3 3 3 ...

Page 35: ...loppy disk drive into the floppy drive bay until the screw holes align with the holes on the bay 2 2 2 2 2 3 Secure the floppy disk drive with two screws 4 Connect the floppy disk drive signal cable to the signal connector at the back of the drive 5 Connect the other end of the signal cable to the floppy disk drive connector labeled FLOPPY on the motherboard See page 4 10 for the connector locatio...

Page 36: ...isk drive To install an IDE hard disk drive 1 Locate the HDD tray lock screw on the other side of the chassis 2 Remove the lock screw with a Philips screw driver Keep the screw for later use 4 Place a hard disk drive on the tray with its bottom on the open side Align the HDD and HDD tray screw holes 5 Secure the HDD with four screws 3 Slide the HDD tray outward until the tray slots are released fr...

Page 37: ... IDE connector blue connector labeled PRI_IDE on the motherboard See page 4 8 for the location of the primary IDE connector 6 6 6 6 6 7 7 7 7 7 8 8 8 8 8 9 9 9 9 9 To install a Serial ATA hard disk drive 1 Follow steps 1 7 of the previous section 2 Connect one end of the supplied 7 pin SATA cable to the SATA connector at the back of the drive then connect the other end to a SATA connector on the m...

Page 38: ...ctor on the motherboard See page 4 10 for the location of this connectors 2 Position the PSU over the chassis 3 Align the PSU side hook with the metal slot located on the side of the optical drive bay 4 Slide the PSU toward the direction of the rear panel until it fits in place 5 Secure the PSU with the screw you removed earlier Make sure the PSU cables do not interfere with the CPU and or chassis...

Page 39: ... selector Voltage selector Voltage selector The PSU has a 115 V 230 V voltage selector switch located beside the power connector Use this switch to select the appropriate system input voltage according to the voltage supply in your area If the voltage supply in your area is 100 127 V set the switch to 115 V If the voltage supply in your area is 200 240 V set the switch to 230 V 115 Setting the swi...

Page 40: ...cover To replace the cover 1 Turn the chassis upright 2 Position the front edge of the cover at least two inches from the front panel cover Fit the cover tabs with the chassis rail and the front panel tabs 3 Lower the rear edge of the cover as shown 4 Push the cover slightly toward the front panel until it fits in place 2 3 4 5 5 Secure the cover with the three screws you removed earlier ...

Page 41: ...ng external devices To the front panel To the front panel To the front panel To the front panel To the front panel M i c M i c M i c M i c M i c Headphone Headphone Headphone Headphone Headphone H D D H D D H D D H D D H D D Scanner Scanner Scanner Scanner Scanner Camera Camera Camera Camera Camera ...

Page 42: ...ine Out Line Out Recorder Recorder Recorder Recorder Recorder M i c M i c M i c M i c M i c R J 4 5 R J 4 5 R J 4 5 R J 4 5 R J 4 5 VGA monitor VGA monitor VGA monitor VGA monitor VGA monitor Card reader Card reader Card reader Card reader Card reader Joystick Joystick Joystick Joystick Joystick P P P P Po w e r o w e r o w e r o w e r o w e r o u t l e t o u t l e t o u t l e t o u t l e t o u t ...

Page 43: ...ASUS T2 AE1 ASUS T2 AE1 ASUS T2 AE1 ASUS T2 AE1 ASUS T2 AE1 Chapter 3 Starting up This chapter helps you power up the system and install drivers and utilities from the support CD ...

Page 44: ...nce the system features 3 2 Powering up The system has two power buttons located in the front panel Press the system power button to enter the OS Press to enter the Press to enter the Press to enter the Press to enter the Press to enter the system OS system OS system OS system OS system OS Because motherboard settings and hardware options vary use the setup procedures presented in this chapter for...

Page 45: ...s the available device drivers if the system detects installed devices Install the necessary drivers to activate the devices SiS AGP Driver SiS AGP Driver SiS AGP Driver SiS AGP Driver SiS AGP Driver Installs the SiS AGP driver SiS Graphics Adapter Drivers SiS Graphics Adapter Drivers SiS Graphics Adapter Drivers SiS Graphics Adapter Drivers SiS Graphics Adapter Drivers Installs the SiS graphics a...

Page 46: ...180 182 RAID controller drivers Make SiS180 182 SATA Driver Disk Make SiS180 182 SATA Driver Disk Make SiS180 182 SATA Driver Disk Make SiS180 182 SATA Driver Disk Make SiS180 182 SATA Driver Disk Allows you to make a SiS180 182 Serial ATA driver disk USB 2 0 Card Reader Software USB 2 0 Card Reader Software USB 2 0 Card Reader Software USB 2 0 Card Reader Software USB 2 0 Card Reader Software Ins...

Page 47: ... ASUS Screensaver ASUS Screensaver Bring life to your idle screen by installing the ASUS Screensaver AMD Cool n Quiet Utility AMD Cool n Quiet Utility AMD Cool n Quiet Utility AMD Cool n Quiet Utility AMD Cool n Quiet Utility Installs the AMD Cool n Quiet software Adobe Acrobat Reader V5 0 Adobe Acrobat Reader V5 0 Adobe Acrobat Reader V5 0 Adobe Acrobat Reader V5 0 Adobe Acrobat Reader V5 0 The A...

Page 48: ...n Other information Other information Other information The icons on the top right side of the screen provide additional information on the motherboard and the contents of the support CD 3 3 4 3 3 4 3 3 4 3 3 4 3 3 4 ASUS contact information ASUS contact information ASUS contact information ASUS contact information ASUS contact information The Contact tab displays the ASUS contact information ...

Page 49: ...nabled Enabled Enabled Enabled Enabled See section 5 4 6 Instant Music Configuration 4 The Instant Music CD ROM Drive Instant Music CD ROM Drive Instant Music CD ROM Drive Instant Music CD ROM Drive Instant Music CD ROM Drive item appears if you enabled Instant Music Highlight the item then press Enter to display the CD ROM options 5 Save your changes and exit BIOS Setup The hot key is F10 Make su...

Page 50: ...on the rear panel or on the optical drive front panel 4 Insert an audio CD to the optical drive 5 Press Esc Esc Esc Esc Esc to turn on Instant Music 6 Press F1 F1 F1 F1 F1 or the Space Bar Space Bar Space Bar Space Bar Space Bar to play the first track on the audio CD 7 Refer to the Instant Music keyboard label to select other tracks or control the volume 8 Press F2 or Enter once to stop playing t...

Page 51: ...rope Europe Europe Europe If you purchased the barebone system outside Europe U S A U S A U S A U S A U S A or Japan Japan Japan Japan Japan you must change the radio region in the BIOS setup to receive FM radio signals See section 5 4 1 Instant Music Configuration for details Tune left Tune left Tune left Tune left Tune left Scan left Scan left Scan left Scan left Scan left S t o p S t o p S t o ...

Page 52: ... l C h a n n e l C h a n n e l C h a n n e l preset number to the radio station using the arrow buttons 4 Type the station name in the field then click O K O K O K O K O K 5 The stored channel is displayed in the preset station list 3 Another E d i t C h a n n e l E d i t C h a n n e l E d i t C h a n n e l E d i t C h a n n e l E d i t C h a n n e l window appears 4 Edit the station frequency and...

Page 53: ...SUS T2 AE1 ASUS T2 AE1 ASUS T2 AE1 Chapter 4 Motherboard info This chapter gives information about the motherboard that comes with the system This chapter includes the motherboard layout jumper settings and connector locations ...

Page 54: ... the motherboard for future upgrades or system reconfiguration 4 2 Motherboard layout CD ALC655 AUX USB56 IOC_MB Super I O Flash BIOS ATX12V BUZZ CLRTC PRI_IDE 24 89cm 9 8in 20 06cm 7 9in DDR DIMM1 64 72 bit 184 pin module DDR DIMM2 64 72 bit 184 pin module SB_PWR PANEL FP_AUDIO SPDIF_OUT SiS 965L USB78 ATXPWR SATA2 SATA1 USB12 DJ_BTN LCD_PANEL LPT VGA Mic In Line In Line Out LAN_USB34 CPU_FAN USB...

Page 55: ... system passwords is powered by the onboard button cell battery To erase the RTC RAM 1 Turn OFF the computer and unplug the power cord 2 Remove the battery 3 Move the jumper cap from pins 1 2 default to pins 2 3 Keep the cap on pins 2 3 for about 5 10 seconds then move the cap back to pins 1 2 4 Re install the battery 5 Plug the power cord and turn ON the computer 6 Hold down the Del key during th...

Page 56: ...ake up 3 pin USBPWR12 USBPWR34 USB device wake up 3 pin USBPWR12 USBPWR34 The USBPWR12 and USBPWR34 jumpers are for the rear USB ports Set these jumpers to 5V to wake up the computer from S1 sleep mode CPU stopped DRAM refreshed system running in low power mode using the connected USB devices Set to 5VSB to wake up from S3 and S4 sleep modes no power to CPU DRAM in slow refresh power supply in red...

Page 57: ...therboard is for the USB_2 connector on the front panel I O daughterboard to support the USB 2 0 ports on the front panel USB connector USB56 USB Power USB5 USB5 GND NC USB Power USB4 USB4 GND 1 10 2 9 2 2 2 2 2 Front panel audio connector 10 1 pin FP_AUDIO Front panel audio connector 10 1 pin FP_AUDIO Front panel audio connector 10 1 pin FP_AUDIO Front panel audio connector 10 1 pin FP_AUDIO Fron...

Page 58: ...4a connectors 6 pin IE13 IEEE 1394a connectors 6 pin IE13 IEEE 1394a connectors 6 pin IE13 IEEE 1394a connectors 6 pin IE1394_1 8 pin IE1394_0 94_1 8 pin IE1394_0 94_1 8 pin IE1394_0 94_1 8 pin IE1394_0 94_1 8 pin IE1394_0 These connectors are for the IEEE 1394a connectors on the front panel I O daughterboard to support the front panel IEEE 1394a ports Connect the IE1394_0 motherboard connector to...

Page 59: ...CPU and chassis fan connectors 3 pin CPU_FAN CPU and chassis fan connectors 3 pin CPU_FAN CPU and chassis fan connectors 3 pin CPU_FAN CPU and chassis fan connectors 3 pin CPU_FAN 3 pin CHA_FAN 3 pin CHA_FAN 3 pin CHA_FAN 3 pin CHA_FAN 3 pin CHA_FAN The fan connectors support the proprietary CPU fan and chassis fan Connect the fan cable to the connector matching the black wire to the ground pin Do...

Page 60: ...1 pin PRI_IDE IDE connector 40 1 pin PRI_IDE IDE connector 40 1 pin PRI_IDE IDE connector 40 1 pin PRI_IDE The PRI_IDE connector is for the UltraATA100 IDE hard disk ribbon cable Connect the cable s blue connector to the IDE connector then connect the gray connector to a slave device optical drive and the black connector to the UltraATA100 master device hard disk drive Refer to the hard disk docum...

Page 61: ...onnector Connector C o l o r C o l o r C o l o r C o l o r C o l o r S e t t i n g S e t t i n g S e t t i n g S e t t i n g S e t t i n g U s e U s e U s e U s e U s e S A T A 1 S A T A 1 S A T A 1 S A T A 1 S A T A 1 B l a c k B l a c k B l a c k B l a c k B l a c k M a s t e r M a s t e r M a s t e r M a s t e r M a s t e r Boot disk Boot disk Boot disk Boot disk Boot disk S A T A 2 S A T A 2 S...

Page 62: ...n FLOPPY Floppy disk drive connector 34 1 pin FLOPPY Floppy disk drive connector 34 1 pin FLOPPY Floppy disk drive connector 34 1 pin FLOPPY Floppy disk drive connector 34 1 pin FLOPPY This connector is for the provided floppy disk drive FDD signal cable Insert one end of the cable to this connector then connect the other end to the signal connector at the back of the floppy disk drive Pin 5 on th...

Page 63: ...de Hard disk drive activity 2 pin HDLED Hard disk drive activity 2 pin HDLED Hard disk drive activity 2 pin HDLED Hard disk drive activity 2 pin HDLED Hard disk drive activity 2 pin HDLED This 2 pin connector is for the HDD Activity LED Connect the HDD Activity LED cable to this connector The IDE LED lights up or flashes when data is read from or written to the HDD Power Soft off button 2 pin PWR ...

Page 64: ...4 12 4 12 4 12 4 12 4 12 Chapter 4 Motherboard info Chapter 4 Motherboard info Chapter 4 Motherboard info Chapter 4 Motherboard info Chapter 4 Motherboard info ...

Page 65: ...1 ASUS T2 AE1 ASUS T2 AE1 ASUS T2 AE1 ASUS T2 AE1 ASUS T2 AE1 Chapter 5 BIOS setup This chapter tells how to change system settings through the BIOS Setup menus and describes the BIOS parameters ...

Page 66: ... to create a bootable floppy disk DOS environment a Insert a 1 44MB floppy disk into the drive b At the DOS prompt type format A S then press Enter Windows XP environment a Insert a 1 44 MB floppy disk to the floppy disk drive b Click Start Start Start Start Start from the Windows desktop then select M y M y M y M y M y Computer Computer Computer Computer Computer c Select the 3 1 2 Floppy Drive i...

Page 67: ...bsite www asus com to download the latest BIOS file for the motherboard and rename the same to K8ST ROM K8ST ROM K8ST ROM K8ST ROM K8ST ROM 2 Save the BIOS file to a floppy disk then restart the system 3 Press Alt F2 during POST to display the following EZFlash starting BIOS update Checking for floppy 4 Insert the floppy disk that contains the BIOS file to the floppy disk drive When the correct BI...

Page 68: ...ess Enter The utility copies the current BIOS file to the floppy disk A afudos oOLDBIOS1 ROM AMI Firmware Update Utility Version 1 10 Copyright C 2002 American Megatrends Inc All rights reserved Reading flash done A Main filename Main filename Main filename Main filename Main filename Extension name Extension name Extension name Extension name Extension name 1 Copy the AFUDOS utility afudos exe fr...

Page 69: ...Visit the ASUS website www asus com and download the latest BIOS file for the motherboard Save the BIOS file to a bootable floppy disk 4 The utility reads the file and starts updating the BIOS Do not shut down or reset the system while updating the BIOS to prevent system boot failure Write the BIOS filename on a piece of paper You need to type the exact BIOS filename at the DOS prompt A afudos iK8...

Page 70: ... ASUS CrashFree BIOS 2 utility ASUS CrashFree BIOS 2 utility The ASUS CrashFree BIOS 2 is an auto recovery tool that allows you to restore the BIOS file when it fails or gets corrupted during the updating process You can update a corrupted BIOS file using the motherboard support CD or the floppy disk that contains the updated BIOS file Recovering the BIOS from a floppy disk Recovering the BIOS fro...

Page 71: ...CD ROM CD ROM found Reading file K8ST ROM Completed Start flashing When no floppy disk is found the utility automatically checks the optical drive for the original or updated BIOS file The utility then updates the corrupted BIOS file Bad BIOS checksum Starting BIOS recovery Checking for floppy Bad BIOS checksum Starting BIOS recovery Checking for floppy 4 Restart the system after the utility compl...

Page 72: ...pdate Install ASUS Update Install ASUS Update Install ASUS Update VX XX XX VX XX XX VX XX XX VX XX XX VX XX XX See page 3 4 for the Utilities Utilities Utilities Utilities Utilities screen menu 3 The ASUS Update utility is copied to your system 5 1 5 5 1 5 5 1 5 5 1 5 5 1 5 ASUS Update utility ASUS Update utility ASUS Update utility ASUS Update utility ASUS Update utility The ASUS Update is a util...

Page 73: ...the BIOS through the Internet To update the BIOS through the Internet 1 Launch the ASUS Update utility from the Windows desktop by clicking Start Start Start Start Start Programs Programs Programs Programs Programs ASUS ASUS ASUS ASUS ASUS ASUSUpdate ASUSUpdate ASUSUpdate ASUSUpdate ASUSUpdate ASUSUpdate ASUSUpdate ASUSUpdate ASUSUpdate ASUSUpdate The ASUS Update main window appears 2 Select Updat...

Page 74: ...SUSUpdate ASUSUpdate ASUSUpdate ASUSUpdate ASUSUpdate ASUSUpdate ASUSUpdate ASUSUpdate The ASUS Update main window appears 2 Select Update BIOS from a Update BIOS from a Update BIOS from a Update BIOS from a Update BIOS from a file file file file file option from the drop down menu then click Next Next Next Next Next 4 From the FTP site select the BIOS version that you wish to download Click Next ...

Page 75: ...program Press Del during the Power On Self Test POST to enter the Setup utility otherwise POST continues with its test routines If you wish to enter Setup after POST restart the system by pressing Ctrl Alt Delete You can also restart by turning the system off and then back on Do this last option only if the first two failed The Setup program is designed to make it as easy to use as possible Being ...

Page 76: ...he desired item is highlighted Some of the navigation keys differ from one screen to another 5 2 3 5 2 3 5 2 3 5 2 3 5 2 3 Navigation keys Navigation keys Navigation keys Navigation keys Navigation keys At the bottom right corner of a menu screen are the navigation keys for that particular menu Use the navigation keys to select items in the menu and change the settings System Time 16 37 21 System ...

Page 77: ...of options Refer to 5 2 7 Pop up window 5 2 7 5 2 7 5 2 7 5 2 7 5 2 7 Pop up window Pop up window Pop up window Pop up window Pop up window Select a menu item then press Enter to display a pop up window with the configuration options for that item 5 2 8 5 2 8 5 2 8 5 2 8 5 2 8 Scroll bar Scroll bar Scroll bar Scroll bar Scroll bar A scroll bar appears on the right side of a menu screen when there ...

Page 78: ...ystem Date Day xx xx xxxx Allows you to set the system date 5 3 3 5 3 3 5 3 3 5 3 3 5 3 3 Legacy Diskette A 1 44M 3 5 in Legacy Diskette A 1 44M 3 5 in Legacy Diskette A 1 44M 3 5 in Legacy Diskette A 1 44M 3 5 in Legacy Diskette A 1 44M 3 5 in Sets the type of floppy drive installed Configuration options Disabled 360K 5 25 in 1 2M 5 25 in 720K 3 5 in 1 44M 3 5 in 2 88M 3 5 in Refer to section 5 2...

Page 79: ...le These items show N A if no IDE device is installed in the system Type Auto Type Auto Type Auto Type Auto Type Auto Selects the type of IDE drive Setting to Auto allows automatic selection of the appropriate IDE device type Select CDROM if you are specifically configuring a CD ROM drive Select ARMD ATAPI Removable Media Device if your device is either a ZIP LS 120 or MO drive Configuration optio...

Page 80: ...RT Monitoring Auto Sets the Smart Monitoring Analysis and Reporting Technology Configuration options Auto Disabled Enabled 32Bit Data Transfer Disabled 32Bit Data Transfer Disabled 32Bit Data Transfer Disabled 32Bit Data Transfer Disabled 32Bit Data Transfer Disabled Enables or disables 32 bit data transfer Configuration options Disabled Enabled 5 3 5 5 3 5 5 3 5 5 3 5 5 3 5 Onboard PCI S ATA Cont...

Page 81: ...e BIOS automatically detects the items in this menu AMI BIOS AMI BIOS AMI BIOS AMI BIOS AMI BIOS Displays the auto detected BIOS information Processor Processor Processor Processor Processor Displays the auto detected CPU specification System Memory System Memory System Memory System Memory System Memory Displays the auto detected system memory AMIBIOS Version 0117 Build Date 02 21 05 Processor Ty...

Page 82: ...stem to malfunction CPU Configuration Chipset Onboard Devices Configuration PCI PnP Instant Music Configuration 5 4 1 5 4 1 5 4 1 5 4 1 5 4 1 CPU Configuration CPU Configuration CPU Configuration CPU Configuration CPU Configuration Cool n Quiet Enabled Cool n Quiet Enabled Cool n Quiet Enabled Cool n Quiet Enabled Cool n Quiet Enabled Allows you to enable or disable the AMD Cool n Quiet technology...

Page 83: ...andard values Configuration options Auto Limit CPU Configuration Burst length 4 Beats Memclock Mode Auto Memory CLK 200 MHz CAS Latency 3 0 TRCD 3CLK TRP 3CLK TRAS 8CLK Burst length can be set to 8 or 4 beats 64 bit Dq must use the 4 beats The following item appears when the Memclock Mode Memclock Mode Memclock Mode Memclock Mode Memclock Mode item is set to Limit Memclock Value 100 MHz Memclock V...

Page 84: ...guration Aperture Size 64 MB Graphic Adapter Priority AGP Int VGA AGP FAST WRITE Disabled Select AGP 3 0 Data Ratio 8x Share Memory 32 MB The size of mapped memory for AGP graphic data Aperture Size 64 MB Configuration options 32 MB 64 MB 128 MB Graphic Adapter Priority AGP Int VGA Allows selection of the graphics controller to use as a primary boot device Configuration options Internal VGA AGP In...

Page 85: ...erTransport Configuration HT Width 8x16 BIT HT Speed 800 MHz Host Link_width_out x Link_width_in HT Width 8x16 BIT Configuration options 8x8 BIT 16x16 BIT 16x8 BIT 8x16 BIT HT Speed 800 MHz Configuration options 200 MHz 400 MHz 600 MHz 800 MHz MPS Configuration MPS Configuration MPS Configuration MPS Configuration MPS Configuration MPS Configuration MPS Revision 1 4 Select MPS Revision MPS Revisio...

Page 86: ...l DMA3 Parallel Port IRQ IRQ7 Onboard Game MIDI Port Disabled Onboard AC97 Audio Device Enabled Onboard AC97 Audio Device Enabled Onboard AC97 Audio Device Enabled Onboard AC97 Audio Device Enabled Onboard AC97 Audio Device Enabled Enables or disables the AC 97 CODEC Configuration options Enabled Disabled OnBoard SiS190 LAN Device Enabled OnBoard SiS190 LAN Device Enabled OnBoard SiS190 LAN Device...

Page 87: ...S USB2 0 Device Enabled Onboard SiS USB2 0 Device Enabled Onboard SiS USB2 0 Device Enabled Onboard SiS USB2 0 Device Enabled Allows you to enable or disable the onboard SiS USB 2 0 controller Configuration options Enabled Disabled Legacy USB Support Auto Legacy USB Support Auto Legacy USB Support Auto Legacy USB Support Auto Legacy USB Support Auto Allows you to enable or disable support for USB ...

Page 88: ...ECP Mode DMA Channel DMA3 ECP Mode DMA Channel DMA3 ECP Mode DMA Channel DMA3 ECP Mode DMA Channel DMA3 ECP Mode DMA Channel DMA3 Appears only when the Parallel Port Mode Parallel Port Mode Parallel Port Mode Parallel Port Mode Parallel Port Mode is set to ECP This item allows you to set the Parallel Port ECP DMA Configuration options DMA0 DMA1 DMA3 EPP Version 1 9 EPP Version 1 9 EPP Version 1 9 ...

Page 89: ...set to No BIOS configures all the devices in the system When set to Yes and if you install a Plug and Play operating system the operating system configures the Plug and Play devices not required for boot Configuration options No Yes PCI Latency Timer 64 PCI Latency Timer 64 PCI Latency Timer 64 PCI Latency Timer 64 PCI Latency Timer 64 Allows you to select the value in units of PCI clocks for the ...

Page 90: ...E Card Auto OffBoard PCI ISA IDE Card Auto OffBoard PCI ISA IDE Card Auto OffBoard PCI ISA IDE Card Auto Allows you to set the PCI slot number holding a PCI IDE card that requires you to set the slot number Configuration options Auto PCI Slot1 PCI Slot2 PCI Slot3 PCI Slot4 PCI Slot5 PCI Slot6 IRQ xx assigned to PCI Device IRQ xx assigned to PCI Device IRQ xx assigned to PCI Device IRQ xx assigned ...

Page 91: ...to configure the Instant Music CD ROM selection Configuration options IDE Primary Master IDE Primary Slave 5 4 5 5 4 5 5 4 5 5 4 5 5 4 5 Instant Music Configuration Instant Music Configuration Instant Music Configuration Instant Music Configuration Instant Music Configuration Instant Music Disabled Instant Music Disabled Instant Music Disabled Instant Music Disabled Instant Music Disabled Enables ...

Page 92: ...deo on S3 Resume No Determines whether to invoke VGA BIOS POST on S3 STR resume Configuration options No Yes 5 5 3 5 5 3 5 5 3 5 5 3 5 5 3 ACPI 2 0 Support No ACPI 2 0 Support No ACPI 2 0 Support No ACPI 2 0 Support No ACPI 2 0 Support No Allows you to add more tables for Advanced Configuration and Power Interface ACPI 2 0 specifications Configuration options No Yes 5 5 4 5 5 4 5 5 4 5 5 4 5 5 4 A...

Page 93: ...Last State the system goes into either off or on state whatever the system state was before the AC power loss Configuration options Power Off Power On Last State Resume on Ring Disabled Resume on Ring Disabled Resume on Ring Disabled Resume on Ring Disabled Resume on Ring Disabled Allows you to enable or disable RI to generate a wake event Configuration options Disabled Enabled Resume on LAN Disab...

Page 94: ...ically detects and displays the motherboard and CPU temperatures Select Disabled if you do not wish to display the detected temperatures CPU Fan Speed xxxxRPM or N A CPU Fan Speed xxxxRPM or N A CPU Fan Speed xxxxRPM or N A CPU Fan Speed xxxxRPM or N A CPU Fan Speed xxxxRPM or N A The onboard hardware monitor automatically detects and displays the CPU fan speed in rotations per minute RPM If the f...

Page 95: ...es more ventilation Configuration options Auto 90 80 70 60 Chassis Fan Speed Ignored or N A Chassis Fan Speed Ignored or N A Chassis Fan Speed Ignored or N A Chassis Fan Speed Ignored or N A Chassis Fan Speed Ignored or N A The onboard hardware monitor automatically detects and displays the chassis fan speed in rotations per minute RPM If the fan is not connected to the chassis the specific field ...

Page 96: ...vice Priority 1st xxth Boot Device 1st Floppy Drive 1st xxth Boot Device 1st Floppy Drive 1st xxth Boot Device 1st Floppy Drive 1st xxth Boot Device 1st Floppy Drive 1st xxth Boot Device 1st Floppy Drive These items specify the boot device priority sequence from the available devices The number of device items that appears on the screen depends on the number of devices installed in the system Conf...

Page 97: ...Enabled Full Screen Logo Enabled Full Screen Logo Enabled Full Screen Logo Enabled Full Screen Logo Enabled Full Screen Logo Enabled This allows you to enable or disable the full screen logo display feature Configuration options Disabled Enabled Add On ROM Display Mode Force BIOS Add On ROM Display Mode Force BIOS Add On ROM Display Mode Force BIOS Add On ROM Display Mode Force BIOS Add On ROM Dis...

Page 98: ...sor Password Not Installed User Password Not Installed Change Supervisor Password Boot Sector Virus Protection Disabled Enter to change password Enter again to disabled password Change Supervisor Password Change Supervisor Password Change Supervisor Password Change Supervisor Password Change Supervisor Password Select this item to set or change the supervisor password The Supervisor Password item ...

Page 99: ...the Setup utility Change User Password Change User Password Change User Password Change User Password Change User Password Select this item to set or change the user password The User Password item on top of the screen shows the default Not Installed Not Installed Not Installed Not Installed Not Installed After you set a password this item shows Installed Installed Installed Installed Installed To...

Page 100: ... for user password both when accessing Setup and booting the system Configuration options Setup Always Boot Sector Virus Protection Disabled Boot Sector Virus Protection Disabled Boot Sector Virus Protection Disabled Boot Sector Virus Protection Disabled Boot Sector Virus Protection Disabled Allows you to enable or disable the boot sector virus protection Configuration options Disabled Enabled 5 7...

Page 101: ...tion allows you to load the default values for each of the parameters on the Setup menus When you select this option or if you press F5 a confirmation window appears Select Y e s Y e s Y e s Y e s Y e s to load default values Select Exit Save Changes Exit Save Changes Exit Save Changes Exit Save Changes Exit Save Changes or make other changes before saving the values to the non volatile RAM If you...

Page 102: ...5 38 5 38 5 38 5 38 5 38 Chapter 5 BIOS setup Chapter 5 BIOS setup Chapter 5 BIOS setup Chapter 5 BIOS setup Chapter 5 BIOS setup ...

Page 103: ...ASUS T2 AE1 ASUS T2 AE1 ASUS T2 AE1 ASUS T2 AE1 ASUS T2 AE1 Appendix Appendix The Appendix includes the power supply unit specification for this system ...

Page 104: ...ic Current Harmonic Current Harmonic Current Harmonic Meets EN61000 3 2 100 Vac 50 Hz or 230 Vac 50 Hz at full load E P A E P A E P A E P A E P A 50 min at input 115 Vac 60 Hz Output characteristics Output characteristics Output characteristics Output characteristics Output characteristics O u t p u t O u t p u t O u t p u t O u t p u t O u t p u t Load Range Load Range Load Range Load Range Load ...

Reviews: