background image

22

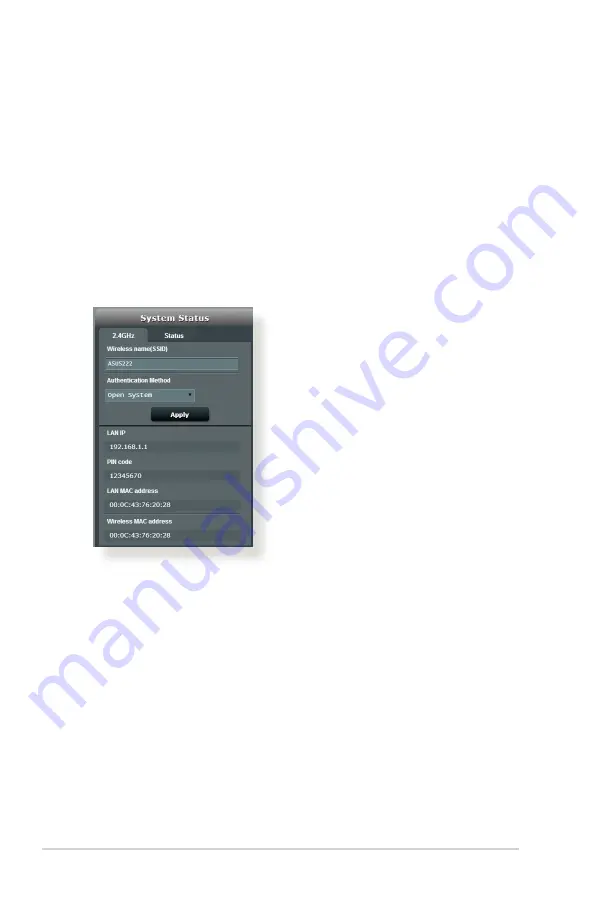
3.1.1 Setting up the wireless security settings

To protect your wireless network from unauthorized access, you 
need to configure its security settings.

To set up the wireless security settings:

1.  From the navigation panel, go to 

General

 > 

Network Map

.

2.  On the Network Map screen and under 

System status

, you can 

configure the wireless security settings such as SSID, security 

level, and encryption settings.

3

.  On the 

Wireless name (SSID)

 field, key in a unique name for 

your wireless network.

Summary of Contents for 90IG01N0-BM3000/10

Page 1: ...User Guide RT N12 Wireless N300 Router ...

Page 2: ...ARTICULAR PURPOSE IN NO EVENT SHALL ASUS ITS DIRECTORS OFFICERS EMPLOYEES OR AGENTS BE LIABLE FOR ANY INDIRECT SPECIAL INCIDENTAL OR CONSEQUENTIAL DAMAGES INCLUDING DAMAGES FOR LOSS OF PROFITS LOSS OF BUSINESS LOSS OF USE OR DATA INTERRUPTION OF BUSINESS AND THE LIKE EVEN IF ASUS HAS BEEN ADVISED OF THE POSSIBILITY OF SUCH DAMAGES ARISING FROM ANY DEFECT OR ERROR IN THIS MANUAL OR PRODUCT SPECIFIC...

Page 3: ...ith Auto detection 15 2 3 Connecting to your wireless network 19 3 Configuring the General settings 20 3 1 Using the Network Map 20 3 1 1 Setting up the wireless security settings 21 3 1 2 Managing your network clients 22 3 2 Creating a Guest Network 23 3 3 Using the Traffic Manager 25 3 3 1 Managing QoS Quality of Service Bandwidth 25 3 3 2 Monitoring Traffic 28 3 4 Setting up Parental Control 29...

Page 4: ...46 4 3 2 Port Trigger 49 4 3 3 Virtual Server Port Forwarding 51 4 3 4 DMZ 54 4 3 5 DDNS 55 4 3 6 NAT Passthrough 56 4 4 IPv6 57 4 5 VPN Server 58 4 6 Firewall 59 4 6 1 General 59 4 6 2 URL Filter 59 4 6 3 Keyword filter 60 4 6 4 Network Services Filter 61 4 7 Administration 63 4 7 1 Operation Mode 63 4 7 2 System 64 4 7 3 Firmware Upgrade 65 4 7 4 Restore Save Upload Setting 65 ...

Page 5: ...ilities 67 5 1 Device Discovery 67 5 2 Firmware Restoration 68 6 Troubleshooting 70 6 1 Basic Troubleshooting 70 6 2 Frequently Asked Questions FAQs 73 Appendices 83 Notices 83 ASUS Contact information 97 Networks Global Hotline Information 98 ...

Page 6: ...chnical inquiries and support Refer to the ASUS Support Hotline list at the back of this user manual Keep the original packaging material in case you would need future warranty services such as repair or replacement RT N12 Wireless Router Network cable RJ 45 Power adapter Quick Start Guide 1 1 Package contents ...

Page 7: ...ion WAN Internet LED Off No power or no physical connection On Has physical connection to a wide area network WAN LAN 1 4 LED Off No power or no physical connection On Has physical connection to a local area network LAN WPS Reset button 2 in 1 This button launches the WPS Wizard or resets restores the system to its factory default settings LAN 1 4 ports Connect network cables into these ports to e...

Page 8: ...1 75A current Operating Temperature 0 40o C Storage 0 70o C Operating Humidity 50 90 Storage 20 90 WAN Internet port Connect a network cable into this port to establish WAN connection Power DC IN port Insert the bundled AC adapter into this port and connect your router to a power source Power button Press this button to power on or off the stystem On Off ...

Page 9: ... a wall is not recommended as it reduces wireless performance Item Description Mounting hooks Use the mounting hooks to mount your router on concrete or wooden surfaces using two round head screws Air vents These vents provide ventilation to your router ...

Page 10: ...the device away from 802 11g or 20MHz only Wi Fi devices 2 4GHz computer peripherals Bluetooth devices cordless phones transformers heavy duty motors fluorescent lights microwave ovens refrigerators and other industrial equipment to prevent signal interference or loss Always update to the latest firmware Visit the ASUS website at http www asus com to get the latest firmware updates To ensure the b...

Page 11: ...such as Internet Explorer Firefox Safari or Google Chrome NOTES If your computer does not have built in wireless capabilities you may install an IEEE 802 11b g n WLAN adapter to your computer to connect to the network If your computer does not have built in wireless capabilities you may install a WLAN adapter to your computer to connect to the network The Ethernet RJ 45 cables that will be used to...

Page 12: ...twork Disconnect the cables wires from your existing modem setup If your modem has a backup battery remove it as well Reboot your cable modem and computer recommended 1 6 1 Wired connection NOTE You can use either a straight through cable or a crossover cable for wired connection To set up your wireless router via wired connection 1 Insert your wireless router s AC adapter to the DC IN port and pl...

Page 13: ...ur wireless router s WAN port 4 Insert your modem s AC adapter to the DC IN port and plug it to a power outlet 1 6 2 Wireless connection To set up your wireless router via wireless connection 1 Insert your wireless router s AC adapter to the DC IN port and plug it to a power outlet 2 Using the bundled network cable connect your modem to your wireless router s WAN port RT N12 4 1 3 Modem WAN 2 ...

Page 14: ...all an IEEE 802 11b g n WLAN adapter on your computer NOTES For details on connecting to a wireless network refer to the WLAN adapter s user manual To set up the security settings for your network refer to the section Setting up the wireless security settings in Chapter 3 of this user manual ...

Page 15: ...s To log into the web GUI 1 On your web browser manually key in the wireless router s default IP address 192 168 1 1 or enter http router asus com 2 On the login page key in the default user name admin and password admin 3 You can now use the Web GUI to configure various settings of your ASUS Wireless Router NOTE If you are logging into the Web GUI for the first time you will be directed to the Qu...

Page 16: ... to its factory default settings To use QIS with auto detection 1 Log into the Web GUI The QIS page launches automatically NOTES By default the login username and password for your wireless router s Web GUI is admin For details on changing your wireless router s login username and password refer to section 4 7 2 System The wireless router s login username and password allows you to log into your w...

Page 17: ... connection type is Dynamic IP PPPoE PPTP L2TP and Static IP Key in the necessary information for your ISP connection type IMPORTANT Obtain the necessary information from your ISP about the Internet connection type for Automatic IP DHCP for PPPoE PPTP and L2TP ...

Page 18: ...r the first time or when your wireless router is reset to its default settings If QIS failed to detect your Internet connection type click Skip to manual setting and manually configure your connection settings 3 Assign the wireless network name SSID and security key for your 2 4GHz wireless connection Click Apply when done ...

Page 19: ...19 4 Your Internet and wireless settings are displayed Click Next to continue 5 Read the wireless network connection tutorial When done click Finish ...

Page 20: ...reless network that you want to connect to then click Connect 3 You may need to key in the network security key for a secured wireless network then click OK 4 Wait while your computer establishes connection to the wireless network successfully The connection status is displayed and the network icon displays the connected status NOTES Refer to the next chapters for more details on configuring your ...

Page 21: ...21 3 Configuring the General settings 3 1 Using the Network Map Network Map allows you to configure your network s security settings manage your network clients ...

Page 22: ...ity settings To set up the wireless security settings 1 From the navigation panel go to General Network Map 2 On the Network Map screen and under System status you can configure the wireless security settings such as SSID security level and encryption settings 3 On the Wireless name SSID field key in a unique name for your wireless network ...

Page 23: ...yption methods your data rate will drop to IEEE 802 11g 54Mbps connection 5 Key in your security passkey 6 Click Apply when done 3 1 2 Managing your network clients To manage your network clients 1 From the navigation panel go to General Network Map tab 2 On the Network Map screen select the Client Status icon to display your network client s information 3 To block a client s access to your networ...

Page 24: ...rary visitors with Internet connectivity via access to separate SSIDs or networks without providing access to your private network NOTE RT N12 supports up to three SSIDs To create a guest network 1 From the navigation panel go to General Guest Network 2 Click Enable ...

Page 25: ...dify 5 Assign a wireless name for your temporary network on the Network Name SSID field 6 Select an Authentication Method 7 Specify the Access time or choose Limitless 8 Select Disable or Enable on the Access Intranet item 9 When done click Apply ...

Page 26: ... panel go to General Traffic Manager QoS tab 2 Click ON to enable QoS Fill in the upload and download bandwidth fields NOTE Get the bandwidth information from your ISP 3 Click Apply NOTE The User Specify Rule List is for advanced settings If you want to prioritize specific network applications and network services select User defined QoS rules or User defined Priorities from the drop down list on ...

Page 27: ...ups of two hexadecimal digits separated by colons in transmission order e g 12 34 56 aa bc ef For source or destination port range you can either a Enter a specific port such as 95 b Enter ports within a range such as 103 315 100 or 65535 The Transferred column contains information about the upstream and downstream traffic outgoing and incoming network traffic for one section In this column you ca...

Page 28: ...t are available for specified network applications NOTES Low priority packets are disregarded to ensure the transmission of high priority packets Under Download Bandwidth table set Maximum Bandwidth Limit for multiple network applications in corresponding order The higher priority upstream packet will cause the higher priority downstream packet If there are no packets being sent from high priority...

Page 29: ...ction allows you to access the bandwidth usage and speed of your Internet wired and wireless networks It allows you to monitor network traffic even on a daily basis NOTE Packets from the Internet are evenly transmitted to the wired and wireless devices ...

Page 30: ...rol 3 Select the client whose network usage you want to control You may also key in the client s MAC address in the Client MAC Address column NOTE Ensure that the client name does not contain special characters or spaces as this may cause the router to function abnormally 4 Click or to add or delete the client s profile 5 Set up the allowed time limit in Time Management map Drag and drop a desired...

Page 31: ... the navigation panel go to Advanced Settings Wireless General tab 2 Assign a unique name containing up to 32 characters for your SSID Service Set Identifier or network name to identify your wireless network Wi Fi devices can identify and connect to the wireless network via your assigned SSID The SSIDs on the information banner are updated once new SSIDs are saved to the settings ...

Page 32: ...ever will only run at a maximum speed of 54Mbps N only Select N only to maximize wireless N performance This setting prevents 802 11g and 802 11b devices from connecting to the wireless router 5 Select the operating channel for your wireless router Select Auto to allow the wireless router to automatically select the channel that has the least amount of interference 6 Select any of these channel ba...

Page 33: ...urity It is with integrated EAP server or an external RADIUS back end authentication server Radius with 802 1x NOTE Your wireless router supports the maximum transmission rate of 54Mbps when the Wireless Mode is set to Legacy and encryption method is WEP 8 Select any of these WEP Wired Equivalent Privacy Encryption options for the data transmitted over your wireless network Off Disables WEP encryp...

Page 34: ...connect devices to a wireless network You can configure the WPS function via the PIN code or WPS button NOTE Ensure that the devices support WPS To enableWPS on your wireless network 1 From the navigation panel go to Advanced Settings Wireless WPS tab 2 In the EnableWPS field move the slider to ON ...

Page 35: ...wireless router b Press the WPS button on your wireless device This is normally identified by the WPS logo NOTE Check your wireless device or its user manual for the location of the WPS button c The wireless router will scan for any available WPS devices If the wireless router does not find any WPS devices it will switch to standby mode 5 To set up WPS using the Client s PIN code follow these step...

Page 36: ...red as a wireless repeater where your ASUS wireless router communicates with another access point and other wireless devices To set up the wireless bridge 1 From the navigation panel go to Advanced Settings Wireless WDS tab 2 In the AP Mode field select any of these options AP Only Disables the Wireless Bridge function WDS Only Enables the Wireless Bridge feature but prevents other wireless device...

Page 37: ...n the Remote AP List 4 The router is set to Auto by default to let the router select the channel with the least amount of interference automatically If you want to modify it click the link to return to the General page to modify the channel selection NOTE Channel availability varies per country or region 5 On the Remote AP List key in a MAC address and click the Add button to enter the MAC address...

Page 38: ...panel go to Advanced Settings Wireless Wireless MAC Filter tab 2 In the MAC Filter Mode dropdown list select either Accept or Reject Select Accept to allow devices in the MAC filter list to access to the wireless network Select Reject to prevent devices in the MAC filter list to access to the wireless network 3 On the MAC filter list click the Add button and key in the MAC address of the wireless ...

Page 39: ...hat the wireless router s authentication mode is set to WPA Enterprise WPA2 Enterprise or Radius with 802 1x NOTE Please refer to section 4 1 1 General section for configuring your wireless router s Authentication Mode 2 From the navigation panel go to Advanced Settings Wireless RADIUS Setting 3 In the Server IP Address field key in your RADIUS server s IP Address 4 In the Connection Secret field ...

Page 40: ...orking Date to Enable Radio weekdays You can specify which days of the week wireless networking is enabled Time of Day to Enable Radio You can specify a time range when wireless networking is enabled during the week 4 1 6 Professional The Professional screen provides advanced configuration options NOTE We recommend that you use the default values on this page ...

Page 41: ...ring data transmission Select Short for a busy wireless network with high network traffic Select Long if your wireless network is composed of older or legacy wireless devices RTSThreshold Select a lower value for RTS Request to Send Threshold to improve wireless communication in a busy or noisy wireless network with high network traffic and numerous wireless devices DTIM Interval DTIM Delivery Tra...

Page 42: ...very to improve power management between wireless devices Select Disable to switch off WMM APSD 4 2 LAN 4 2 1 LAN IP The LAN IP screen allows you to modify the LAN IP settings of your wireless router NOTE Any changes to the LAN IP address will be reflected on your DHCP settings ...

Page 43: ...one click Apply 4 2 2 DHCP Server Your wireless router uses DHCP to assign IP addresses automatically on your network You can specify the IP address range and lease time for the clients on your network To configure the DHCP server 1 From the navigation panel go to Advanced Settings LAN DHCP Server tab 2 In the Enable the DHCP Server field tick Yes ...

Page 44: ...mend that you use an IP address format of 192 168 1 xxx where xxx can be any number between 2 and 254 when specifying an IP address range An IP Pool Starting Address should not be greater than the IP Pool Ending Address 7 In the DNS and Server Settings section key in your DNS Server and WINS Server IP address if needed 8 Your wireless router can also manually assign IP addresses to devices on the ...

Page 45: ...ault route settings unless you have advanced knowledge of routing tables To configure the LAN Routing table 1 From the navigation panel go to Advanced Settings LAN Route tab 2 On the Enable static routes field choose Yes 3 On the Static Route List enter the network information of other access points or nodes Click the Add or Delete button to add or remove a device on the list 4 Click Apply ...

Page 46: ...pports connection to IPTV services through an ISP or a LAN The IPTV tab provides the configuration settings needed to set up IPTV VoIP multicasting and UDP for your service Contact your ISP for specific information regarding your service ...

Page 47: ...tings WAN Internet Connection tab 2 Configure the following settings below When done click Apply WAN ConnectionType Choose your Internet Service Provider type The choices are Automatic IP PPPoE PPTP L2TP or fixed IP Consult your ISP if the router is unable to obtain a valid IP address or if you are unsure the WAN connection type EnableWAN Select Yes to allow the router Internet access Select No to...

Page 48: ... discovered automatically Once connected to the network devices can be remotely configured to support P2P applications interactive gaming video conferencing and web or proxy servers Unlike Port forwarding which involves manually configuring port settings UPnP automatically configures the router to accept incoming connections and direct requests to a specific PC on the local network Connect to DNS ...

Page 49: ...ct to their service and reject any unrecognized device that attempt to connect To avoid connection issues due to an unregistered MAC address you can Contact your ISP and update the MAC address associated with your ISP service Clone or change the MAC address of the ASUS wireless router to match the MAC address of the previous networking device recognized by the ISP ...

Page 50: ... for the same application at a different time An application requires specific incoming ports that are different from the outgoing ports To set up PortTrigger 1 From the navigation panel go to Advanced Settings WAN PortTrigger tab 2 Configure the following settings below When done click Apply Enable PortTrigger Choose Yes to enable Port Trigger Well Known Applications Select popular games and web ...

Page 51: ...t Trigger is disabled the router drops the connection because it is unable to determine which PC is requesting for IRC access When Port Trigger is enabled the router assigns an incoming port to receive the inbound data This incoming port closes once a specific time period has elapsed because the router is unsure when the application has been terminated Port triggering only allows one client in the...

Page 52: ...r allows PCs outside the network to access specific services provided by a PC in your network NOTE When port forwarding is enabled the ASUS router blocks unsolicited inbound traffic from the Internet and only allows replies from outbound requests from the LAN The network client does not have access to the Internet directly and vice versa To set up Port Forwarding 1 From the navigation panel go to ...

Page 53: ... range accepts various formats such as Port Range 300 350 individual ports 566 789 or Mix 1015 1024 3021 NOTES When your network s firewall is disabled and you set 80 as the HTTP server s port range for your WAN setup then your http server web server would be in conflict with the router s web user interface A network makes use of ports in order to exchange data with each port assigned a port numbe...

Page 54: ... On the Internet client use the router s WAN IP to access the server If port forwarding has been successful you should be able to access the files or applications Differences between port trigger and port forwarding Port triggering will work even without setting up a specific LAN IP address Unlike port forwarding which requires a static LAN IP address port triggering allows dynamic port forwarding...

Page 55: ...n or you want to host a domain web or e mail server CAUTION Opening all the ports on a client to the Internet makes the network vulnerable to outside attacks Please be aware of the security risks involved in using DMZ To set up DMZ 1 From the navigation panel go to Advanced Settings WAN DMZ tab 2 Configure the setting below When done click Apply IP address of Exposed Station Key in the client s LA...

Page 56: ...owing settings below When done click Apply Enable the DDNS Client Enable DDNS to access the ASUS router via the DNS name rather than WAN IP address Server and Host Name Choose ASUS DDNS or other DDNS If you want to use ASUS DDNS fill in the Host Name in the format of xxx asuscomm com xxx is your host name If you want to use a different DDNS service click FREE TRIAL and register online first Fill i...

Page 57: ... be on a network that uses multiple NAT tables 4 3 6 NAT Passthrough NAT Passthrough allows a Virtual Private Network VPN connection to pass through the router to the network clients PPTP Passthrough L2TP Passthrough IPsec Passthrough and RTSP Passthrough are enabled by default To enable disable the NAT Passthrough settings go to the Advanced Settings WAN NAT Passthrough tab When done click Apply ...

Page 58: ... if your Internet service supports IPv6 To set up IPv6 1 From the navigation panel go to Advanced Settings IPv6 2 Select your ConnectionType The configuration options vary depending on your selected connection type 3 Enter your IPv6 LAN and DNS settings 4 Click Apply NOTE Please refer to your ISP regarding specific IPv6 information for your Internet service ...

Page 59: ... you are trying to access To set up access to aVPN server 1 From the navigation panel go to Advanced Settings VPN Server 2 On the Enable VPN Server field select ON 3 On the Network Place Samba Support field select Yes 4 Enter the user name and password for accessing the VPN server Click the button 5 Click Apply NOTE For advanced VPN server settings click the VPN Server tab to configure broadcast s...

Page 60: ...tacks though this may affect your router s performance 4 You can also monitor packets exchanged between the LAN and WAN connection On the Logged packets type select Dropped Accepted or Both 5 Click Apply 4 6 2 URL Filter You can specify keywords or web addresses to prevent access to specific URLs NOTE The URL Filter is based on a DNS query If a network client has already accessed a website such as...

Page 61: ...lter field select Enabled 3 Enter a URL and click the button 4 Click Apply 4 6 3 Keyword filter Keyword filter blocks access to webpages containing specified keywords To set up a keyword filter 1 From the navigation panel go to Advanced Settings Firewall Keyword Filter tab 2 On the Enable Keyword Filter field select Enabled ...

Page 62: ...S cache in the system stores previously visited websites To resolve this issue clear the DNS cache before setting up the Keyword Filter Web pages compressed using HTTP compression cannot be filtered HTTPS pages also cannot be blocked using a keyword filter 4 6 4 Network Services Filter The Network Services Filter blocks LAN to WAN packet exchanges and restricts network clients from accessing speci...

Page 63: ...s Filter field select Yes 3 Select the Filter table type Black List blocks the specified network services White List limits access to only the specified network services 4 Specify the day and time when the filters will be active 5 To specify a Network Service to filter enter the Source IP Destination IP Port Range and Protocol Click the button 6 Click Apply ...

Page 64: ...er connects to the Internet and provides Internet access to available devices on its own local network In this mode the router takes an existing signal from a wireless router or access point and rebroadcasts it to create a second network Repeater mode In this mode the router takes an existing signal from a wireless router or access point and rebroadcasts it to create a second network Access Point ...

Page 65: ...er can access a NTP Network time Protocol server in order to synchronize the time EnableTelnet Click Yes to enable Telnet services on the network Click No to disable Telnet Authentication Method You can select HTTP HTTPS or both protocols to secure router access EnableWeb Access fromWAN Select Yes to allow devices outside the network to access the wireless router GUI settings Select No to prevent ...

Page 66: ...lowly To recover or restore the system refer to section 5 2 Firmware Restoration 4 7 4 Restore Save Upload Setting To restore save upload wireless router settings 1 From the navigation panel go to Advanced Settings Administration Restore Save Upload Setting tab 2 Select the tasks that you want to do To restore to the default factory settings click Restore and click OK in the confirmation message T...

Page 67: ...E System log resets when the router is rebooted or powered off To view your system log 1 From the navigation panel go to Advanced Settings System Log 2 You can view your network activities in any of these tabs General Log DHCP Leases Wireless Log Port Forwarding Routing Table ...

Page 68: ...escue zip The utilities are not supported on MAC OS 5 1 Device Discovery Device Discovery is an ASUS WLAN utility that detects an ASUS wireless router device and allows you to configure the wireless networking settings To launch the Device Discovery utility From your computer s desktop click Start All Programs ASUS Utility RT N12 Wireless Router Device Discovery RT N12 RT N12 NOTE When you set the...

Page 69: ...uter before using the Firmware Restoration utility NOTE This feature is not supported on MAC OS To launch the rescue mode and use the Firmware Restoration utility 1 Unplug the wireless router from the power source 2 Hold the Reset button at the rear panel and simultaneously replug the wireless router into the power source Release the Reset button when the Power LED at the front panel flashes slowl...

Page 70: ...desktop click Start All Programs ASUS Utility RT N12 Wireless Router Firmware Restoration 5 Specify a firmware file then click Upload NOTE This is not a firmware upgrade utility and cannot be used on a working ASUS Wireless Router Normal firmware upgrades must be done through the web interface Refer to Chapter 4 Configuring the Advanced Settings for more details ...

Page 71: ...ms with your router try these basic steps in this section before looking for further solutions Upgrade Firmware to the latest version 1 Launch the Web GUI Go to Advanced Settings Administration Firmware Upgrade tab Click Check to verify if the latest firmware is available 2 If the latest firmware is available visit the ASUS global website at http www asus com Networking RTN12 HelpDesk_ Download to...

Page 72: ...ly the WAN LED will be on When the Ethernet cable connecting your powered on computer with the router is plugged in properly the corresponding LAN LED will be on Check if the wireless setting on your computer matches that of your computer When you connect your computer to the router wirelessly ensure that the SSID wireless network name encryption method and password are correct Check if your netwo...

Page 73: ... providers require you to use the MAC address of the computer initially registered on the account You can view the MAC address in the web GUI Network Map Clients page and hover the mouse pointer over your device in Client Status ...

Page 74: ...nformation Delete the cookies and files in your web browser For Internet Explorer 8 follow these steps 1 Launch Internet Explorer 8 then click Tools Internet Options 2 In the General tab under Browsing history click Delete select Temporary Internet Files and Cookies then click Delete NOTES The commands for deleting cookies and files vary with web browsers Disable proxy server settings cancel the d...

Page 75: ...the best direction as described in section 1 4 Positioning your router DHCP server has been disabled 1 Launch the web GUI Go to General Network Map Clients and search for the device that you want to connect to the router 2 If you cannot find the device in the Network Map go to Advanced Settings LAN DHCP Server Basic Config list select Yes on the Enable the DHCP Server ...

Page 76: ...ol Channel If you are using a wireless LAN adapter check if the wireless channel in use conforms to the channels available in your country area If not adjust the channel channel bandwidth and wireless mode If you still cannot connect to the router wirelessly you can reset your router to factory default settings In the router GUI click Administration Restore Save Upload Setting and click Restore ...

Page 77: ...ct to your ISP s WAN IP address try restarting your network as described in the section Restart your network in following sequence under Basic Troubleshooting The device has been blocked via the Parental Control function Go to General Parental Control and see if the device is in the list If the device is listed under Client Name remove the device using the Delete button or adjust the Time Manageme...

Page 78: ...to Network Map click the router icon enter a new SSID and encryption key and then click Apply Reset your router to the default settings Launch the web GUI go to Administration Restore Save Upload Setting and click Restore The default login account and password are both admin How to restore the system to its default settings Go to Administration Restore Save Upload Setting and click Restore The fol...

Page 79: ...79 Firmware upgrade failed Launch the rescue mode and run the Firmware Restoration utility Refer to section 5 2 Firmware Restoration on how to use the Firmware Restoration utility ...

Page 80: ...aunch the browser 2 Click Tools Internet options Connections tab LAN settings Before configuring your wireless router do the steps described in this section for your host computer and network clients 3 From the Local Area Network LAN Settings screen untick Use a proxy server for your LAN 4 Click OK when done ...

Page 81: ...n done NOTE Refer to your browser s help feature for details on disabling the proxy server B Set theTCP IP settings to automatically obtain an IP address Windows 7 1 Click Start Control Panel Network and Internet Network and Sharing Center Manage network connections 2 Select Internet Protocol Version 4 TCP IPv4 or Internet ProtocolVersion 6 TCP IPv6 then click Properties ...

Page 82: ...atically 4 Click OK when done MAC OS 1 Click the Apple icon located on the top left of your screen 2 Click System Preferences Network Configure 3 From the TCP IP tab select Using DHCP in the Configure IPv4 dropdown list 4 Cllick Apply Now when done NOTE Refer to your operating system s help and support feature for details on configuring your computer s TCP IP settings ...

Page 83: ...ndows 7 1 Click Start Internet Explorer to launch the browser 2 Click Tools Internet options Connections tab 3 Tick Never dial a connection 4 Click OK when done NOTE Refer to your browser s help feature for details on disabling the dial up connection ...

Page 84: ...valuation Authorisation and Restriction of Chemicals regulatory framework we published the chemical substances in our products at ASUS REACH website at http csr asus com english index aspx Federal Communications Commission Statement This device complies with Part 15 of the FCC Rules Operation is subject to the following two conditions This device may not cause harmful interference This device must...

Page 85: ...s against harmful interference in a residential installation This equipment generates uses and can radiate radio frequency energy and if not installed and used in accordance with the instructions may cause harmful interference to radio communications However there is no guarantee that interference will not occur in a particular installation If this equipment does cause harmful interference to radi...

Page 86: ...c compatibility Article 3 1b Testing for electromagnetic compatibility according to EN 301 489 1 and EN 301 489 17 has been conducted These are considered relevant and sufficient Effective use of the radio spectrum Article 3 2 Testing for radio test suites according to EN 300 328 EN 301 893 have been conducted These are considered relevant and sufficient Operate the device in 5150 5250 MHz frequen...

Page 87: ...ntial for human contact during normal operation is minimized This device has been evaluated for and shown compliant with the IC Specific Absorption Rate SAR limits when installed in specific host products operated in portable exposure conditions antennas are less than 20 centimeters of a person s body This device has been certified for use in Canada Status of the listing in the Industry Canada s R...

Page 88: ...MPE 標準值 1mWcm2 送測產品實測值 為 0 529 mWcm2 GNU General Public License Licensing information This product includes copyrighted third party software licensed under the terms of the GNU General Public License Please see The GNU General Public License for the exact terms and conditions of this license We include a copy of the GPL with every CD shipped with our product All future firmware updates will also b...

Page 89: ...When we speak of free software we are referring to freedom not price Our General Public Licenses are designed to make sure that you have the freedom to distribute copies of free software and charge for this service if you wish that you receive source code or can get it if you want it that you can change the software or use pieces of it in new free programs and that you know you can do these things...

Page 90: ...ent this we have made it clear that any patent must be licensed for everyone s free use or not licensed at all The precise terms and conditions for copying distribution and modification follow Terms conditions for copying distribution modification 0 This License applies to any program or other work which contains a notice placed by the copyright holder saying it may be distributed under the terms ...

Page 91: ...ion in exchange for a fee 2 You may modify your copy or copies of the Program or any portion of it thus forming a work based on the Program and copy and distribute such modifications or work under the terms of Section 1 above provided that you also meet all of these conditions a You must cause the modified files to carry prominent notices stating that you changed the files and the date of any chan...

Page 92: ...y part regardless of who wrote it Thus it is not the intent of this section to claim rights or contest your rights to work written entirely by you rather the intent is to exercise the right to control the distribution of derivative or collective works based on the Program In addition mere aggregation of another work not based on the Program with the Program or with a work based on the Program on a...

Page 93: ...er source or binary form with the major components compiler kernel and so on of the operating system on which the executable runs unless that component itself accompanies the executable If distribution of executable or object code is made by offering access to copy from a designated place then offering equivalent access to copy the source code from the same place counts as distribution of the sour...

Page 94: ...e conditions of this License If you cannot distribute so as to satisfy simultaneously your obligations under this License and any other pertinent obligations then as a consequence you may not distribute the Program at all For example if a patent license would not permit royalty free redistribution of the Program by all those who receive copies directly or indirectly through you then the only way y...

Page 95: ...nse from time to time Such new versions will be similar in spirit to the present version but may differ in detail to address new problems or concerns Each version is given a distinguishing version number If the Program specifies a version number of this License which applies to it and any later version you have the option of following the terms and conditions either of that version or of any later...

Page 96: ...PROVE DEFECTIVE YOU ASSUME THE COST OF ALL NECESSARY SERVICING REPAIR OR CORRECTION 12 IN NO EVENT UNLESS REQUIRED BY APPLICABLE LAW OR AGREED TO IN WRITING WILL ANY COPYRIGHT HOLDER OR ANY OTHER PARTY WHO MAY MODIFY AND OR REDISTRIBUTE THE PROGRAM AS PERMITTED ABOVE BE LIABLE TOYOU FOR DAMAGES INCLUDING ANY GENERAL SPECIAL INCIDENTAL OR CONSEQUENTIAL DAMAGES ARISING OUT OF THE USE OR INABILITY TO...

Page 97: ...Address AYAZAGA MAH KEMERBURGAZ CAD NO 10 AYAZAGA ISTANBUL CIZGI Elektronik San Tic Ltd Sti Tel No 90 212 3567070 Address CEMAL SURURI CD HALIM MERIC IS MERKEZI No 15 C D 5 6 34394 MECIDIYEKOY ISTANBUL KOYUNCU ELEKTRONiK BiLGi iSLEM SiST SAN VE DISTIC A S Tel No 90 216 5288888 Address EMEK MAH ORDU CAD NO 18 SARIGAZi SANCAKTEPE ISTANBUL ...

Page 98: ...CA 94539 USA Telephone 15107393777 Fax 15106084555 Website usa asus com Online support support asus com ASUS COMPUTER GmbH Germany and Austria Address Harkort Str 21 23 D 40880 Ratingen Germany Support Fax 49 2102 959931 Website asus com de Online contact eu rma asus com sales Technical Support Telephone Component 49 2102 5789555 Telephone Germany System Notebook Eee LCD 49 2102 5789557 Telephone ...

Page 99: ...00 17 00 Mon Fri Norway 0047 2316 2682 09 00 18 00 Mon Fri Sweden 0046 858769407 09 00 18 00 Mon Fri Finland 00358 969379690 10 00 19 00 Mon Fri Denmark 0045 38322943 09 00 18 00 Mon Fri Poland 0048 225718040 08 30 17 30 Mon Fri Spain 0034 902889688 09 00 18 00 Mon Fri Portugal 00351 707500310 09 00 18 00 Mon Fri Slovak Republic 00421 232162621 08 00 17 00 Mon Fri Czech Republic 00420 596766888 08...

Page 100: ...8525201 Singapore 0065 64157917 11 00 19 00 Mon Fri 0065 67203835 11 00 19 00 Mon Fri Repair Status Only 11 00 13 00 Sat Malaysia 0060 320535077 10 00 19 00 Mon Fri Philippine 1800 18550163 09 00 18 00 Mon Fri India 1800 2090365 09 00 18 00 Mon Sat India WL NW 09 00 21 00 Mon Sun Indonesia 0062 2129495000 09 30 17 00 Mon Fri 500128 Local Only 9 30 12 00 Sat Vietnam 1900 555581 08 00 12 00 13 30 17...

Page 101: ...ica 0861 278772 08 00 17 00 Mon Fri Israel 6557 00972 39142800 08 00 17 00 Sun Thu 9770 00972 35598555 08 30 17 30 Sun Thu Balkan Countries Romania 0040 213301786 09 00 18 30 Mon Fri Bosnia Herzegovina 00387 33773163 09 00 17 00 Mon Fri Bulgaria 00359 70014411 09 30 18 30 Mon Fri 00359 29889170 09 30 18 00 Mon Fri Croatia 00385 16401111 09 00 17 00 Mon Fri Montenegro 00382 20608251 09 00 17 00 Mon...

Reviews: