Page 5
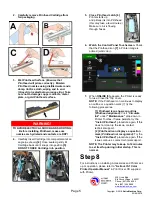
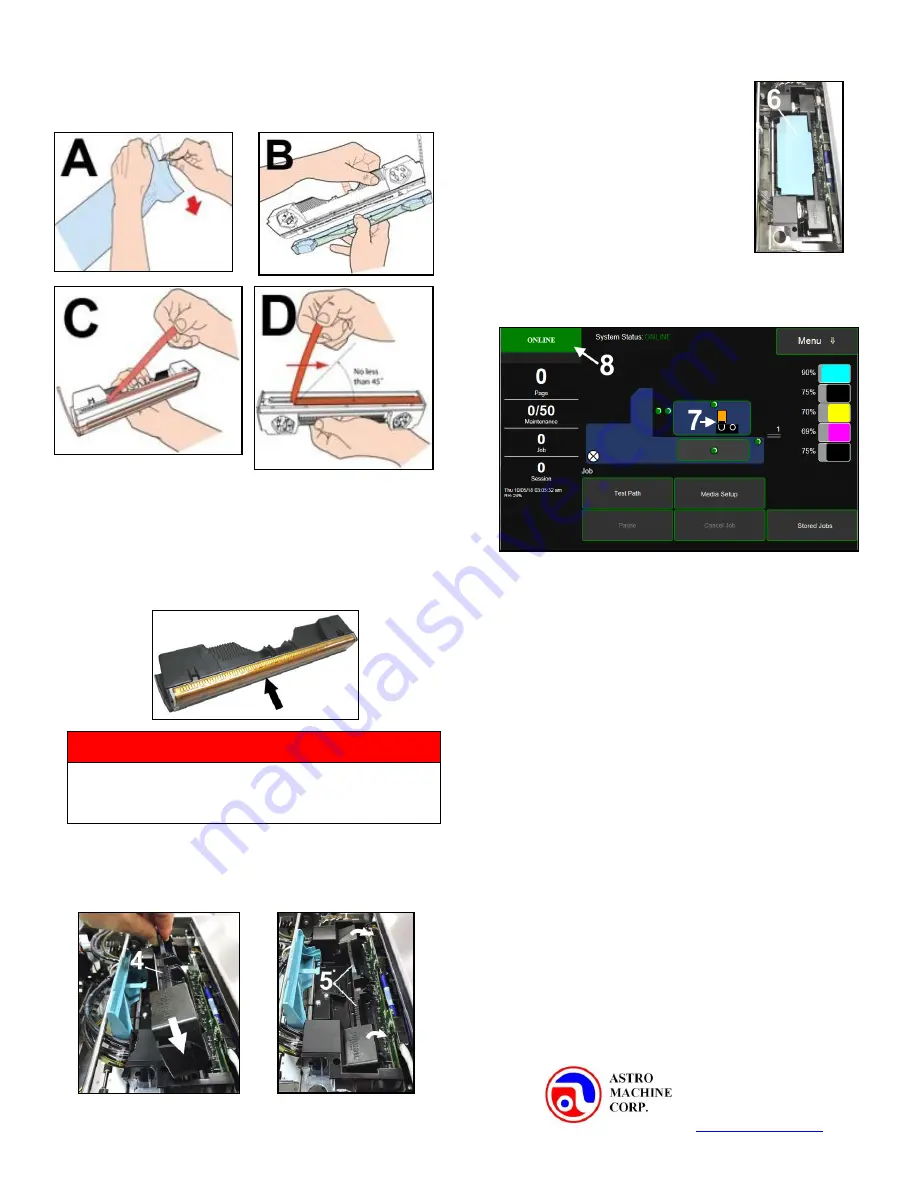
2. Carefully remove Printhead Cartridge from
foil packaging
.
3. Wet Printhead Surface. (
Ensures that
Printhead will prime correctly
.)
.
Moisten
Printhead nozzles using distilled water and a
damp, lint-free cloth, wiping end to end.
(
Gray strip located below orange strip.
) Take
care not to damage copper contacts, metal
plate, or gold Printhead surface.
4.
Carefully insert Cartridge into compartment at an
angle (
as shown
)
[4]
. Once seated, gently tilt
Cartridge back until it snaps into position
[5]
.
DO NOT FORCE Cartridge into position.
5. Close Printhead Latch
[6]
.
Printer starts up
and primes ink into Printhead
(
this may take a few minutes
.)
Make sure ink is flowing
through hoses.
6. Watch the Control Panel Touchscreen.
Check
that the Printhead icon
[7]
in Printer image is
primed (
solid color
).
7.
When
ONLINE
[8]
appears, the Printer is ready
for use. Close the Top Cover.
NOTE:
If the Printhead icon continues to display
an outline or a question mark (?) try the
following procedures:
[1]
Printhead icon shows an outline
(
Printhead unprimed)
:
Click
“Circulate
Ink”
under
“Maintenance”
drop-down in
Printer Toolbox. If issue persists, try the
“Install Printhead”
procedure again. If this
does not clear up the issue, contact
technical support.
[2] Printhead icon displays a question
mark (
Printhead not recognized
):
Try the
“Install Printhead”
procedure again. If the
issue continues, contact technical support.
NOTE: The Printer may take up to 12 minutes
to set itself up during initial startup. This is
normal.
Step 8
For instructions on installing Accessories and Printer set-
up or operation, please refer to
“AstroJet S1 Color
Printer Operator Manual”
in Print Driver CD supplied
with Printer.
WARNING!
TO AVOID ELECTRICAL SHOCK AND SHORTING:
Before installing Printhead, make sure
nozzles are hydrated and contacts are DRY!
Copyright © 2019
Astro Machine Corp.
02/06/2019
630 Lively Blvd.
Elk Grove Village, IL 60007
Phone: (847) 364-6363
Fax: (847) 364 9898
www.astromachine.com


