background image

User Guide


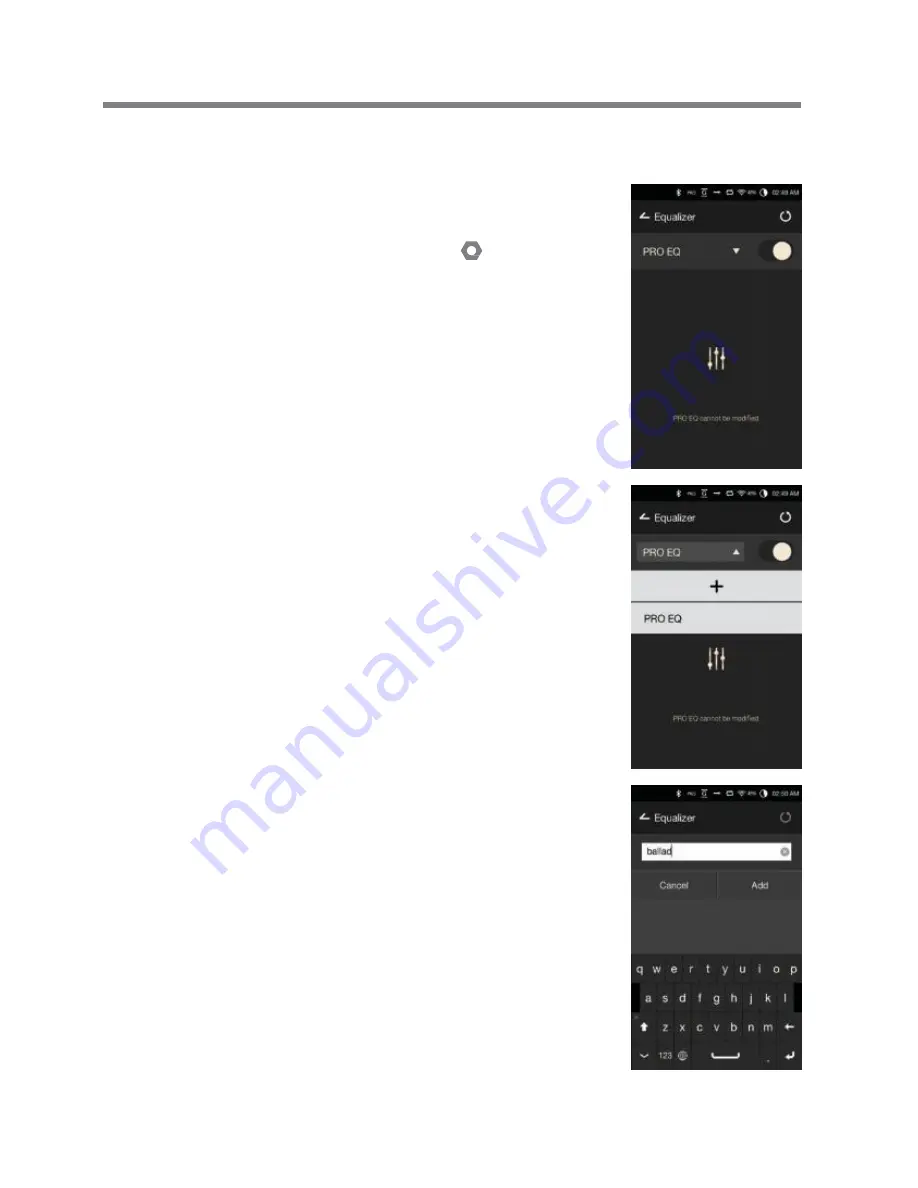
2. Press [Pro EQ] at the upper-left  

corner of the screen and select  

[ + ].


3. Enter a name for the custom  

EQ settings and select [Add].


Equalizer  
Setup


Equalizer Setup


1. Long-press  [EQ] from the  

Notification  Bar, or turn on


the feature from [ 

- Equalizer].


Using the Device 

45 

Summary of Contents for PPE12

Page 1: ...PPE12 INSTRUCTION BOOK UserGuide...

Page 2: ...tenin g to Music Playlist M anagement USB DA C Installation CD Rip ping Using Bluetooth Settings Connecting to a WirelessNetwork Equalizer Setup 12 14 15 18 19 25 31 34 35 37 39 44 45 Using the Device...

Page 3: ...ty Card The warranty card is required for customer and technical support Do not misplace the card User Guide The User Guide can be downloaded from the Astell Kern website http www astellnkern com Supp...

Page 4: ...o earphones or headphones that support balanced audio connections Connect to an e xternal audio device by using both the earphone port grou nd and balanced audio port LR in conjunction Micro USB Port...

Page 5: ...ress the button to turn off t he screen 2 Press the button again to turn off the screen TurnOn Off 1 Long press the button to turn on the device 2 While the device is on long press the button to disp...

Page 6: ...ff The device will not charge normally when using a fast charge ad apter that supports 5V and 9V together Doing so may cause da mage to thedevice If the device is on and or being used while charging t...

Page 7: ...hones port OR Balanced Earphones Headphones 1 Connect supported earphones or headphones to the balanced port OR Getting Started 6 Balanced Audio Device 1 Connect to an external audio device by using t...

Page 8: ...n be played back on a S PDIF capable external audio device by using an optical cable DSD format is converted to PCM when using Optical Out The volume will be fixed at the maximum level Mac users need...

Page 9: ...ed before attempting to disconnect the device from the computer Disconnecting the device from the computer during an operation e g file transfer may corrupt data on the device Windows XP users require...

Page 10: ...r speedsmay be affected dependingon the computer and or OSenvironment UserGuide Insert Remove a microSDCard 1 Refer to the diagram and gently insert a microSD card into the microSD c ardslot Getting S...

Page 11: ...system Do not remove the microSD card while it is in use Doingso m ay cause data corruption deletion malfunction anddamage to the microSDcard Miscellaneous If the device is unable to recognize the mi...

Page 12: ...upgrade Doing so may cause data corruption and or damage to thesystem If an error occurs or the notice in the Notification Bar disappears during an upgrade download the firmware update again through...

Page 13: ...erated with lightpressure Basic LCD Touchscreen Operations 1 This device features an LCD touchscreen that allows you t o perform operations by touch Interact with the device by touching the screen to...

Page 14: ...UserGuide Navigating Up Down in a List 1 Scroll through the list by dragging the list screen up and down Using the Device 13...

Page 15: ...ormation Launches AK Connect View the list of songs by different searchoptions 1 Current Song 2 AK CONNECT 3 Search Options 1 2 3 Home Screen The search options can be long pressed and dragged tochang...

Page 16: ...UserGuide 8 9 10 11 12 13 14 15 16 17 3 4 5 6 7 Notification 1 Bar 2 Using the Device 15...

Page 17: ...he same network The icon will become enabled when AK Connect is turned on Notification contents are displayed in this area Enter keywords to display a list of items containing the searchterms Displays...

Page 18: ...ay modes Sequential playback Shuffleplayback Press to cycle through different Repeatmodes Repeat the entire playlist Repeat the current song Disablerepeat Turn the CD Ripper on or off Enabled when con...

Page 19: ...t Store from the home screen 3 Select the desired store 4 Check the user guide or help menu within each store for detailed information Using the Device 18 connected to a wireless network Purchasing Co...

Page 20: ...d installer and follow the on screen instructions 3 Check the User Guide within the program for detailed information on using the MQS Streaming Server The PPE12 can access and play back music files st...

Page 21: ...right to s elect a server The selected server will be connected and the server h ome screen will be displayed 6 Select a search option at the bott om of the server home screen to display a list ofmus...

Page 22: ...begin downloading A message on the Notification Bar will indicate a completed download Depending on network conditions song loading may be slow or streaming may stutter Server response may be slow wh...

Page 23: ...device settings 3 Press from the notification bar to display a list of speakers available on the same network as the PPE12 4 Scroll the screen left and right to select a speaker The selected sp eaker...

Page 24: ...UserGuide Example2 Example3 AK500N LIBRARY REMOTE SPEAKER AK T1 PPE12 REMOTE LIBRARY PPE12 SPEAKER AK500N Using the Device 23...

Page 25: ...UserGuide Example4 Example5 LIBRARY SPEAKER AK T1 PPE12 AK500N REMOTE SPEAKER AK T1 LIBRARY PPE12 REMOTE or AK ConnectAPP AK500N LIBRARY Using the Device 24...

Page 26: ...m the home screen to begin playback Turn the Volume Wheel to adjust the volume Press during playback to pause and to resume pla yback You can also pause resume playback by pressing the button on the d...

Page 27: ...an additional screen Display the previous screen Display the current playlist Press next to the playlist to edit the playlist or der Press at the top of the music list to display music options Add the...

Page 28: ...UserGuide Playlist Screen 1 2 4 5 6 3 Using the Device 27...

Page 29: ...playlist options 1 Current Location Indicates the current location Press to return to the previous screen 2 Play All Play all songs from the current playlist 3 Playlist Displays the playlist for the c...

Page 30: ...5 4 2 3 6 7 8 9 13 14 15 Display album covers Press the album cover to show additional functions Previous Screen Return to the previous screen Album Cover 1 2 UserGuide Music Player Screen Using the...

Page 31: ...ng Short press Next song Long press Fast forward the current song Song Progress Indicates song duration Details Title Artist Play Pause Song Duration Indicates the song s totalduration Press to switch...

Page 32: ...s 2 Press at the upper right corner of the screen 3 Enter a name for the playlist and then press Add to create a new playlist Adding a Song to a Playlist 1 Press Playlists to display a list of playlis...

Page 33: ...movethe song fr om the selected playlist Editing the Playlist Order 1 Press next to the playlist to modify the playlist order Playing a Playlist 1 Press Playlists to display a list of playlists and th...

Page 34: ...deleted 3 Press at the top of the screen to delete the selected playlist 1 Press Playlists to display a list of playlists and then press at the top of thescreen 2 Select a playlist to be renamed 3 Pre...

Page 35: ...nce Sound will not play back for files that exceed the supported form ats Volume control is unavailable when the LCD screen is turned off during USB DACconnection The Previous Play and Next buttons ar...

Page 36: ...ID3tags for the inserted CD will be retrieved viaGracenote 3 CD ripping will begin automatically after the metadata has been retrieved 4 When finished press OK on the results prompt to complete automa...

Page 37: ...r playback until the en tire CD has been ripped You can set the desired file format and ripping speed from the CD Ripping menu Several attempts at correction will be made for data with errors when the...

Page 38: ...s 1 Select from the home screen o r select On Off from Blu etooth BluetoothPairing 1 Select the appropriate Bluetooth device from the list of availabledevices Terminating a Bluetooth Connection 1 Pres...

Page 39: ...ultipoint devices make the necessary connections priorto use Car audioBluetooth connections are not supported Malfunction noise and other undesirableeffects may occur due to the devic e s battery leve...

Page 40: ...red item for setup Wi Fi Change wireless network settings and turn Wi Fi on or off Bluetooth Connect a Bluetooth device to listen to music wirelessly Refer to page 44 of the manual for more informatio...

Page 41: ...the user s preferences Pro EQ EQ Preset recommended by professionals User EQ Adjust the frequencies according to the user s preferences Left Right Balance Adjust the left right balance for earphones...

Page 42: ...UserGuide Amp Set the amplification level when connected to the AKAmp Device Name Set the name of the device The maximum name length is 30 characters Language Select the display language Supported la...

Page 43: ...eout The screen will turn off after a defined period when there is no user input Sleep Timer Music playback will stop and the device will turn off after a defined period UserGuide Keyboard Select the...

Page 44: ...evert all user settings back to their original settings Factory Reset Delete all user data and restore the device to its original factory settings UserGuide Update System Update Update the system when...

Page 45: ...settings 3 Long press the network name a nd select Network Settings to edit specific network settings UserGuide Connecting Connecting to a Network 1 Long press from the Notifi cation Bar or select Wi...

Page 46: ...upper left corner of the screen and select 3 Enter a name for the custom EQ settings and select Add Equalizer Setup EqualizerSetup 1 Long press EQ from the Notification Bar or turn on the feature fro...

Page 47: ...t the frequencies left and right according to the user s p references 5 The number values at the lower left corner of the screen can be adjusted for fine tuning 6 Press at the lower right c orner of t...

Page 48: ...n 2 Press next to the desired it em to delete the selected eq ualizer Renaming an Equalizer 1 Press Pro EQ at the upper left corner of the screen 2 Press next to the desired ite m and enter a new name...

Page 49: ...use in hot and humid places such as saunas Avoid places with excess moisture dust or smoke Do not use for extended period on blankets electric blankets or carpet Do not place near a fire or in a micr...

Page 50: ...use reduce the volume or discontinue using the product and obtain medical advice Donot listen to music at excessive volumesforextended periods Do not use the earphones headphones at excessive volumes...

Page 51: ...the time at P ower Saving ScreenTimeout 5 The screen does not display images properl y Check the screen for debris 6 There is no sound or there is static interferenc e Check that the volume setting i...

Page 52: ...right laws T he user accepts all legal responsibility for the unauthorized r eproduction or distribution of the copyrighted contents from this product Companies organizations products people and event...

Page 53: ...C Mac Connection Mode MTP Media Device Outputs Phones 3 5 mm Optical Out 3 5 mm Balanced Out 2 5 mm only 4 pole supported Wi Fi 802 11 b g n 2 4GHz Bluetooth v4 0 A2DP AVRCP APT x Dimensions 2 95 75 1...

Page 54: ...d on current product specifications The manufacturer iriver Li mited is adding new complementary features and will co ntinue to apply new technologies in the future All specifications may be changed w...

Page 55: ...y result Please contact your local dealer for re placement antenna Body worn accessory exposure conditions Specific information must be included in the operating ma nuals to enable users to select bod...

Page 56: ...p ose of used batteries according to the instructions Miscellaneous 55 FCC Caution Any changes or modifications in construction of this device which are not expressly a pproved by the party responsibl...

Reviews: