background image

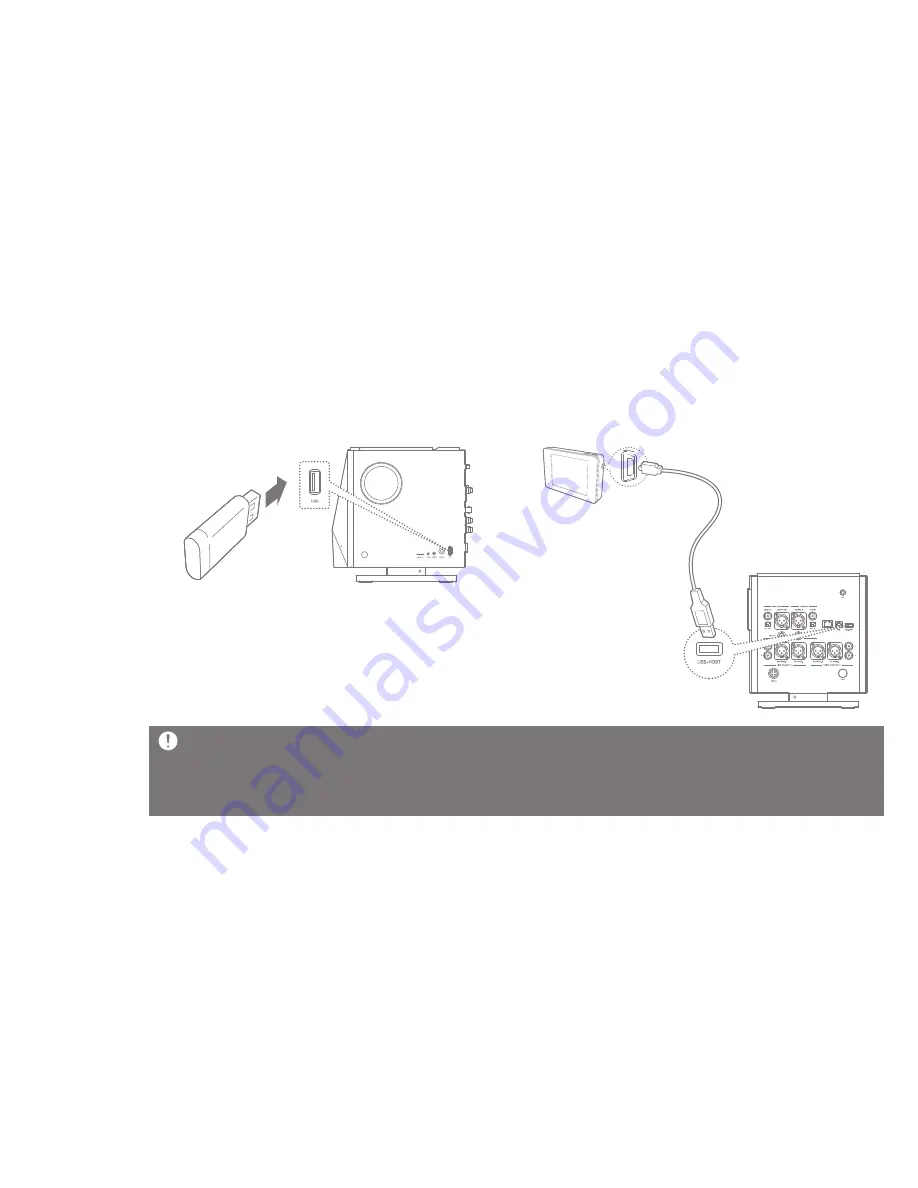
Connecting USB Storage

1. Connect the USB storage device to the [USB] port 
  on the side of the product. 

1. Connect the USB storage device to the [USB-HOST] 
  port on the back of the product by using a USB cable.

Some products that require a separate driver installation or multiple drive generation(multi-card reader), etc. may not 
be supported. 
Some products that require a separate power source(external HDD, etc.) may not be supported. 
The USB host cable is optional. 

2 3

Before Use

Summary of Contents for DPF11

Page 1: ...INSTRUCTION BOOK DPF11 User Guide Product Name Network Audio Player Model Name DPF11...

Page 2: ...usic playback screen Listening to music Ripping the CD Managing the current playlist Managing the playlist Searching files 2 8 3 0 3 2 3 4 3 5 3 6 3 8 3 9 4 2 Managing Files MQS streaming Purchasing m...

Page 3: ...an cause fire or electric shock Stop using the product immediately if the operation is not smooth or a failure occurs If water or foreign object get inside the product disconnect the power plug from t...

Page 4: ...bad LCD protective film or stickers to the screen the darkening screen phenomenon can occur If you keep the same screen an afterimage may remain on the screen When you touch the screen use a clean an...

Page 5: ...et You can cause a fire or electric shock POWER CODE AND PLUG Do not plug or unplug with wet hands Plug the power plug into a 110 220V 50 60Hz AC outlet If there is dust on the power plug pins or moun...

Page 6: ...direct sunlight A place where are dust oil or smoky ex Kitchen A place where temperature 5 C 40 C is too high or low or where there is a sudden temperature changes A place with a strong vibration A u...

Page 7: ...ts Coded or encrypted tracks in a special way cannot be played on this product Do not disconnect the device when playing a file on the USB device Both the product and the USB device can cause a malfun...

Page 8: ...aint may peel off therefore please note the following Do not wipe with a hard cloth Do not wipe too hard Do not wipe with thinner or benzene Do not leave for a long time in contact with rubber or plas...

Page 9: ...ticalx1 AES EBUx1 BNCx1 Coaxialx1 Opticalx1 Balanced L R x2 RCA L R x2 3V RCA Balanced 7 5V RCA 10V Balanced 135dB 1Khz 0 02dB 20Hz 20Khz 0 4dB 10Hz 70Khz 0 0008 1Khz 10v 0 001 10Hz 20kHz 10v 118dB 10...

Page 10: ...rk connection Please tighten it on the ANT terminal of the back of the product T Wrench Use when combine or spate the body and stand of DPF11 Quick Start Guide A manual of basic methods of using the p...

Page 11: ...rate Push the CD to insert Displays the Power On Off status Turnthewheeltoadjustthesizeofthesound YoucanturnOn Offthepoweroftheproduct You can equip a Micro SD card into the product and play music fil...

Page 12: ...tput to digital Connect an optical cable to the port to output to digital Connect a coaxial cable to the port to output to digital Connect an AES EBU cable to the port to output to digital Connect an...

Page 13: ...t to analog Connect Balanced cable to the port to output to analog Connect RCA cable to the port to output to analog Connect a wired LAN cable to the port Connect USB B type cable to the port and the...

Page 14: ...n the product for 2 3 seconds 4 logo appears on the screen while the product is booted Connect the power cord to a wall outlet after completing the connection of the product an adapter and the power c...

Page 15: ...t support the balance cable to BAL port on the side of the product You can use various earphones headphones that fit 2 5 3 5 6 5 Do not raise the volume to loud when connecting earphones or headphones...

Page 16: ...can be transmitted from a long distance UnBalanced RCA Cable It is the most commonly used basic cable to transmit the audio signal Optical Coaxial BNC Cable Optical cable and coaxial cable Coaxial BN...

Page 17: ...COAX OUT BNC OUT port of the rear panel BNC Cable Coaxial Cable AES EBU Cable Optical Cable Connecting DIGITAL IN 1 You can connect the product to an external source device by using AES EBU Optical C...

Page 18: ...nal amplifier device from VAIRABLE ALALOG OUT of the back of the product RCA Cable L R Balanced Cable L R This product supports both Fixed Analog Out and Variable Analog Out If it is set to Fixed Anal...

Page 19: ...the CD Ripping fuction will be activated Cautions for CD insertion Do not put excessive force when inserting a CD This can cause malfuction and CD breakage If the CD is inserted incorrectly the produ...

Page 20: ...rd If the microSD card is not positioned properly the product may mulfuction or the card may become un removable Cautions for removing microSD card Please remove the microSD card through Safe Removal...

Page 21: ...o the USB HOST port on the back of the product by using a USB cable Some products that require a separate driver installation or multiple drive generation multi card reader etc may not be supported So...

Page 22: ...product Connecting to the Network 1 Connect the internet connections ADSL VDSL cable model and wired wireless router etc to the ETHERNET port on the back of the product or connect to an AP that provi...

Page 23: ...stall to use Do not use a cable other than the USB cable supplied for data transfer This cay cause a malfuction Please connect at the state all the features stopped for a smooth connection of the comp...

Page 24: ...uter drag and drop Drop Drop to the drive added by the product the selected files folders will be copied Please connect the USB cable for data transfer correctly If you copy files folders or the compu...

Page 25: ...ding the firmware Refer to page 56 for a network connection method If you move to another screen while downloading upgrade files the download will be stopped Please do not turn off the network connect...

Page 26: ...ing screen that is displayed when you turn on the power for the first time after purchasing the product and then click Next 2 Set the time to use from the world time settings and then click Next 3 The...

Page 27: ...nd with Digital Out If you choose Digital In from the Sound In Out selection screen Digital Out is not available While Sound In Out is connected to Digital In Coax OPT AES EBU BNC the connection will...

Page 28: ...s network Turns on off the Bluetooth to use Bluetooth remote control Turns on off the automatic CD ripping function Extract the inserted CD from the CD slot Only activated when a CD is inserted Turns...

Page 29: ...being played Repeats the currently playing music Turn off Repeat Mode Indicates the setting screen If you choose it battery charging starts Displays the sound setting EQ etc screen Indicates the curre...

Page 30: ...want Displays the total duration of the song Short Plays the previous song Long Rewinds the music being played Pauses or replays the music Short Plays the next song Long Forwards fast to the playing...

Reviews: