background image

2

An ASSA ABLOY Group brand

80-8420-0900 Rev. B (05-08)

INSIDE

ESCUTCHEON

ASSEMBLY

Section

Prepare the Door .............................................................................................

-A Prepare the Door .................................... ...............................................................
-B Locate and Drill Holes for Electronic Components ............................................

Section

Prepare Lock for Installation ........................................................................

-A How to Change Hands (Standard Cylinder Locks) ...........................................
-B How to Change Hands (Interchangeable Core Cylinder and

Non Cylinder Locks) ............................................................................................

-C Re-Keying/Competitor Cylinder/ Important Cylinder Data................................

Section

The Install  ....................................................................................................

-A Install The Trim......................... ...........................................................................
-B Exit Device Cover Installation ...........................................................................
-C Install Electric Components...............................................................................

Section

Electrical Connections and Testing.............................................................

Section

Troubleshooting..............................................................................................

Template.............................................................................................................................

I

I

I

II

II

II

II

III

III

III

IV

III

V

Table of Contents

Page

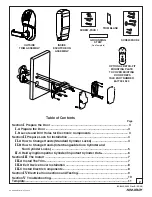
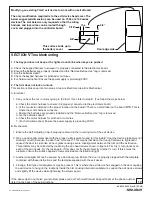
GROUNDING

STRIP

(See Template)

OUTSIDE

TRIM ASSEMBLY

SCREW-PACK 2

3

3

4

4

4

5

6
7

7

8

8

9

10
11

TRIM BLANK

SCREW-PACK 1

OPTIONAL RETRO-FIT

MOUNTING PLATE

TO COVER EXISTING

DOOR PREPS

YALE PART NUMBER

60-7700-1520

Summary of Contents for Yale eBoss 886F Series

Page 1: ...e can gain access Lock re lock automatically Lockout Lockset will not accept any assigned user codes except for the Supervisor and Emergency Codes Passage Maintains unlocked state Relocks by entering passage code the second time Electronic Battery Operated Security Solution Finish Care This lockset is designed to provide the highest standard of product quality and performance Care should be taken ...

Page 2: ...Cylinder Locks C Re Keying Competitor Cylinder Important Cylinder Data Section The Install A Install The Trim B Exit Device Cover Installation C Install Electric Components Section Electrical Connections and Testing Section Troubleshooting Template I I I II II II II III III III IV III V Table of Contents Page GROUNDING STRIP See Template OUTSIDE TRIM ASSEMBLY SCREW PACK 2 3 3 4 4 4 5 6 7 7 8 8 9 1...

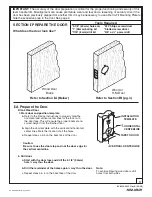
Page 3: ...oles again way thru the door c Repeat steps a b on the back face of the door I A Prepare the Door Blank Wood Door 1 Mark door and position template a b c Refer to the Device instructions to properly draw the horizontal and vertical center lines for the lock on to the door face This will ensure the proper backset and correct height from the finished floor Align the door template with the vertical a...

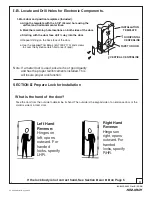
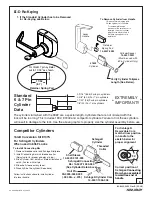
Page 4: ...l latch bolt prep if reqd Note If a metal door is used ensure it is of good quality and has the proper reinforcements installed This will insure proper lock function SECTION Prepare Lock for Installation II If the lock body is not correct hand See Section or on Page 5 IIA IIB What is the hand of the door Face the door from the outside to determine its hand The outside is the keypad side of an entr...

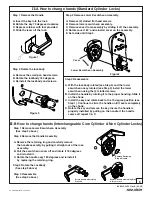
Page 5: ...utcheon assy rotated see Step 2 install the lower escutcheon using the 2 slotted screws B Install the handle by rotating it to the proper handing Slide it on the shank C Install the key and rotate back to the 70 degree position see Step 1 Continue to slide the handle until it seats completely on the shank D Rotate the key and remove the key Insure the handle is properly installed by pulling on the...

Page 6: ...Sleeve 14 5407 9101 999 To Remove Cylinder from Handle 1 Remove retainer spring pad 2 Slide cylinder out of handle To reassemble reverse procedure Be sure spacer is installed on back of cylinder plug Water may br used to lubricate spring pad to aid installation 11 32 8 7 For Yale 7 pin cylinder cut to 11 32 as shown Retainer Spring Pad 90 Correct position of Schlage Connecting Bar when assembled t...

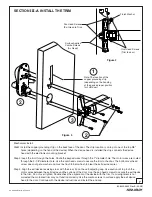
Page 7: ... to clear the exit device carrier Step 3 Align the exit device receiving cross with the cross tip on the self adjusting cap Use caution not to pinch the motor wires between the exit device and the surface of the door Use the pan head screws to secure the exit device to the trim Do not over tighten Double check the alignment of the device with the trim If a misalignment is not corrected the motoriz...

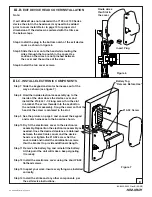
Page 8: ...ture on page 9 and connect the keypad and motor harnesses to the board as shown Step 10 Dry fit the electronics cover to the electronics assembly Reposition the electronics assembly as needed Once the desired clearance is obtained between the electronics cover and the device head cover tighten the 10 32 screw Set the cover aside and install the combination screws thru the bracket to provide additi...

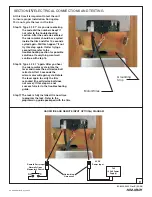
Page 9: ...rying a second time refer to the troubleshooting section for possible solutions If everything went well continue with step 16 Step 16 Type 4 3 2 1 again After you hear the micro motor cycle rotate the lever and insure the exit device bolt retracts After 10 seconds the micro motor will again cycle Rotate the lever again to verify the trim re locked the exit device bolt does not move If this step wa...

Page 10: ...probably is not working correctly because the door has oil canned This means that when the through bolts were tightened it caused the door to crush like an hour glass causing severe misalignment between the trim and the exit device This problem may be corrected by loosening the pan head screws shown in figure 4 First try turn loosen on each of the pan heads Try the lock again If this does not fix ...

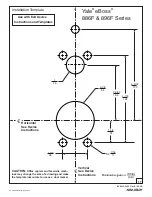
Page 11: ...evice Instructions and Templates C L Vertical See Device Instructions C L Horizontal See Device Instructions CAUTION Office copiers and facsimile mach ines may change the size of a drawing and make the template inaccurate to use as a door marker 2 1 8 54 7 16 11 5x 4 7 8 124 1 1 4 32 3 3 32 78 5 5 3 32 129 1 25 1 3 8 35 ...

Page 12: ...e owners and are mentioned for reference purposes only These materials are protected under U S copyright laws All contents current at time of publication Yale Security Inc reserves the right to change availability of any item in this catalog its design construction and or its materials Copyright 2008 Yale Security Inc All rights reserved Reproduction in whole or in part without the express written...

Reviews: