background image

1 7

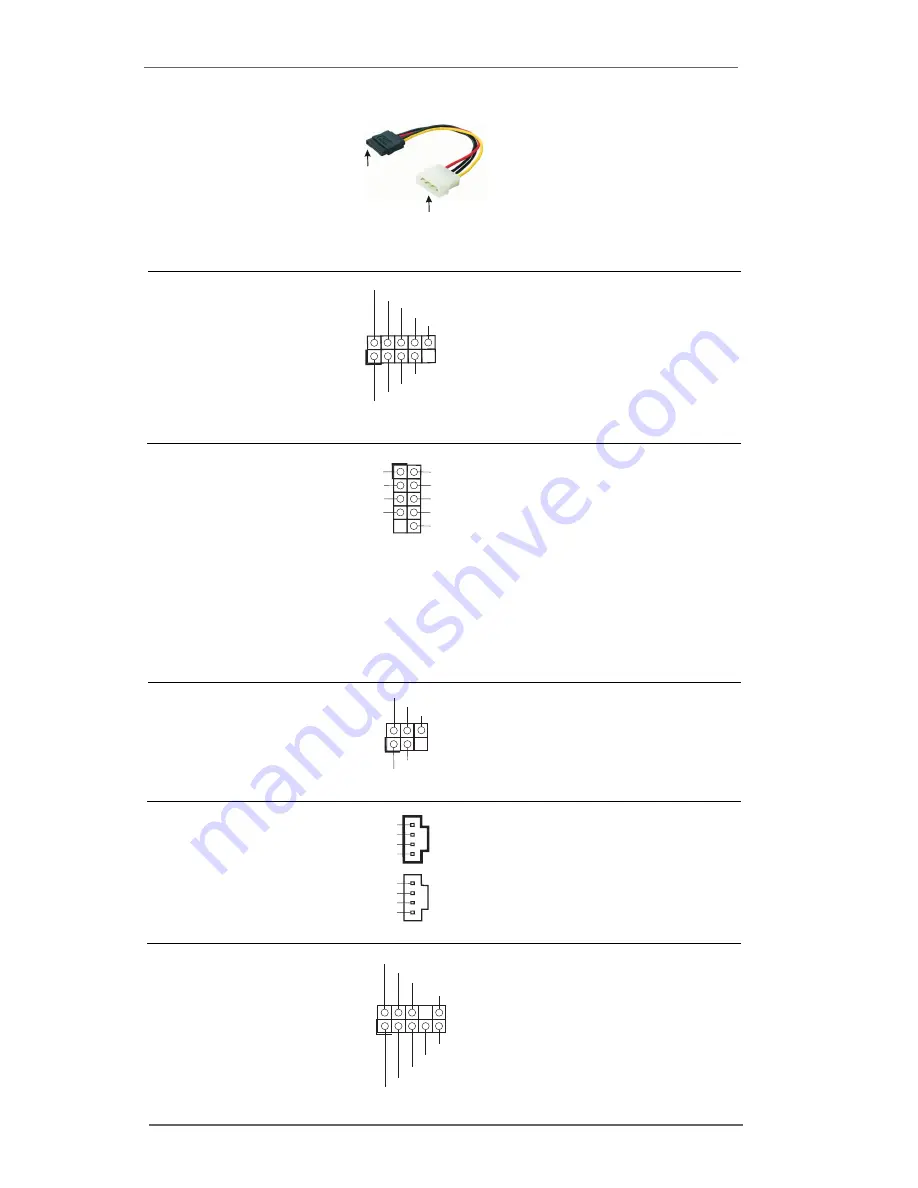
Serial ATA (SATA)

Please connect the black end of

Power Cable

SATA power cable to the power

(Optional)

connector on the drive. Then

connect the white end of SATA

power cable to the power

connector of the power supply.

USB 2.0 Header

ASRock I/O Plus

TM

 provides you

(9-pin USB67)

6 ready-to-use USB 2.0 ports on

(see  p.8, No. 20)

the rear panel. If the rear USB

ports are not sufficient, this

USB 2.0 header is available to

support 2 extra USB 2.0 ports.

Shared USB 2.0 Header

This USB4_5 connector is shared

(9-pin USB4_5)

with the USB 2.0 ports 4,5 on

(see  p.8,  No. 30)

ASRock I/O Plus

TM

. When using

the front panel USB ports by

attaching the front panel USB

cable to this connector

(USB4_5), the USB ports 4,5 on

ASRock I/O Plus

TM

 will not be able

to function.

Infrared Module Header

This header supports an optional

(5-pin IR1)

wireless transmitting and

(see  p.8, No. 21)

receiving infrared module.

Internal Audio Connectors

These connectors allow you

(4-pin CD1, 4-pin AUX1)

to receive stereo audio input

(CD1: see  p.8, No. 29)

from sound sources such as

(AUX1: see  p.8, No. 28)

a  CD-ROM, DVD-ROM, TV

tuner card, or MPEG card.

Front Panel Audio Header

This is an interface for the front

(9-pin AUDIO1)

panel audio cable that allows

(see  p.8, No. 27)

convenient connection and

control of audio devices.

DUMMY

GND

+5V

IRTX

IRRX

1

CD-R

GND

GND

CD-L

AUX-R

GND

GND

AUX-L

CD1

AUX1

USB_PWR

USB_PWR

P+7

P-7

P+6

P-6

GND

GND

DUMMY

1

GND

GND

+5VA

BACKOUT-R

BACKOUT-L

AUD-OUT-L

AUD-OUT-R

MIC-POWER

MIC

1

connect  to the SATA  HDD

power connector

connect  to the

power supply

USB_PWR

USB_PWR

P+5

P-5

P+4

P-4

GND

GND

DUMMY

1

Summary of Contents for P4V88

Page 1: ...1 P4V88 P4V88 User Manual Version 1 0 Published December 2004 Copyright 2004 ASRock INC All rights reserved...

Page 2: ...missions that may appear in this manual With respect to the contents of this manual ASRock does not provide warranty of any kind either expressed or implied including but not limited to the implied wa...

Page 3: ...8 Hot Plug and Hot Swap Functions for SATA HDDs 19 2 9 Making An SATA Driver Diskette 20 3 BIOS SETUP UTILITY 21 3 1 Introduction 21 3 1 1 BIOS Menu Bar 21 3 1 2 Navigation Keys 22 3 2 Main Screen 22...

Page 4: ...4 4 Software Support 36 4 1 Install Operating System 36 4 2 Support CD Information 36 4 2 1 Running Support CD 36 4 2 2 Drivers Menu 36 4 2 3 Utilities Menu 36 4 2 4 Contact Information 36...

Page 5: ...ns and the BIOS software might be updated the content of this manual will be subject to change without notice In case any modifications of this manual occur the updated version will be available on AS...

Page 6: ...TA 133 Ultra DMA Mode 6 IDE2 ATA 133 Ultra DMA Mode 6 Supports up to 4 IDE devices Serial ATA 2 SATA connectors Support up to 1 5Gb s data transfer rate Floppy Port Supports up to 2 floppy disk drives...

Page 7: ...on guide of memory modules on page 12 for proper installation 3 While CPU overheat is detected the system will automatically shutdown Before you resume the system please check if the CPU fan on the mo...

Page 8: ...A2 29 Internal Audio Connector CD1 Black 13 Primary Serial ATA Connector SATA1 30 Shared USB 2 0 Header USB4_5 Blue 14 South Bridge Controller 31 ATX Power Connector ATXPWR1 15 Clear CMOS Jumper CLRCM...

Page 9: ...0 Ports USB0 USB1 2 RJ 45 Port 8 2 x USB 2 0 Ports USB2 USB3 3 Line In Light Blue 9 Serial Port COM1 4 Line Out Lime 10 PS 2 Keyboard Port Purple 5 Microphone Pink 11 PS 2 Mouse Port Green 6 2 x Shar...

Page 10: ...To avoid damaging the motherboard components due to static electricity NEVER place your motherboard directly on the carpet or the like Also remember to use a grounded wrist strap or touch a safety gro...

Page 11: ...d 2 2 Installation of CPU Fan and Heatsink This motherboard adopts 478 pin CPU socket to support Intel Pentium 4 Celeron CPU It requires larger heatsink and cooling fan to dissipate heat You also need...

Page 12: ...Dual Channel Memory Configuration Table below Dual Channel Memory Configurations DDR1 DDR2 DDR3 DDR4 Blue Slot Black Slot Blue Slot Black Slot 1 Populated Populated 2 Populated Populated 3 Populated...

Page 13: ...ard Step 2 Align a DIMM on the slot such that the notch on the DIMM matches the break on the slot The DIMM only fits in one correct orientation It will cause permanent damage to the motherboard and th...

Page 14: ...check with the AGP card vendors Installing an expansion card Step 1 Before installing the expansion card please make sure that the power supply is switched off or the power cord is unplugged Please r...

Page 15: ...and JR1 are short both the front panel and the rear panel audio connectors can work Clear CMOS CLRCMOS1 2 pin jumper see p 8 No 15 Note CLRCMOS1 allows you to clear the data in CMOS The data in CMOS...

Page 16: ...to the instruction of your IDE device vendor for the details Besides to optimize compatibility and performance please connect your hard disk drive to the primary IDE connector IDE1 blue and CD ROM to...

Page 17: ...SB ports 4 5 on ASRock I O PlusTM will not be able to function Infrared Module Header This header supports an optional 5 pin IR1 wireless transmitting and see p 8 No 21 receiving infrared module Inter...

Page 18: ...black wire to the ground pin Game Connector Connect a Game cable to this 15 pin GAME1 connector if the Game port see p 8 No 22 bracket is installed ATX Power Connector Please connect an ATX power 20...

Page 19: ...EP4 Connect the other end of the SATA data cable to the SATA hard disk 2 8 Hot Plug and Hot Swap Functions for SATA HDDs P4V88 P4V88 motherboard supports Hot Plug and Hot Swap functions for SATA Devic...

Page 20: ...N Please insert a floppy diskette into the floppy drive and press Y STEP5 The system will start to format the floppy diskette and copy SATA drivers into the floppy diskette Once you have the SATA driv...

Page 21: ...tart by turning the system off and then back on Because the BIOS software is constantly being updated the following BIOS setup screens and descriptions are for reference purpose only and they may not...

Page 22: ...the system overview System Time Hour Minute Second Use this item to specify the system time System Date Day Month Date Year Use this item to specify the system date BIOS SETUP UTILITY Main Advanced H...

Page 23: ...below sections may cause system to malfunction Configure CPU Select Screen Select Item Enter Go to Sub Screen F1 General Help F9 Load Defaults F10 Save and Exit ESC Exit v02 54 C Copyright 1985 2003 A...

Page 24: ...or this technology such as Microsoft Win dows XP Set to Auto if using Microsoft Windows XP or Linux kernel version 2 4 18 or higher This option will be hidden if the installed CPU does not support Hyp...

Page 25: ...mong Normal and High for AGP Voltage The default value is High Primary Graphics Adapter This allows you to select PCI or AGP as the primary graphics adapter The default vaule is PCI AGP Aperture Size...

Page 26: ...f mode PCI Devices Power On Use this item to enable or disable PCI devices to turn on the system from the power soft off mode PS 2 Keyboard Power On Use this item to enable or disable PS 2 keyboard to...

Page 27: ...oth Hard Disk Not Detected Not Detected Not Detected Select Screen Select Item Change Option F1 General Help F9 Load Defaults F10 Save and Exit ESC Exit Select Screen Select Item Change Option F1 Gene...

Page 28: ...uch as MO LBA Large Mode Use this item to select the LBA Large mode for a hard disk 512 MB under DOS and Windows for Netware and UNIX user select Disabled to disable the LBA Large mode Block Multi Sec...

Page 29: ...PnP Configuration Value in units of PCI clocks for PCI device latency timer register Select Screen Select Item Change Option F1 General Help F9 Load Defaults F10 Save and Exit ESC Exit v02 54 C Copyri...

Page 30: ...w the EPP version in the following item EPP Version Configuration options Normal Bi Directional and ECP EPP EPP Version Use this item to set the EPP version Configuration options 1 9 and 1 7 ECP Mode...

Page 31: ...his item to enable or disable the support to emulate legacy I O devices such as mouse keyboard etc Or you may select Auto so that the system will start to auto detect if there is no USB device connect...

Page 32: ...een Select Item F1 General Help F9 Load Defaults F10 Save and Exit ESC Exit v02 54 C Copyright 1985 2003 American Megatrends Inc CPU Temperature M B Temperature CPU Fan Speed Chassis Fan Speed Vcore 3...

Page 33: ...TY Boot Settings Configuration To enable or disable the boot from network feature Select Screen Select Item Change Option F1 General Help F9 Load Defaults F10 Save and Exit ESC Exit v02 54 C Copyright...

Page 34: ...Advanced H W Monitor Boot Exit Install or Change the password Select Screen Select Item Enter Change F1 General Help F10 Save and Exit ESC Exit F9 Load Defaults v02 54 C Copyright 1985 2003 American...

Page 35: ...t the following message Dis card changes Select OK to discard all changes Load Optimal Defaults When you select this option it will pop out the following message Load optimal defaults Select OK to loa...

Page 36: ...omatically displays the Main Menu if AUTORUN is enabled in your computer If the Main Menu did not appear automatically locate and double click on the file ASSETUP EXE from the BIN folder in the Suppor...

Reviews: