background image

24

25

English

Chapter  5  Board Specifications

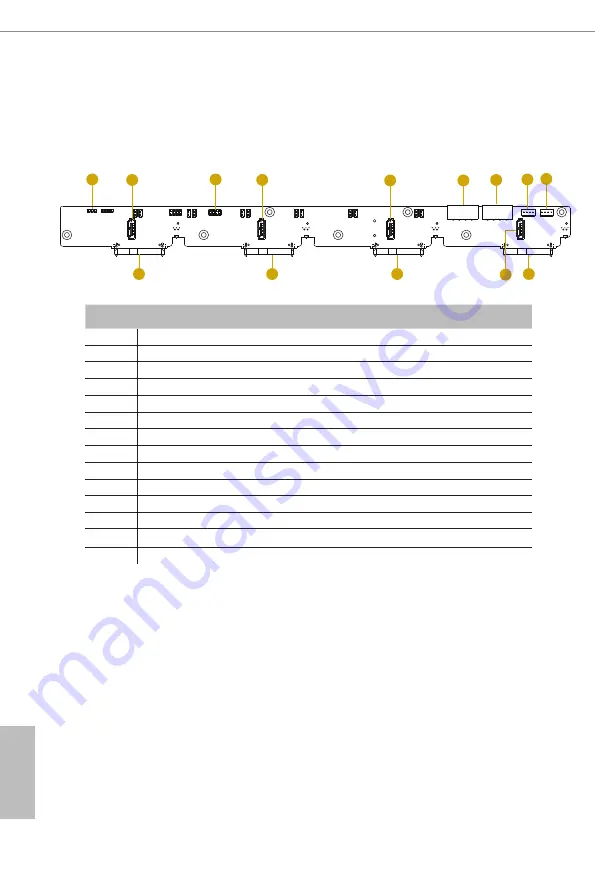
5.1 Hard Drive Backplanes (BPB) 

No.

Description

1

SGPIO Disabled/Enabled Jumper (JP1)

2

SATA Connector (SATA_1)

3

SGPIO Code Programming Pin (CN6)

4

SATA Connector (SATA_2)

5

SATA Connector (SATA_3)

6

SATA HDD Power Connector (CN2)

7

SATA HDD Power Connector (CN1)

8

Slim ODD Power Connector (CN4)

9

Slim ODD Power Connector (CN3)

10

SATA Hot-swap Connector 

11

SATA Hot-swap Connector 

12

SATA Hot-swap Connector 

13

SATA Connector (SATA_4)

14

SATA Hot-swap Connector 

1

3

6

7

8

9

14

12

11

10

13

2

4

5

1

Summary of Contents for 1U4LW Series

Page 1: ...1U4LW Series User Manual Version 1 0 Published October 2019 Copyright 2019 ASRock Rack INC All rights reserved...

Page 2: ...r implied including but not limited to the implied warranties or conditions of merchantability or fitness for a particular purpose In no event shall ASRock Rack its directors officers employees or age...

Page 3: ...en removal of the chassis lid required for servicing Turn off power and unplug any power cords cables and Reinstall the chassis lid before restoring power Important Safety Instructions Pay close atten...

Page 4: ...4 System Rear Panel 6 2 5 Front Control Panel Buttons and LEDs 7 2 6 Drive Tray LEDs 9 Chapter 3 Hardware Installation and Maintenance 10 3 1 Server Top Cover 11 3 2 Hard Drive 13 3 3 System Fan 15 3...

Page 5: ...Appendix A 28 Installing the CPU Single Socket H4 LGA1151 28 Installing the CPU Fan and Heatsink 30 Installation of Memory Modules DIMM 31...

Page 6: ......

Page 7: ...pecifications might be updated the content of this documentation will be subject to change without notice In case any modifications of this documentation occur the updated version will be available on...

Page 8: ...System Fans 5 HDD Backplane BPB 1 Front Panel Board FPB 1 Fan Cable L 300mm 1 SATA Cable 1 Accessory Box 1 1U Cooler 1 Riser Board 1 Air Duct for 1U4LW X470 only 3 Slide Rail 1 1 1 Shipping Box Conten...

Page 9: ...e activity LED 2 x Network activity LEDs System event LED I O Ports 2 x USB 3 0 ports External Drive Bay Front Side Drive Bay 4 Bay 3 5 SATA HDD 6Gb s System Cooling Fan 40 x 28 mm PWM Easy Swap Fans...

Page 10: ...rview This chapter provides diagrams showing the location of important components of the server system 2 1 System Components System Fans Server Board Top Cover Front Controls and Indicators Power Supp...

Page 11: ...No From 1 Riser Card 2 Serverboard 3 Power Supply Unit PSU 4 System Fan 5 5 System Fan 4 6 System Fan 3 7 System Fan 2 8 System Fan 1 9 HDD Backplane Board BPB 10 Front Panel Board FPB 11 2 5 SATA HDD...

Page 12: ...Control Panel Buttons and LEDs 2 2 x USB 3 0 Ports 3 4 x 3 5 Hot Swap HDD Trays 2 4 System Rear Panel 3 4 1 2 No Description 1 Power Supply Unit 2 Rear Vent 3 I O Shield depends on the specification o...

Page 13: ...utton with a paper clip or pin to generate a nonmaskable interrupt and to put the server in a halt state for examination System Reset Button When the system is completely unresponsive press the system...

Page 14: ...entification is active Off System identification is disabled System Status LED Status Description Off Running or normal operation Yellow At least one sensor has critical alert HDD Status LED Status De...

Page 15: ...HDD Power LED 2 HDD Activity LED Status LED Definitions HDD Power LED Status Description Blue HDD powered on Off No power to HDD HDD Activity LED Status Description Solid Green HDD active Blinking Gr...

Page 16: ...f properly before touching any system component A discharge of static electricity may damage components Wear a grounded wrist strap if available Installing Procedures The followings are prerequisite t...

Page 17: ...ver to the chassis 2 Push the top cover toward the rear of the chassis to remove the cover from the locked position 3 Lift up and remove the top cover 1 Before removing the top cover power off the ser...

Page 18: ...ish Installing the Server Top Cover 2 1 1 Lower the top cover on the chassis making sure the side latches align with the cutouts 2 Slide the top cover toward the front 3 Secure the top cover with the...

Page 19: ...Drive Removing 3 5 Hard Drive Trays from the Chassis 1 Press the locking lever latch on the drive tray to unlock the retention lever 2 Rotate the lever out and away from the module bay and pull the ha...

Page 20: ...th the printed circuit board side facing down Carefully align the mounting holes in the hard drive and the tray 2 Secure the hard drive using the four screws 3 Slide the drive tray into the HDD bay un...

Page 21: ...1U4LW Series 15 English 3 3 System Fan Replacing the Simple Swap Fan 1 Press and hold the clip on the fan 2 Press and hold the clip on the middle fan 1 2...

Page 22: ...he HDDs Removing the Backplane 1 Remove all of cables connected to the backplanes 2 Remove all 3 5 HDD trays 3 Loosen the securing screws on the backplane bracket 4 Lift the backplane bracket up from...

Page 23: ...p utility 3 5 Server Board Follow the steps below to install the server board to the chassis 1 Hold the server board only by the edges 2 Gently place the server board into the chassis Sit the server b...

Page 24: ...g the add on card power off the server and unplug the power cord Removing the Riser Card Bracket from the Chassis 1 Remove the screws securing the riser card bracket on the chassis Keep the screws for...

Page 25: ...tall the add on card to the riser card bracket 2 Secure the add on card to the bracket with a screw 3 Align the riser card assembly with the openings of the chassis 4 Attach the assembly to the chassi...

Page 26: ...hassis before installing the air duct If an add on card is not installed yet install the add on card first Please see the chapter entitled Add on Card for more instructions 2 Position the fan duct for...

Page 27: ...1U4LW Series 21 English 3 Then install the add on card assembly to the chassis Riser Card Assembly Air Duct add on card 4 Make sure the add on card assembly is well aligned with the air duct...

Page 28: ...22 English 5 Align the air duct over the heat sink and carefully lower the air duct in place...

Page 29: ...4 Chassis Cables This section lists supported cables for your chassis system Cable type and quantity vary depending on the server board that comes with your system 1 SATA Cable IEE4 IEE3 IEE2 IEE5 BUB...

Page 30: ...Programming Pin CN6 4 SATA Connector SATA_2 5 SATA Connector SATA_3 6 SATA HDD Power Connector CN2 7 SATA HDD Power Connector CN1 8 Slim ODD Power Connector CN4 9 Slim ODD Power Connector CN3 10 SATA...

Page 31: ...on these 2 pins SGPIO Disabled Enabled Jumper 3 pin JP1 SGPIO Disabled SGPIO Enabled Default Pin Definitions SATA HDD Power Connectors CN1 CN2 5V 12V GND1 GND2 The 4 pin connectors provide power to t...

Page 32: ...26 English Slim ODD Power Connectors 4 pin CN3 4 pin CN4 GND 5V GND 12V The 4 pin connectors provide power to the slim ODD...

Page 33: ...0 Port USB_1 10 USB 2 0 Port USB_2 11 Front Panel Header AUX_PANEL1 12 USB2 0 Header USB_HEADER1 USB 2 0 Header 9 pin USB_HEADER USB_HEADER1 DUMMY GND GND B B USB_PWR A A USB_PWR 1 The header support...

Page 34: ...28 English Appendix A Installing the CPU Single Socket H4 LGA1151 1 2 A B 3...

Page 35: ...1U4LW Series 29 English 5 6 4...

Page 36: ...30 English Installing the CPU Fan and Heatsink 1 2 C P U _ F A N...

Page 37: ...ts in one correct orientation It will cause permanent damage to the motherboard and the DIMM if you force the DIMM into the slot at incorrect orientation For more information about DIMM installation p...

Reviews: