background image

10

11

English

No.

Description

1

ATX 12V Power Connector (ATX12V2)

2

ATX 4PIN Power Connector (ATX_4PIN)

3

2 x 288-pin  DDR4  DIMM  Slots  (DDR4_A, DDR4_B)

4

Clear CMOS Pad (CLRMOS1)

5

OCuLink x4 Connector (OCU1)

6

SATA3 Connector  (SATA_6)

7

SATA3 Connector  (SATA_7)

8

USB 3.0 Header  (USB3_1_2)

9

SATA SGPIO Connector (SATA_SGPIO2)

10

Front Fan Connector  (FAN2)

11

Rear Fan Connector  (FAN3)

12

SATA3 Connector  (SATA_4)

13

SATA Power Connector (SATA_PWR1)

14

SATA DOM Power Jumper (SATAPWR1)

15

System Panel Header  (PANEL1)

16

Auxiliary Panel Header (ITX_AUX_PANEL1)

17

Speaker Header  (SPEAKER1)

18

PWM Configuration Header (PWM_CFG1)

19

Thermal Sensor Header  (TR1)

20

Security Override Jumper  (SEC_OR1)

21

TPM Header  (TPM1)

22

CPU Fan Connector  (FAN1)

23

SATA SGPIO Connector (SATA_SGPIO1)

24

SATA3 Connector  (SATA_5)

25

OCuLink SATA/PCIE Interface Selection Jumper  (OCU_SEL)

26

M.2 Socket  (M2_1) (Type 2242)

27

COM Port Header (COM1)

28

Front Panel Audio Header (HD_AUDIO1)

Summary of Contents for C246 WSI

Page 1: ...E3C246D2I E3C242D2I C246 WSI User Manual Version 1 0 Published January 2019 Copyright 2019 ASRock Rack INC All rights reserved ...

Page 2: ...r implied including but not limited to the implied warranties or conditions of merchantability or fitness for a particular purpose In no event shall ASRock Rack its directors officers employees or agents be liable for any indirect special incidental or consequential damages including damages for loss of profits loss of business loss of data interruption of business and the like even if ASRock Rack...

Page 3: ...RockRack com or you may contact your dealer for further information ASRock Rack Incorporation 6F No 37 Sec 2 Jhongyang S Rd Beitou District Taipei City 112 Taiwan R O C The terms HDMI and HDMI High Definition Multimedia Interface and the HDMI logo are trademarks or registered trademarks of HDMI Licensing LLC in the United States and other countries ...

Page 4: ...ion Precautions 16 2 3 Installing the CPU 17 2 4 Installing the CPU Fan and Heatsink 19 2 5 Installation of Memory Modules DIMM 20 2 6 Expansion Slot PCI Express Slot 21 2 7 Jumper Setup 22 2 8 Onboard Headers and Connectors 24 2 9 Unit Identification purpose LED Switch 29 2 10 Driver Installation Guide 29 2 11 Dual LAN and Teaming Operation Guide 30 2 12 M 2_SSD NGFF Module Installation Guide M2_...

Page 5: ... Super IO Configuration 46 3 3 8 Serial Port Console Redirection 48 3 3 9 H W Monitor 52 3 3 10 Runtime Error Logging 54 3 3 11 Intel SPS Configuration E3C246D2I E3C242D2I only Server ME Configuration C246 WSI only 56 3 3 12 Intel R Bios Guard Technology 57 3 3 13 Instant Flash 58 3 4 Server Mgmt E3C246D2I E3C242D2I only 59 3 4 1 System Event Log 60 3 4 2 BMC Network Configuration 61 3 5 Security ...

Page 6: ...g System 74 4 2 Support CD Information 74 4 2 1 Running The Support CD 74 4 2 2 Drivers Menu 74 4 2 3 Utilities Menu 74 4 2 4 Contact Information 74 Chapter 5 Troubleshooting 75 5 1 Troubleshooting Procedures 75 5 2 Technical Support Procedures 77 5 3 Returning Merchandise for Service 77 ...

Page 7: ...Factor 6 7 in x 6 7 in 17 02 cm x17 02 cm Support CD C246 WSI only Quick Installation Guide 1 x SATA3 Cable 60cm 1 x SATA Power Cable 80cm 1 x ATX 4P to 24P Power Cable 1 x I O Shield 1 x Screw for M 2 Socket If any items are missing or appear damaged contact your authorized dealer Because the motherboard specifications and the BIOS software might be updated the con tent of this manual will be sub...

Page 8: ...r C246 1x OCULINK SATA_0 1 2 3 4x SATA3 6Gb s SATA_4 5 6 7 C242 1x OCULINK SATA_0 1 2 3 2x SATA3 6Gb s SATA_4 5 Please contact sales to buy the OCuLink to 4x SATA cable NVMe Devices C246 WSI E3C246D2I NVMe SSDs PCIEx4 Share with SATA_0 1 2 3 E3C242D2I N A M 2 1 x M 2 NGFF 2242 PCI E Gen3 x4 link or SATA signal SATA 1 will be disabled when M 2 is SATA signal Audio Audio Codec E3C246D2I E3C242D2I N ...

Page 9: ... WSI 1 Audio E3C246D2I E3C242D2I N A C246 WSI 3 Jack SPDIF E3C246D2I E3C242D2I N A C246 WSI 1 UID E3C246D2I E3C242D2I 1 C246 WSI N A Internal Connector Auxiliary Panel Header 1 includes chassis intrusion front LAN LED TR1 1 TPM Header 1 Fan Header 3 1CPU 1Front 1Rear ATX power DC IN 1x 8 pin SATA Port 3 SATADOM 1 ATX Power 1x 4 pin SATA Power 1x 4 pin OCuLink 1 USB 3 0 Header 1 supports 2 USB3 0 C...

Page 10: ...core DRAM 1 05V_PCH BAT 3VSB 5VSB C246 WSI Voltage Monitoring 3V Vcore 12V VCCST_SFR 3VSB Support OS OS E3C246D2I and E3C242D2I Microsoft Windows Server 2016 64 bit Server 2019 64 bit Linux RedHat Enterprise Linux Server 6 10 64 bit 7 5 64 bit SUSE Enterprise Linux Server 11 SP4 64 bit 12 SP3 64 bit Ubuntu 16 04 64 bit 18 04 64 bit Virtual VMWare ESXi 6 5 u1 Win hyper V Server 2016 C246 WSI Micros...

Page 11: ...ower On is enabled in UEFI SETUP UTILITY Advanced ACPI Configuration After that onboard LAN1 2 can wake up S5 under OS If you install Intel LAN utility or Marvell SATA utility this motherboard may fail Win dows Hardware Quality Lab WHQL certification tests If you install the drivers only it will pass the WHQL tests Environment Temperature Operation temperature 10 C 35 C Non operation temperature 4...

Page 12: ...ity you can press the F6 key during the POST or the F2 key to enter into the BIOS setup menu to access ASRock Rack Instant Flash Just launch this tool and save the new BIOS file to your USB flash drive floppy disk or hard drive then you can update your BIOS only in a few clicks without preparing an additional floppy diskette or other complicated flash utility Please be noted that the USB flash dri...

Page 13: ...5 23 SATA_SGPIO1 E3C246D2I E3C242D2I LAN2 USB 3 1 T USB_3 B USB_4 PANEL1 HDLED RESET PLED PWRBTN 1 SATA_4 32 CLRMOS1 4 ATX12V2 ATX_4PIN Super I O Intel C246 C242 COM1 1 OCU1 FAN2 FAN1 1 OCU_SEL C 1 M2_1 T 1 SATAPWR1 SPEAKER1 ITX_AUX_PANEL1 1 CMOS Battery 1 SATA_SGPIO2 1 FAN3 BMC 1 2 16 15 14 13 9 10 12 11 7 8 SATA_6 SATA_7 5 6 28 31 25 17 18 1 PECI1 OCU_SEL CHASSIS_ID1 CHASSIS_ID0 29 30 24 21 TPM1...

Page 14: ...onnector SATA_PWR1 14 SATA DOM Power Jumper SATAPWR1 15 System Panel Header PANEL1 16 Auxiliary Panel Header ITX_AUX_PANEL1 17 Speaker Header SPEAKER1 18 CPU PECI Mode Jumper PECI1 19 PWM Configuration Header PWM_CFG1 20 Thermal Sensor Header TR1 21 Security Override Jumper SEC_OR1 22 TPM Header TPM1 23 PSU SMBus PSU_SMB1 24 Intelligent Platform Management Bus header IPMB1 25 CPU Fan Connector FAN...

Page 15: ...SATA_5 23 SATA_SGPIO1 C246 WSI LAN2 USB 3 1 T USB_3 B USB_4 HDMI1 Display1 PANEL1 HDLED RESET PLED PWRBTN 1 SATA_4 27 CLRMOS1 4 Top LINE IN Center FRONT Bottom MIC IN Optical SPDIF 22 1 HD_AUDIO1 ATX12V2 ATX_4PIN Super I O Intel C246 COM1 1 OCU1 FAN2 FAN1 1 T 1 R OCU_SEL C 1 M2_1 T 1 SATAPWR1 SPEAKER1 ITX_AUX_PANEL1 1 CMOS Battery 1 SATA_SGPIO2 1 FAN3 1 1 1 PWM_CFG1 SEC_OR1 1 2 16 20 15 14 13 9 10...

Page 16: ...r FAN3 12 SATA3 Connector SATA_4 13 SATA Power Connector SATA_PWR1 14 SATA DOM Power Jumper SATAPWR1 15 System Panel Header PANEL1 16 Auxiliary Panel Header ITX_AUX_PANEL1 17 Speaker Header SPEAKER1 18 PWM Configuration Header PWM_CFG1 19 Thermal Sensor Header TR1 20 Security Override Jumper SEC_OR1 21 TPM Header TPM1 22 CPU Fan Connector FAN1 23 SATA SGPIO Connector SATA_SGPIO1 24 SATA3 Connector...

Page 17: ...SET PLED PWRBTN 1 6 1 Super I O Intel C246 1 1 1 1 1 1 1 1 1 1 2 3 4 UID 5 No Item Status Description 1 SB_PWR1 Green STB PWR ready 2 FAN_LED2 Red FAN2 failed 3 FAN_LED3 Red FAN3 failed 4 FAN_LED1 Red FAN1 failed 5 UID_LED1 Blue Unit Identification LED Please see 2 9 Unit Identification purpose LED Switch for more information 6 BMC_LED1 Green BMC heartbeat LED ...

Page 18: ...42D2I USB 3 1 Gen1 Ports USB31_1_2 7 USB 2 0 Ports USB_1_2 4 LAN RJ 45 Port LAN2 8 UID Switch UID1 C246 WSI 5 4 3 11 6 7 8 10 9 2 1 12 No Description No Description 1 Line In Light Blue 7 LAN RJ 45 Port LAN2 2 Front Speaker Lime 8 USB 3 1 Gen2 Ports USB31_3_4 3 Microphone Pink 9 Display Port 4 VGA Port VGA1 10 HDMI Port 5 LAN RJ 45 Port LAN1 11 USB 2 0 Ports USB_1_2 6 USB 3 1 Gen2 Ports USB31_1_2 ...

Page 19: ...onnection or no link Blinking Yellow Data Activity Yellow 100Mbps connection On Link Green 1Gbps connection There are two LEDs on each LAN port Please refer to the table below for the LAN port LED indications LAN Port LED Indications Activity Link LED Speed LED Status Description Status Description Off No Link Off 10M bps connection or no link Blinking Yellow Data Activity Yellow 100M bps connecti...

Page 20: ... HSIO22 HSIO23 25 PCI Ex1 100MHz INTELI210 LAN1 NCSI PCI Ex1 100MHz INTELI219LM LAN2 SPI SPI FLASH SYSTEM BIOS HSIO7 HSIO10 SIO NCT5567D B 22 17 SATA PCI E SATA_4 SATADOM USB2 0 480Mb s USB2 0 High Speed USB 2 rearports Oculink It is onlyleft with SATA 0 SATA 2 SATA 3 ifuse M 2 SATA HSIO18 21 BMC AST2500 HSIO 15 RGB TPM S Header DDR4 256MB PWM RTL8211E RGMII MNG RJ45 IPMB CPU FAN1 FRNT FAN1 REARFA...

Page 21: ...USB 2 front ports USB 3 1 10Gb s USB3 1 Gen2 SuperSpeed USB 4 rear ports TypeA HSIO 4 5 HSIO 0 3 DIGITAL PORT C eDP M 2_1 PCI E SATA SATA 3 6Gb s SATA_5 SATA_6 SATA_7 HSIO 14 17 HSIO 22 HSIO 23 25 PCI Ex1 100MHz INTEL I210 LAN1 NCSI PCI Ex1 100MHz INTEL I219LM LAN2 24MHz ALC892 SPI SPI FLASH SYSTEM BIOS HSIO 7 HSIO 10 TPM S Header SIO NCT5567D B LPC BUS CPUFAN1 REAR FAN1 FRNTFAN1 PWM COMConnector ...

Page 22: ...VER place your motherboard directly on the carpet or the like Also remember to use a grounded wrist strap or touch a safety grounded object before you handle the compo nents 3 Hold components by the edges and do not touch the ICs 4 Whenever you uninstall any component place it on a grounded anti static pad or in the bag that comes with the component 5 When placing screws into the screw holes to se...

Page 23: ...or if there are any bent pins in the socket Do not force to insert the CPU into the socket if above situation is found Otherwise the CPU will be seriously damaged 2 Unplug all power cables before installing the CPU Illustrations in this User Manual are provided for reference only and may slightly differ from actual product appearances 1 2 A B 3 2 3 Installing the CPU ...

Page 24: ...18 English Please save and replace the cover if the processor is removed The cover must be placed if you wish to return the motherboard for after service 5 6 4 ...

Page 25: ...E3C246D2I E3C242D2I C246 WSI 19 English 2 4 Installing the CPU Fan and Heatsink 1 2 C P U _ F A N ...

Page 26: ...M slots 1 It is not allowed to install a DDR DDR2 or DDR3 memory module into a DDR4 slot otherwise this motherboard and DIMM may be damaged 2 The DIMM only fits in one correct orientation It will cause permanent damage to the motherboard and the DIMM if you force the DIMM into the slot at incorrect orientation 1 2 3 ...

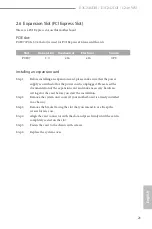
Page 27: ...ower supply is switched off or the power cord is unplugged Please read the documentation of the expansion card and make necessary hardware settings for the card before you start the installation Step 2 Remove the system unit cover if your motherboard is already installed in a chassis Step 3 Remove the bracket facing the slot that you intend to use Keep the screws for later use Step 4 Align the car...

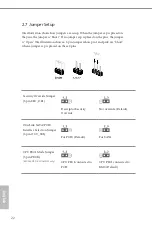
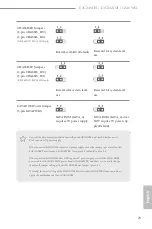
Page 28: ...illustration shows a 3 pin jumper whose pin1 and pin2 are Short when a jumper cap is placed on these 2 pins Security Override Jumper 3 pin SEC_OR1 Descriptor Security Override Not override Default OCuLink SATA PCIE Interface Selection Jumper 3 pin OCU_SEL For PCIE Default For SATA CPU PECI Mode Jumper 3 pin PECI1 E3C246D2I E3C242D2I only CPU PECI connected to PCH CPU PECI connected to BMC Default ...

Page 29: ... power sup ply Default Consult the documentation that comes with your SATA DOM and check whether or not Pin 7 requires 5V power supply If the connected SATA DOM requires 5V power supply move the jumper caps placed on the SATA DOM Power Jumper SATAPWR1 from pins 2 3 default to pins 1 2 If the connected SATA DOM does NOT require 5V power supply connect the SATA DOM power cable to the SATA DOM power ...

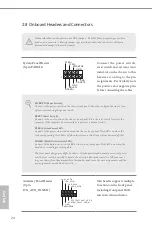
Page 30: ...s front panel Press the reset switch to restart the computer if the computer freezes and fails to perform a normal restart PLED System Power LED Connect to the power status indicator on the chassis front panel The LED is on when the system is operating The LED is off when the system is in S4 sleep state or powered off S5 HDLED Hard Drive Activity LED Connect to the hard drive activity LED on the c...

Page 31: ...ND 12V GND Please use a SATA power cable to connect this SATA Power Connector and your SATA HDD for supplying power from the motherboard when using DC_IN mode without SATA power supply USB 3 0 Header 19 pin USB3_1_2 Besides four default USB 3 0 ports on the I O panel there is one USB 3 0 header on this motherboard This USB 3 0 header can support two USB 3 0 ports Chassis Speaker Header 4 pin SPEAK...

Page 32: ...he fan connector and match the black wire to the ground pin All fans support Fan Control ATX 12V Power Connector 8 pin ATX12V2 4 8 1 5 12V GND This motherboard provides one 8 pin ATX 12V power connector ATX 12V Power Connector 4 pin ATX_4PIN 1 2 3 4 ATX_PG 5VSB GND PSON This motherboard provides a 4 pin ATX 12V power connector TPM Header 13 pin TPM1 This connector supports Trusted Platform Module ...

Page 33: ...ch you wish to monitor its temperature Front Panel Audio Header 9 pin HD_AUDIO1 C246 WSI only J_SENSE OUT2_L 1 MIC_RET PRESENCE GND OUT2_R MIC2_R MIC2_L OUT_RET This header is for connecting audio devices to the front audio panel PWM Configuration Header 3 pin PWM_CFG1 GND SMB_DATA_VSB SMB_CLK_VSB 1 This header is used for PWM configurations OCuLink Connector OCU1 OCU1 Please connect PCIE SSDs or ...

Page 34: ...MBDATA PSU SMBus monitors the status of the power supply fan and system temperature Intelligent Platform Management Bus Header 4 pin IPMB1 E3C246D2I E3C242D2I only IPMB_SDA IPMB_SCL No Connect GND This 4 pin connector is used to provide a cabled base board or front panel connection for value added features and 3rd party add in cards such as Emergency Management cards that provide management featur...

Page 35: ...s pressed the front rear UID blue LED indicator will be turned on Press the UID button again to turn off the indicator 2 10 Driver Installation Guide To install the drivers to your system please insert the support CD to your optical drive first Then the drivers compatible to your system can be auto detected and listed on the support CD driver page Please follow the order from top to bottom to inst...

Page 36: ...andles all non TCP IP traffic The Secondary adapter will receive fallback traffic if the primary fails If the Preferred Primary adapter fails but is later restored to an active status control is automatically switched back to the Preferred Primary adapter Step 1 From Device Manager open the properties of a team Step 2 Click the Settings tab Step 3 Click the Modify Team button Step 4 Select the ada...

Page 37: ...nstalling the M 2_SSD NGFF Module Step 1 Prepare a M 2_SSD NGFF module and the screw 20o Step 2 Gently insert the M 2 NGFF SSD module into the M 2 slot Please be aware that the M 2 NGFF SSD module only fits in one orientation NUT1 NUT2 Step 3 Tighten the screw with a screwdriver to secure the module into place Please do not overtighten the screw as this might damage the module M 2_SSD NGFF Module ...

Page 38: ...n has a menu bar with the following selections Item Description Main To set up the system time date information Advanced To set up the advanced UEFI features Server Mgmt E3C246D2I E3C242D2I only To manage the server Security To set up the security features Boot To set up the default system device to locate and load the Operating System Event Logs For event log configuration Exit To exit the curren...

Page 39: ... option for the selected items Tab Switch to next function Enter To bring up the selected screen PGUP Go to the previous page PGDN Go to the next page HOME Go to the top of the screen END Go to the bottom of the screen F1 To display the General Help Screen F7 Discard changes and exit the UEFI SETUP UTILITY F9 Load optimal default values for all the settings F10 Save changes and exit the UEFI SETUP...

Page 40: ...3 2 Main Screen Once you enter the UEFI SETUP UTILITY the Main screen will appear and display the system overview The Main screen provides system overview information and allows you to set the system time and date ...

Page 41: ...set Configuration Storage Configuration ACPI Configura tion USB Configuration Super IO Configuration Serial Port Console Redirection H W Monitor Runtime Error Logging Intel SPS Configuration E3C246D2I E3C242D2I only Server ME Configuration C246 WSI only Intel R Bios Guard Technology and Instant Flash Save User Default Type a profile name and press enter to save your settings as user default Load U...

Page 42: ...that the overall performance on threaded software is improved Active Processor Cores Select the number of cores to enable in each processor package C States C246 WSI CPU C States Support E3C246D2I E3C242D2I Enable CPU C States Support for power saving It is recommended to keep C3 C6 and C7 all enabled for better power saving Enhanced Halt State C1E Enable Enhanced Halt State C1E for lower power co...

Page 43: ...iding additional levels of manageability security isolation and I O performance Hardware Prefetcher Automatically prefetch data and code for the processor Enable for better performance Adjacent Cache Line Prefetch Automatically prefetch the subsequent cache line while retrieving the currently requested cache line Enable for better performance CPU AES Use this to enable or disable CPU Advanced Encr...

Page 44: ...atio will be lowered after a period of time A lower limit can protect the CPU and save power while a higher limit may improve performance Long Duration Maintained Configure the period of time until the CPU ratio is lowered when the Long Duration Power Limit is exceeded Short Duration Power Limit Configure Package Power Limit 2 in watts When the limit is exceeded the CPU ratio will be lowered immed...

Page 45: ... 3 2 DRAM Configuration DRAM Frequency If Auto is selected the motherboard will detect the memory module s inserted and assign the appropriate frequency automatically ECC Support C246 WSI only Use this item to enable or disable DDR ECC Support ...

Page 46: ...ard LAN1 function The default value is Auto Onboard LAN2 E3C246D2I E3C242D2I only Use this to enable or disable the Onboard LAN2 function The default value is Auto Top of Lower Usable Dram C246 WSI only Maximum Value of TOLUD Dynamic assignment would adjust TOLUD automatically based on largest MMIO length of installed graphic controller VT d C246 WSI only Intel Virtualization Technology for Direct...

Page 47: ... Speed This allows you to select PCIE 7 Link Speed The default value is Auto PCIE7 ASPM Support This option enables or disables the ASPM support for PCIE7 OCULINK Speed E3C246D2I E3C242D2I only This allows you to select OCULINK Link Speed The default value is Auto OCULINK ASPM Support E3C246D2I E3C242D2I only This option enables or disables the ASPM support for OCULINK Above 4G Decoding C246 WSI o...

Page 48: ... Auto to enable onboard HD audio and automatically disable it when a sound card is installed Front Panel C246 WSI only Enable disable front panel HD audio Restore on AC Power Loss This allows you to set the power state after an unexpected AC power loss If Power Off is selected the AC power remains off when the power recovers If Power On is selected the AC power resumes and the system starts to boo...

Page 49: ...er hard disk drives to detect and report on various indicators or reliability SATA Controller Use this item to enable or disable SATA Controllers SATA M 2_SATA Mode Selection Identify the SATA M 2_SATA port is connected to Solid State Drive or Hard Disk Drive Press Ctrl I to enter RAID ROM during UEFI POST process Support Aggressive Link Power Management Use this item to enable or disable SALP ...

Page 50: ... system from the power soft off mode Ring In Power On Use this item to enable or disable Ring In signals to turn on the system from the power soft off mode RTC Alarm Power On Use this item to enable or disable RTC Real Time Clock to power on the system USB Keyboard Remote Power On C246 WSI only Allow the system to be waked up by an USB keyboard or remote controller USB Mouse Power On C246 WSI only...

Page 51: ...E3C246D2I E3C242D2I C246 WSI 45 English 3 3 6 USB Configuration Legacy USB Support Use this option to enable or disable legacy support for USB devices The default value is Enabled ...

Page 52: ...ect an optimal setting for Super IO device E3C246D2I E3C242D2I only Serial Port 1 Configuration Use this item to set parameters of Serial Port 1 COM1 Serial Port Use this item to enable or disable the onboard serial port Change Settings Use this item to select an optimal setting for Super IO device SOL Port Configuration Use this item to set parameters of SOL ...

Page 53: ...E3C246D2I E3C242D2I C246 WSI 47 English SOL Port Configuration Use this item to enable or disable Serial Port SOL SOL Port Address Use this item to select an optimal setting for Super IO device ...

Page 54: ...ion to configure Console Redirection Settings and specify how your computer and the host computer to which you are connected exchange information Terminal Type Use this item to select the preferred terminal emulation type for out of band management It is recommended to select VT UTF8 Option Description VT100 ASCII character set VT100 Extended VT100 that supports color and function keys VT UTF8 UTF...

Page 55: ...signal can be sent to stop the data flow Once the buffers are empty a start signal can be sent to restart the flow Hardware flow uses two wires to send start stop signals The options include None and Hardware RTS CTS VT UTF8 Combo Key Support Use this item to enable or disable the VT UTF8 Combo Key Support for ANSI VT100 terminals Recorder Mode Use this item to enable or disable Recorder Mode to c...

Page 56: ... Console Redirection Use this option to enable or disable Console Redirection If this item is set to Enabled you can select a COM Port to be used for Console Redirection Console Redirection Settings Use this option to configure Console Redirection Settings and specify how your computer and the host computer to which you are connected exchange information Terminal Type Use this item to select the p...

Page 57: ...erflow When sending data if the receiving buffers are full a stop signal can be sent to stop the data flow Once the buffers are empty a start signal can be sent to restart the flow Hardware flow uses two wires to send start stop signals The options include None Hardware RTS CTS and Software Xon Xoff Data Bits Parity Stop Bits ...

Page 58: ... assign a respective fan speed for each temperature FAN2 Setting Select a fan mode for FAN or choose Customize to set 5 CPU temperatures and assign a respective fan speed for each temperature FAN3 Setting Select a fan mode for FAN or choose Customize to set 5 CPU temperatures and assign a respective fan speed for each temperature Watch Dog Timer This allows you to enable or disable the Watch Dog T...

Page 59: ... REAR_FAN1 This allows you to set the rear fan 1 s speed The default value is Smart Fan FRNT_FAN1 This allows you to set the front fan 1 s speed The default value is Smart Fan Smart Fan Control This allows you to set the Smart fan s level speed Smart Fan Duty Control Smart Fan Duty x x means 1 to 11 stage This allows you to set duty cycle for each stage Smart Fan Temp Control Smart Fan Temp x x me...

Page 60: ... Logging System Enabling Use this item to enable or disable Runtime Error Logging System Memory Error Enabling Memory enabling and logging setup option PCI PCI Error Enabling Use this item to enable or disable PCI errors Corrected Error Enable Use this item to enable or disable Correctable errors Uncorrected Error Enable Use this item to enable or disable Uncorrectable errors ...

Page 61: ...E3C246D2I E3C242D2I C246 WSI 55 English Fatal Error Enable Use this item to enable or disable Fatal errors ...

Page 62: ...h 3 3 11 Intel SPS Configuration E3C246D2I E3C242D2I only Server ME Configuration C246 WSI only SPS screen displays the Intel SPS Configuration information such as Operational Firmware Version and Firmware State ...

Page 63: ...E3C246D2I E3C242D2I C246 WSI 57 English 3 3 12 Intel R Bios Guard Technology Intel Bios Guard Support Use this to enable or disable Intel Bios Guard Support The default value is Disabled ...

Page 64: ...disk or hard drive and launch this tool then you can update your UEFI only in a few clicks without preparing an additional floppy diskette or other compli cated flash utility Please be noted that the USB flash drive or hard drive must use FAT32 16 12 file system If you execute Instant Flash utility the utility will show the UEFI files and their respective information Select the proper UEFI file to...

Page 65: ...C Wait For BMC response for specified time out BMC starts at the same time when BIOS starts during AC power ON It takes around 90 seconds to initialize Host to BMC interfaces Inventory Support This will execute inventory function for system Enabling this item will take some time at system boot ...

Page 66: ...ng for error progress codes during boot Erase SEL Use this to choose options for earsing SEL When SEL is Full Use this to choose options for reactions to a full SEL Log EFI Status Codes Use this item to disable the logging of EFI Status Codes or log only error code or only progress code or both ...

Page 67: ...g a static IP address toggle to Yes and the changes take effect after the system reboots The default value is No Configuration Address Source Select to configure BMC network parameters statically or dynamically by BIOS or BMC Configuration options Static and DHCP Static Manually enter the IP Address Subnet Mask and Gateway Address in the BIOS for BMC LAN channel configuration DHCP IP address Subne...

Page 68: ...rface is Username admin Password admin For more instructions on how to set up remote control environment and use the IPMI man agement platform please refer to the IPMI Configuration User Guide or go to the Support website at http www asrockrack com support faq asp ...

Page 69: ...nd press enter to remove the password User Password Set or change the password for the user account Users are unable to change the settings in the UEFI Setup Utility Leave it blank and press enter to remove the password Secure Boot Use this to enable or disable Secure Boot Control The default value is Disabled Enable to support Windows Server 2012 R2 or later versions Secure Boot Secure Boot Mode ...

Page 70: ... Boot keys Force System to Setup Mode clear all Secure Boot Variables Change takes effect after reboot Export Secure Boot variables Copy NVRAM content of Secure Boot variables to files in a root folder on a file system device Enroll Efi Image Allow the image to run in Secure Boot mode Enroll SHA256 Hash certificate of a PE image into Authorized Signature Database db Remove UEFI CA from DB Device G...

Page 71: ... 512 2 Authenticated UEFI Variable 3 EFI PE COFF Image SHA256 Key Source Factory External Mixed Key Exchange Keys Enroll Factory Defaults or load certificates from a file 1 Public Key Certificate in a EFI_SIGNATURE_LIST b EFI_CERT_X509 DER encoded c EFI_CERT_RSA2048 bin d EFI_CERT_SHA256 384 512 2 Authenticated UEFI Variable 3 EFI PE COFF Image SHA256 Key Source Factory External Mixed Authorized S...

Page 72: ... a EFI_SIGNATURE_LIST b EFI_CERT_X509 DER encoded c EFI_CERT_RSA2048 bin d EFI_CERT_SHA256 384 512 2 Authenticated UEFI Variable 3 EFI PE COFF Image SHA256 Key Source Factory External Mixed Authorized TimeStamps Enroll Factory Defaults or load certificates from a file 1 Public Key Certificate in a EFI_SIGNATURE_LIST b EFI_CERT_X509 DER encoded c EFI_CERT_RSA2048 bin d EFI_CERT_SHA256 384 512 2 Aut...

Page 73: ...Factory Defaults or load certificates from a file 1 Public Key Certificate in a EFI_SIGNATURE_LIST b EFI_CERT_X509 DER encoded c EFI_CERT_RSA2048 bin d EFI_CERT_SHA256 384 512 2 Authenticated UEFI Variable 3 EFI PE COFF Image SHA256 Key Source Default External Mixed Test ...

Page 74: ...order Boot Option 3 Use this item to set the system boot order Boot Option Filter This option controls Legacy UEFI ROMs priority USB Device BBS Priorities This page will show only when system install USB Storage Fast Boot C246 WSI only Fast Boot minimizes your computer s boot time In fast mode you may not boot from an USB storage device Ultra Fast mode is only supported by Windows 8 1 and the VBIO...

Page 75: ...ally activate the Numeric Lock function after boot up Boot Beep Select whether the Boot Beep should be turned on or off when the system boots up Please note that a buzzer is needed Full Screen Logo Use this item to enable or disable OEM Logo The default value is Enabled AddOn ROM Display Use this option to adjust AddOn ROM Display If you enable the option Full Screen Logo but you want to see the A...

Page 76: ...se that support UEFI option ROM only Select Legacy only to run those that support legacy option ROM only Select Do not launch to not execute both legacy and UEFI option ROM Launch Video OpROM Policy Select UEFI only to run those that support UEFI option ROM only Select Legacy only to run those that support legacy option ROM only Select Do not launch to not execute both legacy and UEFI option ROM P...

Page 77: ...E3C246D2I E3C242D2I C246 WSI 71 English OCU1 Slot OpROM This option controls Legacy UEFI ROMs priority ...

Page 78: ... Event Log The options include No Yes Next reset and Yes Every reset If Yes is selected all logged events will be erased When Log is Full Use this item to choose options for reactions to a full Smbios Event Log The options include Do Nothing and Erase Immediately Log System Boot Event Choose option to enable disable logging of System boot event View Smbios Event Log Press Enter to view the Smbios ...

Page 79: ...he following message Discard changes and exit setup will pop out Press ESC key or select Yes to exit the UEFI SETUP UTILITY without saving any changes Discard Changes When you select this option the following message Discard changes will pop out Press F7 key or select Yes to discard all changes Load UEFI Defaults Load UEFI default values for all the setup questions F9 key can be used for this oper...

Page 80: ...ng The Support CD To begin using the support CD insert the CD into your CD ROM drive The CD automatically displays the Main Menu if AUTORUN is enabled in your computer If the Main Menu does not appear automatically locate and double click on the file ASRSetup exe from the root folder in the Support CD to display the menu 4 2 2 Drivers Menu The Drivers Menu shows the available device s drivers if t...

Page 81: ...s are set to default settings 3 Check the settings of the 115V 230V switch on the power supply 4 Verify if the battery on the motherboard provides 3VDC Install a new battery if it does not If there is no video 1 Try replugging the monitor cables and power cord 2 Check for memory errors If there are memory errors 1 Verify that the DIMM modules are properly seated in the slots 2 Use recommended DDR4...

Page 82: ... battery on the motherboard provides 3VDC Install a new battery if it does not 2 Confirm whether your power supply provides adaquate and stable power Other problems 1 Try searching keywords related to your problem on ASRock Rack s FAQ page http www asrockrack com support ...

Page 83: ...eipt or a copy of your invoice marked with the date of purchase is required By calling your vendor or going to our RMA website http event asrockrack com tsd asp you may obtain a Returned Merchandise Authorization RMA number The RMA number should be displayed on the outside of the shipping carton which is mailed prepaid or hand carried when you return the motherboard to the manufacturer Shipping an...

Reviews: