Installation
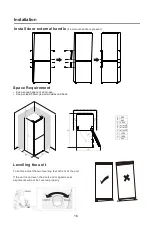
Space
Requirement
y
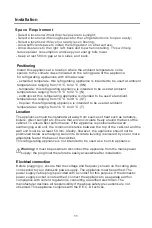
Select a location without direct exposure to sunlight;
y
Select a location with enough space for the refrigerator doors to open
easily;
y
Select a location with level (or nearly level) flooring;
y
Allow sufficient space to install the refrigerator on a flat surface;
y
Allow clearance to the right, left, back and top when installing. This
will help
reduce power
consumption and keep your energy bills lower.
y
Keep at lest 50mm gap at two sides and back.
Positioning
9 $$"$%
$
$$$
for refrigerating appliances with climate class:
- extended temperate: this refrigerating appliance is intended to be used at ambient
temperatures ranging from 10 °C to 32 °C;
(SN)
- temperate: this refrigerating appliance is intended to be used at ambient
temperatures ranging from 16 °C to 32 °C;
(N)
- subtropical: this refrigerating appliance is intended to be used at ambient
temperatures ranging from 16 °C to 38 °C;
(ST)
- tropical: this refrigerating appliance is intended to be used at ambient
temperatures ranging from 16 °C to 43 °C;
(T)
Warning!
9% "$ " $$ $
%$$-$%%
" " &
Electrical connection
=$%0 %#>% $
$%
$ %$$&8$$% "&8
$ %$$"$% $# $%$ &9
$ %$$ 7 0$$ $
$%% 0 %>%&8
%% $ ""# $%
" #&8 $$$ )&)&?&*# &
Location
8$$ %" % % 0
" 0 %&) %%%"7
"&8 %" $0$$ $ "
#%0% "$":
%% "
50
&90#0$$ %"
$ "#% &!%# %"
<% "" "&
This refrigerating appliance is not intended to be used as a built-in appliance.
11
Summary of Contents for AC2600FNF
Page 1: ...AC2600FNF AC2600FNFX Lea atentamente este manual y guárdelo para futuras consultas ...
Page 2: ......
Page 17: ... 1 Fijar la cubierta del tornillo Instalación 15 ...
Page 28: ...Read this manual carefully and keep it for future reference No Frost AC2600FNF AC2600FNFX ...
Page 29: ... 1 ...
Page 30: ... 2 ...
Page 31: ... 5 3 3 ...
Page 32: ... qualified 3 4 3 4 6 7 1 1 7 8 4 4 ...
Page 33: ... recommendations should be 2 9 contact systems 0 5 5 ...
Page 34: ... and the for 2 2 9 they suitable door the 6 6 ...
Page 35: ... 1 5 7 1 of qualified must 0 air 0 7 0 7 7 ...
Page 36: ... as taken 0 1 0 0 0 1 1 8 8 ...
Page 41: ...Installation 9 8 9 8 9 8 9 A 8 9 A 9 8 A 8 9 13 ...
Page 43: ...10 G 9 0 7 11 QVWDOODWLRQ 15 ...
Page 59: ...N O 0 0 HJ HK v v v J 8 J v J v O J 2 OGPSNBÁ FT EF TFHVSBOÁB v O I J J v 5 5 ...
Page 62: ... I HK H O J 5 HJ 5 7 HJ 2 O J V 5 0 5 HJ HJ HJ HJ 8 Q 9 W H OGPSNBÁ FT EF TFHVSBOÁB 8 8 ...
Page 68: ...11 Fixe a tampa do parafuso INSTALAÇÃO 14 ...
Page 82: ......
Page 83: ......
Page 84: ...CKASP C02 www aspes es aspes sareteknika es 902 99 69 01 944 04 14 08 ...

