background image

MPS-Series – Installation Guide 


U-0664-0174.doc – Issue: 07 complete, approved 

Page 14 of 24 

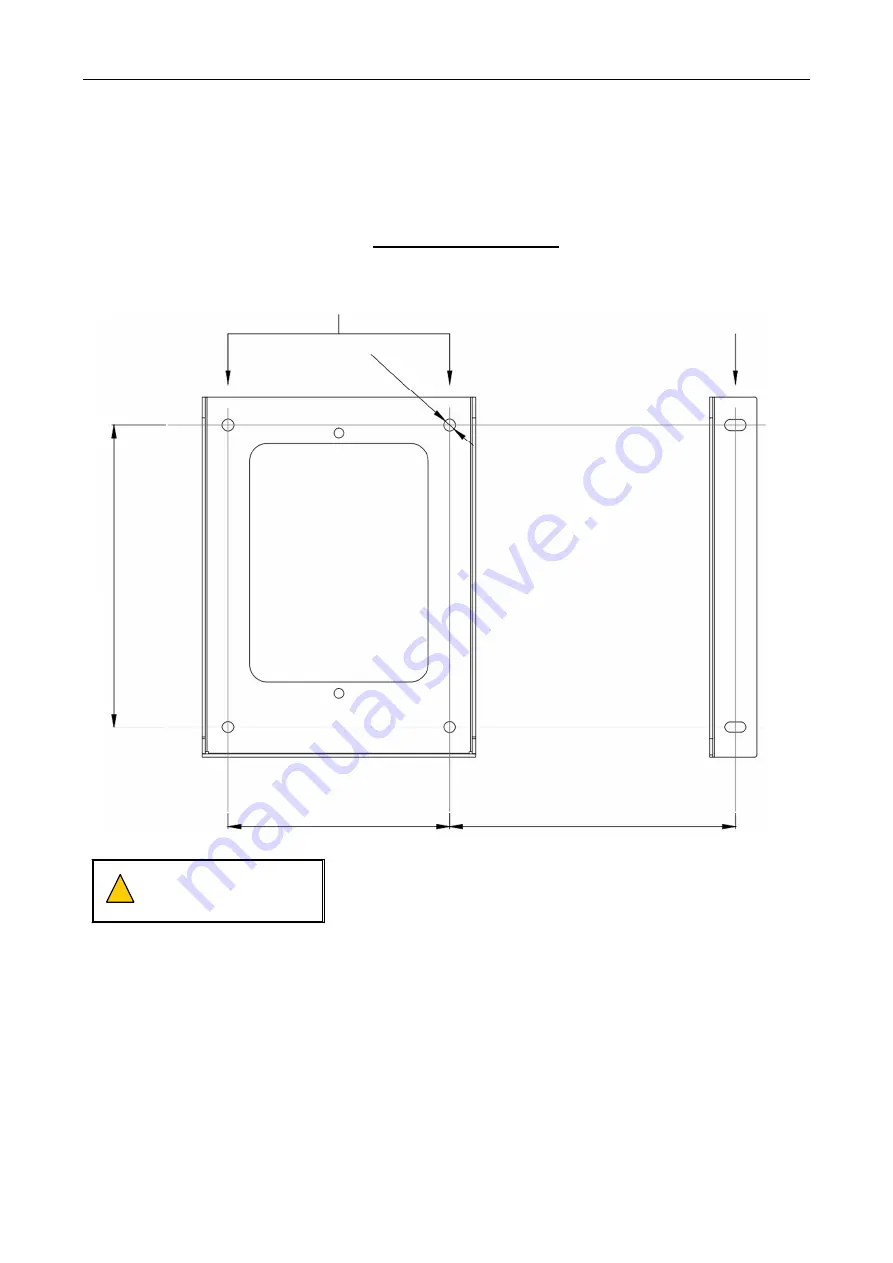
Note that if fixing the microphone to a flat desk or console, it is suggested that the alternative drilling 
centres shown in Figure 11 (page 14), and that the wall bracket (and R/H bracket if used) be rotated 
by 180 degrees in order to impart an aesthetically pleasing slant to the mounted unit.  

Figure 11 

Desk/Console-mounting: mounting hole and Right-Hand Side Bracket position 

DESK/CONSOLE-MOUNTING 

M0664_80 WALL-MOUNT BRACKET 

DRILLING CENTRES 

ADDITIONAL PAIR OF HOLES REQUIRED 
WHEN MOUNTING MICROPHONES WITH 

MPX10 10-BUTTON EXPANSION MODULE(S) 

USING A M0664_81 RIGHT-HAND BRACKET 

140.00 m

m


M0664_80  

WALL BRACKET 

M

0664_81  

R

/H

 BR
AC
KE

102.80 mm 

132.50 mm 

THIS DISTANCE IS CORRECT  

FOR MOUNTING A MPS10 UNIT.  

INCREASE THIS DISTANCE BY A FURTHER 110 mm FOR EACH 

ADDITIONAL MPX10 10-BUTTON EXPANSION MODULE (e.g. FOR 

A MPS20 THIS DISTANCE WOULD BE 242.50 mm) 

DIAMETER=5.50 mm


!

!


Mount the MPS microphone 
at eye height for best viewing 
angle of the LCD display.  


Summary of Contents for MPS Series

Page 1: ...sue 07 complete approved Date 03 09 14 Part Number M0664_65 MPS Series Modular Paging and Emergency Microphones MPS01 G0 MPS10 G0 MPS10 F0 OPTIONAL WALL BRACKET Sold in Australia by Morrison s Public Address Phone 0407442822 Email sales morrisonsav com au ...

Page 2: ...ution degree 2 A Declaration of Conformity statement to the above standards is available on request Voice Alarm When installed in a Voice Alarm system designed and configured in accordance with the ASL s EN 54 16 ISO 7240 16 System Design Guide T 0667 0016 this product meets the requirement of harmonised standards as applicable CPR EN 54 16 and EN 54 4 A Declaration of Performance According to the...

Page 3: ...onnection8 1 x 100BASE T Ethernet RJ45 Audio Output VoIP audio Control Data microphone listen in and IP network control data9 Listen in digital audio Others firmware upgrade and microphone configuration USB Interface 1 x USB 2 0 USB type B Audio Input 1 x 3 5 mm jack balanced or unbalanced stereo audio input music input Audio Output 1 x 3 5 mm jack unbalanced stereo audio output headphone external...

Page 4: ... Microphone Height 260 mm maximum Temperature storage and operating 20 C to 55 C storage 10 C to 55 C operation Humidity Range 0 to 95 non condensing Ordering Code Microphone MPS 01 G0 AN Microphone series MPS Modular Microphone Station Number of microphone buttons 01 None 10 10 buttons right hand side 20 20 buttons right hand side 30 30 buttons custom layout 40 40 buttons custom layout 50 50 butt...

Page 5: ...ion mode 2 Red LED Voice Alarm Yellow LED Fault Green LED Select Busy MPX10 10 button Expansion Module 3 MPS01 none fitted MPS10 one fitted MPS20 two fitted Built in loudspeaker under the unit Function button identification label under plastic cover Emergency mode keyswitch 1 The available functions depend on the PA VA system that hosts the microphone 2 Refer to the application specific documentat...

Page 6: ...guration and operation Menu selection button Toggles between fault and operation menus In Emergency Mode accepts all current faults reported at the connected PA VA System steadies the flashing fault LED indication and turns off the audible alarm until a new fault condition occurs Navigation wheel Navigation controls up S right X down T and left W Selection control Touches in the centre are interpr...

Page 7: ... overall screened Wall socket RJ45 Mic Port Central rack per rack design Standard CAT5 STP or FTP cable From wall socket to central rack normally part of the building installation Listen in optional 1 twisted pair overall screened Wall socket RJ45 Mic Aux Port Central rack per rack design Standard overall screened cable or standard CAT5 STP or FTP cable Ethernet and PoE LAN cable RJ45 Ethernet Por...

Page 8: ...onnect to the external device being used Audio input music 1 x 2 core screened 3 5 mm jack plug Mic Suitably rated 2 core cable Audio output headset microphone 1 x 2 or 3 core screened 3 5 mm jack plug Mic Suitably rated 2 or 3 core cable Contact input 1 x 2 core 3 5 mm jack plug Mic Suitably rated 2 core cable Other connections Contact output 1 x 2 or 3 core 3 5 mm jack plug Mic Suitably rated 2 ...

Page 9: ... label protection cover by pressing in on the plastic clip and lifting the cover off 2 Fit the zone identification label into the slot 3 Fit the label protection cover back in place MPS10 shown as example 3 If not fitted fit the gooseneck or fist microphone to the microphone case see Figure 3 page 9 Figure 3 Fitting the microphone to the microphone base 1 Connect the flying lead s from the goosene...

Page 10: ... required If the MPS microphone is to be used as an Emergency Microphone ensure that the unit s IP30 rating is preserved by fitting any unused 3 5 mm jacks with an anti dust cap plug supplied and fitting any unused large cable strain relief guides with a blanking sponge cord supplied 9 If a gooseneck microphone is used fit the foam windshield to the microphone capsule housing see Figure 4 page 10 ...

Page 11: ... button identification label into the label slot as required see Figure 6 page 11 Figure 6 Fitting the zone identification label 1 Remove the label protection cover by pressing in on the plastic clip and lifting the cover off 2 Fit the zone identification label into the slot 3 Fit the label protection cover back in place MPS10 shown as example 3 Remove the four Torx screws that retain the case bot...

Page 12: ...ad s coming out of the microphone base Gooseneck microphone shown as example 2 Carefully insert the microphone holder into the hole on the microphone case 3 Twist the microphone holder clockwise until the screw hole is aligned with the fixing hole on the microphone case 4 Secure the microphone using the M3 hex screw 15 mm and Allen key 2 5 mm provided 6 Remove the bottom cover by undoing 2 x M4 sc...

Page 13: ...e cable strain relief guides with a blanking sponge cord supplied 11 Use the drilling detail drawings in Figure 10 page 13 to fix the M0664_80 wall bracket to the wall or desk console Figure 10 Wall mounting mounting hole and Right Hand Side Bracket position WALL MOUNTING M0664_80 WALL MOUNT BRACKET DRILLING CENTRES ADDITIONAL PAIR OF HOLES REQUIRED WHEN MOUNTING MICROPHONES WITH MPX10 10 BUTTON E...

Page 14: ...ing hole and Right Hand Side Bracket position DESK CONSOLE MOUNTING M0664_80 WALL MOUNT BRACKET DRILLING CENTRES ADDITIONAL PAIR OF HOLES REQUIRED WHEN MOUNTING MICROPHONES WITH MPX10 10 BUTTON EXPANSION MODULE S USING A M0664_81 RIGHT HAND BRACKET 140 00 mm M0664_80 WALL BRACKET M0664_81 R H BRACKET 102 80 mm 132 50 mm THIS DISTANCE IS CORRECT FOR MOUNTING A MPS10 UNIT INCREASE THIS DISTANCE BY A...

Page 15: ...e 12 page 15 If used fasten the microphone to the Right Hand Side Bracket using one M5 hex screw and washer Figure 12 Fastening the microphone to the wall bracket USE A 3 MM A F HEX DRIVER AND TO THE RIGHT HAND BRACKET IF USED 13 Use the two remaining M5 hex screws and washers to fully lock the microphone to the wall bracket see Figure 13 page 15 Figure 13 Locking the microphone to the wall bracke...

Page 16: ...g the foam windshield Microphone capsule housing without foam windshield Microphone capsule housing with foam windshield fitted 16 If the MPS microphone is to be used as an Emergency Microphone place the supplied pictogram label adjacent to the microphone see example in Figure 15 page 16 Figure 15 Example of pictogram label BS5839 8 requires the pictogram label to be placed so that it is clearly v...

Page 17: ...Interface read only UP DOWN DOWN DOWN Bootloader mode for firmware download via the USB port DIP Switch up off down on DOWN UP DOWN DOWN Configuration via User Interface read and write for commissioning only POE Links RTR Links Configuration Not fitted Fitted DC power supply via Router connections Fitted Not fitted Power over Ethernet 1 Power over Ethernet does not provide EN54 16 compliance 2 Dis...

Page 18: ...X PORT LISTEN IN AND HARDWARE BYPASS PTT SPEAK NOW USB ETHERNET ROUTER 1 MIC PORT Cover removed AUDIO INPUT MUSIC AUDIO OUTPUT SPEAKER HEADSET MICROPHONE CONTACT O P CONTACT I O CABLE TERMINATION OPTIONS TIP RING SLEEVE TRS JACK PLUG TIP RING 1 RING 2 SLEEVE TRRS JACK PLUG CABLE STRAIN RELIEF GUIDES Cable strain relief guide for audio I O cables 3 5 mm jack ...

Page 19: ...are compatibility details RJ45 Socket Pin No Signal CAT5 Cable EIA 568 B Description 1 PTT 2 O P White Orange Push To Talk switch to Router 2 internally fitted with 6k8 470 Ω resistors 2 PTT 1 O P Orange Same as above but to Router 1 3 LISTEN IN I P White Green Listen in audio from Router ve 0 dBu nominal 10 kΩ 4 SPEAK NOW LED 1 I P Blue Cathode of Speak Now indicators with built in 2k2 Ω series r...

Page 20: ...the serial connection ASL Serial Paging DMS and Console ACU The protocol is defined by the host and the MPS will automatically discover the protocol upon connection 4 Emergency Microphones that are used as location for display of mandatory EN 54 16 indications and controls should have dual power supply one power supply connected to ROUTER 1 port and the other power supply to ROUTER 2 port 5 DC pow...

Page 21: ...ixed to mono 2 TRRS plug this input can be used for connection of a balanced audio source Plug Contact Signal Description Tip CONTACT INPUT I P Contact input contact closure to ground internal 10 kΩ pull up to 3 3 V Ring CONTACT OUTPUT O P Contact output open collector TRS Sleeve GROUND Ground TIP RING SLEEVE TRS JACK PLUG I O Contact Input and Output 3 5 mm jack Single contact output provided twi...

Page 22: ...anical Dimensions Figure 18 MPS dimensions Note Increase the width by a further 110 mm for each MPX10 Expansion Module See examples below for MPS10 and MPS20 MPS01 58 mm 48 5 mm 35 mm 260 mm maximum 165 mm 175 mm 171 mm 200 mm 275 mm 285 mm 281 mm 200 mm MPS10 MPS20 385 mm 395 mm 391 mm 200 mm ...

Page 23: ...e correct type and rating ESD Precautions This product contains static sensitive devices Observe ESD precautions when working on the equipment with the cover removed Unpacking and Handling The equipment should be unpacked and inspected immediately on receipt If damage has occurred please advise your carrier or supplier This equipment contains electronic devices that are sensitive to electrostatic ...

Page 24: ...ted repair 9 No fault found where no fault can be found after extensive testing indicating user error or failure in ancillary equipment 10 Electronic assemblies which are improperly packed when returned for repair or service Should any of the above apply Application Solutions Safety and Security Limited reserves the right to raise any relevant charges to the customer Application Solutions Safety a...

Reviews: