background image

Before contacting the service
division

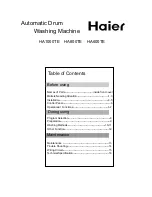
Before you contact the service division, make sure
that you know the model number (located on the
front panel), and serial number.

The model designation can be found on the panel.
The type designation and serial number can be
found on the type plate on the inside of the washer
door.

1

Serial number (12 digits)

70.1

Type

Model Number

Serial
Number

29

Service

Summary of Contents for W6444

Page 1: ...ctionality and high quality These are key characteristics of all our products and the reason they are greatly appreciated throughout the world To get the most from your new machine we recommend that y...

Page 2: ...hing 11 Sort your laundry 11 Turn on the main power switch 11 Open the washer door and load the washing 11 Add detergent and fabric softener as required 12 Select the program 15 Select options 16 Clos...

Page 3: ...27 Positioning the washing machine 27 Adjusting the feet 27 Connection to water supply 28 Drainage connection 28 Electrical installation 29 Service 29 Before contacting the service division 32 Quick g...

Page 4: ...arted when the door is open To open the washer door while a program is running see Close the door and press the Start Stop button in the Washing chapter Checking water hardness The quantity of deterge...

Page 5: ...tool for opening the washer door in emergencies Installation See the Installation chapter Overflow guard function If the machine s water level rises above the normal level the overflow guard function...

Page 6: ...ung children should be supervised to ensure that they do not play with the appliance Store detergent and fabric softener out of the reach of children CAUTION If this appliance is supplied from a cord...

Page 7: ...compartment 3 Program panel 4 Serial number plate on inside of washer door 5 Drainage pump cover 6 Drainage pump behind cover 7 Washer door Detergent compartment 1 Pre wash 2 Main wash 3 Fabric soften...

Page 8: ...ctions for each garment Load Program Material Laundry labels 1 1 drum Colour White 60 C to 95 C Cotton linen white and light coloured items 1 1 drum Quick 60 C Cotton linen cotton polyester Light and...

Page 9: ...an save energy by not using higher temperature programs than necessary Select Quick if you just need to freshen up shirts or exercise clothes for example This will save both water and energy If you se...

Page 10: ...vironmental concerns we discourage the use of strong chemicals When using agents for bleaching or stain removal there is a risk of rust corrosion and discolouration of the machine 10 Advice and tips b...

Page 11: ...you can reduce the amount of detergent used Powder detergent Pour the powder into the compartment for the main wash and pre wash as well if desired Liquid detergent When using liquid detergent follow...

Page 12: ...normal to heavily soiled laundry whites and colours You can select the temperature freely so follow the washing instructions for each garment 60 C is a good temperature for heavily soiled cotton garm...

Page 13: ...lended materials or silk The maximum temperature is 60 C but follow the washing instructions for each garment Many synthetics will come clean at 40 C Garments worn next to the skin ought to be washed...

Page 14: ...40 1 40 1 1 60 7 1400 3 60 4 Colour White 0 40 0 4 25 3 5 1400 2 40 5 Quick 1 20 0 5 50 3 5 1200 2 40 6 Easy Care 1 20 0 4 30 3 5 800 3 40 7 Synthetics 0 45 0 5 70 2 3 800 3 30 8 Wool hand wash 0 20...

Page 15: ...ning No drain means that the program does not include a spin cycle and ends with the water from the final rinse still in the machine The washing will remain covered by the water from the final rinse s...

Page 16: ...washer door The machine continues automatically from the point where the program was interrupted Stopping or changing a program You can stop a program by pressing the Start Stop button for three seco...

Page 17: ...er Rinse button to change the setting 5 Press the Door opening button to save the setting Extra rinses Upon delivery your washing machine is set to use three rinses in the Normal and Colour White prog...

Page 18: ...sing and the cover Also check that the pump blades right at the back rotate 6 Screw on the cover replace the drainage hose on the hatch pin and close the hatch Cleaning the detergent compartment NOTE...

Page 19: ...ns that small deposits can build up in the machine These in turn may lead to unpleasant smells developing especially if constantly using cold wash To avoid this we recommend running a 95 C wash progra...

Page 20: ...ly pry to the left 2 Use your other hand to grasp the agitator and pull it towards you 3 Lift the agitator 4 Remove any objects 5 Place the agitator in the mounting hole with the F mark towards you En...

Page 21: ...s does not work the machine must be drained manually See Cleaning the trap and the drainage pump in the Care and cleaning chapter B Ensure that the main power switch is turned off and that the plug ha...

Page 22: ...oes not resolve the problem call the service division F12 Water inlet fault Check that the tap on the water pipe is open that the filter in the machine s water inlet is not blocked Action 1 Shut off t...

Page 23: ...stainless steel Outer casing material 1 5 m pex pipe Water connection 1 7 m polypropylene hose Drain Information for test institute Energy declaration AS NZS 2040 1 1998 Australian standard Normal 40...

Page 24: ...ch es Top Left 1 30 Bath towel Right 1 29 Pillow case Front 1 28 Pillow case 27 Undershorts Rear 1 26 T shirt Right 1 25 Tablecloth 24 Bath towel Front 1 23 Shirt Center 1 22 Undershorts 21 Undershort...

Page 25: ...ag contains three plastic plugs to fit in the empty screw holes NOTE If the machine is to be moved and transported the transport screws must be refitted to prevent damage to the machine through shakin...

Page 26: ...ers into the three holes that contained the plugs Save the plastic plugs in case the machine is moved in the future NOTE If the machine is to be transported the bolts and plastic plugs for locking the...

Page 27: ...inimum by adjusting the feet so that the machine is steady and balanced on the floor Tighten the lock nuts Locking nut Connection to water supply Water connection should be carried out by an appropria...

Page 28: ...See the illustration At least 18 mm Electrical installation Connect the machine by plugging it into an earthed wall socket The electrical wall socket must be placed outside of the installation area t...

Page 29: ...ou know the model number located on the front panel and serial number The model designation can be found on the panel The type designation and serial number can be found on the type plate on the insid...

Page 30: ...30 Your notes...

Page 31: ...31 Your notes...

Page 32: ...f you use liquid detergent follow the detergent manufacturer s recommendations 4Select the program 1 Select a program by turning the program selector 2 Select any options and settings 3 Press the Star...

Reviews: