


5
Operating Manual - Pema Protea Equipped Media Amplifier
2. PEMA AMPLIFIER MODELS
2.1 Product Overview
The Pema series of amplifiers are available in the following 120 VAC or 230 VAC mains configurations. Each model can
have an optional factory installed CobraNet or Dante network audio module. Constant voltage amplifiers can include 25V, 70V,
and 100V output models.
Pema 4125
- Eight input, four 125W amp channels, low Z (speaker), or constant voltage (High Z) output models.
Pema 8125
- Eight input, eight 125W amp channels, low Z (speaker), or constant voltage (High Z) output models.
Pema 4250
- Eight input, four 250W amp channels, low Z (speaker), or constant voltage (High Z) output models.
Pema 8250
- Eight input, eight 250W amp channels, low Z (speaker), or constant voltage (High Z) output models.
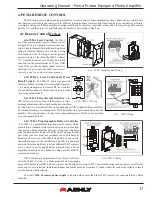
2.2 Installation Requirements
Each Pema
model is 2RU, and weighs <22 pounds (10kg). The model number, mains voltage, and power consumption
are indicated on the back panel beneath the AC inlet.
Caution
:
Before mounting or wiring the unit, always disconnect it from the mains. Use four screws when mounting
the amplifier to the front rack rails. Rear support is also recommended, especially for mobile or touring use. Air flow vents
for cooling the amplifier require the front panel to have access to ambient room temperature air. Cool air is drawn in from the
front and blown out the sides. It is not necessary to leave a space above or below the amplifier in the rack. To reduce the risk
of fire or electric shock, do not expose this apparatus to rain or moisture. Before connecting to mains power, make sure that
the controls, software, and wiring are all set to the configuration needed for your particular application. Failure to do so could
result in damage to the unit or other components in the system.
Wiring
: Always use high quality shielded cable for input signals, and use balanced input signal when possible. To avoid
possible system noise or oscillation, avoid running low level signal wires parallel to speaker outputs or AC wiring, especially
over long distance. Before testing the system, double check all connections and settings. Refer to the specifications section of
this manual for input, output, Ethernet, and other amplifier properties to consider during installation.
2.3 Ethernet Communications Requirements
Ethernet communications with this amplifier is made by connecting it directly to a PC running Protea
ne
control software,
or connecting it to a networked PC through an Ethernet router, switch, hub, or patch panel. Networks using the Cat-5, Cat-5e,
and Cat-6 standard will all work with Pema amplifiers. Maximum cable distance is 100 meters (328 ft) from the nearest router,
hub, or switch. Ashly network amplifiers and remotes will auto detect their Ethernet connection, and adapt to either a straight
through pin to pin or crossover Ethernet cable.
2.3a IP Address
- There is no need to assign IP addresses to Pema products used with a PC or a network router. The router
or Link Local Addressing will assign IP addresses to each product automatically.
When a router is not available, most current Pema
and NE products have the capability to assign their own IP address
based on Link Local Addressing. This allows the device to operate without the need to set up static IP address. If the only option
is to use an Ethernet switch instead of a router, and communications problems remain which cannot be solved with the use of
the link local standard, each Pema
device must have a static IP address assigned from within Protea
ne
software. This is done by
selecting “Manual Configuration” in the Network Properties tab of each device, where the system/network administrator must
assign each product its’ own unique static IP address, each with the appropriate sub net if applicable.


