Operating Manual - nX, nXe, and nXp Power Amplifiers
14
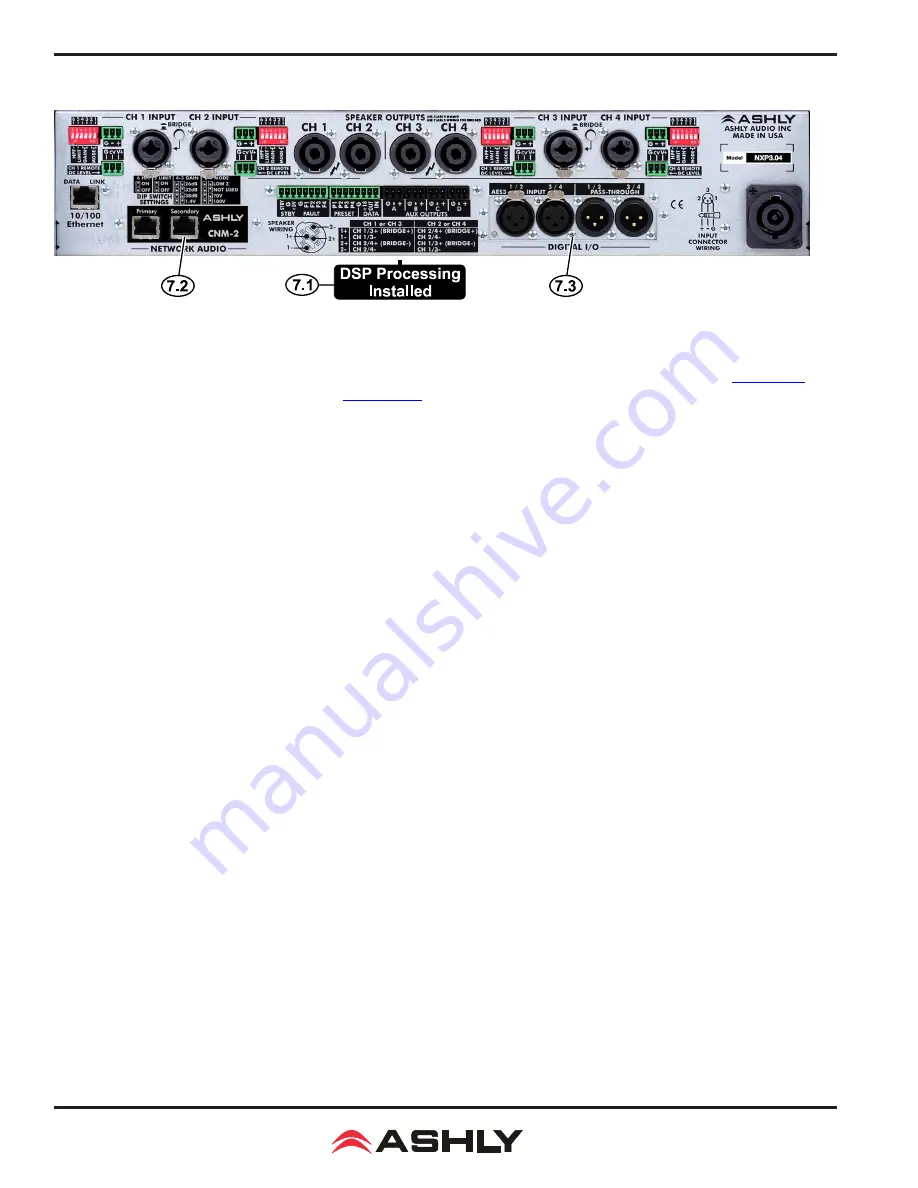
7 nXp SERIES REAR PANEL FEATURES
*The following nXp features are in addition to all of standard features found in nX and nXe series amplifiers:
7.1 Installed DSP
- Factory installed DSP allows for comprehensive signal processing of amplifier signals (
)
as well as loudspeaker load impedance analysis
7.2 Network Audio
- CobraNet or Dante network audio modules can be factory installed in nXe or nXp models.
7.3 AES3 Digital Audio I/O
- AES3 digital audio module can be factory installed in nXe or nXp models.
8 ETHERNET COMMUNICATIONS
(nXe and nXp models only)
Ethernet communication is made by connecting the amplifier directly to a PC running Protea
ne
software or connecting through a network router,
switch, hub, or patch panel using Cat-5, Cat-5e, or Cat-6 wiring. Maximum Ethernet cable distance is 100 meters (328 ft). Ashly nXe and
nXp amplifiers will adapt to either a straight through pin to pin or crossover Ethernet cable.
For wireless iPad control using a custom "Ashly
Remote" user interface, the iPad must be connected to a wireless access point that is connected to the same network (subnet) as the amplifier.
8.1 IP Address
- There is no need to assign an IP address to nXe amplifiers. The router or Link Local Addressing will assign
IP addresses to each device automatically.
When a router is not available, each amplifier will acquire it's own IP address based on Link Local Addressing. This allows the
device to operate without the need to set up static IP address. If the only option is to use an Ethernet switch instead of a router,
and communications problems remain which cannot be solved with the use of the link local standard, each device can have
a static IP address assigned from within Protea
ne
software. This is done by selecting “Manual Configuration” in the Network
Properties tab of each device, where the system/network administrator must assign each product its’ own unique static IP ad
-
dress, each with the appropriate sub net if applicable.
8.2 Firewalls
-
If Protea
ne
software does not detect the amplifier or show real time changes, the firewall in the host PC may need to
have Protea
ne
software added to its firewall exceptions, since firewalls may block the amplifier response to the PC. The current PC firewall
status is found by clicking on the Windows Start button, then Control Panel, then double clicking on the security shield where firewall
exceptions are configured.
8.3 Wi-Fi and LAN
–
For the initial device auto-configuration process, any secondary Wi-Fi connection should be disabled on
the PC, and the LAN (Local Area Network) connection must be enabled on the PC. Secondary network connections may confuse the
auto device discovery process. Go to the Windows Control Panel, then Network Connections, to disable any secondary network con
-
nections. Once communications with the device is established, secondary network connections can be enabled again.
8.4 Connecting Device(s)
- Connect the Ethernet cable from the PC or network to the amplifier. If a successful Ethernet
connection has been made, a solid green LED (Link) lights up on the amplifier's RJ-45 Ethernet port. If there is no green LED
showing, there is either a problem with the cable or the network source which must be addressed before proceeding further. All
RJ-45 Ethernet ports flash green when active, so backtrack through any other cables, routers, or switches to find the problem.
The flashing yellow LED (Data) indicates that data is flowing to or from the amplifier.


