-18-
GASKETING
It is recommended that you change the door gasket (which makes your stove door air tight) once a year, in
order to insure good control over the combustion, maximum efficiency and security. To change the door gasket,
simply remove the damaged one. Carefully clean the available gasket groove, apply a high temperature
silicone sold for this purpose, and install the new gasket. You may light up your stove again approximately 24
hours after having completed this operation. This unit’s door uses a 1/2” diameter rope gasket.
AIR TUBES
The air tubes assembled in this unit are designed to provide an accurate mix of secondary air to insure the
highest efficiency. Any damage or deterioration of these tubes may reduce the efficiency of combustion. The
air tubes are held in position by either screws or snap pins. Locate these to either side of the tube and remove to
allow the tube to be removed and replaced.
PAINT
Remember to only clean your stove with a dry soft cloth that will not harm the stoves finish.
Your stove has two types of coatings that are used in the final finish; porcelain enamel and high temperature
stove paint.
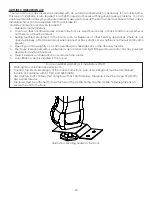
ENAMEL REPAIR
The porcelain enamel finish will maintain its color and luster for the life of the stove. However, because it is glass
it may chip if hit with a hard or sharp object. If you experience a scratch or chip in the porcelain enamel finish,
specially formulated gloss touch up paint can be used. Contact you stove dealer to request a small bottle of this
touch up paint.
1. Ensure the stove is cool.
Note: The paint may be applied to a warm stove, but the temperature of the section to be painted should be
below the boiling temperature
2.
(200°F) to achieve a smooth finish.
3. The area should be built up with multiple thin coats.
Note: Better results are obtained if the stove is brought up to operational temperatures between coats.
HIGH TEMPERATURE STOVE PAINT REPAIR
If the painted portions of your stove need re coating it is possible to give those pieces a brand new look by
repainting it with a 1200°F heat resistant stove paint.
1.
Scrub the surface to be repainted with fine sand paper.
2. Clean it properly.
3. Apply thin coats (2-3) of paint successively.
AIR TUBES
The air tubes assembled in this unit are designed to provide an accurate mix of secondary air to insure the
highest efficiency. Any damage or deterioration of these tubes may reduce the efficiency of combustion. The
air tubes are held in position by either screws or snap pins. Locate these to either side of the tube and remove to
allow the tube to be removed and replaced.
During the curing process there are changes in the paint causing it to give off an odor and some visible
smoke. The fumes are non-toxic, but can be unpleasant. Ventilate and vacate the room to avoid discomfort.
Once the curing is complete there will be no odor or smoke. After re-coating portions of your stove
remember to follow the curing process as discussed in the first fire section of this manual.
CAUTION: This wood heater needs periodic inspection and repair for proper operation. It is against federal
regulations to operate this wood heater in a manner inconsistent with operating instructions in this manual.
WARNING:
• Never operate the stove without a gasket or with a broken one. Damage to the stove or even house fire
may result.
Summary of Contents for AWC31
Page 24: ... 24 NOTES ...

