ASA Electronics iN-Command NCSP3 Installation And Operation Manual Download Page 28

NCSP3

27

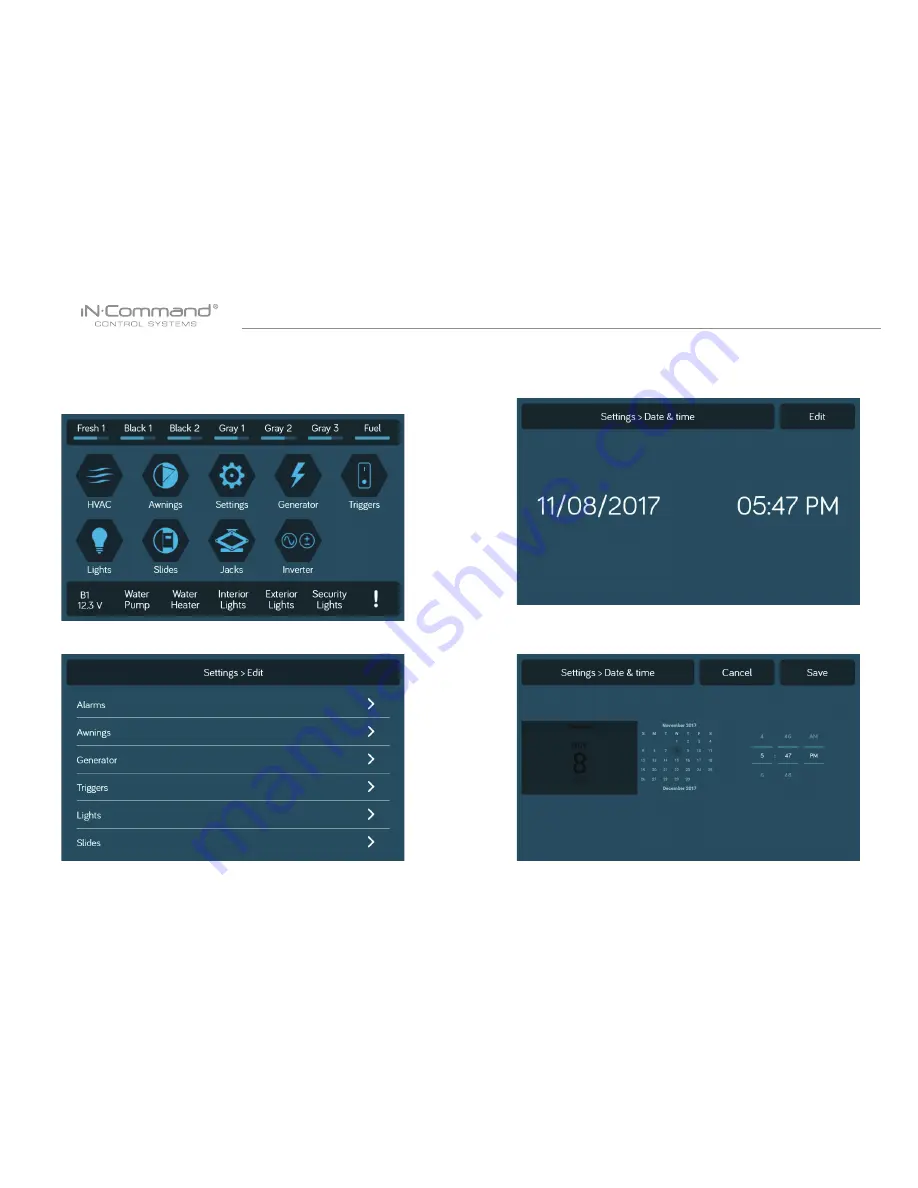
The Date & Time feature is used for the Generator and HVAC 

scheduling functions.

1. Select "Settings".

• Date & Time

2. Press Date & Time.

3. In the Date & Time page, press the "Edit" tab to adjust the date 

    and time.

4. Use the Calendar to select the Date and the Clock to change the  

    time. Press Save.

Summary of Contents for iN-Command NCSP3

Page 1: ...RV CONTROL AND MONITORING SYSTEM Patent D776 068 Patent D762 644 Patent US 9 679 735 NCSP3 Installation and Operation Manual...

Page 2: ......

Page 3: ...njury or property damage Operate only when you have a clear line of sight Do not operate any moving parts including but not limited to awnings jacks and slides unless you have a clear line of sight to...

Page 4: ...ROTECTION 11 SETTINGS 11 Text Editing 11 Scroll List Editing 13 Triggers 14 Generator Fuel 14 Alarm Inputs 14 Passcode 14 Set Passcode Timer 15 Change Passcode 16 Clear Passcode 16 MOBILE DEVICES 17 P...

Page 5: ...and Hydraulic Slides Control Jacks non automatic function 4 Programmable Auxiliary 12V Triggers 4 Alarm Inputs 12V Monitor Battery Voltage with Low Voltage Alert Auto Generator Start Precautions Use t...

Page 6: ...lecting the Mounting Location Select a mounting location taking care to avoid the following Places exposed to heat radiating appliances such as electric heaters Adjacent to other equipment that radiat...

Page 7: ...NCSP3 6 WIRING The wiring diagram depicts all the wiring connections required for proper operation of the unit BODY CONTROL MODULE BCM CONNECTIONS...

Page 8: ...Stop time Awings Awning Light No Yes Awning 1 In Out Awning 2 In Out Slides Hydraulic In Out Slide 1 In Out Slide 2 In Out Slide 3 In Out Slide 4 In Out Slide 5 In Out Lights Light Group 1 No Yes Lig...

Page 9: ...ed the iN Command will lock down all motorized functions The Display Commander DC and mobile devices will also display Travel Lock Engaged and the affected buttons will cease to activate The lights wa...

Page 10: ...s The right switch controls the slides To use the override switches locate the switch needed to actuate the desired component Rotate the switch underneath the rocker switch to select the motor Press u...

Page 11: ...ter must be installed to provide a separation distance of at least 20 cm from all persons and must not be co located or operating in conjunction with any other antenna or transmitter No change to the...

Page 12: ...erties from momentary to latch See the status of iN Command Connect devices with Bluetooth Change the passcode Reset the floor plan Control the brightness of the DC screen View IN Command s Legal docu...

Page 13: ...oard to edit the name then press Save 2 Press Edit to enter Edit page 3 Select the function to edit Note Editing the text on the DC will not change the text on a device s App 4 Long press the intended...

Page 14: ...NCSP3 13 3 Select the funcition to edit 2 Press Edit to enter Edit page Scroll List Editing 1 Select Settings 4 Use the Up and Down arrows next to the function to move the item in the list...

Page 15: ...d devices need to be correctly wired to the BCM to function Triggers In the Generator Page Gasoline or Propane can be selected for the fuel type Generator Fuel Alarm inputs can added to the system Not...

Page 16: ...asscode to enter passcode setup 2 1 Enter the correct passcode to proceed 3 The passcode setup window will open Set Passcode Timer Press Set Timer select the idle time to activate the passcode protect...

Page 17: ...e to clear the passcode This will restart the App take the user to the End User License Agreement and have the user setup a new passcode 1 Press the Change Passcode button to change to a new passcode...

Page 18: ...paired to iN Command at one time but only 1 iOS and 3 Android devices are able to be actively paired meaning 3 Android devices and 1 iOS device can all actively control the iN Command functions To use...

Page 19: ...obile Device to DC 1 Enable Bluetooth in the system settings of the mobile device 2 From the DC Home page select Settings 2 1 Select the Bluetooth tab 2 2 Select Pairing to pair devices and view curre...

Page 20: ...obile device in the Unpaired Device list Select the device by pressing it 2 4 A Popup with the device name will apear on the display Pass Pair 2 5 A Bluetooth Pairing request will appear on the DC and...

Page 21: ...isplayed in the Paired Devcies list on the DC 2 9 The DC will be displayed on the mobile device list in the format JENSENDCXXXXX Press the DC on the mobile device to connect with it 2 10 The mobile de...

Page 22: ...NCSP3 21 4 Reset Floor Plan Press the Reset button in the Menu page to load the floor plan configuration from the DC The current settings will be lost replaced...

Page 23: ...page shows information of current active Bluetooth devices To disconnect a handheld device press Disconnect or simply shut down the device s App This function is used to disconnect a device that is no...

Page 24: ...ge the fan speed and change the flow 1 Select the desired Zone Press the Mode button to switch to Cool mode 2 Use the Set up and down arrows to set the desired temperature for the zone 3 Press the Fan...

Page 25: ...button to switch between Off Low High and Auto Off is not available in Electric Heat Source Auto Mode will automatically switch between Cool and Heat modes to reach the desired Set temperature Heat M...

Page 26: ...bottom right corner of the HVAC home screen to enter the Schedule page HVAC Schedule AUTO GENERATOR START 1 Press the Generator icon 2 Press the Manual button to switch to Auto and activate Auto Gen...

Page 27: ...mes If it fails to start after the third attempt the system will turn off the Auto feature and display a Check Generator fault 4 If the generator is started the system will run the generator for 60 mi...

Page 28: ...the Generator and HVAC scheduling functions 1 Select Settings Date Time 2 Press Date Time 3 In the Date Time page press the Edit tab to adjust the date and time 4 Use the Calendar to select the Date a...

Page 29: ...nd BCM Versions Software updates include floorplan redesigns and App version updates The system will look for specific file names for software updates File name NCSP3 DC VXXXX zip DC OS update xxxx is...

Page 30: ...NCSP3 29 7 Framework Update Press Update 8 Press OK to continue 6 Press the DC Version to update the DC OS sytem Press UPDATE 9 Press the BCM Version to update the BCM system Press Updae...

Page 31: ...lan to select a floor plan Press Load to select the floor plan If a software update is needed go to http www asaelectronics com in command If there is a software issue Call ASA Electronics Technical S...

Page 32: ...ct System Reset in the Settings page 3 Select on of the two options Floor Plan of Factory to restore to a previous state Current settings will be lost a Floor Plan restores to previous floor plan sett...

Page 33: ...32 TOUCH SCREEN CALIBRATION 1 Select Settings 2 Select Calibartion 3 To calibrate the Touch Screen select Set Follow the instructions The DC will restart after calibration 4 Touch the center of the c...

Page 34: ...nks to set resistor reference value for every tank SYSTEM CALIBRATION From the admin page the App Date can be deleted the Generator Hour Meter can be set and the Water Tanks can be calibrated 1 From t...

Page 35: ...g and troubleshooting purposes Should there be a calibration issue call ASA Electronics Technical Support at 1 877 845 8750 or email them at info asaelectronics com 8 Press the App Date Delete button...

Page 36: ...of the DC Shut off all power to the DC and BCM Reconnect power wires to the DC Return power to the DC and BCM Press Rest button on the BCM Awnings do not move Check for 12VDC on Pin 88 Ensure the rela...

Page 37: ...NCSP3...

Page 38: ...NCSP3...

Page 39: ......

Page 40: ...www jensenrvdirect com 2016 ASA Electronics LLC MA 1705001 1R...

Reviews: