Aruba Instant On AP25 Installation Manual Download Page 5

Aruba Instant On AP25 Access Point 

| Installation Guide

5

The following sections provide instructions on how to use this mount bracket.

Installing the Access Point to a Ceiling Rail

1. Pull the necessary cables through a prepared hole in the ceiling tile near where the access point will be 

placed.

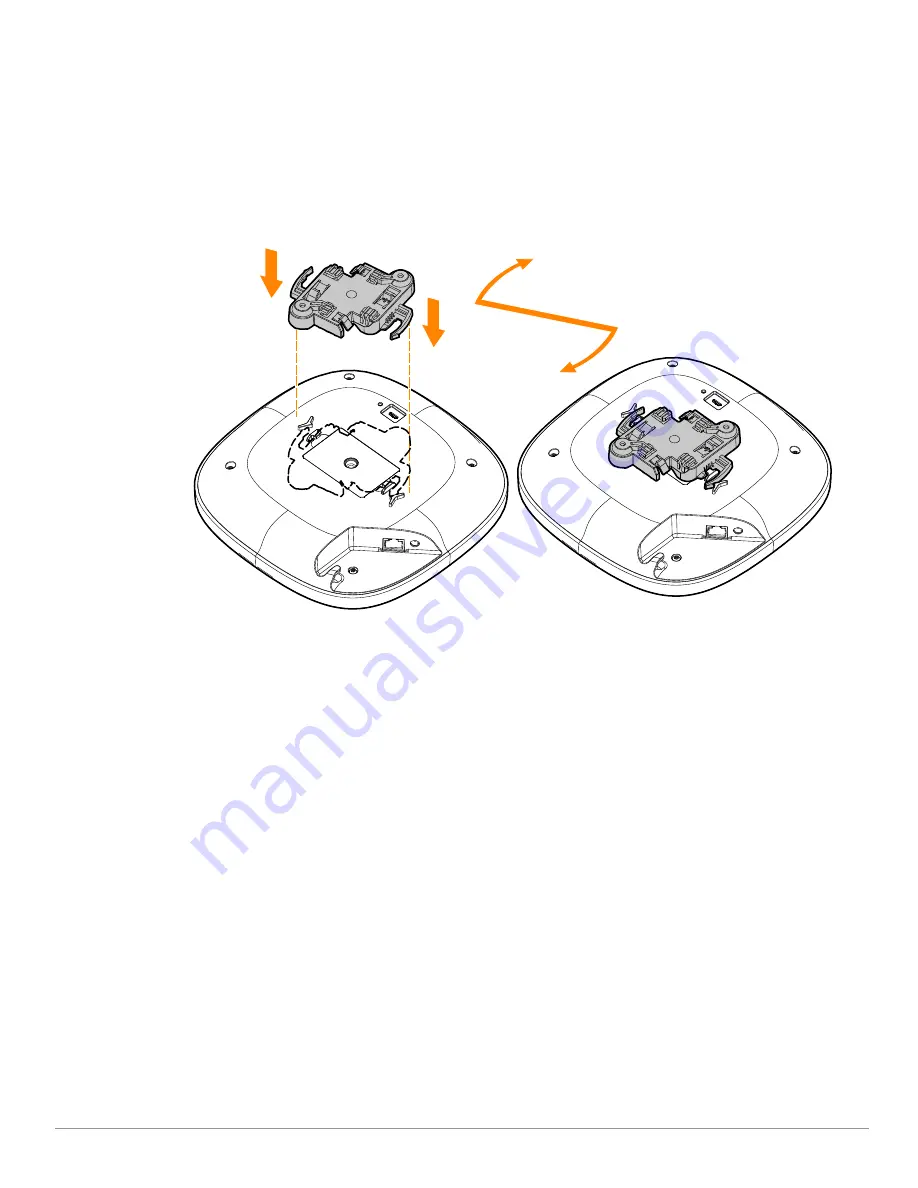
2. Place the mount bracket against the back of the access point with the mount bracket at an angle of 

approximately 30 degrees to the tabs (see 

Figure 4

).

3. Twist the mount bracket clockwise until it snaps into place in the tabs (see 

Figure 4

).

Figure 4  

Attaching the Mount Bracket to the AP

4. Hold the access point next to the ceiling rail with the mounting tabs of the mount bracket at approximately a 

30-degree angle to the ceiling rail (see 

Figure 5

 and 

Figure 6

). Make sure that any cable slack is above the 

ceiling tile.

5. Pushing toward the ceiling rail, rotate the access point clockwise until the device clicks into place on the 

ceiling rail.

Summary of Contents for Instant On AP25

Page 1: ...ices Package Contents 1 x AP25 access point 1 x Wall Ceiling mount bracket 1 x Ethernet cable Hardware Overview Figure 1 AP25 Front View If you have ordered AP25 bundle the package would also include...

Page 2: ...ector or a network switch Kensington Lock Slot The AP25 access point is equipped with a Kensington lock slot for additional security Table 1 AP25 Access Point LEDs Status LED Color State Meaning Syste...

Page 3: ...hile the reset button is being held down 3 Release the reset button on the access point after 15 seconds Power If PoE is not available a proprietary Aruba power adapter can be used to power the AP25 a...

Page 4: ...eating ducts Make sure that access points are placed below ducts to avoid RF disturbances RF interference sources include Microwave ovens and other 2 4 or 5 GHz objects such as cordless phones Cordles...

Page 5: ...mount bracket at an angle of approximately 30 degrees to the tabs see Figure 4 3 Twist the mount bracket clockwise until it snaps into place in the tabs see Figure 4 Figure 4 Attaching the Mount Brack...

Page 6: ...g Rail Installing the Access Point to a Solid Surface 1 Attach the mount bracket to any solid surface such as a wall or hard ceiling as shown in Figure 7 a Install any necessary wall anchors Wall anch...

Page 7: ...tach the access point to the secured mount bracket as shown in Figure 8 a Align the access point with the mount bracket placing the access point so that it s mounting tabs are at an angle of approxima...

Page 8: ...n screen In the login screen enter your Instant On account credentials to access your site Electrical and Environmental Specifications Electrical Ethernet E0 port 100 1000 2500BaseT auto sensing MDI M...

Page 9: ...duce potential radio interference the type of antenna and its gain shall be chosen so that the equivalent isotropic radiated power EIRP does not exceed the values necessary for effective communication...

Page 10: ...Latvia LV Liechtenstein LI Lithuania LT Luxembourg LU Malta MT Netherlands NL Norway NO Poland PL Portugal PT Romania RO Slovakia SK Slovenia SL Spain ES Sweden SE Switzerland CH Turkey TR United Kin...

Page 11: ...este equipo o dispositivo debeaceptar cualquier interferencia incluyendo la que pueda causar su operaci n no deseada Morocco Russia HPE Russia 125171 16 3 7 499 403 4248 7 499 403 4677 HPE Kazakhstan...

Page 12: ...pment type APIN0515 is in compliance with Ukrainian Technical Regulation on Radio Equipment approved by resolution of the CABINET OF MINISTERS OF UKRAINE dated May 24 2017 No 355 The full text of the...

Page 13: ...ears following the date of the final distribution of this product version by Hewlett Packard Enterprise Company To obtain such source code send a check or money order in the amount of US 10 00 to Hewl...

Reviews: