background image

Arturia Microbrute User’s Manual 


46 


6 Rear panel  


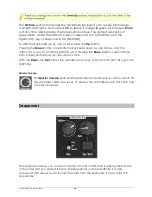
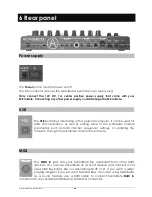
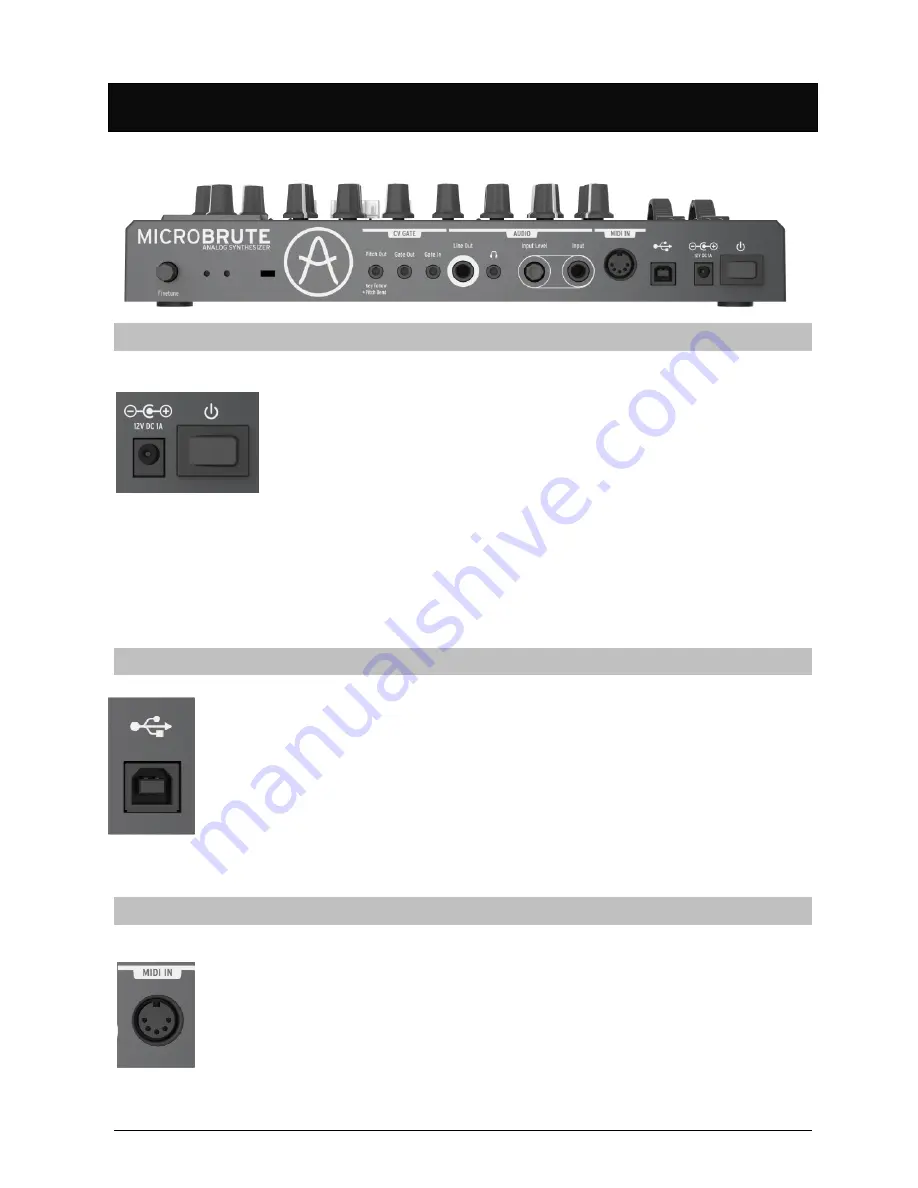
Power supply  


The 

Power 

button turns the power on/off.  

The DC connector receives the MicroBrute’s external power supply plug.  

Only  connect  the  12V  DC,  1A,  center  positive  power  supply  that  came  with  your 
MicroBrute. Connecting any other power supply could damage the MicroBrute. 


USB  


The 

USB 

port allows interfacing with a personal computer. It can be used for 

MIDI  communication,  as  well  as  editing  some  of  the  synthesizer  internal 
parameters  such  as  MIDI  channel,  sequencer  settings,  or  updating  the 
firmware, through the MicroBrute Connection software. 


MIDI  


The 

MIDI  In 

jack  lets  your  MicroBrute  be  controlled  from  other  MIDI 

devices. You can use MicroBrute as a sound module and connect a full 
sized MIDI Keyboard, like our Arturia Keylab 49 or 61, if you want a wider 
playing range or if you just want full sized keys. If you are using MicroBrute 
as  a  sound  module,  use  a  MIDI  cable  to  connect  MicroBrute 

MIDI  In 

connector to


your external MIDI device’s MIDI Out connector.  

Summary of Contents for Microbrute

Page 1: ...Arturia Microbrute User s Manual 1 USER S MANUAL...

Page 2: ...ontained in this manual is subject to change without notice and does not represent a commitment on behalf of ARTURIA The hardware unit and the software product described in this manual are provided un...

Page 3: ...VELOPE TO VCA 20 Introducing The LFO 21 Introducing the Mod Matrix 22 Introducing The Sequencer 23 Recording A Basic Pattern 23 Inserting Rests 23 Moving On 24 4 Synthesis Basics 25 Analog synthesizer...

Page 4: ...nt 39 Rate 39 Sync 39 LFO Settings via the MicroBrute Editor 39 Mod Wheel 40 Mod to Cutoff 40 Mod to LFO Amt 40 Glide 40 Mod Matrix 41 Modulations Sources 41 Modulation Destinations 41 General Control...

Page 5: ...classic for anyone from the first time synth buyer to the experienced pro with a studio full of gear Since the late 1990s ARTURIA has received acclaim from players and reviewers alike for designing s...

Page 6: ...analog circuit designer and synthesizer enthusiast whose work spans three decades Besides being a talented researcher in bio molecular microscopy his clones of the Moog modules as well as ARP or EMS...

Page 7: ...e of wired friends Combining ARTURIA s acclaimed savoir faire in designing innovative musical instruments and Yves deep knowledge and experience both the MiniBrute and MicroBrute analog synthesizers h...

Page 8: ...tions than many synthesizers in the 1000 price range The multimode Steiner Parker filter is the same design that is found on the MiniBrute The inventor Nyle Steiner himself looked over our design and...

Page 9: ...y components please observe all safety markings and instructions that accompany the accessory products SPECIFICATIONS SUBJECT TO CHANGE The information contained in this manual is believed to be corre...

Page 10: ...position where it might accidentally fall over Do not place heavy objects on the instrument Do not block openings or vents of the instrument these locations are used for ventilation to prevent the ins...

Page 11: ...o not have an account create a new one Once you have your account and are logged in go to the section My Registered Products and add the MicroBrute synthesizer by entering its serial number as printed...

Page 12: ...oBrute synthesizer s connectors Audio Input Outputs 6 35 mm 1 4 mono jacks Headphone Output 3 5 mm 1 8 miniature stereo jack CV Gate 3 5 mm 1 8 miniature mono jacks MIDI Input Standard MIDI DIN 5 USB...

Page 13: ...result in shorter times Once the synthesizer has reached its running temperature tune it to pitch Use an external tuner to check the instruments tuning if needed tweak the Fine Tune knob on the rear...

Page 14: ...ure 1 Switch on your MicroBrute there will be about a 5 10 second time with no sound Once it is booted up let it warm up to stabilize the pitch You can of course use it before it is warmed up but the...

Page 15: ...even darker now Turn the Triangle Wave down and turn up the Overtone level and listen to it More Oscillator options The knobs directly above each of the waveform level knobs adjust aspects of the sou...

Page 16: ...affecting the sound of the OSCILLATOR at all In LOW PASS mode having the CUTOFF knob in the full clockwise setting means that all frequencies will pass through it See Figure 3 Figure 3 With the BASIC...

Page 17: ...es the frequencies that the CUTOFF is set to If you reset your filter controls to the BASIC PATCH settings we can do some sonic experiments to see how this affects the sound Play a sound and turn the...

Page 18: ...rol will vary the pitch that you hear See Figure 8 Be careful as it can result in some high volume sounds coming out Figure 8 Brute Factor The BRUTE FACTOR control can add some subtle grunge to warm u...

Page 19: ...oving SUSTAIN to the minimum setting and the DECAY slider to the maximum setting To have the ENVELOPE affect the FILTER CUTOFF you need to turn up the ENV Amt knob in the FILTER section The ENV Amt kn...

Page 20: ...settings are at the minimum settings you will hear the same thing that you would hear with the VCA set to GATE Now let s shape the sound s amplification envelope which determines how the level change...

Page 21: ...th the BASIC PATCH the LFO s output amount is routed through the MOD WHEEL Play a note and increase the MOD WHEEL and you will hear the pitch start to wobble To have the LFO bypass the MOD WHEEL set t...

Page 22: ...from the jack labeled LFO to the jack labeled FILTER Now when you increase the MOD WHEEL the LFO will change the FILTER CUTOFF You will need to turn the CUTOFF knob down to hear the effect As you can...

Page 23: ...ying notes it will erase the sequence that is in the currently selected memory When you are finished move the PLAY MODE switch back to OFF To play a sequence just move the PLAY MODE switch to PLAY and...

Page 24: ...editor These features are described in detail in the separate MicroBrute Connection manual Moving On If you have followed all the steps of this Quick Start you should be fairly familiar with how to m...

Page 25: ...or all of the following basic waveforms sine wave triangular wave sawtooth wave square and pulse waves Figure 18 The different waveform shapes have different timbres For example the sine wave sounds...

Page 26: ...ntrol sources that affect the pitch Signal Modifiers Signal modifiers or wave shapers transform shape or distort the oscillator s basic signal to change their harmonic content The MicroBrute provides...

Page 27: ...rolled by the LFO ENVELOPE or KEYBOARD CV OUT by patching it in the MOD MATRIX Figure 21 The Metalizer takes the basic triangular waveform and warps folds it to create very complex jagged waveforms th...

Page 28: ...pass filter or a high pass filter In low pass mode the spectral contents below a given cutoff frequency set with the CUTOFF knob remain unchanged while harmonics above the cutoff frequency are attenua...

Page 29: ...ng it with other devices like a keyboard keyboard tracking an LFO or envelope generator creates dynamically changing and interesting timbres Resonance or emphasis Figure 26 Resonance is a filter s abi...

Page 30: ...behavior of oscillators wave shapers filters and amplifiers For example when you sing with vibrato you are modulating your voice with a low frequency change in pitch typically around 5Hz or so The tre...

Page 31: ...keyboard a sequencer or the Gate input Pressing down a key or sending a gate signal provides an evolving signal with four different stages The ATTACK DECAY SUSTAIN and RELEASE The attack stage determ...

Page 32: ...namics of your playing and can modulate multiple parameters The MicroBrute will send velocity as a USB controller It does not have internal velocity routing and does not respond to velocity however Tr...

Page 33: ...only the saw signal is audible Turning this knob clockwise mixes more Ultrasaw sound in with the plain saw signal The Ultrasaw consists of two copies of the plain saw these can be modulated by patchi...

Page 34: ...usted with the ENV Amt knob in the envelope section The Overtone oscillator The Overtone oscillator level is controlled with the knob labeled Overtone Turning it down completely mutes the signal and m...

Page 35: ...eviously LP BP HP The cutoff can be controlled by the keyboard the Envelope the LFO via the mod matrix and the mod wheel The MicroBrute filter is based on Nyle Steiner s Sallen Key architecture design...

Page 36: ...p the knob gradually adds distortion to the sound For low Brute Factor settings the distortion is smooth and gentle but becomes harsher as you turn up the knob When turned up above about 75 of the way...

Page 37: ...ally triggered by the keyboard GATE signal It can also be triggered by other GATE sources such as the Sequencer or the rear panel s external GATE IN jack The required gate signal at the back panel is...

Page 38: ...r The Release slider sets the duration of the envelope s final stage that takes place after you release a key or once the GATE signal goes low Depending on the filter section s ENV Speed switch the Re...

Page 39: ...coming or Seq clock These sync d rates are 4 measures 2 measures 1 measure note note The Rate and the LFO sync can be set within the MicroBrute Editor In the editor you can set whether the LFO is Free...

Page 40: ...l controls the LFO modulation signal level When it is at its minimum position Min the modulation destinations receive no LFO signal The control also works in conjunction with the LFO Amount knob in th...

Page 41: ...hat can control external synthesizers or be patched to Modulation Destinations within the MicroBrute Modulation Destinations The jacks under the CV In section are all inputs These can also be called M...

Page 42: ...also be used as a fully polyphonic MIDI controller for other devices via the rear panel USB jack Wheels The MicroBrute features the two classic control wheels The Pitch wheel position defaults to the...

Page 43: ...by one octave and the leftmost C is now C1 and the rightmost is C3 Pressing the Down button a second time shifts the keyboard down by one more octave With the Down and Up buttons the MicroBrute can p...

Page 44: ...then you have written over the current sequence Rate The Rate knob sets the sequencer s clock rate from 30 bpm to 260 bpm The red LED under the knob blinks in sync with the tempo beat Internal Sync W...

Page 45: ...by tapping the button in real time The number of taps that get averaged to calculate the tempo can be set using the MicroBrute Editor software Rest The Tap Tempo button will act as a rest input when...

Page 46: ...I communication as well as editing some of the synthesizer internal parameters such as MIDI channel sequencer settings or updating the firmware through the MicroBrute Connection software MIDI The MIDI...

Page 47: ...ult tuning i e A 440Hz when you play the second rightmost A of the keyboard and the default Octave is selected The full range of the Fine Tuning knob is from about 2 semitones to 2 semitones The Fine...

Page 48: ...rd as well as by the Pitch wheel The keyboard s GATE signal is also available on the Gate Out 1 4 jack The Gate is a standard positive going 0 5V gate The CV inputs and outputs are standard 1V per oct...

Page 49: ...another product use only high quality shielded cables Cable s supplied with this product MUST be used Follow all installation instructions Failure to follow instructions could void your FFC authoriza...

Page 50: ...ot locate the appropriate retailer please contact ARTURIA The above statements apply ONLY to those products distributed in the USA Canada NOTICE This class B digital apparatus meets all the requiremen...

Reviews: