background image

• Word Clock
• S/PDIF
• ADAT

When external clock is chosen as master clock, internal clock must be set as the same or

"multiple or divided" rate sample rate.

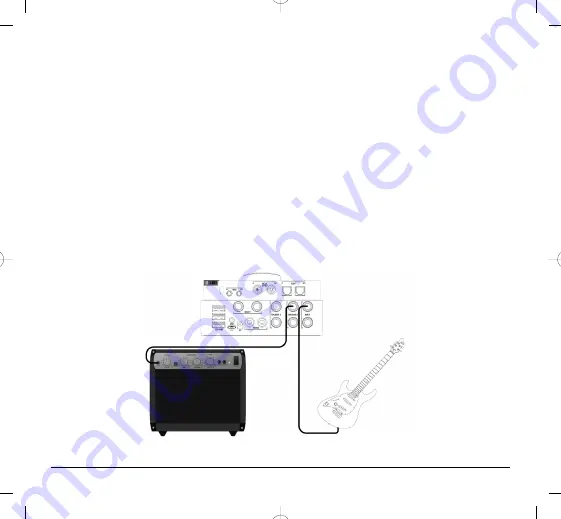
3.7. Re-Amping

AudioFuse has a great Re-Amping function. Re-Amping is also called reverse D-I and is used

to play a direct guitar track in an amplifier. You can now re-record the amplified sound.

For this, you need a track with a direct guitar sound.

You activate the Re-Amping function in the AudioFuse Control Center, by pressing "FROM

PHONE 2" switch and then "REAMPING" switch. You can also press "GROUND LIFT" switch if

needed. See Audiofuse Control Center online manual for more details.

29

Arturia - User Manual AudioFuse - Getting started

Summary of Contents for AUDIOFUSE STUDIO

Page 1: ...USER MANUAL...

Page 2: ...al is subject to change without notice and does not represent a commitment on the part of Arturia The software described in this manual is provided under the terms of a license agreement or non disclo...

Page 3: ...high end analog studio consoles with the flexibility of a solid mobile interface with all the connectivity you need for any recording or performance AudioFuse comes with very high quality audio pre a...

Page 4: ...vice Do not block openings or vents of the device these locations are used for air circulation to prevent the device from overheating Do not place the device near a heat vent at any location with poor...

Page 5: ...rs may be able to produce sound levels that could cause permanent hearing loss DO NOT operate for long periods of time at a high level or at a level that is uncomfortable If you encounter any hearing...

Page 6: ...ation 28 3 7 Re Amping 29 3 8 Talkback 30 3 9 MIDI Interface 30 3 10 The AudioFuse Control Center 31 3 11 The AudioFuse switch 32 4 How to use the AudioFuse 33 4 1 Using an external effect on inputs 1...

Page 7: ...de DiscretePro certificate DiscretePRO certificate Your AudioFuse comes with 2 pre amplifiers using the DiscretePRO technology to ensure the best audio quality when recording Your AudioFuse is unique...

Page 8: ...r product on www arturia com register with your registration card Important Go to www arturia com audiofuse start to register your product check for the latest firmware download the user guide and the...

Page 9: ...t 3 port USB hub 2 microphone preamps 24 bit latest generation AD DA converters at up to 192kHz sampling rate 2 phono RIAA preamps Talkback feature with a dedicated built in microphone A B speaker swi...

Page 10: ...el 24dBu Microphone Preamps Input Impedance 4k ohms Equivalent Input Noise EIN 72dB gain 129 3dBu A weighted Frequency Response 20Hz 20kHz 0 08dB Gain Range 3dB to 72dB Inserts Output Impedance 35 ohm...

Page 11: ...dance 35 ohms Max Output Level 24dBu Dynamic Range 119dB A weighted THD N 95dB A weighted Clocks Supported Frequency Rates 44 1 kHz 48 kHz 88 2 kHz 96 kHz 176 4 kHz 192 kHz Arturia User Manual AudioFu...

Page 12: ...n Out Connect any MIDI instrument or equipment 3 WordClock S PDIF In Out Sync to any Word Clock equipment or connect to any S PDIF digital audio device 4 ADAT In Out Connect to any ADAT equipment with...

Page 13: ...ofuse to tablets and phones 7 Phono Line inputs 3 4 Connect external phono or line devices to these RCA ground and balanced 1 4 inputs 8 Speaker outputs A B Connect two pairs of speakers to these bala...

Page 14: ...trol sections 1 2 Direct access to each feature of analog inputs 1 2 input gain with vu metering true 48V phase invert 20dB pad boost option for MIC signals and instrument mode 9 Arturia User Manual A...

Page 15: ...the recorded signals and blend them into your mix 13 Phones control sections 1 2 Direct access to each of the features of Phones 1 2 outputs output level mono mode and audio mix selection 14 Talkback...

Page 16: ...es instruments or line devices to the 2 XLR balanced 1 4 combo inputs 16 Phones output channels 1 2 Don t bother looking for a 1 4 or 1 8 phones adapter AudioFuse has both connectors for each phones o...

Page 17: ...extend your laptop computer or phone s battery life DC Powered Bus Powered Low Power Number of Analog Input 4 4 0 Number of Analog Output 4 4 2 Max Input Level 24dBu 18dBu Max Output Level 24dBu 18dB...

Page 18: ...ur AudioFuse to the USB Port your AudioFuse simply show up in Audio MIDI Setup immediately To set it up as your default device Select it in the Audio MIDI Settings left panel Then select set as defaul...

Page 19: ...turia com audiofuse start Once this is installed simply connect AudioFuse to the USB ports using the provided double USB cable it will automatically appear in your audio devices Open Manage Audio Devi...

Page 20: ...a camera connection kit The device will appear in Settings General About AudioFuse For more info on the compatibility look on www arturia com audiofuse start 3 2 5 Set up on Android Connect AudioFuse...

Page 21: ...connected pressing PAD switch one time will add a boost to your mic signal Pressing it a second time will apply a 20db pad to your mic signal INST to switch from LINE to INST level and impedance GAIN...

Page 22: ...Note on Phantom Power The phantom power is rated 14 mA per channel Input channel 1 2 path 17 Arturia User Manual AudioFuse Getting started...

Page 23: ...DiscretePRO pre amplifiers of inputs 1 2 When not used these connectors do not need to be patched Insert are working at line level 18 dBu for 0 dBFS Tip You could also send line level input signal dir...

Page 24: ...3 4 are selected A 20db pad can be activated in AudioFuse Control Center When using Line input you can switch input 3 to INST mode in Audiofuse Control Center Phono inputs can be activated from the Au...

Page 25: ...Input channel 3 4 path Arturia User Manual AudioFuse Getting started 20...

Page 26: ...3 4 Digital inputs AudioFuse provides up to 8 digital inputs on S PDIF or ADAT You can switch between ADAT and S PDIF using the AudioFuse Control Center 21 Arturia User Manual AudioFuse Getting starte...

Page 27: ...hones 1 Phones 2 Speaker A Speaker B On each of these you can listen to Main Cue 1 or Cue 2 buses by using the selectors available on the interface The Output Level section also features various setti...

Page 28: ...level The amount of level reduction is available in AudioFuse Control Center Mute Speaker A B selector to switch between 2 sets of speakers OUTPUT LEVEL output level knob A special feature allow to s...

Page 29: ...it to speaker B outputs By activating the Phone 2 to Speaker B function in the AudioFuse control Center you send the phone 2 signal to speaker B output In this case speaker A is automatically selecte...

Page 30: ...button to switch between them To add direct monitoring to the selected bus activate local monitoring on the output in the AudioFuse Control Center and turn the Direct Computer mix knob to adjust the q...

Page 31: ...Arturia User Manual AudioFuse Getting started 26...

Page 32: ...T IN 3 OUT 3 CUE 1 L Input 4 LINE PHONO IN 4 OUT 4 CUE 1 R Talkback MIC IN 5 OUT 5 CUE 2 L Talkback MIC IN 6 OUT 6 CUE 2 R ADAT 1 SPDIF L IN 7 OUT 7 ADAT 1 SPDIF L ADAT 2 SPDIF R IN 8 OUT 8 ADAT 2 SPD...

Page 33: ...IF Coax using the RCA inputs on the rear panel S PDIF optical using the ADAT IN optical connector ADAT using the ADAT IN optical connector 96kHz is the maximum samples rate clock for ADAT The internal...

Page 34: ...I and is used to play a direct guitar track in an amplifier You can now re record the amplified sound For this you need a track with a direct guitar sound You activate the Re Amping function in the A...

Page 35: ...be mixed into the physical outputs Speaker Phone 1 and Phone 2 The level of the talkback and the selected outputs can be set in the AudioFuse Control Center 3 9 MIDI Interface MIDI In and MIDI Out po...

Page 36: ...ns that are not directly accessible on the AudioFuse device These include Input 3 4 selection Change the Digital input setting Clock Synchronization settings Update the firmware version Change the Mon...

Page 37: ...3 11 The AudioFuse switch Pressing the Arturia switch will automatically wake up the AudioFuse Control Center on your computer Arturia User Manual AudioFuse Getting started 32...

Page 38: ...THE AUDIOFUSE 4 1 Using an external effect on inputs 1 and 2 with inserts Record your mic and process it using an external processing unit before recording 33 Arturia User Manual AudioFuse How to use...

Page 39: ...nes simply use the inputs 1 or 2 on the front 1 Connect your microphone with a XLR 2 The AudioFuse will auto detect that you are using a microphone input 3 Set your phantom power if needed and your ga...

Page 40: ...your instrument with a TRS jack or a standard tip sleeve jack 2 The AudioFuse will auto detect you are using either a line or instrument input press the Inst button of the input section to light the I...

Page 41: ...You can use 2 different sets of headphones and use each one to listen to a different mix Use the Main Cue bus selector above the Headphone plug to set which mix you want to listen to Arturia User Man...

Page 42: ...With the Speaker A Speaker B function on the AudioFuse you can easily switch the master output between 2 different sets of speakers This will allow for quick monitor referencing to check your mix 37...

Page 43: ...e AudioFuse to the computer 4 In the AudioFuse Control Center set the mix you want for your output 5 Set the Direct Monitor knob on the right of the AudioFuse to Direct Now you can unplug the computer...

Page 44: ...t give the product back to where you have purchased it including all written material the complete undamaged packing as well as the enclosed hardware immediately but at the latest within 30 days in re...

Page 45: ...pport purposes and for the verification of the upgrade or update right 5 No Unbundling The software usually contains a variety of different files which in its configuration ensure the complete functio...

Page 46: ...programs and accompanying materials are provided as is without warranty of any kind The complete risk as to the quality and performance of the programs is with you Should the program prove defective...

Page 47: ...ness profits business interruption loss of business information and the like even if Arturia was previously advised of the possibility of such damages Some states do not allow limitations on the lengt...

Page 48: ...ed and used according to the instructions found in the users manual may cause interferences harmful to the operation to other electronic devices Compliance with FCC regulations does not guarantee that...

Page 49: ...que de la classe B respecte toutes les exigences du R glement sur le mat riel brouilleur du Canada EUROPE This product complies with the requirements of European Directive 89 336 EEC This product may...

Reviews: