


2 of 6
This kit is designed to be mounted to flat
finished or most unfinished types of walls, with
adequate spacing to allow room for the Cam
Lever Latches to operate. The illustrations to
the right are for reference of various types of
installations.
It is the user’s responsibility to ensure that
installation of this product does not affect
integrity of the structure to which it is attached,
and that the structure is stable enough to hold
the Tool Bar and any of its accessories.
A minimum of 48 inches of unobstructed wall area
is recommended.
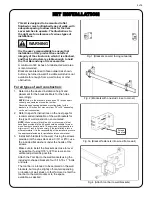
Brackets are intended to face outward as shown,
but may be turned inward if a viable wall stud is not
available far enough from a wall corner or other
obstruction.
For all types of wall construction:
1. Determine the desired installation height and
placement for the brackets. Mark for the holes
accordingly.
NOTE: Holes in the brackets are spaced 3.5 inches apart
vertically and centered around the tool bar.
Recommended spacing between mounting holes for the
brackets is 32 inches, but may vary from 24” to 36” depending
on the wall construction.
2. Refer to specific instructions on the next page for
recommended installation of the wall brackets for
the type of wall construction encountered.
NOTE: Wood screws (black) and concrete screws (blue)
have been provided in this kit and should be suitable for most
wood frame or concrete walls. These screws must penetrate a
minimum of 1 inch to hold securely. If the installation is into a
different material, it is the responsibility of the installer to procure
the appropriate fasteners for installation into such material.
3. Install both brackets to the wall. If using the screws
provided (or the equivalent size: 3/16” or #10), use
the included flat washers under the heads of the
screws.
Make sure to install the brackets as close to level
as possible. If using 3/16” or #10 screws, some
vertical adjustment is possible.
Attach the Tool Bar to the wall brackets using the
included U-shaped brackets, four 5/16-18 x 1” bolts
and nuts.
The tool bar is intended to be centered on the wall
brackets, but may be slightly off-center depending
on location of wall studs or other factors. Center the
tool bar to the wall mounts or to the space
available, as desired.
Fig. 1 (Brackets on wall, facing outwards)
Fig. 2 (Brackets with one stud close to corner)
Fig. 4 (Attach tool bar to wall brackets)
Fig. 3a (Bracket fasteners into wood frame wall)
KIT INSTALLATION
Screws
into stud
WARNING


