background image

10

11

CONTROLS 

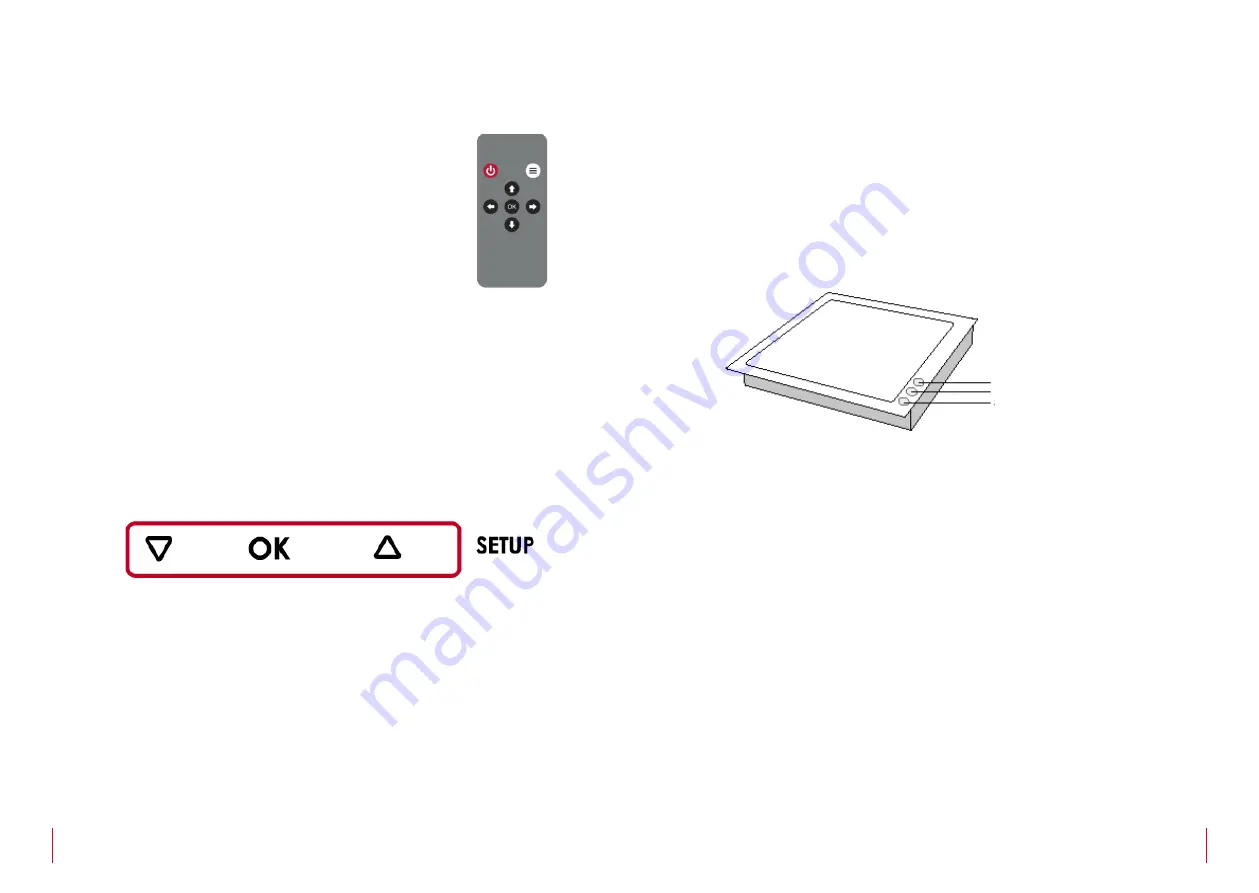
Remote control

POWER  

 Switch ON/OFF the monitor

MENU     

Activates the OSD menu on screen

UP  


 Cursor control up on the OSD menu

DOWN   

 Cursor control down on the OSD menu

LEFT  


 Cursor control left on the OSD menu

RIGHT    

 Cursor control right on the OSD menu

OK  


 Selects the function on the OSD menu. When the OSD 
menu is not active on screen, selects the input source

Monitor address

Below the monitor, there is a screen to set-up the monitor. Press the UP 
or DOWN buttons to change the function. Press the OK button to select 
the function. Change the parameter using the UP or DOWN buttons 
and press OK to save the changes.

AHNET ID 

Selects the number AHnet ID to RS422 to externally    


control the monitor

INPUT SELECT  Selects the input source signal (DVIA, DVI1 or DVI2)

BRIGHTNESS 

Configuration of the monitor brightness level

CONTRAST  

Configuration of the monitor contrast level

BACKLIGHT 

Configuration of the monitor backlight level

STATUS INFORMATION List of the monitor status to service

CONTROLS

IR sensor

The IR sensor is located on the lower right side of the screen.

Monitor movement controls

On the upper cover plate, there are three buttons to control the UP and 
DOWN monitor movements.

1.  Closing the monitor:

Press the top button (1) to completely fold the monitor. The monitor 
will slowly fold. To adjust the angle, permanent press this button 
(1) and release it when the screen is at the desired working angle. 
Please, make sure that there are no objects, which could obstruct 
the folding of the display.

2.  Memory button:

Press the middle button (2) to raise the display at the memorised 
position. In order to memorise a position, use buttons 1 and 3, to 
position the screen at the desired tilt angle (permanent press the 
UP & DOWN buttons and release it when the screen is at the desired 
position). To save or store the position, press and hold the middle 
button (2) for 3 seconds (the sound of a “beep” will indicate that 
the desired position has been saved). Please, make sure that there 
are no objects, which could obstruct the folding of the display.

3.  Opening the monitor:

Press the bottom button (3) to raise the display at the maximum 
angle. Permanent press this button to slowly raise the monitor and 
release it when the desired position is reached. Please, make sure 
that there are no objects, which could obstruct the raising of the 
display.

1. CONTROL DOWN  BUTTON
2. MEMORY POSITION BUTTON
3. CONTROL UP BUTTON

Summary of Contents for AH12D1HGA

Page 1: ...User Guide Danish craftmanship Mediterranean soul Technology Serving Desing AH12D1HGA AH15D1HGA AH17D1HGA AH22D1HGA HDCP compliant motorised monitors for furniture integration ...

Page 2: ...NTS EC REGULATIONS AND SECURITY 6 SAFETY INSTRUCTIONS 6 SYSTEM DESCRIPTION 8 CONTROLS 10 INPUT CONNECTORS 12 OSD MENU 14 AHNET PROTOCOL 17 INPUT SIGNALS 21 INFORMATION ON DISPOSAL 22 WARRANTY TERMS AND CONDITIONS 23 ...

Page 3: ...nd customisation specially created to enhance communication in reception collaboration conference and meeting areas The art of customisation Arthur Holm offers a range of ingenious products whose designs are based on quality materials and the latest technology Products which endow meeting and conference rooms with silent ergonomic innovative and aesthetic solutions that integrate into the furnitur...

Page 4: ...pment has some potential entrapment hazard parts Wiring connected to hazardous voltage requires installation by qualified personnel or the use of ready made flexible cables For your security your equipment must be connected to an electrical outlet with grounding connection protection Since the plug is used to disconnect the device the operating electrical outlet must be in an easily accessible pla...

Page 5: ... AH22D1HGA 22 widescreen format FULL HD Motorised foldable unfoldable aluminium monitor Up and down functions operated by two buttons on the cover plate Low power consumption Low radiation Quick response time Data inputs DVI I DVI D HDCP compliant Addressable RS422 for monitor control by AHnet protocol RJ45 connector CAT5 Box Contents Before the installation of your motorised monitor please check ...

Page 6: ...ols On the upper cover plate there are three buttons to control the UP and DOWN monitor movements 1 Closing the monitor Press the top button 1 to completely fold the monitor The monitor will slowly fold To adjust the angle permanent press this button 1 and release it when the screen is at the desired working angle Please make sure that there are no objects which could obstruct the folding of the d...

Page 7: ... 5 GPI3 6 GPI3 7 N C 8 12Vdc 600mA max 9 Ground Use GPI1 1 12Vdc 2 Ground to open the monitor Use GPI2 3 12Vdc 4 Ground to move the monitor to the memorised position Use GPI3 6 12Vdc 5 Ground to close the monitor INPUT CONNECTORS Termination Activate ON the termination ONLY on the last unit of the RS422 bus AHnet RJ45 CAT5 connector for addressable RS422 control There is a loop through connector t...

Page 8: ...er of the function Press the MENU button to access to the main menu Picture Picture Mode Adjusts the mode of the image Dynamic Standard Mild User Contrast Brightness Colour Sharpness Tint Colour Temperature Adjusts the colour of the image Cool Medium Warm Use Red Green Blue Aspect Ratio Adjusts the image aspect on screen 4 3 16 9 Just scan OSD MENU Picture Noise Reduction Adjusts the image noise f...

Page 9: ...mmunications protocol COMMUNICATION RS422 CONNECTION RJ45 WIRING CAT 5 Speed and configuration BAUD RATE 38400 DATA BITS 8 PARITY NONE STOP BITS 1 Wiring Diagram 1 Data TX 2 Data TX 3 Data RX 4 NC 5 NC 6 Data RX 7 NC 8 NC Connection PINS 1 2 The units respond PINS 3 6 The units receive instructions Protocol to control the monitor by addressable RS422 bus You can connect up to 30 monitors on the sa...

Page 10: ... 00 00 DVI 1 SELECTION FB XX 03 00 00 FA XX 03 03 00 DVI 2 SELECTION FB XX 03 03 00 FA XX 04 01 00 BUTTON LOCK FB XX 04 01 00 FA XX 04 00 00 BUTTON UNLOCK FB XX 04 00 00 FA XX 14 00 00 INQUIRY CONTROL BYTE FB XX 14 CB1 CB2 XX Number of the monitor address Up to 30 monitors for each RS422 BUS CB1 Response in 8 bits of the monitor status CB2 Response in 8 bits of the monitor status AHNET PROTOCOL CB...

Page 11: ... XX Number of the monitor address Up to 30 monitors for each RS422 BUS ZZ Level of the function selected 00 99 Dec To send an order to all the monitors use address F8 INPUT SIGNALS RESOLUTION Horizontal freq KHz Vertical freq Hz Scanning type 800x600 60Hz 37 879 60 317 Progressive 800x600 72Hz 48 077 72 188 Progressive 800x600 75Hz 46 875 75 000 Progressive 1024x768 60Hz 48 363 60 005 Progressive ...

Page 12: ...ONDITIONS Albiral Display Solutions warrants this product against manufacturing defects and workmanship for a period of two 2 years from the date of purchase subject to the conditions below 1 LCD panel inverter controller electrical electronic boards accessories and power supply are warranted against manufacturing defects and workmanship for a period of two 2 years from the date of purchase 2 Labo...

Page 13: ...amages during transportation 8 The warranty is not valid if the beneficiary of the warranty does not include a RMA form and a copy of the purchasing invoice Please note that laws vary from country to country and the same provisions of this warranty may not apply to you If you have any doubts concerning the terms of this warranty please contact business albiral com 34 938 502 376 Copyright Dec 2019...

Page 14: ...nt Hipòlit de Voltregà 08512 Barcelona Spain tel 34 93 850 23 76 23 83 fax 34 93 850 25 50 23 72 web www arthurholm com e mail marketing arthurholm com This manual can be modified without previous notice ENG January 2020 P27178ITEP P27178RUPC P27178USPC P27284DEEP P27284EPPC P27284ESEP P27284GBEP P27284RUPC P27284USPC P27715ESEP P28089DEEP P28089ESEP P28089ITEP P28089USPC P28090EP00 P31160ESES P31...

Reviews: