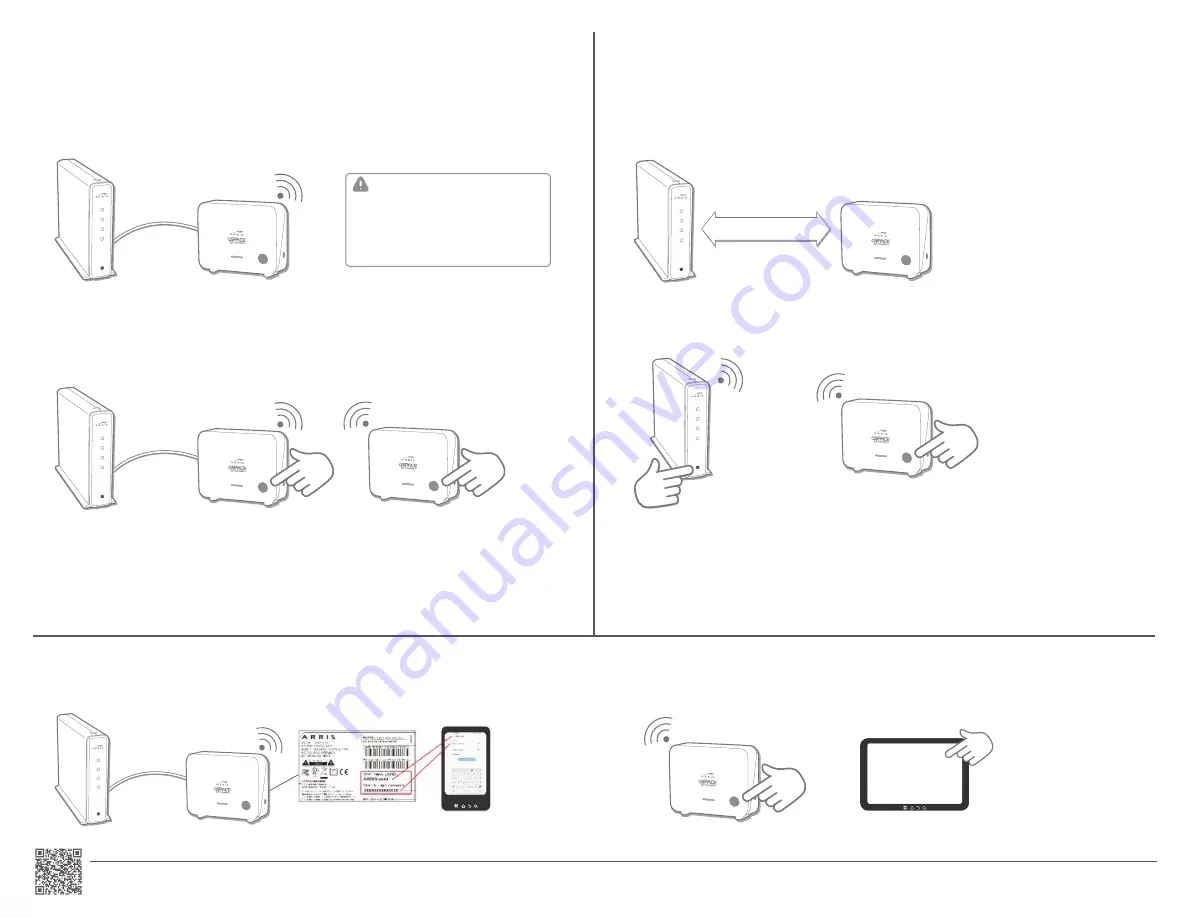
CONNECt yOuR FiRSt VAP4641
WIRED
CONNECtiON
Has your service provider informed you that your router is Easymesh enabled?
NO
1. Connect your first VaP4641 Mesh Point to your current router using an ethernet cable. Connect the Mesh Point
to power and switch to on. The LeD will blink fast, then blink slow, then turn to solid green. This will take a
couple of minutes. now, you are ready to add additional Mesh Points to the network.
2. Locate your second Mesh Point approximately 5-15m from your router; if you have line-of-sight they can be
further apart, but move closer if there are thick walls between.
3. Pair the units: Push the WPS button on the first Mesh Point, then push the WPS button on the second Mesh
Point. note: When adding additional Mesh Points, always push the button on the first Mesh Point and then
push the WPS button on the mesh Point you are adding.
4. The LeD on the second Mesh Point flashes green quickly when the two units pair successfully.
5. The second Mesh Point will be automatically configured with the same Wi-Fi settings as the first Mesh Point;
this will take a few moments.
6. When configuration is complete, the LeD on the second Mesh Point will change color to indicate the quality of
the link between the first and the second Mesh Points. See How to read your Wireless extender LeDs in this
guide to understand the state the LeD color indicates.
I
O
RES
ET
I
O
RES
ET
I
O
RES
ET
2. Pair the router and the mesh Point: Push the WPS button on the router, then push the WPS button on the mesh
Point. The LeD on the Mesh Point flashes green quickly when it has paired successfully with the router.
3. next, the LeD will change color to indicate the quality of the link between the router and the Mesh Point. See
How to read your Wireless extender LeDs in this guide to understand the state the LeD color indicates.
4. To add additional Mesh Points, repeat steps 1-3. additional Mesh Points are configured with the same Wi-Fi
settings as the first Mesh Point.
CONNECt yOuR VAP4641
WIRELESS
CONNECtiON
Has your service provider informed you that your router is Easymesh Enabled?
YES
1. Locate your first VaP4641 Mesh Point approximately 5-15m from your router; if you have line-of-sight they can
be further apart, but move closer if there are thick walls between. Connect the Mesh Point to power and switch
to On.
I
O
RES
ET
5-15m
I
O
RES
ET
1. use the Wi-Fi credentials used for your easyMesh enabled router or the Wi-Fi credentials printed on the first
mesh Point connected to your router, or
I
O
RES
ET
- OR -
2. use the WPS button on the front of the Mesh Point and the WPS Push-button configuration (PBC) functionality
on your device.
For advanced setup -
Please visit our website product page:
https://www.spacetv.co.za/product/wi-fi-network-extender-with-arris-wi-fi-home-vap4641/
use Wi-Fi WPS PBC
I
O
RES
ET
Connecting clients (optional) :
You can connect to your network in two ways:
www.spacetv.co.za
Helpline: 0861 40 41 42
IMPORTANT!!!
When connecting using the WIRED OPTION,
it is recommended that you switch off the
Wi-Fi on the current router, and use the
Space Connect Arris VAP4641 as your
primary connection.


