This instruction sheetl covers the S7029AA deck mounted self-closing tap which is designed to
provide water for hand washing while avoiding waste.
It is intended to be installed basin tap ledges.
The flow duration can be adjusted by the installer
The fittings covered by this installation and maintenance instruction
should be installed in accordance with the water regulations
published in 1999*, therefore Armitage Shanks would strongly
recommend that these fittings are installed by a professional installer
*A guide to the Water Supply (Water Fittings) Regulations 1999 and the Water Byelaws 2000, Scotland is published by
WRAS (Water Regulations Advisory Scheme) Fern Close, Pen-y-Fan Industrial Estate, Oakdale, Newport, NP11 3EH.
ISBN 0-9539708-0-9
Avoid using heat for soldering near the inlet
to prevent damage to internal components.
The filter will keep the fitting free from waterborne debris but may require to be cleaned
periodically. The aerator may also require cleaning from time to time and the use of a
proprietary lime scale remover is recommended
The chromium plated surfaces should be cleaned using only a mild detergent and wiped dry
usig oft cloth. Abrasives, solvents and acidic cleaners should not be used.
It is good practice to fit volume regulators to control the incoming supply and as an aid to
servicing. These will also be found useful in reducing the possibility of splashing.
For self closing taps to function efficiently the supply pipes MUST be flushed to clear all
plumbing debris before final connection of the press tap otherwise damage could be caused to
the mechanism
Minimum working pressure
1.0 bar
(10metre head)
Maximum working pressure
7.5 bar
(75 metre head)
Average cycle time
3-5 seconds
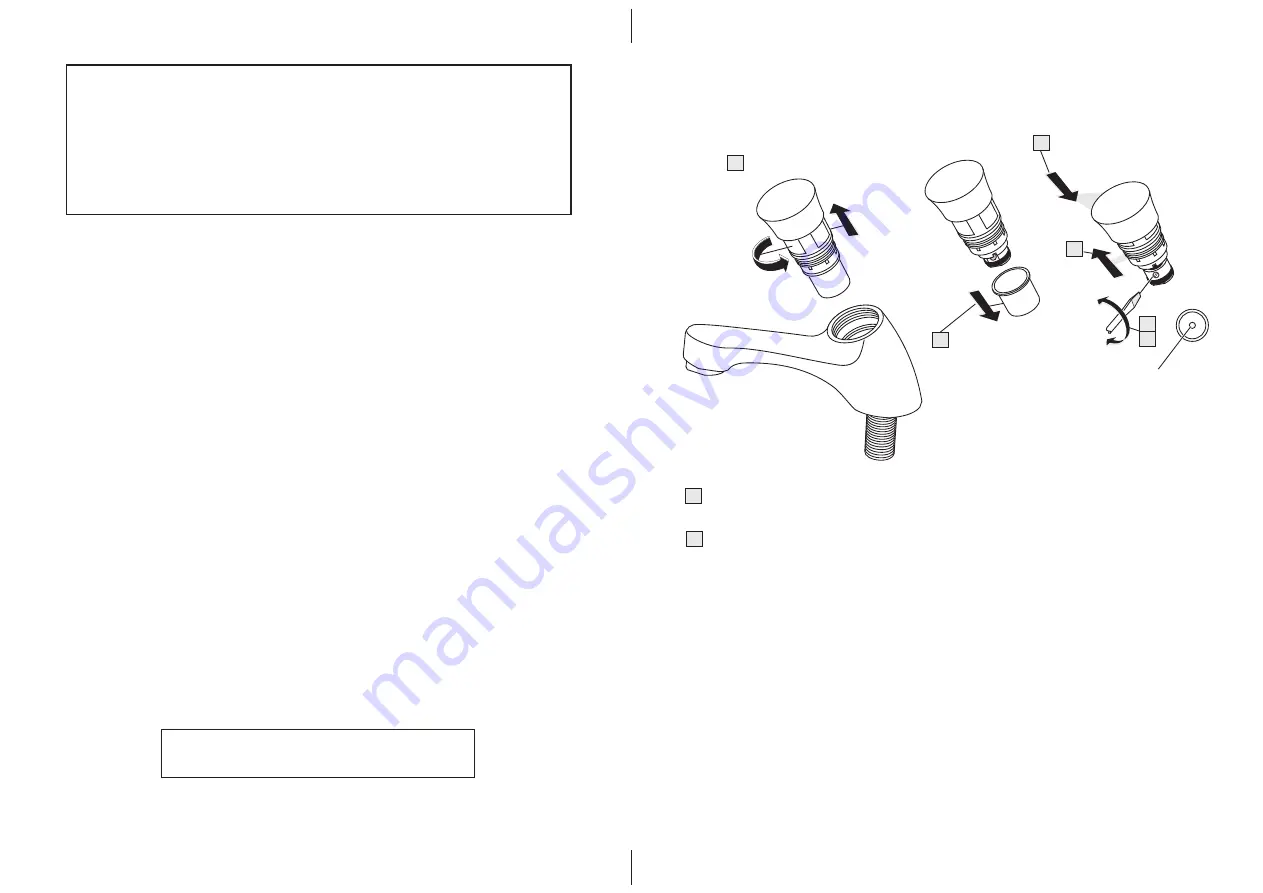
remove headwork
pull off moulded cap
push handle into mechanism
to expose adjustment screw
Start with the screw full engaged (screwed in fully clockwise), this will give the shortest run time
possible.
Unscrew (anti clockwise) to increase the run time. Make small adjustments as only ¾ of a turn
will achieve continuous running.
NB: from fully engaged, unscrewing and then screwing back in by more than 2 turns will wipe
any debris off the face of the pilot hole, however a blocked pilot hole will lead to continuous
running and would require pricking with a circa 0.4mm pin
The adjustment screw
moves an 0-ring relative
to a tiny pilot hole in the
base of the spindle
1
2
3
3
4
5
4
5
Installation:
Products covered:
Adjustment:
Technical Data:
Care and Maintenance:


