Arm Electronics OCD10XMSD Installation And Operation Manual Download Page 34

FUNCTION SETTING

PRESETS

SCAN
PATTERNS
TOUR

ZONES
TIME RUNNING
BACK

EXIT

MAIN MENU

SYST EM SE TTIN G

C AM ERA SE TTI NG

FUNC TIO N S ETT ING

W IND OW BL ANK ING

EXIT

TIME CHANNEL

I

START TIME

0 0:00

END TIM E

00:0 0

RUNNING

NONE

TIME R UNNING

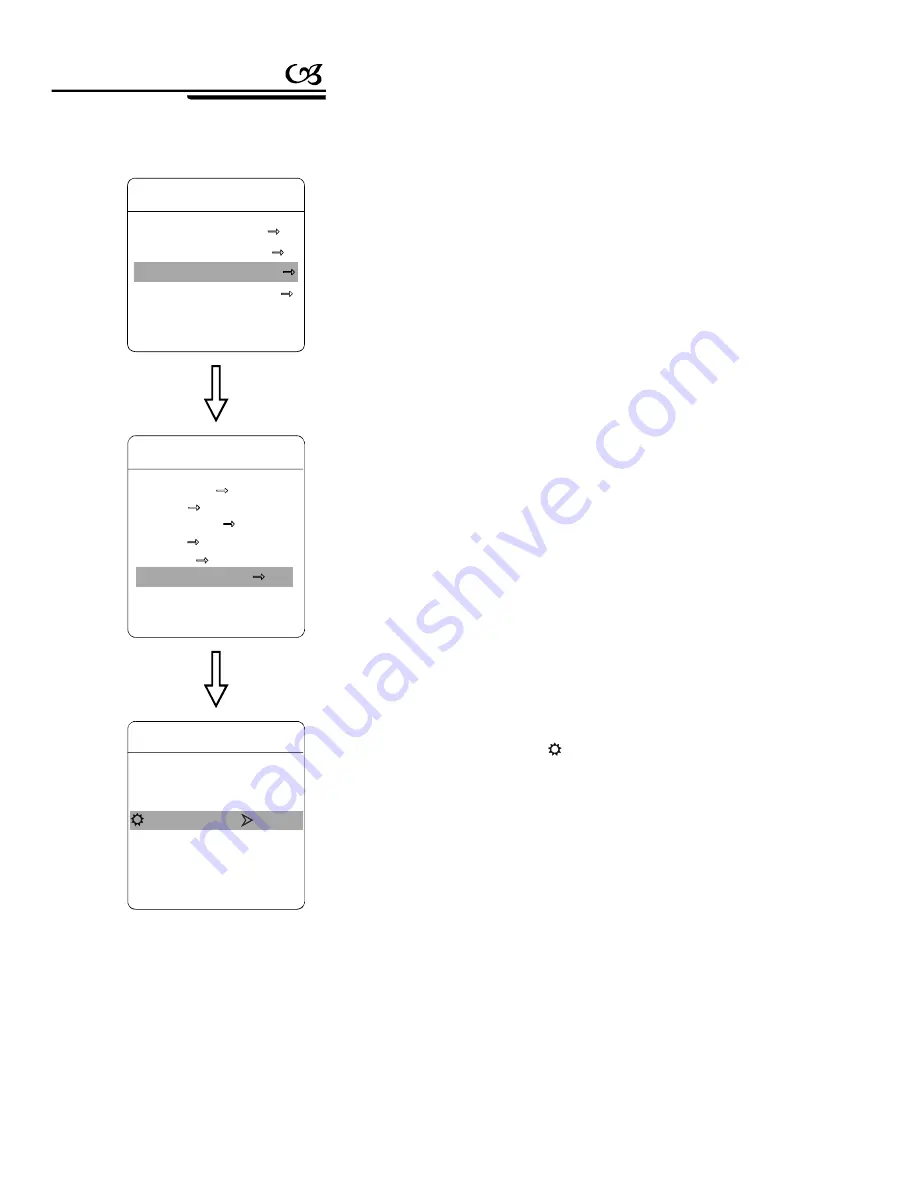
2.Operate joystick, move the cursor to

FUNCTION SETTING

, p ress

OPEN

to call th e submenu.

3.Operate joystick, move the cursor to

TIME RUNNING

, Tilt up and

down the joystick to set time channel, this system can set up to 4 time

channels, press

OPEN

, the time chan nel that you choose is the

current time channel, the following operations is only for current time

channel.

4. Set the start and end of the time: move the cursor to

START TIME

,

by tilting up and down the joystick to set the start time, press

OPEN

to sav e; move the cursor to

END TIME

, by tilting up and down the

joystick to set the end time, press

OPEN

to save.

5. Motion setting: operate joystick, move the cursor to

RUNNING

,

press

OPEN

, there will be a

to display in the front of

RUNGING

,

the cursor jumps to right, tilt up an d down the joystick to choose the mo-

tion in corresponding time channel, press

OPEN

to save. The following

items can be selected.

1.The system enters into the main menu by calling 95 preset or by calling

9 preset twice within 3 seconds.

8. 6 Tour Time Setting

Function instruction

34

PDF created with pdfFactory Pro trial version 

www.pdffactory.com

Summary of Contents for OCD10XMSD

Page 1: ...Installation and Operation Manual Mini high Speed Dome ...

Page 2: ...n of menu and keyboard 6 4 5 1 Auto flip 10 4 5 2 Speed proportion 10 4 5 3 Park action 11 2 1 Dome parameter 2 2 2 Camera parameter 2 2 3 Dome performance Feature 3 6 Function setting 23 6 1 Preset setting 23 6 2 Scan 24 6 3 Pattern 25 6 4 Tour 26 6 5 Zone setting 27 4 5 4 Power up action 11 4 5 5 Fan startup by temperature 11 3 3 Constant temperature function 5 3 4 Constant temperature Function ...

Page 3: ...nsion of product 30 8 2 Installation of product 30 9 Appendix 33 8 3 Installation of camera 31 7 Privacy zone masking 29 9 1 Menu index 33 9 2 Trouble shooting 34 9 3 The cleaning of the transparent cover 34 9 4 Rs485 Bus basic knowledge 35 ...

Page 4: ... dome uses DC12V 1500MA 1 The dome should be protected against extremes of pressure vibration humidity and other damage during storage and transportation 2 The dome should be shipped in parts disassembled as the original integrated packing during the transportation Damage caused by improper transportation is not within the warranty 1 Please refer to user manual when installation and sufficient str...

Page 5: ...ard on the ceiling floor by using of 3 M4 bolts Like picture 8 2 2 2 1 1 2 Installation instruction P ictu re M ou nt Place W all C eil ing I n door on ly I n door a nd ou t door 1 2 Item no corresponding sheet 1 3 details of relevant parts 1 2 3 4 5 1 wall bracket 2 base board 3 power cable 4 speed dome 5 transparent cover 2 1 2 1 1 Installation instruction ...

Page 6: ... of product 1 Get the products out from the packages As picture 2 1 1 2 2 1 Picture2 2 3 Insert three screws in the mini dome into the apertures on the base board pls refer to then turn 15 degrees in clockwise pls refer to 2 1 3 4 Using 3 additional M3 5 screws to lock tightly 2 1 4 2 Installation of product 1 Get the products out from the packages As picture 2 1 1 Installation instruction ...

Page 7: ...through the wall bracket and make the three screw of cover board in the mini dome into the aperture on the base board then turn 15 deg rees in clockwise and be sure that central posit ion of the two ear holes of base board and cover board are matched and then lock it tightly using the additional M3 5 screw Installation instruction 4 Picture2 2 5 6 Connect the power cable video cable and Rs485 cont...

Page 8: ...ntrolling Preset 128 Weight Tilt rotation Tilt90 with auto flip Environmental humidity 0 95 no condensation 8 4 Dome performance Tilt1 150 S Wall mount Ceiling Model Specification parameter Dome performance N 1 4kg G 1 7kg Imaging Element 1 4 CCD Scanning System 625lines 50field s White Balance Auto manual Gain Control Auto Gain Control S N 50dB Shutter Auto 1 50 1 120 000 s continuously manual Le...

Page 9: ...f Auto focus 3 Integrated and multi protocol decoder a Figure design all the data are stored in the inner of camera pan tilt when power off the storage data can t be lose b Built in decoder Integrated and multi protocol includePELCO D PELCO P FACTORY and mainstream protocols c 128 presets can be set support auto tour but can transfer 1 80 presets and 1 tour can store up to 32 presets d 4 pattern t...

Page 10: ...ase contact dealer to get necessary information under some conditions there are have some particular requirements and operations 4 1Auto run motion By the menu park time and park action user may set auto call preset or run tour pattern and scan etc after pointing a few minutes if the dome doesn t run any motions By the menu power up action after the dome powers up or restarts user may set auto res...

Page 11: ...he position can display on the screen Set and call preset Tour Scan Pattern Lens position display 4 4 Constant temperature Function Inner temperature sensor check temperature inside of the dome When the dome work in the high temperature the dome will automatically to start up the fan to reduce the heat to make sure the dome work in the reliable temperature environment increase its stability and pr...

Page 12: ...ord 892226 then the password will turn to factory setting original password 000000 You need set the password again if you need it the detail of information show in password setting 6 7 when choosing picture it means to increase Iris when setting menu it means to enter into the next menu or setting or save after finishing setting when choosing pictures it means to reduce Iris close to cancel Focus ...

Page 13: ...Moving joystick to BACK press OPEN to back to the former menu 13 Notice The label may set 16 characters and doesn t need editing characters Pressing OPEN continuously to jump over and using spacebar to replace the deleted characters When you finish to edit a character pressing OPEN to enter into the next editing character when you editing the last character pressing OPEN to save MAIN MENU SYSTEM S...

Page 14: ...rmation INITIAL INFO S N 4JKAA7824000058 FIRMWARE V2 40 PROTOCOL FACTORY DOME ADDRESS 001 COMM 4800 N 8 1 BACK EXIT SYSTEM SETTING EDIT DOME LABEL INITIAL INFO DISPLAY SETUP MOTION CLEAR PASSWORD SETTING CLOCK SETTING COMM SETTING BACK EXIT MAIN MENU SYSTEM SETTING CAMERA SETTING FUNCTION SETTING WINDOW BLANKING EXIT Initial information includes S N of the dome the name of manufact urer soft editi...

Page 15: ...yed the dome works as the following picture shows in the picture 305 means pan angel 45 means tilt angle DOME LABEL dome label display setting PRESET LABEL preset label or scan label display setting ZONE LABEL zone label display setting DIRECTION LABEL direction label display setting LABEL temperature label display setting 4 Taking display dome label as an example to explain the operation process ...

Page 16: ... the joystick in the down position the camera rotates pan 180 degrees after the camera rotates tilts up to 90 degrees you may directly watch the rear view to surveillance all process in portrait 180 degrees 5 5 1 Auto flip Operation knacks Operate joystick move the cursor to PROPORTIONAL PAN press OPEN to enter proportion pan setting tilt up down joystick to choose if choosing ON it means to open ...

Page 17: ...UP ACTION press OPEN to jump to the following choice tilt up down joystick to choose power up action press OPEN to save run scan run pattern X run tour none action the dome resumes the primary action and direction before power up use preset 1 6 5 5 O O C C Fan startup by temperature The temperature of the dome will rise when its environment is in high temperature The fan will open automatically wh...

Page 18: ...ction clear all windows and alarm setting Please be cautious to use this function RESTART The dome restart 4 Set clear zone as an example to explain the process Tilt up down joystick to CLEAR ALL ZONES press OPEN to clear all zones once clear all commands in the controlling menu they does not resume so please be careful of using Notice 18 MAIN MENU SYSTEM SETTING CAMERA SETTING FUNCTION SETTING WI...

Page 19: ... old password Operate joystick move the cursor to OLD PASSWORD press OPEN there will be a to display in the front of OLD PASSWORD the cursor jumps to the first character on the right tilt up and down the joystick to set the first password its option rage is 0 9 by tilting left and right the joystick to input the other bits press OPEN to save 5 Input new password Operate joystick move the cursor to...

Page 20: ...he cursor to System setting by up and down the joystick press OPEN to enter into the next menu 3 move the cursor to Clock setting by up and down the joystick Press OPEN to call clock setting you could set the following TIME DATE 4 For example move the cursor to TIME by up and down the joystick press OPEN Pls move the cursor to the first number the three number means hour minute second it also mean...

Page 21: ... the next menu 3 Moving joystick up and down to move the cursor to COMM SETTING and pressing OPEN to enter into Dome parameter setup menu Show Series NO of the dome ex work Using to edit the series NO of the dome is the same as S N series Number Setting up the ID Number of the dome address scope 001 255 COMM SPEED Baud rate setup The user can choose 4 kinds of Baud rate 2400 BPS 4800 BPS 9600 BPS ...

Page 22: ...setting 7 1 Zoom speed 1 The system enters into the main menu by calling 95 preset or by calling 9 preset twice within 3 seconds 2 3 4 Tilt up down joystick to CAMERA SETTING press OPEN to enter submenu Operate joystick move the cursor to ZOOM SPEED press OPEN will appear a sign in the front of ZOOM SPEED the cursor moves to right tilt up down joystick to choose HIGH or LOW Press OPEN to save pres...

Page 23: ...digital zoom increase to choose OFF means to close digital zoom control Press OPEN to save NOTICE The option of the digital zoom is ON OFF when the camera module is SONY LG CNB HITACHI When digital zoom be set as ON the maximum zoom magni fication of the dome is digital zoom magnification times optical zoom magnification when digital zoom be set as OFF the maximum zoom magnification of the dome is...

Page 24: ...OPEN There will be a sign in the front of BLC MODE the cursor jump to right tilt joystick to open or close back light compensation function If cho osing ON means to open back light compensation mode if choosing OFF means to close back light compensation mode Press OPEN to save NOTICE OPERATION KNACKS Strong background ray can make backlighting objects engender shadow back light compensation the sp...

Page 25: ... time of lighting in turn the more the long lighting Press OPEN to save OPERATION KNACKS When the dome monitors at night or dark environment because the ray is not enough the image on the screen is too dark setting slow shutter can lengthen the time of lighting so that make the picture that is shoot in dark more legible This function depends on the models and parameters of built in camera in dome ...

Page 26: ...CUT FILTER press OPEN there will be a sign in the front of IR CUT FILTER the cursor jumps to right move joystick to IR cut filter choices as follow AUTO is default mode it means the dome automatically transfers according to sensitivity TIME Can set black color time for example can set color image in day and set black in the night set as color mode set as black and white mode Press OPEN to save OPE...

Page 27: ...tter priority mode Move joystick to the sub choices of AE mode IRIS F1 4 press OPEN to choose adequate Iris press OPEN to save it means shutter speed when AE mode is shutter priority this function can be set it means the size of iris when AE mode is iris priority this function can be set it means brightness when AE mode is brigh tness priority this function can be set The camera can automatically ...

Page 28: ...auto revert real color after the white balance sensor check the environment by camera When choosing manual mode MANUAL adjust the numerical value of R GAIN and B GAIN he range is 1 225 the numerical value is bigger it means that adding red is more the tone changes to be warm the range is 1 225 the numerical value is bigger it means that adding green is more the tone changes to be cold NOTICE That ...

Page 29: ...urrent preset move the cursor to SHOW PRESET press OPEN the screen will display the current preset Clear current preset move the cursor to CLEAR PRESET press OPEN the current preset is cleared Edit current preset label move the cursor to EDIT PRESET LABEL press OPEN to enter into editing preset submenu system auto sets label as PRESET XX press OPEN to revise label Operation knacks 8 Function setti...

Page 30: ... the cursor to scan number press open tilt up downjoystick to choose scan number press open to save the following operations aim at the current scan number 3 Notice The label can set up to 16 characters and doesn t need editing characters Pressing Open continuously to jump over and using spacebar to replace the deleted characters When you finish to edit a character pressing Open to enter into the ...

Page 31: ...ursor to PROGRAM PATTERN press OPEN to set pattern track move the image wantonly and draw the focus The dome has a tour that is no less than 180s a series of park time magnification focus will be recorded press OPEN to save Run pattern Operate joystick to RUN PATTERN press OPEN to run the dome will continuously and repeatedly record the specific track choose current pattern number as the current p...

Page 32: ... of a line press CLOSE to save Press CLOSE to exit If set the presets of the second line move the cursor to the second line press OPEN to edit continuously When the numerical value is 00 the following presets are invalid A tour can set up to 32 presets Run tour Operate joystick move the cursor to RUN TOUR press OPEN to exit the menu it stars to run tour 8 4 Tour FUNCTION SETTING PRESETS SCAN PATTE...

Page 33: ...ss OPEN to enter submenu as the left picture shows choose zone number as current zone there choices in the menu aim at current zone set current zone s left limit set current zone s right limit clear current zone setting edit current zone label as zone number is 1 Zone label will auto change as ZONE 1 Regard the left right limit as the demarcation line and set the middle part as a zone Various oper...

Page 34: ...lowing operations is only for current time channel 4 Set the start and end of the time move the cursor to START TIME by tilting up and down the joystick to set the start time press OPEN to save move the cursor to END TIME by tilting up and down the joystick to set the end time press OPEN to save 5 Motion setting operate joystick move the cursor to RUNNING press OPEN there will be a to display in t...

Page 35: ...ndow number then do the following operations a Operate joystick move the cursor to EDIT WINDOW press OPE N to move the image that need privacy window to display in the screen b Press OPEN there will be a square displaying in the center of the sc reen operate joystick and move the square to the central place that need to conceal c Press OPEN operate joystick to adjust the size of privacy zone joyst...

Page 36: ... IT LABEL PRESET 01 BACK EXIT EDIT PRESET LABEL LABEL AUTO SCAN BACK EXIT EDIT SCAN LABEL LABEL PATTERN 1 BACK EXIT EDIT PATTERN LABEL LABEL ZONE 1 BACK EXIT EDIT ZONE LABEL MAIN MENU SYSTEM SETTING CAMERA SETTING FUNCTION SETTING WINDOW BLANKING EXIT LABEL SPEED DOME V1 00 BACK EXIT EDITDOME LABEL DISPLAY SETUP ZOOM SPEED HIGH DIGITAL ZOOM ON BLC NODE OFF SLOW SHUTTER X2 IR CUT FILTER ADVANCE SET...

Page 37: ...th Controlling line is bad connection Rs485 loads so many or the distance of communication is much far 1 Connect 120 resistance in the dome pan tilt that is far from the controller Ω 2 Increase distributor Power supply is damage or power consumption is not enough Replace Replace right power adapter it is better to put the switch and power adapter near the dome To obtain constant clear videos user ...

Page 38: ...he jumper on Pin1 pin2 Install the PCB back and the termination resistor is connected as show the picture10 4 3 The connection of 120 temination resistor Ω Ω Ω Factory default setting Connection of120 setting Ω 1 2 3 On On Off On means insert the jumper cap Off On On Picture10 4 3 As specified by Rs485 standard Rs485 Bus is of half duplexed data transmission cables with characteristic impedance as...

Page 39: ...he and connection of Rs485 C Make sure the connections are fully seated D Change Rs485 Bus wires A Secure the connection B Replace Rs485 bus wires C Add termination resistors to the system D Install Rs485 distributor Ø Rs485Bus troubles shooting Rs485Distributor B 1 2 3 120Ω 120Ω 120Ω A Picture 10 4 5 1 32 15 6 Ma in con troll er Picture10 4 4 120Ω 120Ω In such circumstances the Factory recommends...

Page 40: ...40 Notes PDF created with pdfFactory Pro trial version www pdffactory com ...

Reviews: