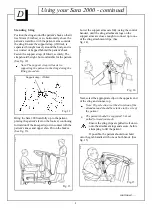
Arjo Sara 2000 Operating Instructions Manual Download Page 8

8

Standing Sling

Position the sling around the patient’s back so that it 

lies 50mm (2 inches) or so, horizontally above the 

patient’s waistline, with the patient’s arms outside 

the sling. Ensure the support strap, (if fitted), is 

separated, brought loosely around the body, and is 

not twisted or trapped behind the patient’s back.
Fasten the support strap, (if fitted), securely. The 

strap should be tight, but comfortable for the patient. 

(See fig. 12).

Note: The support strap will assist in 

supporting the patient in the sling during the 

lifting procedure.

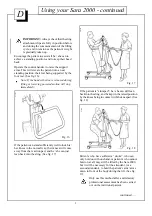
Bring the Sara 2000 carefully up to the patient, 

placing the patient’s feet on the footrest, continuing 

forward until the kneepad is just in contact with the 

patient’s knees and upper shin. Put on the brakes. 

(See fig. 13).

Lower the support arms carefully, using the control 

handset, until the sling attachment lugs on the 

support arms are close enough to connect up to one 

of the sling attachment clips. (See

fig. 14).

Next, select the appropriate clip on the opposite end 

of the sling and connect up.

Note: Clip selection is at the discretion of the 

attendant and should be relative to the size of 

the patient.
The patient should be supported, but not 

pulled forward too much.

Ensure the sling clips are pulled well down 

onto the attachment lugs and secure, before 

attempting to lift the patient.
If possible, the patient should now hold 

onto the grab handles with one or both hands. (See

fig. 15).

P.

10

67

a

Support strap - if fitted

Fig. 12

P.

10

64

a

Fig. 13

P.

1063

d

Fig. 14

P.

10

63

c

Fig.15

D

Using your Sara 2000 - continued

continued .....

Summary of Contents for Sara 2000

Page 1: ...Sara 2000 Operating Instructions TM...

Page 2: ...ment clips 12 Patient support arms with grab handles 13 Sling 14 Commode seat attachment accessory 15 Chassis 16 Buttock leg support transfer sling only 17 Reset button Green 18 Emergency stop button...

Page 3: ...Sling a single loop sling with buttock and leg support used for easy and comfortable transporting of patients over short distances The sling has variable adjustment using the different attachment clip...

Page 4: ...ging section When the battery pack is charged disconnect the mains power then remove the pack from the charger and insert it fully into the Sara 2000 battery compartment located at the lower rear of t...

Page 5: ...Select which sling will be required See the description of sling types in the Introduction section Transfer Sling With the patient in a sitting position place the sling around the patients back so th...

Page 6: ...ide The leg pieces should be pulled tight but still be comfortable for the patient Ensure the sling clips are pulled well down onto the attachment lugs and secure and that the leg pieces are correctly...

Page 7: ...chassis legs open or closed but will be easier through doorways etc with the chassis legs closed When the patient is seated in the new position and you wish to remove the sling unloop the leg support...

Page 8: ...ust in contact with the patient s knees and upper shin Put on the brakes See fig 13 Lower the support arms carefully using the control handset until the sling attachment lugs on the support arms are c...

Page 9: ...y well to lock his her knees in the normal way their knees will come away from the reaction pad and he she can just lean back into the sling See fig 17 If the patient is slumped he she can still lean...

Page 10: ...support strap while the patient is supported by the sling Remove the sling from the patient If the patient lacks sitting balance and has been returned to the bed on the Sara 2000 a second attendant m...

Page 11: ...operated the green reset button will have to be re engaged by pressing it in before any powered movement can be utilised System Overload Fuse resettable If the chassis legs open close function or the...

Page 12: ...lows Ensure the mains power is switched off Insert the battery pack into the charger unit and push firmly in the charging connector will automatically couple then switch on the mains power A green lig...

Page 13: ...r Batteries Only use the charger unit supplied with the Sara 2000 Do NOT charge batteries in a sealed container Do NOT place batteries near or dispose of in a fire Do NOT short circuit a battery Do NO...

Page 14: ...and accessories wipe down with a damp cloth using warm water to which a disinfectant cleaner has been added e g ARJO CLEAN disinfectant cleaner or equivalent Note ARJO CLEAN disinfectant cleaner is a...

Page 15: ...support arms up briefly See fig 23 The motor will stop while the arms weight is held Stop the powered movement after a second or two and lower the arms carefully This check is for the correct functio...

Page 16: ...at into the disinfectant solution to soak and then place the seat frame into the bath Using an appropriate long handled stiff bristled bottle type brush clean the inside of the commode pan support tub...

Page 17: ...from Arjo or their approved distributors Special tools are required for certain component replacement The simplest safest and most effective way to maintain your product in good working order is to ha...

Page 18: ...voltage 24V Fuse overload 10A thermal cutout resettable Medical Equipment type protection against electrical shock in accordance with IEC 601 1 Arjo patient handling products meet the requirements of...

Page 19: ...19 G Technical Specification All dimensions in millimetres equivalent in inches...

Page 20: ...CANDINAVIA AB Box 61 241 21 Eslov Tel 0413 645 00 Fax 0413 645 83 E post kundservice arjo se Danmark ARJO SCANDINAVIA Postboks 51 4632 Bj verskov Tel 45 93 27 37 Fax 45 93 27 39 E post kundservice arj...

Reviews: