background image

Testing the operating temperature

Testing of the operating temperature should be done at least every 6 months or according to
institutional protocol.

CAUTION

Temperature adjustments cannot be made to the Ranger warming unit. If the tested 
temperature is out of specification, please call Arizant Healthcare Customer Service. 

TOOLS AND EQUIPMENT

•Thermocouple: 0.005" leads or smaller
•Calibrated thermocouple temperature monitor
•Aluminum tape
•IV bag containing room temperature saline

METHOD

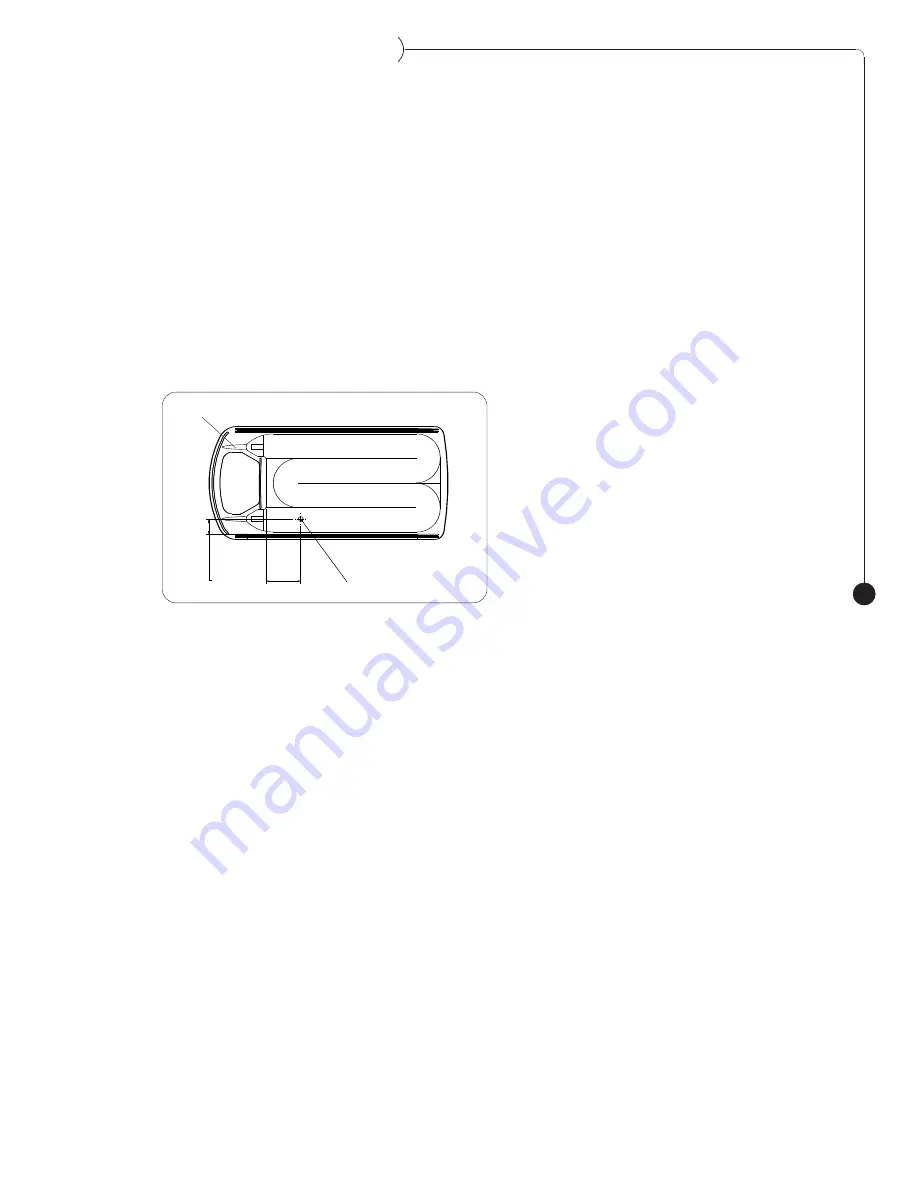
1. Tape a thermocouple to the exterior of one side of the Ranger warming cassette. See figure 

above for correct position of the thermocouple. 

2. Slide the warming cassette into the slot of the Ranger warming unit.

3. Using room temperature fluids, prime the cassette just until fluid flows through the patient 

end. Clamp the white clamp to stop the flow.

NOTE: To achieve correct results, fluids must be administered into the inlet tube, NOT into
the outlet tube.

4. Turn the Ranger unit ON and allow it to warm up for 5 minutes. The Ranger unit display

should read 41˚±1˚C. Note the temperature on the thermocouple temperature monitor. If the 

temperature reading is not 41˚±1˚C call Arizant Healthcare Customer Service.

NOTE:  Most hand-held temperature meters have a ±1°C tolerance. 

Ranger

Blood/Fluid Warming System

5

Inlet tube

0.75

"

1.80

"

Thermocouple

Summary of Contents for Ranger 245

Page 1: ... clamp or the equipotential stud on the rear of unit Clamp should be tightened securely Sometime during shipping this unit may have been exposed to extreme temperatures The unit may need a period of 20 minutes or more to return to normal operating temperature Store the Ranger unit at room temperature allowing it to equilibrate before using or testing the unit Check the Ranger system website to ens...

Page 2: ...nstructions Cleaning the Ranger Warming Unit Testing the Operating Temperature Testing the Alarms Testing the Over Temperature Alarm Testing the Under Temperature Alarm Replacing the Power Fuse Troubleshooting Specifications Returning Warming Units for Service Definition of Symbols Ranger Blood Fluid Warming System 1 2 3 3 3 3 4 4 5 6 6 7 8 9 11 12 12 ...

Page 3: ...er service representative Please use the RA number on all correspondence when returning a device for service A shipping carton will be delivered to you at no charge if needed We will service and ship your device within five 5 working days of our receipt Call your local supplier or sales representative to inquire about loaner devices while your device is being serviced When you call for technical s...

Page 4: ...case Do not substitute other devices for the Ranger warming unit or Ranger disposable sets Thermal or electrical injury or device damage may occur Never infuse fluids if air bubbles are present in the fluid line as air embolism may result Do not continue use of the unit if the over temperature alarm continues to sound and the temperature does not return to the set point temperature Immediately sto...

Page 5: ...use abrasive material or solutions to clean the heater plates Do not allow spills to dry inside the unit as this may make it more difficult to clean the unit The cleaning tool provides only superficial cleaning it does not disinfect or sterilize the interior of the unit METHOD 1 Unplug the warming unit 2 Unfold the cleaning tool Wet the foam pads with a nonabrasive solution such as Alconox brand d...

Page 6: ...cassette See figure above for correct position of the thermocouple 2 Slide the warming cassette into the slot of the Ranger warming unit 3 Using room temperature fluids prime the cassette just until fluid flows through the patient end Clamp the white clamp to stop the flow NOTE To achieve correct results fluids must be administered into the inlet tube NOT into the outlet tube 4 Turn the Ranger uni...

Page 7: ... 49 C TEST SET UP 1 Turn on the Ranger warming unit and allow it to stabilize at normal operating temperature 40 41 C for 30 minutes 2 Insert the instrumented warming cassette into the Ranger unit 3 Prime the warming cassette with room temperature IV solution When primed clamp the outlet tube to stop flow 4 Connect the thermocouple to the calibrated thermocouple temperature monitor to verify that ...

Page 8: ...read HI and the plate temperature Watch the thermocouple temperature monitor to determine when the unit temperature has stabilized about 1 minute The temperature reading on the monitor should peak between 45 49 C If you detected the power relay click proceed to step 9 If you did not detect the power relay click follow these instructions When the tempera ture stabilizes reaches a peak and begins to...

Page 9: ... unplug the unit for 5 minutes Securely tighten the over temperature test screw before returning the unit to service Replacing the power fuse The power fuses are located in the power entry module TOOLS AND EQUIPMENT Small slotted screwdriver METHOD 1 Disconnect the warming unit from the power source 2 Remove the power cord 3 Locate the fuse carrier in the power entry module 4 Use the small screwdr...

Page 10: ...2 C before being run through the warming unit Cause Primary controller failure Unit will no longer operate Solution Turn unit on Make sure the power cord is plugged into the power entry module of the warming unit Make sure the warming unit is plugged into a properly grounded outlet Call Arizant Healthcare Customer Service Solution Open flow to reduce tem perature Alarms will stop when the display ...

Page 11: ...e still being infused or clamp is open proximal to the warming cassette Warming unit is below patient level creating excessive back pressure Cause Under temperature condition or defective heater relay Cause Open wire on temperature sensor Cause Electrical interference Solution Make sure test screw is com pletely tightened If it is missing turn unit off and unplug it Call Arizant Healthcare Custome...

Page 12: ...ith Canadian CSA C22 2 No 601 1 Electrical characteristics INPUT VOLTAGE 100 120 or 220 240 VAC OPERATING FREQUENCY 100 120 VAC 50 60 Hz 220 240 VAC 50 60 Hz MAXIMUM HEATING POWER 900 W FUSE RATING 100 120 V unit 250V T10A 220 240 V unit 250V T6 3A Temperature characteristics SET POINT TEMPERATURE 41 C OVER TEMPERATURE ALARM 43 C UNDER TEMPERATURE ALARM 33 C OVER TEMPERATURE CUTOFF 46 C LEAKAGE CU...

Page 13: ...nt Healthcare Customer Service to get a Return Authorization RA number and a service carton Arizant Healthcare Customer Service 1 800 733 7775 Definition of Symbols ON OFF Fuse Attention read accompanying documents Nonexplosion Proof Type B Applied Part Voltage Alternating Current AC ...

Page 14: ...defined in Article 14 of the Medical Device Directive 93 42 EEC Actamed Limited Calder Island Way Wakefield WF2 7AW United Kingdom Tel 44 1924 200550 Fax 44 1924 200518 Ranger Bair Hugger Arizant Arizant Healthcare bright ideas that work and the Bair Hugger and Arizant logos are trademarks of Arizant Healthcare Inc registered or pending in the U S Patent Trademark Office and in other countries 200...

Reviews: