background image

!

 Once the appliance has been installed, the power 

supply cable and the electrical socket must be easily 
accessible.

!

 The cable must not be bent or compressed.

!

 The cable must be checked regularly and replaced 

by authorised technicians only (see Assistance).

!


The manufacturer declines any liability should 

these safety measures not be observed.

Gas connection

The appliance should be connected to the main 
gas supply or to a gas cylinder in compliance with 
current National regulations. Before carrying out the 
connection, make sure the cooker is compatible with 
the gas supply you wish to use. If this is not the case, 
follow the instructions indicated in the paragraph 
“Adapting to different types of gas.”
When using liquid gas from a cylinder, install a 
pressure regulator that complies with current National 
regulations.

!

 Check that the pressure of the gas supply is 

consistent with the values indicated in Table 1 (“Burner 
and nozzle specifications”) since this will ensure the 
safe operation and longevity of your appliance while 
maintaining efficient energy consumption.

!

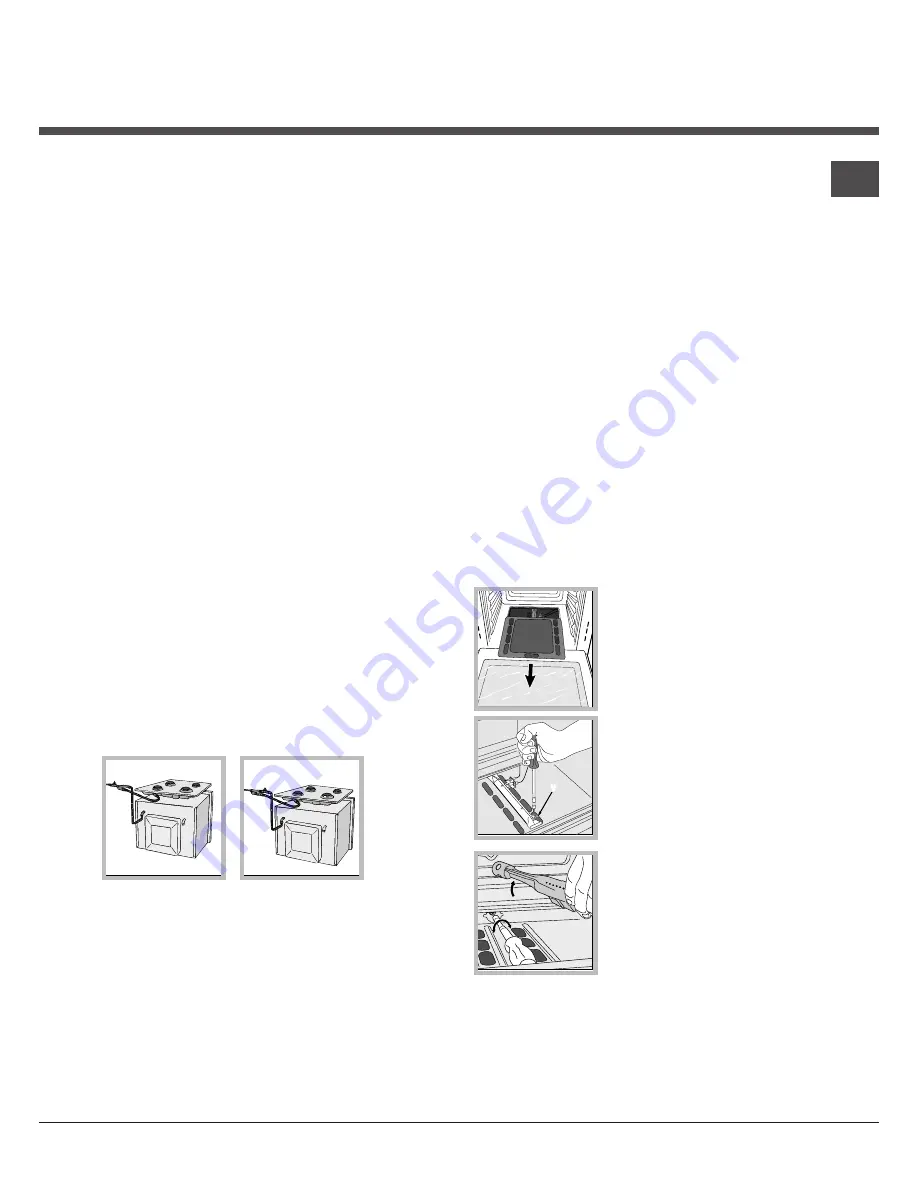
 Should you need to install a gas hob on top of a 

built-in gas oven, it is strictly forbidden to connect the 
two or to use a single cut-off tap. The two appliances 
should be connected separately, and each one should 
have its own stop tap in order to make them completely 
independent from one another (see figures).

Connection with a rigid pipe (copper or steel)

!

 Connection to the gas system must be carried out in 

such a way as not to place any strain of any kind on 
the appliance.
There is an adjustable L-shaped pipe fitting on the 
appliance supply ramp and this is fitted with a seal in 
order to prevent leaks. The seal must always be replaced 
after rotating the pipe fitting (the seal is provided with the 
appliance). The gas supply pipe fitting is a threaded 1/2 
gas cylindrical male attachment.

Connecting a flexible jointless stainless steel pipe 
to a threaded attachment

The gas supply pipe fitting is a threaded 1/2 gas 
cylindrical male attachment.
These pipes must be installed so that they are never 
longer than 2000 mm when fully extended. Once 
connection has been carried out, make sure that the 
flexible metal pipe does not touch any moving parts 
and is not compressed.

!

 Only use pipes and seals that comply with current 

National regulations.

Checking the tightness of the connection

!

 When installation has been completed, check the 

pipe fittings for leaks using a soapy solution. Never use 
a flame.

Adapting to different types of gas

In order to adapt the oven to a type of gas other than 
the type for which it was manufactured (indicated on 
the label), follow these simple steps:
•  Replacing the oven burner nozzle
1. Open the oven door fully.

2. Slide out the bottom of the 
oven.

3. Unscrew the burner fastening 
screws.
4. Remove screw “

V

” and then 

the oven burner.

5. Unscrew the oven burner 
nozzle using the special socket 
spanner for the nozzles, or 
better still a 7 mm socket 
spanner, and replace it with a 
nozzle suited to the new type of 
gas (see Table 1).

6. Replace all the parts, following the steps described 

above in the reverse order.

!


Take particular care when handling the spark plug 

wires and the thermocouple pipes.

NO

OK

V

GB

5

Summary of Contents for FK G

Page 1: ...f the appliance 7 Overall view 7 Control panel 7 Start up and use 8 Starting the oven 8 How to use the timer 9 Cooking modes 10 Cooking modes 10 Practical cooking advice 10 Precautions and tips 11 General safety 11 Disposal 11 Respecting and conserving the environment 11 Maintenance and care 12 Switching the appliance off 12 Cleaning the appliance 12 Cleaning the oven door 12 Replacing the light b...

Page 2: ...e been given supervision or instruction concerning use of the appliance in a safe way and understand the hazards involved Children shall not play with the appliance Cleaning and user maintenance shall not be made by children without supervision Do not use harsh abrasive cleaners or sharp metal scrapers to clean the oven door glass since they can scratch the surface which may result in shattering o...

Page 3: ...directly i e from adjacent rooms fitted with air circulation tubes as described above However these rooms must not be communal rooms bedrooms or rooms that may present a fire hazard Liquid petroleum gas sinks to the floor as it is heavier than air Therefore rooms containing LPG cylinders must also be equipped with vents to allow gas to escape in the event of a leak As a result LPG cylinders whethe...

Page 4: ...ire to the terminal marked N the Brown wire to the terminal marked L and the Yellow Green wire to the terminal marked see diagram 3 Secure the cable by fastening the clamp screw 4 Close the cover of the terminal board Connecting the supply cable to the mains Install a standardised plug corresponding to the load indicated on the data plate see adjacent box The appliance must be directly connected t...

Page 5: ...lace any strain of any kind on the appliance There is an adjustable L shaped pipe fitting on the appliance supply ramp and this is fitted with a seal in order to prevent leaks The seal must always be replaced after rotating the pipe fitting the seal is provided with the appliance The gas supply pipe fitting is a threaded 1 2 gas cylindrical male attachment Connecting a flexible jointless stainless...

Page 6: ...htly as possible Once this procedure is finished replace the old rating sticker with one indicating the new type of gas used This sticker is available from any of our Service Centres If the gas pressure is different from the recommended pressure a suitable pressure regulator must be fitted to the inlet pipe in accordance with current National Regulations DATA PLATE Dimensions width 43 5 cm height ...

Page 7: ... view Control panel Control panel GRILL DRIPPING PAN GUIDES for the sliding racks position 5 position 4 position 3 position 2 position 1 4 5 1 5 3 0 0 1 5 0 18 0 22 0 GRILL indicator light TIMER knob OVEN GRILL knob OVEN LIGHT button GB 7 ...

Page 8: ...he reference mark on the control panel the complete range of temperatures is shown below Min 150 180 220 Max 140 145 160 200 230 240 The oven will automatically reach the temperature set and the thermostat which is controlled by the knob will keep the temperature constant Switching the oven on manually In the event of a power failure the oven burner can be lit manually 1 Open the oven door 2 Hold ...

Page 9: ...se almost one complete revolution 2 Turn the knob anticlockwise to set the desired time align the minutes shown on the knob with the indicator on the control panel 3 The timer operates in minutes when the selected time has elapsed a buzzer will sound The timer does not switch the oven on or off Table 1 Liquid gas Natural gas Burner Thermal Power kW gross heat value By pass 1 100 Nozzle 1 100 Flow ...

Page 10: ... cooking process Selector knob setting Food to be cooked Weight in kg Cooking rack position from oven bottom Preheating time minutes Thermostat knob setting Cooking time minutes Oven Lasagne Cannelloni Pasta bakes Veal Chicken Turkey roll Duck Rabbit Pork loin Leg of lamb Mackerels Dentex Trout baked in foil Neapolitan style pizza Dry biscuits Tart Chocolate cake Leavened cakes 2 5 2 5 2 2 1 7 1 5...

Page 11: ...in use When unplugging the appliance always pull the plug from the mains socket do not pull on the cable Never carry out any cleaning or maintenance work without having unplugged the plug from the mains In case of malfunction under no circumstances should you attempt to repair the appliance yourself Repairs carried out by inexperienced persons may cause injury or further malfunctioning of the appl...

Page 12: ... the surface and cause the glass to crack To clean the oven more thoroughly you can remove its door 1 Open the oven door fully see diagram 2 Use a screwdriver to lift up and turn the small levers F located on the two hinges see diagram 3 Grip the door on the two external sides and close it approximately half way Pull the door towards you extracting it from its hinges see diagram To replace the doo...

Page 13: ...semble 19 Tableau de bord 19 Mise en marche et utilisation 20 Mise en marche du four 20 Utilisation du minuteur 21 Programmes 22 Programmes de cuisson 22 Conseils de cuisson 22 Précautions et conseils 23 Sécurité générale 23 Mise au rebut 23 Economies et respect de l environnement 23 Nettoyage et entretien 24 Mise hors tension 24 Nettoyage de l appareil 24 Nettoyage de la porte 24 Remplacement de ...

Page 14: ...ils soient sous bonne surveillance ou qu ils aient reçu les instructions nécessaires pour une utilisation de l appareil en toute sécurité et à condition qu ils se rendent compte des dangers encourus Les enfants ne doivent pas jouer avec l appareil Les opérations de nettoyage et d entretien ne doivent pas être effectuées par des enfants non surveillés Ne pas utiliser de produits abrasifs ni de spat...

Page 15: ... la combustion ne doit pas être inférieur à 2 m3 h par kW de puissance installée Le système peut être réalisé en prélevant l air directement de l extérieur du bâtiment au moyen d un conduit d au moins100 cm2 de section utile qui ne risque pas d être bouché accidentellement Ou de manière indirecte depuis des locaux adjacents et équipés d un conduit de ventilation avec l extérieur comme susmentionné...

Page 16: ...is du serre câble ainsi que les trois vis des contacts L N puis fixer les fils sous les têtes de vis en respectant les couleurs Bleu N Marron L Jaune Vert voir figure 3 Fixer le câble dans le serre câble prévu 4 Fermer le couvercle du bornier Branchement du câble d alimentation au réseau électrique Monter sur le câble une prise normalisée pour la charge indiquée sur l étiquette des caractéristique...

Page 17: ...e gaz doit être effectué de manière à ce que l appareil ne subisse aucun type de contrainte La rampe d alimentation de l appareil est munie d un raccord en L orientable dont l étanchéité est assurée par un joint S il s avère indispensable d inverser le raccord il faut absolument remplacer le joint d étanchéité fourni avec l appareil Le raccord d entrée du gaz à l appareil est fileté 1 2 gaz mâle c...

Page 18: ...ne s éteint pas En cas de gaz liquides il faut visser à fond la vis de réglage En fin d opération remplacer la vieille étiquette par celle correspondant au nouveau gaz utilisé disponible dans nos Services Après vente Si la pression du gaz utilisé est différente ou variable par rapport à la pression prévue il faut installer sur la tuyauterie d entrée un régulateur de pression approprié conformément...

Page 19: ...u de bord Support GRILLE Support LECHEFRITE GLISSIERES de coulissement niveau 5 niveau 4 niveau 3 niveau 2 niveau 1 Description de l appareil Vue d ensemble Tableau de bord 4 5 1 5 3 0 0 1 5 0 18 0 22 0 FR 19 ...

Page 20: ...la valeur désirée en face du repère situé sur le tableau de bord voir ci dessous la gamme des températures disponibles Min 150 180 220 Max 140 145 160 200 230 240 La température est automatiquement atteinte et maintenue par le thermostat commandé par le bouton F Mise en marche et utilisation Allumage manuel du four En cas de panne de courant un allumage manuel du four est possible procéder comme s...

Page 21: ...ne montre 2 Puis en faisant marche arrière sélectionner le temps désiré en amenant les minutes indiquées sur le bouton MINUTEUR en face du repère fixe du tableau de bord 3 Le minuteur est un indicateur sonore de fonctionnement une fois le temps écoulé il émet un signal sonore Le minuteur ne contrôle pas l allumage et l arrêt du four Tableau 1 Gaz liquide Gaz naturel Brûleur Puissance thermique kW ...

Page 22: ... sélecteur Aliments à cuire Poids Kg Position gradins en partant du bas Temps de préchauffage minutes Position sélecteur de températur es Temps de cuisson minutes Four Lasagnes Cannelloni Gratin de pâtes Veau Poulet Dinde Canard Lapin Longe de porc Gigot d agneau Maquereaux Denté Truite en papillote Pizza napolitaine Biscuits secs Tarte Gâteau au chocolat Gâteaux levés 2 5 2 5 2 2 1 7 1 5 2 5 1 8 ...

Page 23: ...les boutons sont bien dans la position quand l appareil n est pas utilisé Ne pas tirer sur le câble pour débrancher la fiche de la prise de courant N effectuer aucune opération de nettoyage ou d entretien sans avoir auparavant débranché la fiche de la prise de courant En cas de panne n essayer en aucun cas d accéder aux mécanismes internes pour tenter de réparer l appareil Contacter le service d A...

Page 24: ...e briser le verre Pour nettoyer plus à fond il est possible de déposer la porte du four 1 ouvrir la porte complètement voir figure 2 à l aide d un tournevis soulever et faire pivoter les leviers F situés sur les deux charnières voir figure 3 saisir la porte par les côtés la refermer lentement mais pas complètement Tirer ensuite la porte vers soi en la dégageant des charnières voir figure Remonter ...

Page 25: ...o 31 Panel de control 31 Puesta en funcionamiento y uso 32 Poner en funcionamiento el horno 32 Utilizar el temporizador 33 Programas 34 Programas de cocción 34 Consejos prácticos de cocción 34 Precauciones y consejos 35 Seguridad general 35 Eliminación 35 Ahorrar y respetar el medio ambiente 35 Mantenimiento y cuidados 36 Cortar el suministro eléctrico 36 Limpiar el aparato 36 Limpiar la puerta 36...

Page 26: ... adecuada vigilancia o si han sido instruidos sobre el uso del aparato de modo seguro y comprenden los peligros relacionados con el mismo Los niños no deben jugar con el aparato Las operaciones de limpieza y de mantenimiento no deben ser realizadas por niños sin vigilancia No utilice productos abrasivos ni espátulas de metal cortantes para limpiar la puerta de cristal del horno ya que podrían raya...

Page 27: ... También se puede realizar de manera indirecta desde ambientes adyacentes que posean un conducto de ventilación hacia el exterior como se describe más arriba y que no sean partes en común del inmueble ambientes con peligro de incendio o dormitorios Los gases de petróleo licuados más pesados que el aire se depositan en las partes más bajas Luego los ambientes que contienen garrafas de GPL deben ten...

Page 28: ...e los contactos L N y luego fijar los cables debajo de las cabezas de los tornillos respetando los colores Azul N Marrón L y Amarillo Verde ver la figura 3 Fijar el cable en el correspondiente sujetacable 4 Cerrar la tapa del panel de bornes Conexión del cable de alimentación eléctrica a la red Instale en el cable un enchufe normalizado para la carga indicada en la placa de características ver al ...

Page 29: ...segurada por una junta Si resultara necesario girar el empalme sustituya siempre la junta estanca suministrada con el aparato El empalme de entrada de gas al aparato es fileteado 1 2 gas macho cilíndrico Conexión del tubo flexible de acero inoxidable con pared continua y fijación con rosca El empalme de entrada de gas al aparato es fileteado 1 2 gas macho cilíndrico La colocación de dichos tubos s...

Page 30: ...so de gas líquido el tornillo de regulación deberá ajustarse a fondo Al finalizar la operación sustituya la anterior etiqueta de calibrado con la correspondiente al nuevo gas que se va a utilizar disponible en nuestros Centros de Asistencia Técnica En el caso en que la presión del gas utilizado sea distinta o variable de la prevista es necesario instalar en la cañería de ingreso un regulador de pr...

Page 31: ...Panel de control Bandeja PARRILLA Bandeja GRASERA GUÍAS de deslizamiento de las bandejas posición 5 posición 4 posición 3 posición 2 posición 1 4 5 1 5 3 0 0 1 5 0 18 0 22 0 Piloto GRILL Perilla del TEMPORIZADOR Perilla del HORNO GRILL Botón LUZ DEL HORNO ES 31 ...

Page 32: ... obtener se indica a continuación Min 150 180 220 Max 140 145 160 200 230 240 La temperatura seleccionada se alcanza automáticamente y es mantenida constante por el órgano de control el termostato accionado por la perilla Encendido manual del horno En el caso de un corte momentáneo de energía eléctrica se puede encender el quemador del horno manualmente 1 abra la puerta del horno 2 acerque una cer...

Page 33: ... en sentido horario 2 Volviendo hacia atrás en sentido antihorario fije el tiempo deseado haciendo coincidir los minutos indicados en el mando TEMPORIZADOR con la referencia fija que se encuentra en el panel de control 3 El temporizador es un contador de minutos cuando se cumple el tiempo emite una señal sonora El temporizador no controla ni el encendido ni el apagado del horno A 15 C y 1013 mbar ...

Page 34: ...olocar la mozzarella queso típico de Italia en la mitad de la cocción Posición de la perilla de selección Comida para cocinar Peso Kg Posición para la cocción en los pisos desde abajo Tiempo de precalentamiento minutos Posición de la perilla del termostato Tiempo de cocción minutos Horno Lasañas Canelones Fideos al horno Ternera Pollo Arrollado de pavo Pato Conejo Lomo de cerdo Cuarto trasero de c...

Page 35: ...e que los mandos estén en la posición cuando no se utiliza el aparato No desconecte el aparato de la toma de corriente tirando del cable sino sujetando el enchufe No realice la limpieza o el mantenimiento sin haber desconectado primero el aparato de la red eléctrica En caso de avería no acceda nunca a los mecanismos internos para intentar una reparación Llame al Servicio de Asistencia Técnica ver ...

Page 36: ...figura Vuelva a colocar la puerta siguiendo el mismo procedimiento pero en sentido contrario Controle las juntas Controle periódicamente el estado de la junta que rodea la puerta del horno Si se encontrara dañada llame al Centro de Asistencia Técnica más cercano ver Asistencia Es aconsejable no usar el horno hasta que no haya sido reparada Sustituir la bombilla Para sustituir la bombilla de ilumin...

Page 37: ...sta de conjunto 43 Painel de comandos 43 Início e utilização 44 Início do forno 44 Utilização do timer 45 Programas 46 Programas de cozedura 46 Conselhos práticos para cozedura 46 Precauções e conselhos 47 Segurança geral 47 Eliminação 47 Economia e respeito do meio ambiente 47 Manutenção e cuidados 48 Desligar a corrente eléctrica 48 Limpeza do aparelho 48 Limpeza da porta 48 Substituição da lâmp...

Page 38: ...ou caso tenham recebido instruções em relação ao uso do aparelho de forma segura e tenham conhecimento dos perigos associados As crianças não devem brincar com o aparelho As operações de limpeza e manutenção não devem ser efectuadas por crianças sem vigilância Não utilizar produtos abrasivos nem espátulas de metal cortantes para limpar a porta em vidro do forno uma vez que pode riscar a superfície...

Page 39: ...talmente Outro sistema possível seria o de capturar o ar em forma indirecta a partir de locais adjacentes que não constituam partes comuns do imóvel ambientes com perigo de incêndio nem quartos de dormir que possuam um conduto de ventilação comunicadora com a parte externa Os gases de liquefeitos de petróleo mais pesados do que o ar estagnam se embaixo Portanto as salas que contiverem cilindros de...

Page 40: ...os contactos L N e em seguida prenda os fios embaixo das cabeças dos parafusos a obedecer as cores Azul N Castanho L Amarelo Verde veja a figura 3 Prenda o cabo no respectivo grampo 4 Feche a tampa da caixa dos terminais Ligação do cabo de fornecimento à rede eléctrica Monte no cabo uma ficha em conformidade com as normas para a carga indicada na placa de identificação veja ao lado No caso de uma ...

Page 41: ...o é assegurada por uma guarnição Se for preciso girar a união será absolutamente necessário trocar a guarnição de vedação fornecida com o aparelho A junta de entrada de gás no aparelho tem rosca de 1 2 gás macho cilíndrica Ligação com tubo flexível de aço inoxidável com parede contínua com rosca A junta de entrada de gás no aparelho tem rosca de 1 2 gás macho cilíndrica A instalação destes tubos d...

Page 42: ... novo gás utilizado que se acha nos nossos Centros de Assistência Técnica No caso dos gases líquidos o parafuso de regulação deve ser atarraxado até o fundo Se a pressão do gás utilizado for diferente ou variável daquela prevista é necessário instalar na tubagem de entrada um regulador de pressão conforme as Normas Nacionais em vigor sobre os reguladores para gás canalizados PLACA DAS CARACTERÍSTI...

Page 43: ...nnello di controllo Ripiano GRIGLIA Ripiano LECCARDA GUIDE di scorrimento dei ripiani posizione 5 posizione 4 posizione 3 posizione 2 posizione 1 4 5 1 5 3 0 0 1 5 0 18 0 22 0 Indicador do GRILL Selector dos TIMER Selector dos HORNO GRILL Botão LUZ DO FORNO PT 43 ...

Page 44: ...tervalo completo das temperaturas possíveis é apresentado logo a seguir Min 150 180 220 Max 140 145 160 200 230 240 Chega se à temperatura definida automaticamente e a mesma é mantida constante pelo componente de controlo o termostato comandado pelo botão Acender manualmente o forno No caso falta momentânea de energia eléctrica é possível acender o queimador do forno manualmente 1 abra a porta do ...

Page 45: ...direcção dos ponteiros do relógio 2 Volte na direcção contrária aos ponteiros do relógio para configurar o tempo que desejar faça coincidir os minutos indicados no selector do TIMER com a referência fixa do painel de comandos 3 O timer é um contador de minutos quando tiver passado o tempo toca um sinal acústico O timer não comando o forno para acender se nem se apagar A 15 C e 1013 mbars gás seco ...

Page 46: ...a cozedura Posição do botão de selecção Alimento a ser cozido Peso Kg Posição de cozedura prateleiras baixas Tempo de pré aquecimento minutos Posição do botão do termostato Tempo de cozedura minutos Forno Lasanha Cannellone Massa ao forno Vitela Frango Rollé de peru Pato Coelho Lombo de porco Coxa de cordeiro Cavala Peixe dentão Truta no cartucho Pizza Napolitana Biscoitos secos Tortas Bolo de cho...

Page 47: ...er a utilizar o aparelho Não puxe pelo cabo para desligar a ficha da tomada eléctrica pegue pela ficha Não realize limpeza nem manutenção sem antes ter desligado a ficha da rede eléctrica Se houver avarias em nenhum caso mexa nos mecanismos internos para tentar repará las Contacte a Assistência Técnica veja a Assistência técnica Não coloque objectos pesados sobre a porta do forno aberta Não é prev...

Page 48: ...vidro Para uma limpeza mais cuidadosa é possível retirar a porta do forno 1 abra a porta inteiramente veja a figura 2 utilizando uma chave de fendas levante e rode as alavancas F situadas nas duas dobradiças veja a figura 3 segure a porta dos dois lados exteriores e feche a novamente devagar mas não inteiramente Em seguida puxe a porta para a frente e retire a das dobradiças veja a figura Para mon...

Page 49: ...ل 55 وسیله معرفی کلی نمای کنترل صفحه 56 استفاده و اندازی راه فر اندازی راه تایمر از استفاده طرز 58 پخت های حالت پخت های حالت پخت عملی های راهنمایی 59 احتیاطی موارد و نکات کلی ایمنی انداختن دور زیست محیط از حفاظت و احترام 60 مراقبت و نگهداری دستگاه کردن خاموش دستگاه کردن تمیز فر در کردن تمیز المپ حباب کردن عوض رسانی کمک فارسی 49 ...

Page 50: ... دستگاه با ایمن کار به مربوط دستورات و ها آموزش یا و باشند نظارت تحت کارهای کنند بازی دستگاه با نباید کودکان کنند کار دستگاه با توانند می باشند شده آگاه کار خطرات باشند نظارت تحت آنکه مگر شود انجام کودکان توسط نباید نگهداری و کردن تمیز نکنید استفاده فر در شیشه کردن تمیز برای فلزی تیز های کاردک یا ساینده و خشن های شوینده از بشکند شیشه است ممکن و دهند می خراش را سطح چون نکنید استفاده دستگاه این برای...

Page 51: ...هانه بگیرد آنرا جلوی بتواند الزم هوای تواند می همچنین سیستم تامین غیرمستقیم بطور را احتراق برای های اتاق توان می مثال بعنوان کند لوله به فوق توضیح مانند را مجاور اینها البته کرد مجهز هوا گردش های یا خواب اتاق عمومی های اتاق نباید آتش خطر که باید که باشند هایی اتاق دارد وجود آنها در سوزی کف سمت به است تر سنگین هوا از چون LPG مایع گاز LPG مایع گاز سیلندر که هایی اتاق نتیجه در رود می اتاق صورت در تا ...

Page 52: ...ر را برق سیم کنید وصل متناظر های ترمینال ای قهوه سیم N ترمینال به آبی به زرد سبز سیم و L ترمینال به ببینید را شکل ترمینال شود محکم سیم تا کنید سفت را گیره پیچ 3 ببندید را تقسیم جعبه قاب 4 پریز به برق سیم کردن وصل دستگاه پالک روی شده درج بار با مطابق استاندارد دوشاخه یک ببینید را کناری کادر کنید نصب با سوئی همه مدارشکن یک از استفاده با و ً مستقیما باید وسیله وصل پریز و وسیله بین متر میلی 3 کنتاکت ب...

Page 53: ...اه قرار دستگاه ورودی بخش در تنظیم قابل شکل L اتصال یک این هست نیز درزگیر به مجهز نشتی از جلوگیری برای و دارد کرد عوض لوله اتصال چرخاندن بار هر از بعد باید را درزگیر از تغذیه لوله اتصال است شده ارائه دستگاه همراه درزگیر است دار رزوه گازی و اینچ 1 2 قطر به نری نوع دار رزوه اتصال به فوالدی بند بدون منعطف لوله یک کردن وصل دار رزوه گازی و اینچ 1 2 قطر به نری نوع از تغذیه لوله اتصال است کامل شدن باز صور...

Page 54: ...رد سفت امکان جای برچسبی با را بندی رده قدیمی برچسب کار این انجام از بعد این کنید عوض دهد می نشان را مصرفی جدید گاز نوع که کنید تهیه ما خدماتی مراکز از توانید می را برچسب مطابق باید است متفاوت شده توصیه فشار با گاز فشار اگر ورودی لوله در مناسب فشار رگوالتور یک محلی مقررات با کرد نصب دستگاه پالک ابعاد سانتیمتر 43 5 عرض سانتیمتر 31 ارتفاع سانتیمتر 43 5 طول حجم لیتر 58 برق اتصاالت کنید مراجعه دستگاه پ...

Page 55: ... دستگاه معرفی کلی نمای کنترل صفحه فارسی 55 ...

Page 56: ...خواه پخت دمای انتخاب برای آورده زیر در دماها کامل محدوده بیاورید کنترل صفحه مرجع است شده با که ترموستات و رسد می شده انتخاب دمای به خودکار بطور فر کرد خواهد حفظ ثابت را دما شود می کنترل گردان دکمه فر غیرخودکار کردن روشن و دستی بطور را فر شعله توانید می برق قطع صورت در کنید روشن غیرخودکار کنید باز را فر در 1 روشن فندک یا کبریت یک 2 سوراخ نزدیک شکل مطابق را F گردان دکمه بگیرید شعله فشار کامل را ببین...

Page 57: ...ت در را دکمه دلخواه زمان تعیین برای 2 نشانگر با را گردان دکمه روی های دقیقه بچرخانید ساعت های دهید مطابقت کنترل صفحه روی زمان مدت شدن سپری از بعد است دقیقه تایمر زمان واحد 3 رسید خواهد گوش به زنگ صدای شده انتخاب کند خاموش یا روشن را فر تواند نمی تایمر نازل و شعله مشخصات 1 جدول مایع گاز طبیعی گاز شعله کیلووات به حرارتی توان ناخالص حرارتی ارزش پس بای 1 100 نازل 1 100 التدفق ساعة جرام نازل 1 100 جریا...

Page 58: ...اگر بگذارید پیتزا روی پخت زمان از نیمی گذشت از بعد را پخت راهنمای جدول دکمه تنظیم انتخابگر بپزید خواهید می که غذایی وزن به کیلوگرم وضعیت قرارگیری از پخت سینی فر پایین گرمایش پیش زمان دقیقه دما دکمه تنظیم پخت زمان دقیقه فر الزانیا کانلونی پاستا گوساله گوشت مرغ بوقلمون گوشت برشهای اردک خرگوش خوک گوشت گوسفند ران ماکارل ماهی دنتکس فویل در شده پخته آال قزل ناپل سبک به پیتزا خشک بیسکوئیت تارت شکالتی کیک...

Page 59: ...شه بکشید را دستگاه برق سیم خواهید می اگر را سیم خود نه بکشید پریز از اقدام باشید کشیده پریز از را دستگاه برق سیم اینکه بدون هرگز نکنید نگهداری کارهای یا کردن تمیز به آنرا خودتان نباید شرایطی هیچ تحت اشکال بروز صورت در ممکن شود می انجام افراد خود توسط که تعمیراتی کنید تعمیر یک با گردد دستگاه بیشتر خرابی یا جراحت بروز باعث است ببینید را رسانی کمک بخش بگیرید تماس خدمات مرکز نگذارید فر در روی را اشیاء...

Page 60: ...ر ساینده مواد خورد خواهد ترک شیشه و دهند می خراش را سطح بیاورید بیرون را فر در توانید می بهتر کردن تمیز برای کنید باز کامل بطور را فر در 1 ببینید را شکل کردن بلند برای گوشتی پیچ یک از 2 قرار لوال دو روی که F کوچک اهرم ببینید را شکل کنید استفاده دارند آن بیرونی کناره دو از را در 3 سمت به را در ببندید نیمه تا و گرفته بیاید بیرون ها لوال از تا بکشید خود کردن عوض برای ببینید را شکل عکس ترتیب به را مرا...

Page 61: ...لغاز توصيالت 67 الجهاز وصف عامة نظرة التحكم لوحة 68 واالستخدام التشغيل الفرن تشغيل التوقيت ساعة استخدام كيفية 70 الطهي أساليب الطهي أنماط عملية طهي نصائح 71 ونصائح حذر وسائل العامة الوقاية التخلص عليها والحفاظ البيئة احترام 72 والعناية الصيانة الجهاز تشغيل إيقاف الجهاز تنظيف الفرن باب تنظيف اإلنارة مصباح تبديل المساعدة عربي 61 ...

Page 62: ...العقلية الحسية القدرات أو الجسدية اإلعاقات ينطوي لتي المخاطر وفهموا آمنة بطريقة الجهاز باستخدام يتعلق فيما تدريبهم أو إرشادهم تم إذا إال بدون األطفال بواسطة الجهاز وصيانة تنظيف يتم أال يجب بالجهاز األطفال يعبث أال يجب عليها عليهم إشراف تخدش أن يمكن حيث الفرن باب زجاج لتنظيف حادة معدنية كاشطة أو خشنة منظفة مواد تستخدم ال الزجاج ع ّ د تص إلى يؤدي ما وهو السطح الجهاز مع بالضغط المنظفات أو بالبخار الم...

Page 63: ...نظام يمكن مباشر بشكل لالحتراق الالزم الهواء المجهزة المجاورة الغرف من أي بأعلى الشرح تم كما للتهوية بأنابيب االستخدام تكون أال يجب الغرف أن إال تكون قد غرف أو للنوم غرف أو العام الحرائق اندالع لخطر رضة ُ ع الهواء من أثقل ألنها األرض إلى السائلة البترولية الغازات تسقط الغازات أسطوانات على تحتوي التي الغرف فإن ذلك وعلى تسمح بمنافذ كذلك مجهزة تكون أن يجب السائلة البترولية فإن لذلك ونتيجة تسرب حدوث حا...

Page 64: ...رف األزرق السلك للطرف البني السلك N بـ اليه والسلك L بـ اليه المشار النهائي النهائي للطرف أخضر األصفر الرسم أنظر اليه المشار الكبشة برغي شد بواسطة الكبل بتثبيت قم 3 النهائية اللوحة غطاء أغلق 4 الرئيسية الكهربائية بالشبكة الكهرباء تزويد كبل توصيل على إليه المشار الجهد مع تتالءم قياسية إشعال شمعة بتركيب قم المجاور المربع أنظر البيانات لوحة مباشرة الرئيسية الكهربائية بالشبكة الجهاز يتصل أن يجب على مل...

Page 65: ...الجهاز على نوع أي من ضغط سطح على مثبت L حرف شكل على للضبط قابل أنبوب يوجد العازل استبدال ً دائما يجب التسربات لمنع عازل باستخدام الجهاز تزويد أنبوب تركيب الجهاز مع مزود العازل األنبوب لف بعد 1 2 أسطوانية ذكرية وصلة هو الغاز بوصلة الممتدة المرنة للصلب المقاوم الفوالذ أنابيب توصيل 1 2 أسطوانية ذكرية وصلة هو الغاز تزويد أنبوب تركيب عند ملم 2000 عن طولها يزيد ال بحيث األنابيب هذه تركيب يجب األنبوب أن ...

Page 66: ...مكان بقدر الضبط بآخر القديم القيم ملصق استبدل اإلجراء هذا من االنتهاء بمجرد هذا على الحصول يتم الغاز من المستخدم الجديد للنوع يشير الخدمة مراكز من أي من الملصق تركيب يجب به الموصى الضغط عن ً مختلفا الغاز ضغط كان إذا اللوائح مع يتطابق بما الداخلي األنبوب على للضغط مناسب منظم المتبعة المحلية البيانات لوحة األبعاد سم 43 5 االرتفاع سم 31 االرتفاع سم 43 5 العمق السعة لتر 58 التوصيالت الكهربائية البيانا...

Page 67: ... الجهاز وصف عامة نظرة التحكم لوحة عربي 67 ...

Page 68: ...م النطاق يلي وفيما التحكم لوحة على مرجعية بعالمة المطلوبة الحرارة لدرجات الكامل ﺃﺩﻧﻰ ﺣﺪ 150 180 220 ﺃﻗﺼﻰ ﺣﺪ 140 145 160 200 230 240 وتعمل ً أوتوماتيكيا المختارة الحرارة درجة إلى الفرن يصل ثبات على المقبض بواسطة فيها التحكم يتم التي الترموستات الحرارة درجة ً يدويا الفرن تشغيل ً يدويا الفرن محرق إشعال يمكن الكهربائي التيار انقطاع حالة في الفرن باب افتح 1 والعة أو ثقاب عود أشغل 2 كما المحرق فتحة من ب...

Page 69: ...ينة الدقائق بمالءمة قم المطلوب التحكم لوحة على الموجود المختار الوقت انتهاء عند بالدقائق التوقيت ساعة تعمل 3 صوت بإسماع التنيبه جرس فسيقوم تشغيله يوقف أو الفرن الوقت عداد يشغل ال والفوهات المحارق مواصفات 1 الجدول السائل الغاز الطبيعي الغاز المحرق واط بالكيلو الحرارية الطاقة للحرارة اإلجمالية القيمة جانبي 1 100 الفوهة 1 100 التدفق ساعة جرام الفوهة 1 100 التدفق ساعة بوصة أسمية خفض ملم ملم الفرن 2 60...

Page 70: ...لختيار طهيه المطلوب الطعام الوزن بالكجم رف موضع في الطهي الفرن أسفل اإلحماء وقت المسبق بالدقائق مقبض إعداد الترموستات الطهي وقت دقائق الفرن الزانيا كانيلوني المخبوزة المعجنات العجل لحم دجاج الرومي الديك لفافة بط أرنب الخنزير خاصرة لحم الخروف سيقان الماكريل سمك دينتكس ألومنيوم ورق في مخبوز سلمون سمك نابوليتان طريقة على بيتزا المجفف البسكويت التورتات الشوكوالتة كعكة المتخمر الكعك 2 5 2 5 2 2 1 7 1 5...

Page 71: ...هاز يكون مقبس من القابس دائما اسحب الكهرباء عن الجهاز فصل عند الكبل تسحب ال الرئيسية الشبكة شبكة عن الجهاز فصل دون صيانة أو تنظيف عملية بأي تقم ال الرئيسية الكهرباء من شكل بأي تحاول ال الجهاز عمل في خلل حدوث حال في قبل من التصليحات إلجراء يمكن بنفسك الجهاز تصليح األشكال الجهاز تعطيل إلى حتى أو األذى يلحق أن الخبرة قليلي أشخاص المساعدة انظر الخدمة بمركز اتصل مفتوح وهو الفرن باب على ً ء أشيا تضع ال ...

Page 72: ...تخدش أن يمكن فهذه حادة معدنية يلي كما الباب إزالة يمكنك كامل بشكل الفرن لتنظيف بأكمله الفرن باب افتح 1 الرسم أنظر الرافعات وإدارة لرفع مفك استخدم 2 المفصلتين على الموجودة F الصغيرة الرسم أنظر الخارجيين جانبيه من بالباب أمسك 3 الباب اسحب تقريبا نصفه إلى واغلقه انظر مفصلتيه من إخراجه مع باتجاهك نفذ مكانه إلى الباب إلعادة الرسم ّ عكسي بترتيب التعليمات الفرن مطاط فحص المطاط تلف إذا منتظم بشكل الفرن حو...

Reviews: