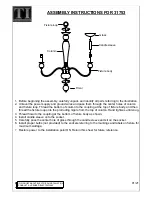
background image

A

B

C

D

G

E

F

3

Ruler

 - Use this ruler to help correctly identify the screws

Tools required

0

5

10 15 20 25 30 35 40 45 50 55 60 65 70 75 80 85 90 95 100

110 115 120 125 130 135 140 145 150 155 160 165 170

105

0

10

20

30

40

50

60

70

80

90

100

110

120

130

140

150

0

1

2

3

4

5

6

Phillips screwdriver 

(medium & large)

F

latblade screwdriver 

(medium)

Small 

hammer

R

uler/tape 

measure

Drill

Eye protection 

(when using a 

hammer or glue)

7mm Suitable drill bit 

(for use with wall plug)

The screws length is measured from the head to the point (30mm screw shown).

Please check you have all the 

 ttings listed below

Note:

 The quantities below are the correct amount to complete the assembly. In some cases more 

 ttings 

may be supplied than are required. 

Components - 

F

ittings

Wall strap x 1

H

Allen key x 1

Wall plug x 1

14mm Screw x 1

30mm Dowel x 16

Nail x 44

Screw cover x 24

50mm Screw x 24

x 1

(This screw is

included in the

wall strap bag)

Summary of Contents for Phoenix 314/9449

Page 1: ...Dimensions Width 70cm Depth 35 5cm Height 175cm Important Version 1 Date 20 10 14 Phoenix 5 Shelf If you need help or have damaged or missing parts call the Customer Helpline Argos 0345 6400800 Please...

Page 2: ...r product please ensure that your power drill is set on a low torque setting Do not use this item if any components are missing or damaged Parts of the assembly will be easier with 2 people During ass...

Page 3: ...elow If you have damaged or missing components call the Customer Helpline Argos 0345 6400800 2 Top Bottom panel x 2 69 9 x 34 9cm 1 Right Left side panel x 2 171 6 x 34 9cm 3 Shelf x 4 66 8 x 34 9cm 2...

Page 4: ...r tape measure Drill Eye protection when using a hammer or glue 7mm Suitable drill bit for use with wall plug The screws length is measured from the head to the point 30mm screw shown Please check you...

Page 5: ...Screw covers to cover the screw heads C X 4 Insert Dowels into the Shelf A 2 2 2 3 3 2 2 2 2 2 2 2 c Fasten Screws 8 pcs by Allen key to fix Right Left side panel onto the unit 3 B H Use Screw covers...

Page 6: ...ortant The unit MUST be square when back is attached 3 1 5 4 1 Use Screw covers to cover the screw heads C 5 Attaching top and bottom panels Fasten Screws 8 pcs by Allen key to fix Top Bottom panel on...

Page 7: ...onal advice if in doubt Step 4 Assembly is complete It is recommended that the unit is fixed to a wall With help move the unit into position Fixing to wall Fix Wall strap to top panel using Screw Mark...

Page 8: ...lugs or screws do not become loose You can use one of the following types of wall plug if your walls are made of brick breeze block concrete stone or wood Important When drilling into walls always che...

Reviews: