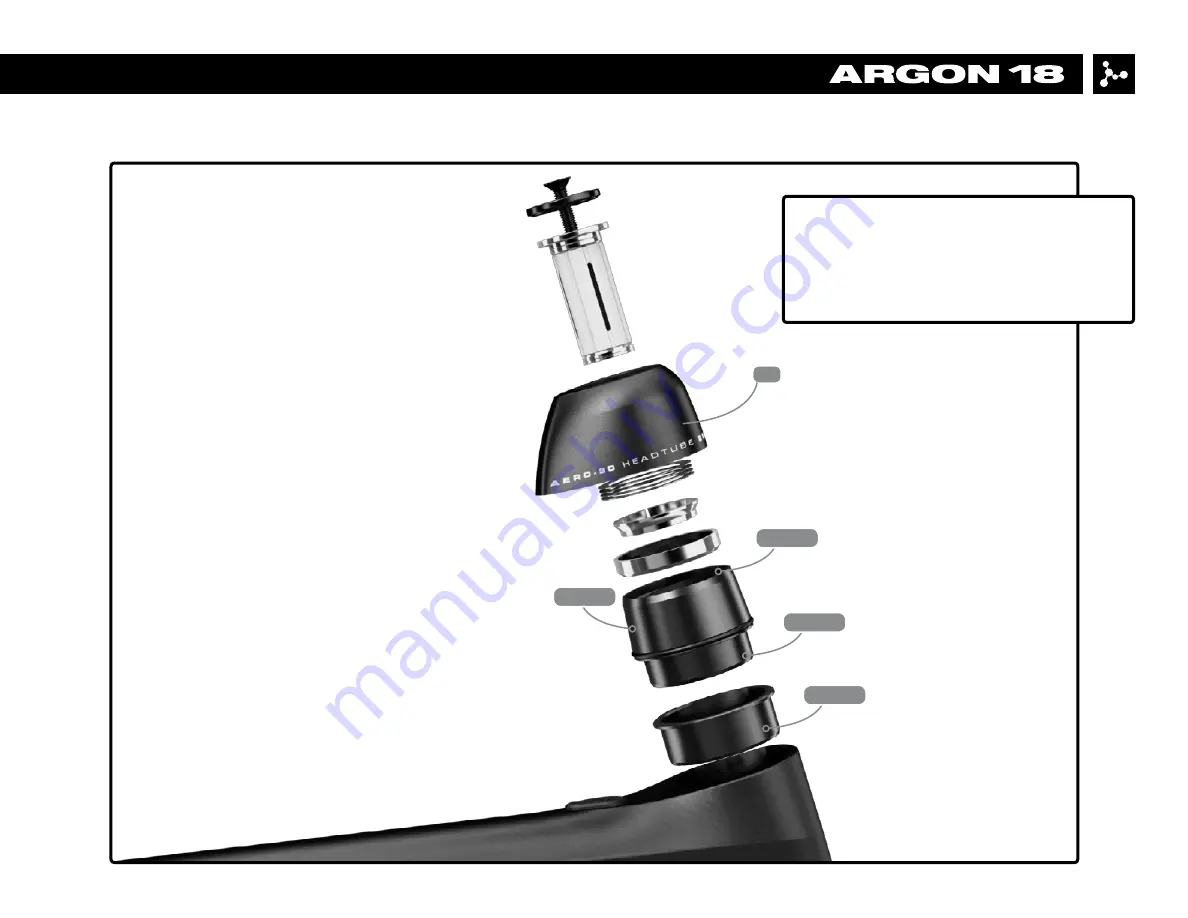
Install the 3D headset (16) according to
the AERO Pressfit assembly guide. You can
choose from 3 different heights: 25mm,
15mm or 0mm.
5
NITROGEN PRO: 3. Headset Installation
16
GREASE
Page 1: ...NITROGEN PRO ASSEMBLY GUIDE Valid for MY2016 Nitrogen Pro Revision 2 0 10 08 2015...
Page 2: ...3 11 Derailleur Hanger Adjustment 34 12 Frameset Parts Checklist 36 For the warranty to be valid the bicycle must be fully assembled by an authorized Argon 18 dealer High end components particularly c...
Page 3: ...these parts according to their torque specifications NITROGEN PRO 1 Frame Inspection 2 BEFORE ASSEMBLING YOUR NEW NITROGEN PRO MAKE SURE THAT YOU HAVE ALL THE FOLLOWING 1 Brakes and gears cables and...
Page 4: ...right to modify change parts of the frameset at any moment without prior notice 16 17 18 3 3g 3c 3e 3h 3f 3d 3b 3a 3i 20 15 4 5 14 13 10 9 6 7 12 8 2 11 17b 17f 17a 17g 17d 17e 17c 17h 17i 17h 17i 17h...
Page 5: ...m A 01 Small Elastic Cover Large Elastic Cover Small Washer M8 Screw M8x50mm Screw M8x30mm Screws M5x16mm 4 22 23 24 25 26 27 28 29 30 31 32 Frameset Handlebar Width Stem Size 20mm Size 38 40 42 44 Sm...
Page 6: ...Install the 3D headset 16 according to the AERO Pressfit assembly guide You can choose from 3 different heights 25mm 15mm or 0mm 5 NITROGEN PRO 3 Headset Installation 16 GREASE GREASE GREASE GREASE...
Page 7: ...htly grease the bottom section of the 3D bearing holder 6 and insert the plastic sleeve 7 3 STEP Position the headset inside the head tube Place the top 3D assembly with the headset bearing inside thi...
Page 8: ...ring Bearing 3D bearing holder Plastic sleeve no need for 0mm setup Top cap for 0mm setup 1 2 3 4 4 5 5 6 6 7 7 8 Press Fit 3D system tool 1 1 4 Bearing Cup Press Park Tool HHP 2 IMPORTANT Use the Pr...
Page 9: ...20mm Large 20mm Large 20mm Large 20mm Medium 20mm Medium 20mm Small Medium Small Medium Small Medium 38 40 42 44 Bar width cm Stem size mm 70 80 90 100 110 120 130 140 Con guration Matrix Failure to u...
Page 10: ...the desired stem length bolt and spacer needed refer to the Product Matrix chart on p X note that the bolt comes pre coated with Loctite In the event of assembling and disassembling one drop of blue L...
Page 11: ...er and stem length using a torque wrench a ratchet extension and a 6mm bit thread the bolt and spacer up to 40Nm 5 For easier handling and to prevent damage to the handlebar we recommend holding it do...
Page 12: ...on the fork and secure the stem combo with the two side bolts to 5Nm 5Nm 5Nm 2 3mm Note When cutting the fork allow 2mm or 3mm of additional space between the compressor cap and the fork in order to o...
Page 13: ...e desired height and make a mark with a white pen 2 Lower the shifter assembly Electronic Shifting Important Always pass the electronic cables before the brake housing the opposite would make it very...
Page 14: ...NITROGEN PRO 4 Stem Handlebar Installation 3 Fish two cables inside the handlebar on each side 4 Select the length of necessary housing and pass both at the same time 13...
Page 15: ...NITROGEN PRO 4 Stem Handlebar Installation 5 Pass the brake and gear cables in the shifter body 6 Connect cables to housing and put the levers back to the white mark on the handlebar 14...
Page 16: ...NITROGEN PRO 4 Stem Handlebar Installation Computer mount is compatible with any 2 screw computer mounting accessories Note tighten to 3 5 Nm maximum 15...
Page 17: ...ize Front brake Rear brake front section Rear brake rear section Front derailleur Rear derailleur 40cm 30cm 20cm 110cm 185cm 45cm 35cm 20cm 110cm 190cm 50cm 40cm 20cm 120cm 195cm 55cm 45cm 25cm 125cm...
Page 18: ...NITROGEN PRO 5 Front Brake Installation Install the brakes as shown in the diagram 17 8Nm 8Nm GREASE GREASE 17h 17d 17e 17c 17g 17f 17a 17b LOCTITE LOCTITE...
Page 19: ...OGEN PRO 5 Front Brake Installation 1 Pass the cable through the curved straw and then in the appropriate guide 2 Fix the cable to the caliper with the 6mm screw and tighten it to 6Nm 18 6Nm Curved st...
Page 20: ...ppropriate Adjust brake pads according to the width of your rims You can configure the brake pad spacers with 1mm 17h or 2mm 17i depending of the rim width you are using 19 Spacers required according...
Page 21: ...NITROGEN PRO 6 Rear Brake Installation Install the brakes as shown in the diagram 20 8Nm 8Nm GREASE outer side 18b 18h 18d 18e 18a 18g 18c 18f LOCTITE...
Page 22: ...he cable guide Make sure that the length of the cable housing is sufficient for the guide to remain horizontal as it can cause interference with the rear wheel tire 3 Use the proper brake bad spacers...
Page 23: ...recommended to use the non compressible jagwire KEB housing Jagwire 5mmKEB SL Suggested lengths of the cable housing housing size Front brake Rear brake front section Rear brake rear section Front de...
Page 24: ...Note The front brake cable guide 17h should be front oriented to ensure good rotation of the handlebar 23 NITROGEN PRO 7 Cable Housing Installation Frontbrakecableguide 17h...
Page 25: ...24 NITROGEN PRO 7 Cable Housing Installation Front brake Pass the cable through the cable guide 17h Create a hook with the cable it will be easier to pass it inside the retainer nut 6Nm...
Page 26: ...necessary cable housing to ensure proper rotation of the handlebar Insert the KEB cable housing and the cable trough the top tube Rear section With a magnet get the rear brake cable out of the frame...
Page 27: ...emove the cable guide 9 under the bottom bracket Pass the cable housing inside the downtube until it comes out the top tube Add a plastic cap at the end of the housing pass the rear derailleur cable i...
Page 28: ...27 NITROGEN PRO 7 Cable Housing Installation 19 Use the provided grommet 19 to correctly set the rear derailleur cable housing in the chainstay mechanical drive train only 19...
Page 29: ...rain Specification The Di2 cable routing can be achieved easily using this simple trick use a gear cable and a metal cable end to fix the Di2 cable For more information on Shimano Di2 electronic syste...
Page 30: ...29 NITROGEN PRO 8 Electronic Drive train Specification Use the proper grommet on the top tube to fix the cable correctly depending if you use electronic shifting or mechanical drive train 15 14...
Page 31: ...30 NITROGEN PRO 8 Electronic Drive train Specification When using an electronic drive train use the grommet 13 to fix the front derailleur cable 13...
Page 32: ...tronic Drive train Specification The Di2 battery is hidden in the seatpost use the Di2 battery holder 2o to fix the battery correctly Apply a slight amount of grease on both parts 20 GREASE CARBON FIB...
Page 33: ...seat clamp wedge 11 2 Place the seat clamp wedge 11 12 inside the frame 3 Insert the seatpost 3 on which some carbon fiber assembly gel has been applied 4 Position the seatpost to the desired height 5...
Page 34: ...en the rail clamp 3c up to 6Nm using the half moon bolt 3i 2 Adjust the angle and the offset of the saddle by hand tightening the thumb screw 3h 3 The rocker 3b can be flipped to change the saddle off...
Page 35: ...front derailleur hanger 6 can be adjusted according to the front derailleur angle to get an equal curve between the derailleur and the big chain ring Once at the right angle use blue 242 Loctite and...
Page 36: ...r Adjustment 35 1 Ensure that the dropout is aligned 2 Use Derailleur Hanger Alignment Gauge like Park Tool Item DAG 2 For any assistance visit Park Tool s website parktool com product derailleur hang...
Page 37: ...gen seat post ASP 5100 AG SP 02 1 SP NITPRO 16 3a AG SP 02 carbon part AG SP 02 carbon part 1 3b Lower Rail Clamp Lower Rail Clamp 1 3c Upper Rail Clamp Upper Rail Clamp 1 3d Barrel Nut M6 Barrel Nut...
Page 38: ...ake cable stopper 1 38878 5 Top tube brake cable stopper 308030017 CS 177 Top tube brake cable stopper 1 38879 6 Front derailleur hanger 308020016 with top screw ButtonHead HexSocket with screws M5 16...
Page 39: ...80 15 Top tube grommet for Di2 309030007 Top tube grommet for Di2 1 38881 Also Included with the frameset shipped separately 16 Headset No 39 3D No 39 3D Press Fit Argon 18 Exclusive with compressor T...
Page 40: ...ht 17e Washers 17f Brake pad left and right 17g Pivot bolt 17h cable guide 17i 2mm spacer 2mm spacer for TKB137 TKB138 brakes 2 17j 1mm spacer 1mm spacer for TKB137 TKB138 brakes 2 18 TKB138 rear brak...
Page 41: ...er 2 End caps CM029BJ POP open end cap black 1 End caps CC715BJ alloy black anodized for rear brake housing 2 Cable STS slick stainless 1 5mm 2 Barrel adjuster CM265BJ for front and rear brake 2 Derai...
Page 42: ...cm 80074 AHB5000 42cm 80075 AHB5000 44cm 1 80076 23 Washer M8 1 80034 24 Screw M8x50mm 1 80030 25 Screw M8x30mm 1 80029 26 Elastic Cover Small 1 80162 27 Elastic Cover Large 1 80163 28 Stem Spacer 20m...