background image

KS-700 Quick Installation Guide

8

Product setup

Initial installation

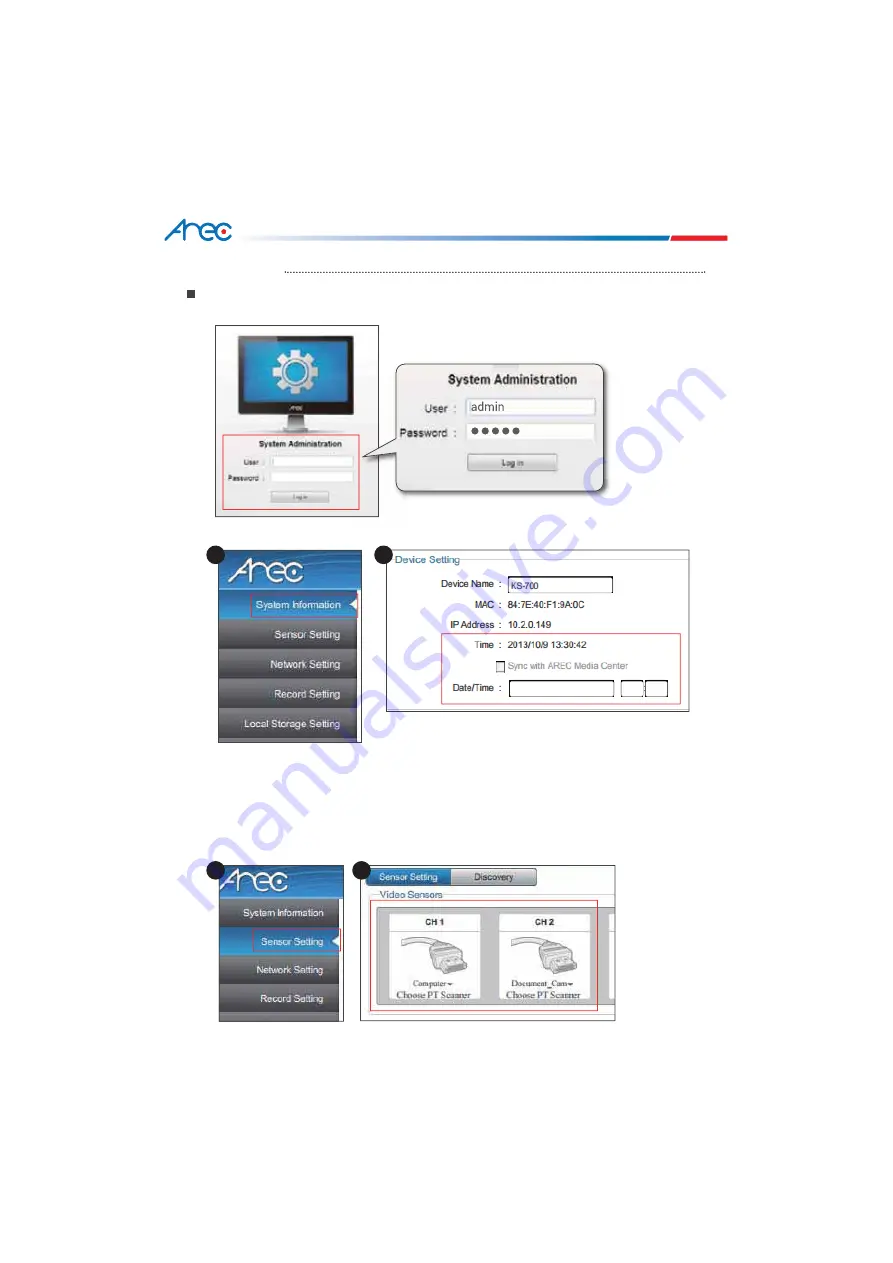
Step1: Log in 

System Administration

, both 

User

 and 

Password

 are defaulted as 

admin.

Step2 : Setting device time, adjust 

Time

 setup at 

System Information

.

Step3 : Setting CH1 and CH2 video input source priority. When user only connected to VGA 
              cables or HDMI cables, CH1 and CH2 will detect automatically to differentiate which 
              cables they are. Then switch image automatically.  Priority is used when user 
              connected both VGA cables and HDMI cables at the same time. Please use mouse to 
              click 

Video Sensor

 which at 

Sensor Setting

 to change images of VGA or HDMI. Then 

              the device will switch video input priority.

1

1

2

2

KS-700 Quick Installation Guide

roduct setup

Initial installation

Step1: Log in 

System Administration

, both 

User

 and

Password

 are defaulted as

admin.

Step2 : Setting device time adjust

Time

setup at

System Information

Summary of Contents for KS-700

Page 1: ...KS 700 Media Station ENGLISH Quick Installation Guide AREC Inc All Rights Reserved 2013 l www arec com All information contained in this document is Proprietary...

Page 2: ...na Increase the separation between the equipment and receiver Connect the equipment into an outlet on a circuit different from that to which the receiver is connected Consult the dealer or an experien...

Page 3: ...such as newspapers table cloths curtains etc no naked flame sources such as lighted candles should be placed on the apparatus attention should be drawn to the environmental aspects of battery disposa...

Page 4: ...sly codec streaming online multi channel split screen live broadcasting and web based video switcher providing complete lecture capture solution Power Adapter Antenna 3A Battery x4 Product CD Quick In...

Page 5: ...tion Remote Control receiving area Bluetooth Record Power Record Play Pause Stop Menu Channel Preview Layout Up Down Left Right Back OK Power on off devices Export document by driving USB flash drive...

Page 6: ...eo play Jump to next course play Switch record layout Pause video play Pause video recording Take a screen shot and capture into photo Start video recording Go to main menu screen Stop video play Stop...

Page 7: ...ampli er Speaker DVD player Hard drive Hard drive AREC TP 100 Auto Tracking System AREC AM 500 Wireless Microphone AREC CI 200 Network Camera Video input VGA HDMI Power Video output VGA HDMI Audio out...

Page 8: ...le Connected to projector or TV Audio input for Line or Mic For example Connected to ampli er or microphone Audio output for Line or Mic For example Connected to ampli er or Speaker USB flash drive or...

Page 9: ...etect automatically to differentiate which cables they are Then switch image automatically Priority is used when user connected both VGA cables and HDMI cables at the same time Please use mouse to cli...

Page 10: ...time devices which are discovered or added will show in the devices status Please click Network Camera or Auto Tracking Mount status list You may access device setting page Type Administrator and Pas...

Page 11: ...Step6 Back to Sensor Setting go to Video Setting Click CH3 and CH4 image Step7 After setting is nished Please click Apply Install successfully preview screen will appear four divided scene Click Add t...

Page 12: ...et your storage device It is recommended to connect brand new hard drive At initial setup please format rst Suggest selecting Enable Local Storage and Cycling Record After setting is nished please cli...

Page 13: ...ns 3 Heat will be generated during the use of this product therefore there must be suf cient ventilation for the temperature of the unit to remain at a stable status So please use the product under no...

Page 14: ...AREC Inc All Rights Reserved 2013 l www arec com All information contained in this document is Proprietary Made in Taiwan Version 2013 11 Part Number 40 70001 A51...

Reviews: