Arec KL-3W User Manual Download Page 35

KL-3W User Manual

35

www.arec.com

3.5 Edit the recording information

If you require to edit the information of a recording, click on the desired recording and you will be directed to the content 
information page. Replace the existing text or enter new information in the content fields. Click APPLY to save the changes.

3.4 Playback the recording

Click on the desired recording and you will be directed to the content information page. Use the player controls at the bottom 
of the window to watch the video. 
There might be more than one files listed under the window if the content is recorded in MP4 Mixed video/ Original source 
recording mode. Select the video for playback by clicking on the image of the desired one.
The title used for Mixed video is “Movie”, and those for Original source(s) are the name of the corresponding video input(s); 
by default are Content, Cam 1 and Cam 2.  To separately download MP4 Mixed video/ Original source files, select the desired 
file and click Download. The file size being download is shown within the button.

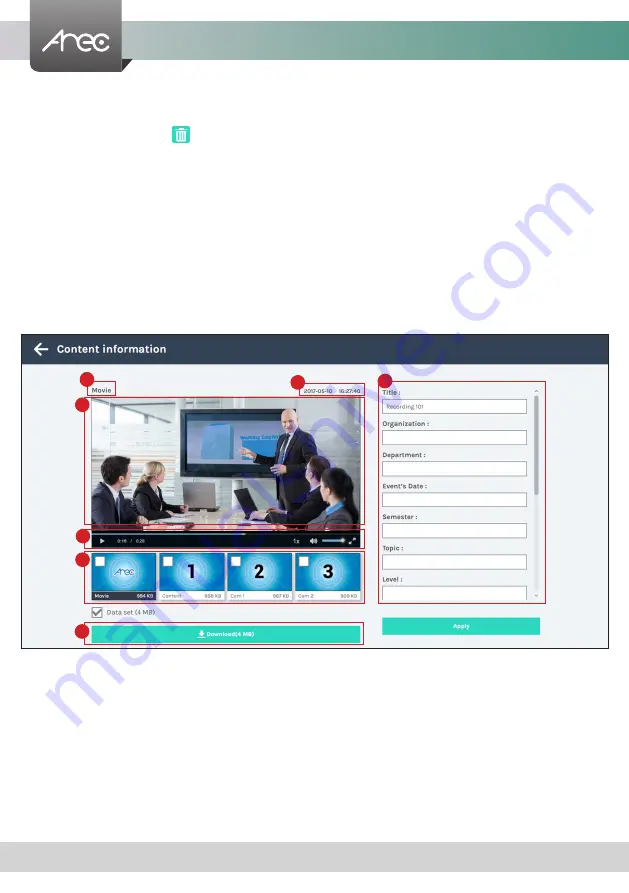
1. Title of the video file being played
2. Recording date and time
3. Edit the content fields
4. Playback window

5. Playback controls
6. Video files and data set (files containing metadata, thumbnail images,
    and bookmarks.)
7. Download button

1

6

4

5

7

2

3

3.3 Delete the recording

Recording packages can be deleted manually to make room for new recordings.
Select the recording and click        . A confirmation dialog box opens asking you to confirm the deletion. Click Confirm 
to permanently remove the recording packages. The list may not update immediately. Refresh the list by reloading this 
webpage. 

Summary of Contents for KL-3W

Page 1: ...AREC Inc All Rights Reserved 2017 l www arec com All information contained in this document is Proprietary KL 3W Media Station User Manual English...

Page 2: ...tion 1 1 2 Camera manager 1 1 3 PTZ control port 1 1 4 Audio 1 1 5 Display 1 2 Video 1 2 1 Recording 1 2 2 Streaming 1 2 3 Content 1 2 4 Logo and background 1 3 Storage 1 4 Upload 1 5 System 1 5 1 Sys...

Page 3: ...ing setup 2 3 1 Recording settings 2 3 2 Streaming settings 2 3 3 Other settings 2 3 4 Content settings Chapter 3 Video Manager 3 1 Upload the recording 3 2 Download the recording 3 3 Delete the recor...

Page 4: ...n 354mm L x 188 2mm W x 97mm H Weight 2692g Power Requirement 12V 3A Power Consumption Max 36W Max Operating Temperature Humidity 0 C 40 C 90 Maximum normal load description Insert 2 IP CAM to LAN por...

Page 5: ...t Line audio input 12 Audio input Mic audio input 13 Audio output Line audio output 14 Back USB port USB interface for camera control over RS 232 15 Network port RJ 45 Ethernet connector for network c...

Page 6: ...ting PC document cam notebook DV microphone amplifier network USB drive RS 232 Audio output LAN LAN Video output VGA HDMI Video input VGA HDMI Audio input USB USB Speaker TV projector RS 232 AREC Wire...

Page 7: ...Single Dual Triple Layout switch Green light of these three buttons flashes alternately Device booting up Green light of any Single Dual Triple layout button glows continuously Boot up completed One...

Page 8: ...in page with default username director and password director This user also has access to Video Manager web pages Administrator To setup the device log in Administrator with default username admin and...

Page 9: ...igure the recording streaming and other functions which define the content being recorded System are pages contain basic settings and information of this device 1 1 Media I O The pages within Media I...

Page 10: ...ted the system would detect and automatically switch to source of signal If both options are connected select one in between Network Camera Select IP address Select from the camera ip address drop lis...

Page 11: ...oom in out Click the buttons or drag on the control bar 5 Preset positions Click the buttons to command that the camera go to the preset position 6 Change preset Click the button to modify the preset...

Page 12: ...manager page You may click Refresh button to scan again Click Login button and the login authentication dialog pop out Enter the username and password of the camera to complete the authentication Take...

Page 13: ...ation VISCA 1 7 PELCO D P 1 255 Baud rate 2400 4800 9600 and 115200 Note Support USB to RS 232 serial port adapter with chip PL2303 or FT4232H Volume control Tune the recorded volume from each audio i...

Page 14: ...on of settings that defines the operating characteristics for a streaming recording include Recording Configure Encoder settings and Bookmark settings for recording Streaming Configure Encoder setting...

Page 15: ...ined option Profile name Video Resolution Bitrate Application description Full HD 1080p 6Mbps Dynamic scene and large local hard disk recording Internet Full HD 1080p 4Mbps General scene and medium lo...

Page 16: ...ww arec com Bookmark settings Select to add bookmark automatically at a regular period of time or whenever the layout is changed during recording Click Apply button at the bottom corner when finished...

Page 17: ...one to see the option details on the right side You may customize your own user defined option Click button to open customization window as shown below and click Save button to make the option change...

Page 18: ...ield Server or Stream URL and paste in the KL 3W streaming protocol setting field Streaming to Ustream Combine the contents of both fields RTMP URL and Stream Key insert a slash between them Paste thi...

Page 19: ...n IP address and the port number where the streaming is played in the format rtp ip port Unicast For a single point connection the destination IP must be set to the location where the stream is played...

Page 20: ...e existing recordings To edit the existing recording information see Video Manager KL 3W by factory default provides one logo one plain black background and three user configurable backgrounds Logo se...

Page 21: ...ead of an image un tick the selection by double clicking on the picture Change the background image Click Browse button and select the desired file in the Open dialog box The file name would appears w...

Page 22: ...ording function Make sure the front USB drive connected can be normally read and written and have enough space for the recorded files Loop recording Set ON OFF to allow prevent that the device automat...

Page 23: ...cording to the upload destination authentication method Connection test Click the Connection test button to validate upload settings Click Apply after setup is completed New setting is effective from...

Page 24: ...zed to PC or with an external NTP network time protocol server Boot settings Change the boot screen image The boot screen is the image you will see when you boot up the device Click Browse button and...

Page 25: ...bnet mask default gateway DNS server Click Apply at lower right corner click Confirm in popup dialog box Note The system will automatically reboot to complete the network settings Login the updated IP...

Page 26: ...1 5 3 WiFi module 1 5 3 1 System information The module provides quick and easy way to enable WiFi connectivity for all kinds of products such as AREC Wireless Full HD Camera and NB The module suppor...

Page 27: ...ting 1 Advanced settings Visit the module website you can modify the other configuration and management Note Log in the Web Interface please enter the correct user name and password and click OK Yes t...

Page 28: ...out 1 A live view window and a control panel of the KL 3W recording and streaming 2 A simplified setting page to configure the content that is going to be recorded and streamed 3 A visual sources moni...

Page 29: ...t provides one plain black background and three user configurable backgrounds See Administrator Video Logo and background for more details There are 21 layout templates which are factory default layou...

Page 30: ...The Record button is red to indicate active recording Pause Click Pause to pause recording The preview and the output video are also suspended while recording is paused To resume recording click Reco...

Page 31: ...will be stored in both the internal storage and the external front USB drive Note Make sure the front USB drive is properly connected and with enough space for the recorded files Live streaming Select...

Page 32: ...ttings fields if desired Click to open more elements of content description Click Clear all Save to temporarily erase preserve the texts in the field These texts will not be validated until that the A...

Page 33: ...st is in descending order by the time of occurrence Entering the Video Manager webpage via Administrator or Online Director by clicking the button and opening a new tab or log in Video Manager from th...

Page 34: ...separately download the files in the recording packages click on the recording thumbnail and access those in the Content information page 3 1 Upload the recording Select the desired recording and cli...

Page 35: ...d one The title used for Mixed video is Movie and those for Original source s are the name of the corresponding video input s by default are Content Cam 1 and Cam 2 To separately download MP4 Mixed vi...

Page 36: ...s event icons and sometimes the error operation warnings Recording in progress Manually add Bookmark Disk full Network connection failure Live Streaming and recording in progress Auto add Bookmark Wir...

Page 37: ...Front USB recording error HDCP protected source Operation is denied Front USB recording Display failure Uploading Front USB drive mount Recording is paused Firmware updating Firmware update failure F...

Page 38: ...ed in this document is Proprietary AREC have the right to change or improve product specifications without obligation to notify any user Go to www arec com get the latest information related to the pr...

Reviews: